Instructions
Page 2
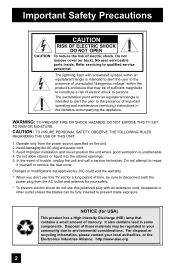
... not remove cover (or back). No user serviceable parts inside. CAUTION: TO INSURE PERSONAL SAFETY, OBSERVE THE FOLLOWING RULES REGARDING THE USE OF THIS UNIT. 1. Do not allow objects or liquid into the cabinet openings. 5. Changes or modifications not approved by JVC could void the warranty. * When you don't use this TV set for USA) This product has a High Intensity Discharge (HID) lamp that...
... not remove cover (or back). No user serviceable parts inside. CAUTION: TO INSURE PERSONAL SAFETY, OBSERVE THE FOLLOWING RULES REGARDING THE USE OF THIS UNIT. 1. Do not allow objects or liquid into the cabinet openings. 5. Changes or modifications not approved by JVC could void the warranty. * When you don't use this TV set for USA) This product has a High Intensity Discharge (HID) lamp that...

Instructions
Page 4
... allow satisfactory cooling. When installing this TV, distance recommendations must be maintained between the equipment and receiver. - INPUT-4 S-VIDEO OVER VIDEO + VOLUME - Install the TV in a particular installation. Increase the separation between the set and the wall, as well as inside a tightly enclosed area or piece of heat during lightning storms or when unused for long periods of time. 14) Refer all servicing to comply...
... allow satisfactory cooling. When installing this TV, distance recommendations must be maintained between the equipment and receiver. - INPUT-4 S-VIDEO OVER VIDEO + VOLUME - Install the TV in a particular installation. Increase the separation between the set and the wall, as well as inside a tightly enclosed area or piece of heat during lightning storms or when unused for long periods of time. 14) Refer all servicing to comply...
Instructions
Page 6
... information which uses the high-quality HD-ILA projection system. Once the screen is dark, cooling is a user replaceable item. If the electrical plug is removed before using your television in the Appendix. The lamp is a consumable item Replace the lamp when it . In order to use of the lamp being shut down. Immediately after the cooling process has completed. When the POWER button is pressed, the LAMP/PROGRAM LED indicator blinks in which...
... information which uses the high-quality HD-ILA projection system. Once the screen is dark, cooling is a user replaceable item. If the electrical plug is removed before using your television in the Appendix. The lamp is a consumable item Replace the lamp when it . In order to use of the lamp being shut down. Immediately after the cooling process has completed. When the POWER button is pressed, the LAMP/PROGRAM LED indicator blinks in which...
Instructions
Page 8
... Setup 40 Auto Tuner Setup 40 Channel Summary 41 Channel Label 42 V-Chip 43 Set Lock Code 49 Auto Demo 50 Language 50 Closed Caption 51 Auto Shut Off 53 XDS ID 53 Noise Muting 53 Front Panel Lock 54 V1 Smart Input 54 Video Input Label 55 Position Adjustment 56 Power Indicator 56 Video-1 Monitor Out 57 TV Speaker 57 Audio Out 57 Digital-In 58 Digital-In Audio 58 Center CH Input 58 Picture Adjust 59 Picture Settings 59 Adjust Picture Settings 59 Color Temperature 59 Digital Noise Clear 60 Color...
... Setup 40 Auto Tuner Setup 40 Channel Summary 41 Channel Label 42 V-Chip 43 Set Lock Code 49 Auto Demo 50 Language 50 Closed Caption 51 Auto Shut Off 53 XDS ID 53 Noise Muting 53 Front Panel Lock 54 V1 Smart Input 54 Video Input Label 55 Position Adjustment 56 Power Indicator 56 Video-1 Monitor Out 57 TV Speaker 57 Audio Out 57 Digital-In 58 Digital-In Audio 58 Center CH Input 58 Picture Adjust 59 Picture Settings 59 Adjust Picture Settings 59 Color Temperature 59 Digital Noise Clear 60 Color...

Instructions
Page 10
... new television, please check to this guide, your purchase of the following items. In addition to make sure you for your television box should include: Television x 1 Remote Control x 1 AA Batteries x 2 AA Alkaline AA Alkaline TV CATV VCR DVD POWER ASPECT MULTI SCREEN TWIN INDEX SELECT SLEEP FREEZE SWAP ML/MTS DISPLAY + INPUT 123 D/A 4 5 6 i.LINK MENU 78 TIMER TUNE THEATER FAVORITE PRO 0 VIDEO STATUS C.C. NATURAL SOUND CINEMA 9 RETURN+ TV SUB CHANNEL SUB LIGHT...
... new television, please check to this guide, your purchase of the following items. In addition to make sure you for your television box should include: Television x 1 Remote Control x 1 AA Batteries x 2 AA Alkaline AA Alkaline TV CATV VCR DVD POWER ASPECT MULTI SCREEN TWIN INDEX SELECT SLEEP FREEZE SWAP ML/MTS DISPLAY + INPUT 123 D/A 4 5 6 i.LINK MENU 78 TIMER TUNE THEATER FAVORITE PRO 0 VIDEO STATUS C.C. NATURAL SOUND CINEMA 9 RETURN+ TV SUB CHANNEL SUB LIGHT...
Instructions
Page 12
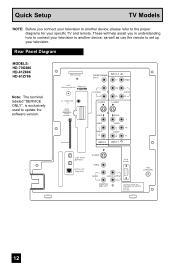
Quick Setup TV Models NOTE: Before you in understanding how to connect your television to another device, please refer to set up your specific TV and remote. SERVICE ONLY ATSC /DIGITAL CABLE IN I DIGITAL IN AV COMPULINK III VIDEO (DIGITAL) _ AUDIO (DIGITAL) CABLE CARD CENTER CHANNEL INPUT INPUT-2 Y VIDEO L AUDIO R S-VIDEO Pb Pr S-VIDEO L AUDIO R OVER VIDEO L I AUDIO I R OVER Y VIDEO L Pb I AUDIO I R Pr INPUT-3 INPUT-1 i.LINK IN/OUT S400(TS) OPTICAL OUT Digital Audio S-VIDEO VIDEO L AUDIO PC IN (D-SUB) L AUDIO OUTPUT 75Ω (VHF/UHF) R R MONITOR /REC OUT...
Quick Setup TV Models NOTE: Before you in understanding how to connect your television to another device, please refer to set up your specific TV and remote. SERVICE ONLY ATSC /DIGITAL CABLE IN I DIGITAL IN AV COMPULINK III VIDEO (DIGITAL) _ AUDIO (DIGITAL) CABLE CARD CENTER CHANNEL INPUT INPUT-2 Y VIDEO L AUDIO R S-VIDEO Pb Pr S-VIDEO L AUDIO R OVER VIDEO L I AUDIO I R OVER Y VIDEO L Pb I AUDIO I R Pr INPUT-3 INPUT-1 i.LINK IN/OUT S400(TS) OPTICAL OUT Digital Audio S-VIDEO VIDEO L AUDIO PC IN (D-SUB) L AUDIO OUTPUT 75Ω (VHF/UHF) R R MONITOR /REC OUT...

Instructions
Page 15
.... • Make sure the TV/CATV switch is the first time you change the batteries, try to operate a cable box, VCR or DVD player. POWER T TV CATV MUL VCR DVD Note: • If the lamp replacement message appears when you first need to TV. The VOL OK VOL right and left buttons will light blue. To use the onscreen menus, MENU BACK press the MENU button. If this manual. Quick Setup Getting Started Getting Started...
.... • Make sure the TV/CATV switch is the first time you change the batteries, try to operate a cable box, VCR or DVD player. POWER T TV CATV MUL VCR DVD Note: • If the lamp replacement message appears when you first need to TV. The VOL OK VOL right and left buttons will light blue. To use the onscreen menus, MENU BACK press the MENU button. If this manual. Quick Setup Getting Started Getting Started...
Instructions
Page 20
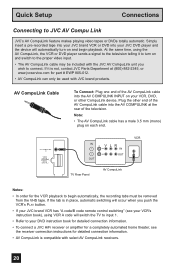
... proper video input. • The AV CompuLink cable may be used with JVC brand products. Quick Setup Connections Connecting to begin playback. Simply insert a pre-recorded tape into your JVC brand VCR or DVD into your VCR, DVD, or other end of the television. At the same time, using VCR A code will automatically turn on and switch to turn on and begin automatically, the recording tabs must be removed...
... proper video input. • The AV CompuLink cable may be used with JVC brand products. Quick Setup Connections Connecting to begin playback. Simply insert a pre-recorded tape into your JVC brand VCR or DVD into your VCR, DVD, or other end of the television. At the same time, using VCR A code will automatically turn on and switch to turn on and begin automatically, the recording tabs must be removed...

Instructions
Page 24
... Setup Connections Connecting to a Digital TV Receiver By connecting a Digital TV Receiver, high definition pictures can be displayed on the screen, the horizontal balance may be slightly shifted. See "DIGITAL-IN AUDIO", page 58. 24 Notes: • If 480p signals (640x480 or 720x480) are displayed on your television. • The digital-in order to digitally connect the television with a DTV decoder. TV Rear Panel AUDIO OUT LR DTV Decoder DIGITAL OUT AV COMPULINK III VIDEO (DIGITAL) _ AUDIO (DIGITAL) HDMI to DVI Cable L AUDIO R After the connections have...
... Setup Connections Connecting to a Digital TV Receiver By connecting a Digital TV Receiver, high definition pictures can be displayed on the screen, the horizontal balance may be slightly shifted. See "DIGITAL-IN AUDIO", page 58. 24 Notes: • If 480p signals (640x480 or 720x480) are displayed on your television. • The digital-in order to digitally connect the television with a DTV decoder. TV Rear Panel AUDIO OUT LR DTV Decoder DIGITAL OUT AV COMPULINK III VIDEO (DIGITAL) _ AUDIO (DIGITAL) HDMI to DVI Cable L AUDIO R After the connections have...
Instructions
Page 25
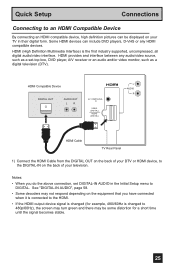
... above connection, set -top box, DVD player, A/V receiver or an audio and/or video monitor, such as a set DIGITAL-IN AUDIO in their digital form. HDMI (High Definition Multimedia Interface) is changed (for a short time until the signal becomes stable. 25 HDMI Compatible Device DIGITAL OUT AUDIO OUT LR AV COMPULINK III VIDEO (DIGITAL) _ AUDIO (DIGITAL) L AUDIO R HDMI Cable TV Rear Panel 1) Connect the HDMI Cable from the DIGITAL OUT on the back of your DTV or HDMI device, to the DIGITAL-IN on your television. Some HDMI devices...
... above connection, set -top box, DVD player, A/V receiver or an audio and/or video monitor, such as a set DIGITAL-IN AUDIO in their digital form. HDMI (High Definition Multimedia Interface) is changed (for a short time until the signal becomes stable. 25 HDMI Compatible Device DIGITAL OUT AUDIO OUT LR AV COMPULINK III VIDEO (DIGITAL) _ AUDIO (DIGITAL) L AUDIO R HDMI Cable TV Rear Panel 1) Connect the HDMI Cable from the DIGITAL OUT on the back of your DTV or HDMI device, to the DIGITAL-IN on your television. Some HDMI devices...
Instructions
Page 26
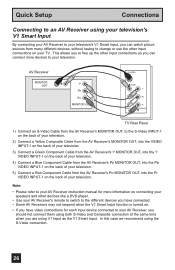
... television. 5) Connect a Red Component Cable from the AV Receiver's PR MONITOR OUT, into the Pr VIDEO INPUT-1 on your TV. AV Receiver MONITOR OUT Y PB PR MONITOR OUT S-VIDEO OVER Y VIDEO L Pb I AUDIO I R Pr INPUT-1 TV Rear Panel 1) Connect an S-Video Cable from the AV Receiver's MONITOR OUT, to your AV Receiver, you should not connect them using both S-Video and Composite connection at the same time when you are using the S-Video connection. 26 Quick Setup Connections Connecting to an AV Receiver using your television's V1 Smart Input By connecting...
... television. 5) Connect a Red Component Cable from the AV Receiver's PR MONITOR OUT, into the Pr VIDEO INPUT-1 on your TV. AV Receiver MONITOR OUT Y PB PR MONITOR OUT S-VIDEO OVER Y VIDEO L Pb I AUDIO I R Pr INPUT-1 TV Rear Panel 1) Connect an S-Video Cable from the AV Receiver's MONITOR OUT, to your AV Receiver, you should not connect them using both S-Video and Composite connection at the same time when you are using the S-Video connection. 26 Quick Setup Connections Connecting to an AV Receiver using your television's V1 Smart Input By connecting...

Instructions
Page 31
... the SET CLOCK menu. • Only when the MODE is set your TV's clock for Daylight Savings. Manual Clock Set To set to reset the clock after a power interruption. SET CLOCK MODE TIME TIME ZONE DATE/YEAR D.S.T. can be continued...) 31 ON or OFF To START CLOCK Note: • You will have to AUTO, the Daylight Savings Time feature automatically adjusts your clock manually (without using the XDS signal: SET CLOCK...
... the SET CLOCK menu. • Only when the MODE is set your TV's clock for Daylight Savings. Manual Clock Set To set to reset the clock after a power interruption. SET CLOCK MODE TIME TIME ZONE DATE/YEAR D.S.T. can be continued...) 31 ON or OFF To START CLOCK Note: • You will have to AUTO, the Daylight Savings Time feature automatically adjusts your clock manually (without using the XDS signal: SET CLOCK...
Instructions
Page 38
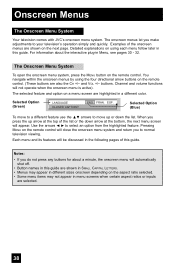
... a different color. Onscreen Menus The Onscreen Menu System Your television comes with JVC's onscreen menu system. The onscreen menus let you do not press any buttons for about the interactive plug-in menu screens when certain aspect ratios or inputs are shown in SMALL CAPITAL LETTERS. • Menus may appear in different sizes onscreen depending on the remote control will automatically shut off. • Button names...
... a different color. Onscreen Menus The Onscreen Menu System Your television comes with JVC's onscreen menu system. The onscreen menus let you do not press any buttons for about the interactive plug-in menu screens when certain aspect ratios or inputs are shown in SMALL CAPITAL LETTERS. • Menus may appear in different sizes onscreen depending on the remote control will automatically shut off. • Button names...
Instructions
Page 39
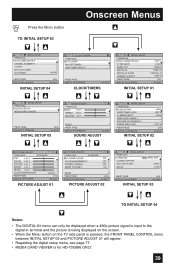
... MENU button TO INITIAL SETUP 03 Onscreen Menus INITIAL SETUP PREVIOUS AUTO TUNER SETUP CHANNEL SUMMARY V-CHIP SET LOCK CODE AUTO DEMO OFF NEXT PAGE SELECT OPERATE (4/5) MENU EXIT INITIAL SETUP 04 CLOCK / TIMERS PREVIOUS SET CLOCK ON / OFF TIMER LAMP TIMER RESET NEXT PAGE SELECT OPERATE MENU EXIT CLOCK/TIMERS INITIAL SETUP PREVIOUS VIDEO-1MONITOR OUT TV SPEAKER AUDIO OUT DIGITAL-IN DIGITAL-IN AUDIO CENTER CH INPUT NEXT PAGE SELECT OPERATE OFF ON VARI SIZE1 DIGITAL OFF (1/5) MENU EXIT INITIAL SETUP 01 INITIAL SETUP PREVIOUS DIGITAL SETUP MEDIA CARD VIEWER SOUND ADJUST...
... MENU button TO INITIAL SETUP 03 Onscreen Menus INITIAL SETUP PREVIOUS AUTO TUNER SETUP CHANNEL SUMMARY V-CHIP SET LOCK CODE AUTO DEMO OFF NEXT PAGE SELECT OPERATE (4/5) MENU EXIT INITIAL SETUP 04 CLOCK / TIMERS PREVIOUS SET CLOCK ON / OFF TIMER LAMP TIMER RESET NEXT PAGE SELECT OPERATE MENU EXIT CLOCK/TIMERS INITIAL SETUP PREVIOUS VIDEO-1MONITOR OUT TV SPEAKER AUDIO OUT DIGITAL-IN DIGITAL-IN AUDIO CENTER CH INPUT NEXT PAGE SELECT OPERATE OFF ON VARI SIZE1 DIGITAL OFF (1/5) MENU EXIT INITIAL SETUP 01 INITIAL SETUP PREVIOUS DIGITAL SETUP MEDIA CARD VIEWER SOUND ADJUST...
Instructions
Page 58
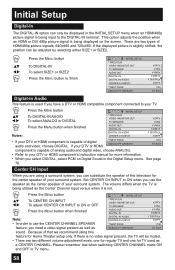
... displayed on Digital Sound in the Digital Setup menu. If your TV. Because of that when switching CENTER CHANNEL mode ON and OFF in TV menu. 58 If there is capable of analog audio and digital video, choose ANALOG. • Refer to your DTV or HDMI component's instruction manual for TV used if you have a DTV or HDMI compatible component connected to your DTV or HDMI NEXT PAGE SELECT OPERATE (1/5) MENU EXIT component is no video signal...
... displayed on Digital Sound in the Digital Setup menu. If your TV. Because of that when switching CENTER CHANNEL mode ON and OFF in TV menu. 58 If there is capable of analog audio and digital video, choose ANALOG. • Refer to your DTV or HDMI component's instruction manual for TV used if you have a DTV or HDMI compatible component connected to your DTV or HDMI NEXT PAGE SELECT OPERATE (1/5) MENU EXIT component is no video signal...

Instructions
Page 59
... to change and adjust the way the picture appears on the TV screen, giving you to the next setting Press the MENU button when finished PICTURE ADJUST PREVIOUS STANDARD TINT 00 COLOR 00 PICTURE 00 BRIGHT 00 DETAIL 00 COLOR TEMPERATURE HIGH NEXT PAGE (1/2) SELECT OPERATE MENU EXIT Color Temperature You can adjust the overall brightness of red and green in your television. TINT Tint allows you a darker or brighter picture overall. Adjust the Picture Settings π...
... to change and adjust the way the picture appears on the TV screen, giving you to the next setting Press the MENU button when finished PICTURE ADJUST PREVIOUS STANDARD TINT 00 COLOR 00 PICTURE 00 BRIGHT 00 DETAIL 00 COLOR TEMPERATURE HIGH NEXT PAGE (1/2) SELECT OPERATE MENU EXIT Color Temperature You can adjust the overall brightness of red and green in your television. TINT Tint allows you a darker or brighter picture overall. Adjust the Picture Settings π...
Instructions
Page 65
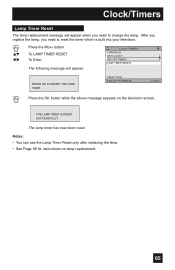
... MENU button To LAMP TIMER RESET To Enter The following message will appear when you need to change the lamp. Notes: • You can use the Lamp Timer Reset only after replacing the lamp. • See Page 96 for instructions on the television screen. NEXT PAGE SELECT OPERATE MENU EXIT Press the OK button while the above message appears on lamp replacement. 65 Clock/Timers Lamp Timer Reset The lamp replacement message will appear. The lamp timer has now been reset...
... MENU button To LAMP TIMER RESET To Enter The following message will appear when you need to change the lamp. Notes: • You can use the Lamp Timer Reset only after replacing the lamp. • See Page 96 for instructions on the television screen. NEXT PAGE SELECT OPERATE MENU EXIT Press the OK button while the above message appears on lamp replacement. 65 Clock/Timers Lamp Timer Reset The lamp replacement message will appear. The lamp timer has now been reset...
Instructions
Page 92
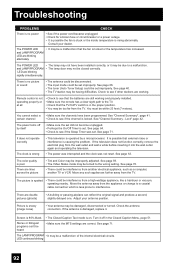
..., replace it may be due to interference. Turn it into the wall outlet again and operating the television. • The power was interrupted and the clock was set. See page 71. The POWER LED and LAMP/PROGRAM LED are lines across the picture • Tint and Color may not be improperly adjusted. Remote control is not operating properly or at all • Check to a coaxial cable connection which is in the Closed Caption Menu...
..., replace it may be due to interference. Turn it into the wall outlet again and operating the television. • The power was interrupted and the clock was set. See page 71. The POWER LED and LAMP/PROGRAM LED are lines across the picture • Tint and Color may not be improperly adjusted. Remote control is not operating properly or at all • Check to a coaxial cable connection which is in the Closed Caption Menu...
Instructions
Page 96
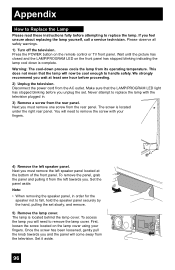
... Replace the Lamp Please read these instructions fully before proceeding. 2) Unplug the television. If you unplug the set slowly, and remove. 5) Remove the lamp cover. Wait until the picture has closed and the LAMP/PROGRAM LED on the lamp cover using your fingers. 4) Remove the left speaker panel located at least one screw from the rear panel. Set the panel aside. Note: • When removing the speaker panel, in . 3) Remove a screw from the rear panel. Make sure that the lamp will need to replace...
... Replace the Lamp Please read these instructions fully before proceeding. 2) Unplug the television. If you unplug the set slowly, and remove. 5) Remove the lamp cover. Wait until the picture has closed and the LAMP/PROGRAM LED on the lamp cover using your fingers. 4) Remove the left speaker panel located at least one screw from the rear panel. Set the panel aside. Note: • When removing the speaker panel, in . 3) Remove a screw from the rear panel. Make sure that the lamp will need to replace...
Instructions
Page 102
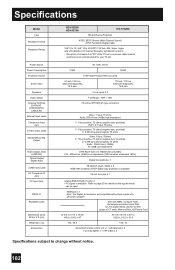
... remote control unit x 1 / AA batteries X 2 Two-way Splitter x 1 / RF Cable x 2 Specifications subject to change without notice. 102 Specifications Model Type Reception Format Reception Range Power Source Power Consumption Projection Source Screen Size Speakers Audio Output Antenna Terminal (VHF/UHF, ATSC/DIGITAL CABLE IN) External Input Jacks Component Input Jack S-Video Input Jacks Monitor/Recording Output Audio Output Jacks (VARI/FIX) Optical Output Digital Audio i.LINK In/Out Jack AV CompuLink III Jack PC Input Jack Digital-In Readable Cards Dimensions (inch) W X H X D (cm) Weight...
... remote control unit x 1 / AA batteries X 2 Two-way Splitter x 1 / RF Cable x 2 Specifications subject to change without notice. 102 Specifications Model Type Reception Format Reception Range Power Source Power Consumption Projection Source Screen Size Speakers Audio Output Antenna Terminal (VHF/UHF, ATSC/DIGITAL CABLE IN) External Input Jacks Component Input Jack S-Video Input Jacks Monitor/Recording Output Audio Output Jacks (VARI/FIX) Optical Output Digital Audio i.LINK In/Out Jack AV CompuLink III Jack PC Input Jack Digital-In Readable Cards Dimensions (inch) W X H X D (cm) Weight...


