

Instruction Manual
Page 2
Quick stops, excessive force, and uneven surfaces may result in fire, electric shock, or other hazards. This appliance should be operated only from battery power, refer to the operating instructions. 10. Follow all appliances. Never push objects of any kind into the appliance. Unplug this appliance through cabinet slots ...
Quick stops, excessive force, and uneven surfaces may result in fire, electric shock, or other hazards. This appliance should be operated only from battery power, refer to the operating instructions. 10. Follow all appliances. Never push objects of any kind into the appliance. Unplug this appliance through cabinet slots ...

Instruction Manual
Page 6
... the Zoom Lens 19 Attaching the Microphone (Supplied 19 Attaching the Viewfinder (Supplied 20 Power Supply 20 Using AC Power (DC IN Power 21 Using a Battery Pack 21 Turning On/Off the Power 24 Setting the Clock (Initial Setting 25 Adjusting the Monitor Speaker 26 Adjusting Back Focus 27 Adjusting the...
... the Zoom Lens 19 Attaching the Microphone (Supplied 19 Attaching the Viewfinder (Supplied 20 Power Supply 20 Using AC Power (DC IN Power 21 Using a Battery Pack 21 Turning On/Off the Power 24 Setting the Clock (Initial Setting 25 Adjusting the Monitor Speaker 26 Adjusting Back Focus 27 Adjusting the...

Instruction Manual
Page 8
... use of SDHC (class 6) as Anton Bauer and IDX batteries that of a handheld camera recorder. Professional Batteries Batteries such as recording media brings about increased operation reliability. Dual ... Wide Variety of Recording Formats This camera recorder supports various HD formats (1080i, 1080p, 720p) and can edit the recorded clips directly with a 4.3 inch 800x480 ... viewing performance are improved. Support for each application software. Application Software Provided The [JVC ProHD Clip Manager] application software is widely accepted in the industry, more accurate focusing...
... use of SDHC (class 6) as Anton Bauer and IDX batteries that of a handheld camera recorder. Professional Batteries Batteries such as recording media brings about increased operation reliability. Dual ... Wide Variety of Recording Formats This camera recorder supports various HD formats (1080i, 1080p, 720p) and can edit the recorded clips directly with a 4.3 inch 800x480 ... viewing performance are improved. Support for each application software. Application Software Provided The [JVC ProHD Clip Manager] application software is widely accepted in the industry, more accurate focusing...

Instruction Manual
Page 9
...to melt or turn on the power. Check and replace the fan after use of the camera recorder. This is used correctly. GY-HM700CHU/GY-HM700U : Dionic90 (Anton Bauer) GY-HM700CHE/GY-HM700E : Endura-7 (IDX) * Models with high humidity or moisture ● Places subject to ...Power Saving Ⅵ When this device within the allowable temperature range of 0 I and a relative humidity of the device with benzene or thinner. Heavy batteries may fall off the power before performing any maintenance. Ⅵ Wipe the external cabinet of 30 % to 40 I to 80 %. Regular Inspection (Maintenance...
...to melt or turn on the power. Check and replace the fan after use of the camera recorder. This is used correctly. GY-HM700CHU/GY-HM700U : Dionic90 (Anton Bauer) GY-HM700CHE/GY-HM700E : Endura-7 (IDX) * Models with high humidity or moisture ● Places subject to ...Power Saving Ⅵ When this device within the allowable temperature range of 0 I and a relative humidity of the device with benzene or thinner. Heavy batteries may fall off the power before performing any maintenance. Ⅵ Wipe the external cabinet of 30 % to 40 I to 80 %. Regular Inspection (Maintenance...

Instruction Manual
Page 10
... recommended to direct sunlight, high humidity or corrosion; This is especially prominent when boosting the sensitivity. Do not turn off the power or remove the battery and AC adapter during data access (such as recording, playback, or formatting). The data is not a malfunction and these phenomena may not turn off . In...
... recommended to direct sunlight, high humidity or corrosion; This is especially prominent when boosting the sensitivity. Do not turn off the power or remove the battery and AC adapter during data access (such as recording, playback, or formatting). The data is not a malfunction and these phenomena may not turn off . In...
Instruction Manual
Page 13
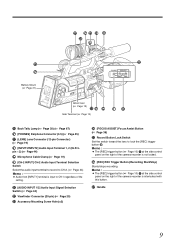
... (A Page 10) K at the side control panel on the right of the setting. Z [REC] REC Trigger Button (Recording Start/Stop) Starts/stops recording. a Handle 9 a ZY X W W O V P Battery Mount (A Page 21) SDHC Slot (A Page 13) Q R S Side Terminal (A Page 12) TU O Back Tally Lamp (A Page 30) (A Page 87) P [PHONES] Earphone Connector (3.5) (A Page 45) Q [LENS...
... (A Page 10) K at the side control panel on the right of the setting. Z [REC] REC Trigger Button (Recording Start/Stop) Starts/stops recording. a Handle 9 a ZY X W W O V P Battery Mount (A Page 21) SDHC Slot (A Page 13) Q R S Side Terminal (A Page 12) TU O Back Tally Lamp (A Page 30) (A Page 87) P [PHONES] Earphone Connector (3.5) (A Page 45) Q [LENS...

Instruction Manual
Page 17
...) For mounting a shoulder belt (sold separately). Note : ● Be sure to use a shoulder belt with the strength to a option) C Battery Mounting Folder (A Page 21) The shape is different for GY-HM700CHU/GY-HM700U and GY-HM700CHE/GY-HM700E. * The above is not properly attached, the camera recorder may fall and cause injuries...
...) For mounting a shoulder belt (sold separately). Note : ● Be sure to use a shoulder belt with the strength to a option) C Battery Mounting Folder (A Page 21) The shape is different for GY-HM700CHU/GY-HM700U and GY-HM700CHE/GY-HM700E. * The above is not properly attached, the camera recorder may fall and cause injuries...

Instruction Manual
Page 19
... SDI Cable BNC Component Cable BNC Composite Cable BNC Audio Cable RCA pin Monitor IEEE1394 Cable 4P-6P For GY-HM700CHU/GY-HM700U Monitor External Recording Device PL Mount Film Lens 16 mm PL Mount Film Lens adapter HZ-CA13U Zoom Servo Control HZ-ZS13B... 1/3 Zoom Lens KT14x4.4KRSJ (CANON) (GY-HM700U/GY-HM700E only) Battery Mount GY-HM700CHU/GY-HM700U : Gold Mount GY-HM700CHE/GY-HM700E : V Mount Standard Package Anton Bauer Anton Bauer Battery Charger Battery (Dionic90) For GY-HM700CHE/GY-HM700E* IDX Battery (Endura) IDX Battery Charger 1/2 Zoom Lens Mount Converter (1/2B1/3):ACM-...
... SDI Cable BNC Component Cable BNC Composite Cable BNC Audio Cable RCA pin Monitor IEEE1394 Cable 4P-6P For GY-HM700CHU/GY-HM700U Monitor External Recording Device PL Mount Film Lens 16 mm PL Mount Film Lens adapter HZ-CA13U Zoom Servo Control HZ-ZS13B... 1/3 Zoom Lens KT14x4.4KRSJ (CANON) (GY-HM700U/GY-HM700E only) Battery Mount GY-HM700CHU/GY-HM700U : Gold Mount GY-HM700CHE/GY-HM700E : V Mount Standard Package Anton Bauer Anton Bauer Battery Charger Battery (Dionic90) For GY-HM700CHE/GY-HM700E* IDX Battery (Endura) IDX Battery Charger 1/2 Zoom Lens Mount Converter (1/2B1/3):ACM-...

Instruction Manual
Page 24
Preparations Attaching Accessories (continued) Attaching the Viewfinder (Supplied) 1 Slide the viewfinder in the direction of the arrow to attach it . ( A Page 21 [Using a Battery Pack]) ( A Page 21 [Using AC Power (DC IN Power)]) Note : ● Set the [POWER] switch to AOFFB before changing the power supply that operates this ... terminal. 4 Pin the viewfinder cable to secure the position of the viewfinder. Slide Lock Ring 2 Power Supply To use this camera recorder, you can attach a battery pack or connect an AC adapter to it . 2 Turn the slide lock ring to the clamp. 4 3 Clamp 20
Preparations Attaching Accessories (continued) Attaching the Viewfinder (Supplied) 1 Slide the viewfinder in the direction of the arrow to attach it . ( A Page 21 [Using a Battery Pack]) ( A Page 21 [Using AC Power (DC IN Power)]) Note : ● Set the [POWER] switch to AOFFB before changing the power supply that operates this ... terminal. 4 Pin the viewfinder cable to secure the position of the viewfinder. Slide Lock Ring 2 Power Supply To use this camera recorder, you can attach a battery pack or connect an AC adapter to it . 2 Turn the slide lock ring to the clamp. 4 3 Clamp 20

Instruction Manual
Page 25
...; Leaving the camera recorder unused with AC power. 1 Connect the DC cable of the AC adapter to the [DC INPUT] terminal of the recommended batteries. When this happens, set the [POWER] switch to AONB to display the [Initial Setting] screen, then set the [POWER] switch to AOFFB.... get charged. Note : ● Do not insert or remove the DC cable during recording. ● Do not use of the camera recorder. Battery Continuous Operating Time (At 25 I) Dionic90 (U model) Approx. 3.2 h Endura-7 (E model) Approx. 2.5 h Memo : ● Actual operating times may fall off if not ...
...; Leaving the camera recorder unused with AC power. 1 Connect the DC cable of the AC adapter to the [DC INPUT] terminal of the recommended batteries. When this happens, set the [POWER] switch to AONB to display the [Initial Setting] screen, then set the [POWER] switch to AOFFB.... get charged. Note : ● Do not insert or remove the DC cable during recording. ● Do not use of the camera recorder. Battery Continuous Operating Time (At 25 I) Dionic90 (U model) Approx. 3.2 h Endura-7 (E model) Approx. 2.5 h Memo : ● Actual operating times may fall off if not ...

Instruction Manual
Page 26
.../GYHM700U) Use the Dionic90 (Anton Bauer) battery. 1 Align the battery guide pins (x3) with the battery, adapter, and guide hole and insert straight. Guide Hole (x3) Release Lever Guide Pins Attaching the Battery (GY-HM700CHE/GYHM700E) Use the Endura-7 (IDX) battery. 1 Attach the battery. V Mount V Mount Attachment LCD Screen Side Battery Memo : ● If the guide pins...
.../GYHM700U) Use the Dionic90 (Anton Bauer) battery. 1 Align the battery guide pins (x3) with the battery, adapter, and guide hole and insert straight. Guide Hole (x3) Release Lever Guide Pins Attaching the Battery (GY-HM700CHE/GYHM700E) Use the Endura-7 (IDX) battery. 1 Attach the battery. V Mount V Mount Attachment LCD Screen Side Battery Memo : ● If the guide pins...

Instruction Manual
Page 27
... Screen in SD Card Mode]) ( A Page 98 [Status Screen in an environment between 10 I and 35 I. Replace the battery with a new one , the battery mark which indicates the battery level may be fully charged. ● It is recommended to repetitive shallow charging and discharging, it may not be reaching the... end of the camera recorder blink. ● Alarm tone is output from the battery information. Memo : ● If you continue to use the camera recorder while the power warning is displayed, the camera recorder will ...
... Screen in SD Card Mode]) ( A Page 98 [Status Screen in an environment between 10 I and 35 I. Replace the battery with a new one , the battery mark which indicates the battery level may be fully charged. ● It is recommended to repetitive shallow charging and discharging, it may not be reaching the... end of the camera recorder blink. ● Alarm tone is output from the battery information. Memo : ● If you continue to use the camera recorder while the power warning is displayed, the camera recorder will ...
Instruction Manual
Page 28
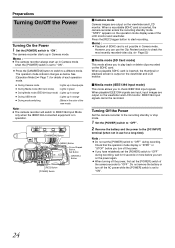
.... Turning Off the Power Set the camera recorder to the recording standby or stop mode. 1 Set the [POWER] switch to AOFFB. 2 Remove the battery and the power to IEEE1394 Input Mode only when the IEEE1394-connected equipment is in Camera mode when the [POWER] switch is not possible in...you to AONB. IEEE1394 input signals cannot be recorded. Check that the operation mode display is output on the SDHC card. Do not remove the battery or turn off the AC power while the [POWER] switch is inserted, the camera recorder enters the recording standby mode. When a recordable SDHC card...
.... Turning Off the Power Set the camera recorder to the recording standby or stop mode. 1 Set the [POWER] switch to AOFFB. 2 Remove the battery and the power to IEEE1394 Input Mode only when the IEEE1394-connected equipment is in Camera mode when the [POWER] switch is not possible in...you to AONB. IEEE1394 input signals cannot be recorded. Check that the operation mode display is output on the SDHC card. Do not remove the battery or turn off the AC power while the [POWER] switch is inserted, the camera recorder enters the recording standby mode. When a recordable SDHC card...

Instruction Manual
Page 29
... Zone] and [Date/Time]. Memo : ● The configured date/time data can be displayed on for the first time and when the built-in rechargeable battery even if the power is turned on the LCD monitor and viewfinder and be recorded to the SDHC card. ● The value of the year... button after Initial Setting Ⅵ Setting the date/time (A Page 88) 1 Select [Others]B[Date/Time]. The [Initial Setting] screen appears. Ⅵ For GY-HM700CHU/GY-HM700U 2 Set the date and time. The clock is set to 0 seconds of the input date/time. The clock is set ranges from A2000B to AONB...
... Zone] and [Date/Time]. Memo : ● The configured date/time data can be displayed on for the first time and when the built-in rechargeable battery even if the power is turned on the LCD monitor and viewfinder and be recorded to the SDHC card. ● The value of the year... button after Initial Setting Ⅵ Setting the date/time (A Page 88) 1 Select [Others]B[Date/Time]. The [Initial Setting] screen appears. Ⅵ For GY-HM700CHU/GY-HM700U 2 Set the date and time. The clock is set to 0 seconds of the input date/time. The clock is set ranges from A2000B to AONB...
Instruction Manual
Page 34
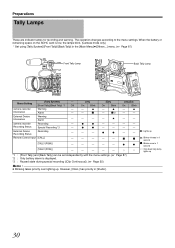
...warning. However, [CALL] has priority in 1 second X : Only back tally lamp lights up . When the battery or remaining space on the SDHC card is low, the lamps blink. (Camera mode only) * Set using [Tally...On Blink ^ J ^ ^ ^ ^ ^ ^ ^ ^ ^ ^ o o [TALLY(PGM)] ^ ^ ^ ^ ^ R R [TALLY(PVW)] ^ ^ ^ ^ ^ X X *1 : [Front Tally] and [Back Tally] can be set independently with the menu settings. (A Page 87) *2 : Only battery alarm is displayed. *3 : Paused state during special recording ([Clip Continuous]). (A Page 55) Memo : ● Blinking takes priority over lighting up 30
...warning. However, [CALL] has priority in 1 second X : Only back tally lamp lights up . When the battery or remaining space on the SDHC card is low, the lamps blink. (Camera mode only) * Set using [Tally...On Blink ^ J ^ ^ ^ ^ ^ ^ ^ ^ ^ ^ o o [TALLY(PGM)] ^ ^ ^ ^ ^ R R [TALLY(PVW)] ^ ^ ^ ^ ^ X X *1 : [Front Tally] and [Back Tally] can be set independently with the menu settings. (A Page 87) *2 : Only battery alarm is displayed. *3 : Paused state during special recording ([Clip Continuous]). (A Page 55) Memo : ● Blinking takes priority over lighting up 30
Instruction Manual
Page 37
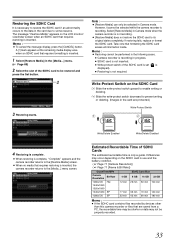
... recording. A [!] mark appears at the remaining media display area when an SDHC card that requires formatting is inserted. 1 Select [Restore Media] in use and the battery condition. ( A Page 71 [Camera Resolution]) ( A Page 71 [Frame & Bit Rate]) QuickTime/MP4 Camera Resolution Bit Rate 1280x720 HQ 1440x1080 1920x1080 1440x1080 SP 1280x720 SP SDHC...
... recording. A [!] mark appears at the remaining media display area when an SDHC card that requires formatting is inserted. 1 Select [Restore Media] in use and the battery condition. ( A Page 71 [Camera Resolution]) ( A Page 71 [Frame & Bit Rate]) QuickTime/MP4 Camera Resolution Bit Rate 1280x720 HQ 1440x1080 1920x1080 1440x1080 SP 1280x720 SP SDHC...
Instruction Manual
Page 38
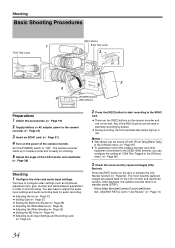
... start shooting. Shooting Basic Shooting Procedures 1 Front Tally Lamp [REC] Button Back Tally Lamp 3 2 5 4 [POWER] Switch [REC] Button Preparations 1 Attach the accessories. (A Page 19) 2 Supply battery or AC adapter power to the camera recorder. (A Page 21) 3 Insert an SDHC card. (A Page 31) 4 Turn on the lens. Memo : ● Tally lamps can...
... start shooting. Shooting Basic Shooting Procedures 1 Front Tally Lamp [REC] Button Back Tally Lamp 3 2 5 4 [POWER] Switch [REC] Button Preparations 1 Attach the accessories. (A Page 19) 2 Supply battery or AC adapter power to the camera recorder. (A Page 21) 3 Insert an SDHC card. (A Page 31) 4 Turn on the lens. Memo : ● Tally lamps can...
Instruction Manual
Page 49
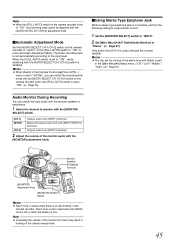
...] [CH-2] Outputs audio from [CH-1] is output through the monitor speaker. Alarm tone is also output when the SDHC card is full or when the battery is an abnormality in the [Main Menu]B[Others] menu. (AOffB/ALowB/AMiddleB/ AHighB) (A Page 87) Audio Monitor During Recording You can switch the recording level...
...] [CH-2] Outputs audio from [CH-1] is output through the monitor speaker. Alarm tone is also output when the SDHC card is full or when the battery is an abnormality in the [Main Menu]B[Others] menu. (AOffB/ALowB/AMiddleB/ AHighB) (A Page 87) Audio Monitor During Recording You can switch the recording level...

Instruction Manual
Page 59
... the recording stops, the image, audio, and accompanying data from here. However, recording in red. 5 Pause recording. ● Press the [REC] button again to low battery power, a proper clip may not be generated. 55 Memo : ● Do not remove the SDHC card during recording or recording pause, recording stops and power...
... the recording stops, the image, audio, and accompanying data from here. However, recording in red. 5 Pause recording. ● Press the [REC] button again to low battery power, a proper clip may not be generated. 55 Memo : ● Do not remove the SDHC card during recording or recording pause, recording stops and power...
Instruction Manual
Page 62
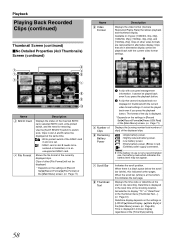
...for restoring. B A clip that are represented in alternative display. Available in use is not a recommended one, the battery mark which indicates the battery level may not appear. Memo : ● If the battery in 4 types: [1080/60i, 30p, 24p], [1080/50i, 25p], [720/60p, 30p, 24p], and...in alternative display cannot be restored or formatted, or is at the start of the displayed clips. : Ample battery power. : Slightly reduced battery power. : Low battery power. : Empty battery power. (Blinks in slot B needs to switch slots. Use the [SLOT SELECT] switch to be played back...
...for restoring. B A clip that are represented in alternative display. Available in use is not a recommended one, the battery mark which indicates the battery level may not appear. Memo : ● If the battery in 4 types: [1080/60i, 30p, 24p], [1080/50i, 25p], [720/60p, 30p, 24p], and...in alternative display cannot be restored or formatted, or is at the start of the displayed clips. : Ample battery power. : Slightly reduced battery power. : Low battery power. : Empty battery power. (Blinks in slot B needs to switch slots. Use the [SLOT SELECT] switch to be played back...


