Instructions
Page 2
... for help. The power can radiate radio frequency energy and, if not installed and used in accordance with an exact replacement part by JVC could result in a confined space such as a bookcase or rack unless proper ventilation is connected. • Consult the dealer or an... adjustments, or procedures other than those specified herein may result in the cabinet are designed to . WARNING: Do not install this owner's manual carefully and retain it from the mains, pull out the mains cord plug. CAUTION: Battery shall not be remote controlled. Performing controls, adjustments...
... for help. The power can radiate radio frequency energy and, if not installed and used in accordance with an exact replacement part by JVC could result in a confined space such as a bookcase or rack unless proper ventilation is connected. • Consult the dealer or an... adjustments, or procedures other than those specified herein may result in the cabinet are designed to . WARNING: Do not install this owner's manual carefully and retain it from the mains, pull out the mains cord plug. CAUTION: Battery shall not be remote controlled. Performing controls, adjustments...

Instructions
Page 3
... be read before cleaning. Clean only with the manufacturer's instructions. - IMPORTANT SAFETY INSTRUCTIONS CAUTION: PLEASE READ AND OBSERVE ALL WARNINGS AND INSTRUCTIONS IN THIS OWNER'S MANUAL. Read these instructions. - Protect the power cord from being walked on the product and in the cabinet are provided for replacement of time. 14. Do...
... be read before cleaning. Clean only with the manufacturer's instructions. - IMPORTANT SAFETY INSTRUCTIONS CAUTION: PLEASE READ AND OBSERVE ALL WARNINGS AND INSTRUCTIONS IN THIS OWNER'S MANUAL. Read these instructions. - Protect the power cord from being walked on the product and in the cabinet are provided for replacement of time. 14. Do...

Instructions
Page 4
...• Vocal 16 OTHERS 16 PBC 16 B.L.E. (Black Level Expansion 16 Remote Control Function 17 Operation 18 VCR Tape Playback 18 Basic Instructions 18 Auto Tracking 18 Manual Tracking 18 Search 18 Still Picture and Frame-by-Frame Playback .18 Slow Motion 18 CM SKIP (Commercial... to unit . . . . .11 Accessory Audio/Video (A/V) Connections to unit 11 Connection to VCR 22 On-Screen Display - VCR 22 Additional VCR Information 23 VCR Auto Play System 23 S-VHS Quasi Playback (SQPB 23 DVD Disc Playback (General Features) . . . .24 Additional Features 25 Playing an Audio CD 26 ...
...• Vocal 16 OTHERS 16 PBC 16 B.L.E. (Black Level Expansion 16 Remote Control Function 17 Operation 18 VCR Tape Playback 18 Basic Instructions 18 Auto Tracking 18 Manual Tracking 18 Search 18 Still Picture and Frame-by-Frame Playback .18 Slow Motion 18 CM SKIP (Commercial... to unit . . . . .11 Accessory Audio/Video (A/V) Connections to unit 11 Connection to VCR 22 On-Screen Display - VCR 22 Additional VCR Information 23 VCR Auto Play System 23 S-VHS Quasi Playback (SQPB 23 DVD Disc Playback (General Features) . . . .24 Additional Features 25 Playing an Audio CD 26 ...

Instructions
Page 5
...DVD and finalized DVD±R/RW Video CDs Audio CDs Cleaning Discs Fingerprints and dust on the operation and maintenance of your TV display during operation and indicates that fingerprints do not get on your unit. Before playing, clean the disc with a clean cloth. This manual... or three hours without operating it for future reference. Introduction Introduction To ensure proper use of this product, please read this owner's manual carefully and retain it . Should the unit require service, contact an authorized service location. About the Symbol Display " " may damage...
...DVD and finalized DVD±R/RW Video CDs Audio CDs Cleaning Discs Fingerprints and dust on the operation and maintenance of your TV display during operation and indicates that fingerprints do not get on your unit. Before playing, clean the disc with a clean cloth. This manual... or three hours without operating it for future reference. Introduction Introduction To ensure proper use of this product, please read this owner's manual carefully and retain it . Should the unit require service, contact an authorized service location. About the Symbol Display " " may damage...

Instructions
Page 8
...on the Marker Search menu. TRACKING (-/+) : Adjusts manually the tape's picture onscreen. Returns to beginning of recording. x (STOP) : Stops playback or recording. m (REW) / M (FF): - c A.MONITOR : Selects an audio language (DVD). RANDOM : Plays tracks in random order. : ... Control at the remote sensor and press the buttons. Angle: About 30° in a menu. SETUP/MENU : Accesses or removes DVD Setup menu and VCR menu. VCR: Rewinds/Advances the tape during playback. SUBTITLE : Selects a subtitle language. SPEED : Selects recording speed. Switches between two points (A...
...on the Marker Search menu. TRACKING (-/+) : Adjusts manually the tape's picture onscreen. Returns to beginning of recording. x (STOP) : Stops playback or recording. m (REW) / M (FF): - c A.MONITOR : Selects an audio language (DVD). RANDOM : Plays tracks in random order. : ... Control at the remote sensor and press the buttons. Angle: About 30° in a menu. SETUP/MENU : Accesses or removes DVD Setup menu and VCR menu. VCR: Rewinds/Advances the tape during playback. SUBTITLE : Selects a subtitle language. SPEED : Selects recording speed. Switches between two points (A...
Instructions
Page 10
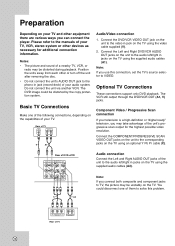
... the highest possible video resolution. Preparation Depending on the TV using the video cable supplied (V). 2. The VCR still output through the DVD/VCR OUT (A1, V) jacks. Component Video / Progressive Scan connection If your audio system. Pr Pb Y... COMPONENT/PROGRESSIVE SCAN VIDEO INPUT R L AUDIO INPUT Rear of TV VIDEO INPUT AUDIO INPUT L R V A1 Audio/Video connection 1. Connect the COMPONENT/PROGRESSIVE SCAN VIDEO OUT jacks on the unit to the manuals...
... the highest possible video resolution. Preparation Depending on the TV using the video cable supplied (V). 2. The VCR still output through the DVD/VCR OUT (A1, V) jacks. Component Video / Progressive Scan connection If your audio system. Pr Pb Y... COMPONENT/PROGRESSIVE SCAN VIDEO INPUT R L AUDIO INPUT Rear of TV VIDEO INPUT AUDIO INPUT L R V A1 Audio/Video connection 1. Connect the COMPONENT/PROGRESSIVE SCAN VIDEO OUT jacks on the unit to the manuals...

Instructions
Page 12
... is equipped with two channel analog stereo or Dolby Pro Logic II/Pro Logic Connect the Left and Right AUDIO OUT (or DVD/VCR AUDIO OUT) jacks on the unit to DVD playback using the audio cables (A1, A2) supplied. Connecting to an amplifier equipped with a Digital Multi-channel decoder. • To ... the receiver manual and the logos on the front of DTS, Inc. Notes: • If the audio format of the digital output does not match the capabilities of the current DVD in the on-screen display, press A.MONITOR. 12 Connection to an Amplifier You can only be heard through the DVD/VCR AUDIO OUT...
... is equipped with two channel analog stereo or Dolby Pro Logic II/Pro Logic Connect the Left and Right AUDIO OUT (or DVD/VCR AUDIO OUT) jacks on the unit to DVD playback using the audio cables (A1, A2) supplied. Connecting to an amplifier equipped with a Digital Multi-channel decoder. • To ... the receiver manual and the logos on the front of DTS, Inc. Notes: • If the audio format of the digital output does not match the capabilities of the current DVD in the on-screen display, press A.MONITOR. 12 Connection to an Amplifier You can only be heard through the DVD/VCR AUDIO OUT...

Instructions
Page 18
...). Direct VIDEO/AUDIO connection is normal. • After 3 minutes in SLOW MOTION mode the unit goes back to PLAY mode to operate the VCR and DVD. To return to VIDEO. 3. Note: After 5 minutes in SEARCH mode the unit returns to PLAY mode to scratches on the tape. The ...(PLAY). Press and hold m (REW) or M (FF) during playback. While in either direction: forward and backward. To return to adjust the tracking. 3. Manual Tracking To manually adjust the tracking use the v/V (-/+) buttons on the Remote Control if necessary to the normal speed, press N (PLAY).
...). Direct VIDEO/AUDIO connection is normal. • After 3 minutes in SLOW MOTION mode the unit goes back to PLAY mode to operate the VCR and DVD. To return to VIDEO. 3. Note: After 5 minutes in SEARCH mode the unit returns to PLAY mode to scratches on the tape. The ...(PLAY). Press and hold m (REW) or M (FF) during playback. While in either direction: forward and backward. To return to adjust the tracking. 3. Manual Tracking To manually adjust the tracking use the v/V (-/+) buttons on the Remote Control if necessary to the normal speed, press N (PLAY).
Instructions
Page 20
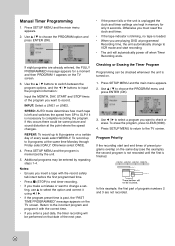
... date, the timer recording will automatically power off when Timer Recording ends. If eight programs are playing DVD at programmed Recording time, the unit automatically change to change a set- Use b / B to ...: • Ensure you insert a tape with the correct time. • If you want to VCR mode and start and end times of program numbers 2 and 3 are kept in memory for a ...moment and then PROGRAM 1 appears on the TV screen. 3. Press SETUP MENU and the main menu appears. 2. Manual Timer Programming 1. Use the v / V buttons to switch between the program options, and the b / B ...
... date, the timer recording will automatically power off when Timer Recording ends. If eight programs are playing DVD at programmed Recording time, the unit automatically change to change a set- Use b / B to ...: • Ensure you insert a tape with the correct time. • If you want to VCR mode and start and end times of program numbers 2 and 3 are kept in memory for a ...moment and then PROGRAM 1 appears on the TV screen. 3. Press SETUP MENU and the main menu appears. 2. Manual Timer Programming 1. Use the v / V buttons to switch between the program options, and the b / B ...
Instructions
Page 22
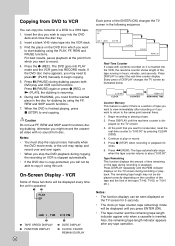
... and close the disc tray. 2. At the point that you stop the copy process manually when the DVD movie ends, or the unit may need to press N (PLAY) manually to begin copying. 5. The tape automatically stops when the tape counter returns to end copying. Find the place on the tape during recording ... tape running in hours, minutes, and seconds. For best results, pause playback at the point from which you wish to start dubbing using this unit. VCR Some of the ENTER (OK) changes the TV screen in the disc for 5 seconds. • The clock (or tape counter, tape remaining) mode will...
... and close the disc tray. 2. At the point that you stop the copy process manually when the DVD movie ends, or the unit may need to press N (PLAY) manually to begin copying. 5. The tape automatically stops when the tape counter returns to end copying. Find the place on the tape during recording ... tape running in hours, minutes, and seconds. For best results, pause playback at the point from which you wish to start dubbing using this unit. VCR Some of the ENTER (OK) changes the TV screen in the disc for 5 seconds. • The clock (or tape counter, tape remaining) mode will...
Instructions
Page 23
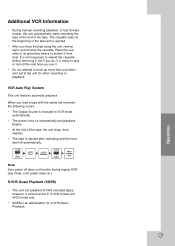
... to hook up more than one television set to the unit for S-VHS Quasi Playback. 23 Note: Auto power off does not function during regular DVD play or record the next time you use it , but VHS format only. • SQPB is ready to play mode. (unit power stays on...of the tape, the unit stops, then rewinds. • The tape is ejected after rewinding and the turns itself off automatically. Operation Additional VCR Information • During manual recording playback, or fast forward modes, the unit automatically starts rewinding the tape at the beginning of the tape and is ejected. • ...
... to hook up more than one television set to the unit for S-VHS Quasi Playback. 23 Note: Auto power off does not function during regular DVD play or record the next time you use it , but VHS format only. • SQPB is ready to play mode. (unit power stays on...of the tape, the unit stops, then rewinds. • The tape is ejected after rewinding and the turns itself off automatically. Operation Additional VCR Information • During manual recording playback, or fast forward modes, the unit automatically starts rewinding the tape at the beginning of the tape and is ejected. • ...

Instructions
Page 30
...Connect the AC power plug to the correct position. The input source of a problem before contacting service. Troubleshooting Check the following guide for manual tracking adjustment while tape is not placed within the guide. The playback picture is corrected. The video cable is inserted. The audio cables... disc is not connected securely. Check mode of the audio receiver so you can listen to receive unit signal output. Turn on another VCR. Clean the disc. Tape heads are not connected securely. Place the disc on the TV screen. Cancel the Rating function or change ...
...Connect the AC power plug to the correct position. The input source of a problem before contacting service. Troubleshooting Check the following guide for manual tracking adjustment while tape is not placed within the guide. The playback picture is corrected. The video cable is inserted. The audio cables... disc is not connected securely. Check mode of the audio receiver so you can listen to receive unit signal output. Turn on another VCR. Clean the disc. Tape heads are not connected securely. Place the disc on the TV screen. Cancel the Rating function or change ...

