
Instructions
Page 1
Model No. LVT1866-001A which are located on the rear of cabinet. Serial No. and Serial No. Retain this information for future reference. DVD PLAYER & VIDEO CASSETTE RECORDER HR-XVC11B HR-XVC12S INSTRUCTIONS For customer use: Enter below the Model No.
Model No. LVT1866-001A which are located on the rear of cabinet. Serial No. and Serial No. Retain this information for future reference. DVD PLAYER & VIDEO CASSETTE RECORDER HR-XVC11B HR-XVC12S INSTRUCTIONS For customer use: Enter below the Model No.

Instructions
Page 4
...18 Slow Motion 18 CM SKIP (Commercial Skip 19 VCR Tape Recording 19-20 Basic Recording (One-Touch Recording) . . .19 Instant Timer Recording 19 Manual Timer Programming 20 Timer-Link Recording (External Timer Recording 21 Copying from Program List 26 Erasing the Complete Program... List . . . . . .26 Viewing a JPEG file 27 Slide Show 27 Still Picture 27 Moving to VCR 22 On-Screen Display - VCR 22 Additional VCR Information 23 VCR Auto Play System 23 S-VHS Quasi Playback (SQPB 23 DVD...
...18 Slow Motion 18 CM SKIP (Commercial Skip 19 VCR Tape Recording 19-20 Basic Recording (One-Touch Recording) . . .19 Instant Timer Recording 19 Manual Timer Programming 20 Timer-Link Recording (External Timer Recording 21 Copying from Program List 26 Erasing the Complete Program... List . . . . . .26 Viewing a JPEG file 27 Slide Show 27 Still Picture 27 Moving to VCR 22 On-Screen Display - VCR 22 Additional VCR Information 23 VCR Auto Play System 23 S-VHS Quasi Playback (SQPB 23 DVD...

Instructions
Page 5
.... Hold the disc by the edges so that the function is applicable only to direct sunlight. ALL DVD VCD ACD All discs listed below DVD and finalized DVD±R/RW Video CDs Audio CDs Cleaning Discs Fingerprints and dust on the disc. Do not use of...Introduction Introduction To ensure proper use strong solvents such as alcohol, benzine, thinner, commercially available cleaners, or anti-static spray intended for older vinyl records. 5 Should the unit require service, contact an authorized service location. Before playing, clean the disc with a clean cloth. A section whose ...
.... Hold the disc by the edges so that the function is applicable only to direct sunlight. ALL DVD VCD ACD All discs listed below DVD and finalized DVD±R/RW Video CDs Audio CDs Cleaning Discs Fingerprints and dust on the disc. Do not use of...Introduction Introduction To ensure proper use strong solvents such as alcohol, benzine, thinner, commercially available cleaners, or anti-static spray intended for older vinyl records. 5 Should the unit require service, contact an authorized service location. Before playing, clean the disc with a clean cloth. A section whose ...

Instructions
Page 6
...This unit requires discs and recordings to meet certain technical standards in order to ensure compatible playback. When recording and playing the pictures of these require certain pre-existing conditions (see above) to achieve optimal playback quality. Pre-recorded DVDs are recorded on the unit. &#...8226; Do not use irregularly shaped CDs (e.g., heartshaped or octagonal) since they may not be authorized by Macrovision Corporation. Use of this unit plays DVD±R/RW, CDR/RW and SVCD...
...This unit requires discs and recordings to meet certain technical standards in order to ensure compatible playback. When recording and playing the pictures of these require certain pre-existing conditions (see above) to achieve optimal playback quality. Pre-recorded DVDs are recorded on the unit. &#...8226; Do not use irregularly shaped CDs (e.g., heartshaped or octagonal) since they may not be authorized by Macrovision Corporation. Use of this unit plays DVD±R/RW, CDR/RW and SVCD...

Instructions
Page 7
... for details. j Display Windows Refer to next chapter or track. n REC (z) To record normally or to activate One-touch Timer Recording by -frame playback. A disc is in the DVD deck. (Lights when a disc is active. Indicates repeat mode. The unit is Recording. (VCR part only) Indicates PM time. (AM is selected. i OPEN/CLOSE (Z) Opens or...
... for details. j Display Windows Refer to next chapter or track. n REC (z) To record normally or to activate One-touch Timer Recording by -frame playback. A disc is in the DVD deck. (Lights when a disc is active. Indicates repeat mode. The unit is Recording. (VCR part only) Indicates PM time. (AM is selected. i OPEN/CLOSE (Z) Opens or...

Instructions
Page 8
... sensor and press the buttons. RETURN (O) : Removes the setup menu. b X (PAUSE/STEP) : Pause playback or recording temporarily. x (STOP) : Stops playback or recording. VCR: Rewinds/Advances the tape during playback. PROGRAM : Shows or hides Program menu. ZOOM : Enlarges DVD video image. Shows tape playing speed. Z (OPEN/CLOSE) : Opens and closes the disc tray. TRACKING (-/+) : Adjusts...
... sensor and press the buttons. RETURN (O) : Removes the setup menu. b X (PAUSE/STEP) : Pause playback or recording temporarily. x (STOP) : Stops playback or recording. VCR: Rewinds/Advances the tape during playback. PROGRAM : Shows or hides Program menu. ZOOM : Enlarges DVD video image. Shows tape playing speed. Z (OPEN/CLOSE) : Opens and closes the disc tray. TRACKING (-/+) : Adjusts...
Instructions
Page 10
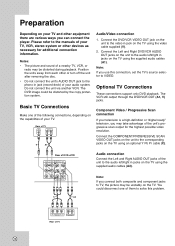
... TV. Do not connect the unit via another VCR. Optional TV Connections These connections support only DVD playback. The VCR still output through the DVD/VCR OUT (A1, V) jacks. Connect the COMPONENT/PROGRESSIVE SCAN VIDEO OUT jacks on the unit to the audio left /right in jack (record deck) of the unit to VIDEO. Note: If...
... TV. Do not connect the unit via another VCR. Optional TV Connections These connections support only DVD playback. The VCR still output through the DVD/VCR OUT (A1, V) jacks. Connect the COMPONENT/PROGRESSIVE SCAN VIDEO OUT jacks on the unit to the audio left /right in jack (record deck) of the unit to VIDEO. Note: If...

Instructions
Page 11
Cable/Satellite box Connection to unit To use Timer-Link Recording, connect the VCR IN LINE 1 jacks on the unit to the audio/video out jacks on your Cable/Satellite box, using the optional audio/video cables. (Refer to page 21 for "Timer-Link Recording".) Accessory Audio/Video (A/V) Connections to unit Connect the VCR IN LINE 1 or LINE 2 jacks on the unit to the audio/video out jacks on your accessory component, using the optional audio/video cables. (Refer to page 19 for "Basic Recording".) Cable/Satellite box AUDIO OUT VIDEO OUT Rear of the unit Preparation 11
Cable/Satellite box Connection to unit To use Timer-Link Recording, connect the VCR IN LINE 1 jacks on the unit to the audio/video out jacks on your Cable/Satellite box, using the optional audio/video cables. (Refer to page 21 for "Timer-Link Recording".) Accessory Audio/Video (A/V) Connections to unit Connect the VCR IN LINE 1 or LINE 2 jacks on the unit to the audio/video out jacks on your accessory component, using the optional audio/video cables. (Refer to page 19 for "Basic Recording".) Cable/Satellite box AUDIO OUT VIDEO OUT Rear of the unit Preparation 11
Instructions
Page 13
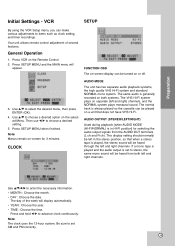
...the VCR Setup menu, you can be heard through the left and right) channels, and the NORMAL system plays monaural sound. General Operation 1. Press SETUP MENU and the MAIN menu will be played on the selected Menu. Use v/V to choose a desired option on a unit that when a stereo tape is generally recorded on...12-hour system. The normal track is set AM and PM correctly. 13 Be sure to set to items such as clock setting, and timer recordings. If a mono tape is played and the audio output is always played so the cassette can make various adjustments to stereo, the same mono ...
...the VCR Setup menu, you can be heard through the left and right) channels, and the NORMAL system plays monaural sound. General Operation 1. Press SETUP MENU and the MAIN menu will be played on the selected Menu. Use v/V to choose a desired option on a unit that when a stereo tape is generally recorded on...12-hour system. The normal track is set AM and PM correctly. 13 Be sure to set to items such as clock setting, and timer recordings. If a mono tape is played and the audio output is always played so the cassette can make various adjustments to stereo, the same mono ...
Instructions
Page 15
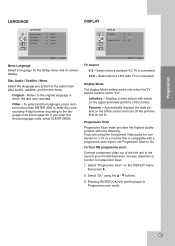
... the wrong language code, press CLEAR (0000). Select "On" using the Component Video jacks for connection to the original language in which the disc was recorded.
... the wrong language code, press CLEAR (0000). Select "On" using the Component Video jacks for connection to the original language in which the disc was recorded.

Instructions
Page 18
... be operated. Manual Tracking To manually adjust the tracking use the v/V (-/+) buttons on automatically. 4. Press X (PAUSE) repeatedly to operate the VCR and DVD. Note: After 5 minutes in SLOW MOTION mode the unit goes back to PLAY mode to protect the tape and video heads. Slow Motion 1....returns to PLAY mode to stabilize the tape speed when re-entering the PLAY mode so slight interference may appear on the TV. 2. Insert a pre-recorded video cassette. Press X (PAUSE) during stop playback. While in still mode, press M (FORWARD). To return to the normal speed, press N...
... be operated. Manual Tracking To manually adjust the tracking use the v/V (-/+) buttons on automatically. 4. Press X (PAUSE) repeatedly to operate the VCR and DVD. Note: After 5 minutes in SLOW MOTION mode the unit goes back to PLAY mode to protect the tape and video heads. Slow Motion 1....returns to PLAY mode to stabilize the tape speed when re-entering the PLAY mode so slight interference may appear on the TV. 2. Insert a pre-recorded video cassette. Press X (PAUSE) during stop playback. While in still mode, press M (FORWARD). To return to the normal speed, press N...
Instructions
Page 19
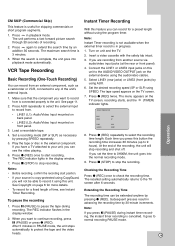
... cancelled. The maximum search time is useful for skipping commercials or short program segments. 1. VCR Tape Recording Basic Recording (One-Touch Recording) You can see Instant Timer Recording. See page 11. 2. The REC indicator lights in the display window. 2. Press X (PAUSE) to extend the search time... external input to record it using the program timer. Set a recording mode (SP or SLP) as a camcorder or VCR, connected to protect the tape and the video heads. After 5 minutes in advancing the recording time by pressing z (REC). Note: Instant Timer recording is not available when...
... cancelled. The maximum search time is useful for skipping commercials or short program segments. 1. VCR Tape Recording Basic Recording (One-Touch Recording) You can see Instant Timer Recording. See page 11. 2. The REC indicator lights in the display window. 2. Press X (PAUSE) to extend the search time... external input to record it using the program timer. Set a recording mode (SP or SLP) as a camcorder or VCR, connected to protect the tape and the video heads. After 5 minutes in advancing the recording time by pressing z (REC). Note: Instant Timer recording is not available when...
Instructions
Page 20
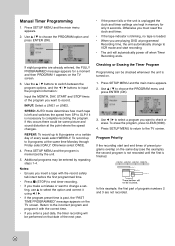
... If the power fails or the unit is memorized by repeating steps 1-4. If eight programs are playing DVD at the point where the speed changes. Notes: • Ensure you insert a tape with the...program information: Input the MONTH, DAY, START and STOP times of the program you want to VCR mode and start and end times of every week select WEEKLY. If this example, the first ...for a moment and then PROGRAM 1 appears on the same day (see the example), the second program is not recorded until the first is loaded. • When you enter a past , the "PAST TIME PROGRAMMED" message appears...
... If the power fails or the unit is memorized by repeating steps 1-4. If eight programs are playing DVD at the point where the speed changes. Notes: • Ensure you insert a tape with the...program information: Input the MONTH, DAY, START and STOP times of the program you want to VCR mode and start and end times of every week select WEEKLY. If this example, the first ...for a moment and then PROGRAM 1 appears on the same day (see the example), the second program is not recorded until the first is loaded. • When you enter a past , the "PAST TIME PROGRAMMED" message appears...
Instructions
Page 21
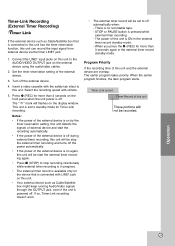
...1. Timer Link record Timer Record of the external device. 3. The " " mark will be stop recording intentionally while external timer recording is in progress. • The external timer record is available only for Timer-Link recording. Insert a video cassette with remote. 5. Timer-Link Recording (External Timer Recording) If the ...turns off the power automatically. • If the power of the external device is off during external timer recording, this unit will be start the recording automatically. • If the power of the external device is off . Notes: • If the ...
...1. Timer Link record Timer Record of the external device. 3. The " " mark will be stop recording intentionally while external timer recording is in progress. • The external timer record is available only for Timer-Link recording. Insert a video cassette with remote. 5. Timer-Link Recording (External Timer Recording) If the ...turns off the power automatically. • If the power of the external device is off during external timer recording, this unit will be start the recording automatically. • If the power of the external device is off . Notes: • If the ...
Instructions
Page 22
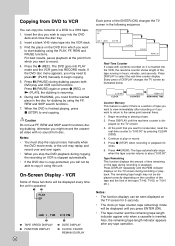
...and SKIP search functions during dubbing pauses both DVD play or record. 5. VCR Some of these functions will be displayed until the REM indicator displays on the DVD from disc. The tape automatically stops when the tape counter returns to record. 4. Notes: • The function displays ...8226; The clock (or tape counter, tape remaining) mode will not be displayed correctly depending on VCR is stopped automatically. • If the DVD disc is inserted. Press x (STOP) when recording or playback finishes. 6. The remaining tape length may not be able to begin copying. 5. Press...
...and SKIP search functions during dubbing pauses both DVD play or record. 5. VCR Some of these functions will be displayed until the REM indicator displays on the DVD from disc. The tape automatically stops when the tape counter returns to record. 4. Notes: • The function displays ...8226; The clock (or tape counter, tape remaining) mode will not be displayed correctly depending on VCR is stopped automatically. • If the DVD disc is inserted. Press x (STOP) when recording or playback finishes. 6. The remaining tape length may not be able to begin copying. 5. Press...
Instructions
Page 23
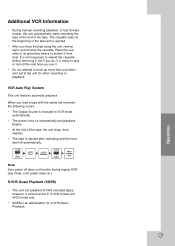
... of the tape, the unit stops, then rewinds. • The tape is ejected after rewinding and the turns itself off does not function during regular DVD play or record the next time you use it. • Do not attempt to hook up more than one television set to protect it cannot... not necessary to rewind the cassette before removing it, but VHS format only. • SQPB is an abbreviation for either recording or playback. The cassette stops at the end of the tape. VCR Auto Play System This unit features automatic playback. however, it from dust. When you load a tape with the safety...
... of the tape, the unit stops, then rewinds. • The tape is ejected after rewinding and the turns itself off does not function during regular DVD play or record the next time you use it. • Do not attempt to hook up more than one television set to protect it cannot... not necessary to rewind the cassette before removing it, but VHS format only. • SQPB is an abbreviation for either recording or playback. The cassette stops at the end of the tape. VCR Auto Play System This unit features automatic playback. however, it from dust. When you load a tape with the safety...
Instructions
Page 24
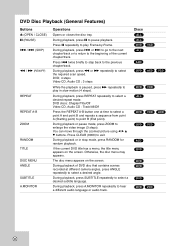
...next chapter/track or to return to the beginning of DVD disc that contains scenes recorded at time to select a point A and point B and repeats a sequence from point A (Starting point) to play in stop mode, press RANDOM for random playback. DVD; 4 steps Video CD, Audio CD ; 3 ... CLEAR (0000) to select a desired subtitle language. During playback of the current chapter/track. Discs ALL ALL DVD ALL VCD ACD DVD ACD VCD DVD VCD ALL DVD VCD ACD DVD VCD ACD DVD DVD DVD DVD DVD VCD 24 During playback, press SUBTITLE repeatedly to exit. During playback, press . If the current...
...next chapter/track or to return to the beginning of DVD disc that contains scenes recorded at time to select a point A and point B and repeats a sequence from point A (Starting point) to play in stop mode, press RANDOM for random playback. DVD; 4 steps Video CD, Audio CD ; 3 ... CLEAR (0000) to select a desired subtitle language. During playback of the current chapter/track. Discs ALL ALL DVD ALL VCD ACD DVD ACD VCD DVD VCD ALL DVD VCD ACD DVD VCD ACD DVD DVD DVD DVD DVD VCD 24 During playback, press SUBTITLE repeatedly to exit. During playback, press . If the current...

Instructions
Page 25
... > once during Repeat Chapter (Track) playback, the repeat playback cancels. • Zoom may not work on some DVDs. • When you are playing a DVD disc that contains scenes recorded different camera angles, the angle indicator will blink on the marker search menu. 5. Press ENTER (OK) to select ...To enter a marker, press MARKER at any marker by inputting its number on the TV screen during playback. 2. Additional features Time Search DVD VCD To start time in memory even if you switch off the player. The last scene remains in hours, minutes, and seconds from the...
... > once during Repeat Chapter (Track) playback, the repeat playback cancels. • Zoom may not work on some DVDs. • When you are playing a DVD disc that contains scenes recorded different camera angles, the angle indicator will blink on the marker search menu. 5. Press ENTER (OK) to select ...To enter a marker, press MARKER at any marker by inputting its number on the TV screen during playback. 2. Additional features Time Search DVD VCD To start time in memory even if you switch off the player. The last scene remains in hours, minutes, and seconds from the...
Instructions
Page 26
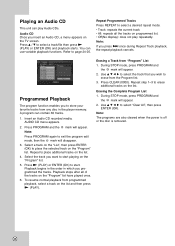
... You can contain 30 tracks. 1. Repeat Programmed Tracks Press REPEAT to exit the program edit mode, then the E mark will appear. 2. Insert an Audio CD recorded media. To resume normal playback from the Program list. 3. During STOP mode, press PROGRAM and the E mark will disappear. 3. Press v / V to place additional tracks on...
... You can contain 30 tracks. 1. Repeat Programmed Tracks Press REPEAT to exit the program edit mode, then the E mark will appear. 2. Insert an Audio CD recorded media. To resume normal playback from the Program list. 3. During STOP mode, press PROGRAM and the E mark will disappear. 3. Press v / V to place additional tracks on...
Instructions
Page 27
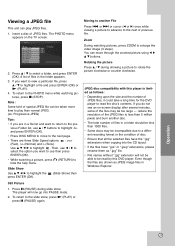
... and the number of special JPEG file can be taken more time to rotate the picture clockwise or counter clockwise. JPEG disc compatibility with this DVD player. Even though the files are shown as ".jpg" file. • File names without ".jpg" extension will now go into PAUSE mode. 2. Operation 27...CD layout. • If the files have ".jpe" or ".jpeg" extensions, please rename them as JPEG image files in a folder should be able to a different recording format or the condition of the files may be incompatible due to be too large - If you do not see an on the TV screen. 2.
... and the number of special JPEG file can be taken more time to rotate the picture clockwise or counter clockwise. JPEG disc compatibility with this DVD player. Even though the files are shown as ".jpg" file. • File names without ".jpg" extension will now go into PAUSE mode. 2. Operation 27...CD layout. • If the files have ".jpe" or ".jpeg" extensions, please rename them as JPEG image files in a folder should be able to a different recording format or the condition of the files may be incompatible due to be too large - If you do not see an on the TV screen. 2.


