
Instruction Manual
Page 4
... carefully and follow the instructions when making any openings in fire, electric shock or other controls may cause serious personal injury. 24. Read the owner's manual of liquid into the unit.
... carefully and follow the instructions when making any openings in fire, electric shock or other controls may cause serious personal injury. 24. Read the owner's manual of liquid into the unit.
Instruction Manual
Page 7
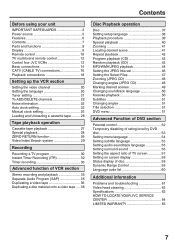
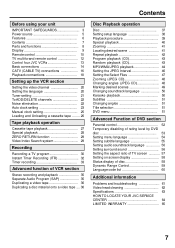
...3 Power source 5 Features 6 Contents 7 Parts and functions 8 Display 9 Remote control 10 TV multi-brand remote control 12 Control four JVC VCRs 13 Basic connections 14 CATV (CABLE TV) connections 16 Playback connections 18 Setting up the VCR section Setting the video channel 20 Setting the... language 20 Tuner setting 21 To ADD/DELETE channels 22 Noise elimination 22 Auto clock setting 23 Manual clock setting 25 Loading and Unloading a cassette tape ......... 26 Tape playback operation Cassette tape playback 27 Special playback 28 ZERO RETURN...
...3 Power source 5 Features 6 Contents 7 Parts and functions 8 Display 9 Remote control 10 TV multi-brand remote control 12 Control four JVC VCRs 13 Basic connections 14 CATV (CABLE TV) connections 16 Playback connections 18 Setting up the VCR section Setting the video channel 20 Setting the... language 20 Tuner setting 21 To ADD/DELETE channels 22 Noise elimination 22 Auto clock setting 23 Manual clock setting 25 Loading and Unloading a cassette tape ......... 26 Tape playback operation Cassette tape playback 27 Special playback 28 ZERO RETURN...
Instruction Manual
Page 10
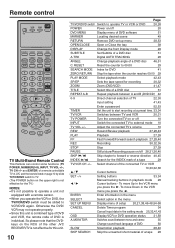
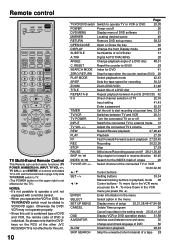
To move Down in playback mode 28 / Cursor buttons - and ENTER) of a remote controllable TV of JVC and the brands listed on page 12 by slide TV/VCR/DVD switch to TV. (The POWER button on ...not effective for the INDEX mark of the connected TV or VCR 10,30,32,36 / Cursor buttons SET -/+ Setting buttons 33,34 Manual tracking buttons in the VCR menu you press the . Otherwise the DVD/ VCR may not operate properly. • Since this unit. ...TV POWER, NUMBER(0-9), INPUT, TV VOL +/-, TV CH +/- So please note that the DVDkeys on the RCU of the other JVC RECEIVER/TV is individual.
To move Down in playback mode 28 / Cursor buttons - and ENTER) of a remote controllable TV of JVC and the brands listed on page 12 by slide TV/VCR/DVD switch to TV. (The POWER button on ...not effective for the INDEX mark of the connected TV or VCR 10,30,32,36 / Cursor buttons SET -/+ Setting buttons 33,34 Manual tracking buttons in the VCR menu you press the . Otherwise the DVD/ VCR may not operate properly. • Since this unit. ...TV POWER, NUMBER(0-9), INPUT, TV VOL +/-, TV CH +/- So please note that the DVDkeys on the RCU of the other JVC RECEIVER/TV is individual.
Instruction Manual
Page 18
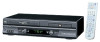
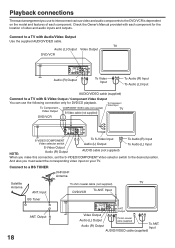
... component. And also you must select the corresponding video input on the model and features of video and audio inputs and outputs. Check the Owner's Manual provided with S-Video Output / Component Video Output You can use to interconnect various video and audio components to the DVD/VCR is dependent on your...
... component. And also you must select the corresponding video input on the model and features of video and audio inputs and outputs. Check the Owner's Manual provided with S-Video Output / Component Video Output You can use to interconnect various video and audio components to the DVD/VCR is dependent on your...
Instruction Manual
Page 20
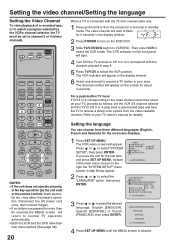
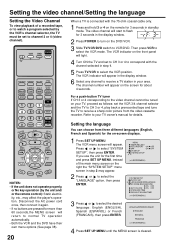
... options (See page 38). 20 Setting the language You can choose from the video cassette recorder. Refer to receive a TV station in your TV owner's manual for details. Disconnect the AC power cord once, then connect it again. • If no buttons are pressed for more than 60 seconds,the MENU...
... options (See page 38). 20 Setting the language You can choose from the video cassette recorder. Refer to receive a TV station in your TV owner's manual for details. Disconnect the AC power cord once, then connect it again. • If no buttons are pressed for more than 60 seconds,the MENU...
Instruction Manual
Page 22
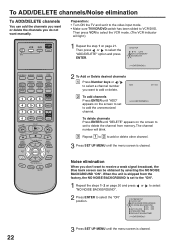
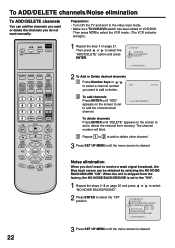
... the channels you do not want to delete the channel from the factory, the NO NOISE BACKGROUND is cleared. 22 Noise elimination When you want manually. The channel number will light.) 1 Repeat the step 1 on page 21. CH SETUP TV CATV AUTO CH MEMORY ADD/DELETE á+/Ð/ENTER/MENU ñ...
... the channels you do not want to delete the channel from the factory, the NO NOISE BACKGROUND is cleared. 22 Noise elimination When you want manually. The channel number will light.) 1 Repeat the step 1 on page 21. CH SETUP TV CATV AUTO CH MEMORY ADD/DELETE á+/Ð/ENTER/MENU ñ...
Instruction Manual
Page 23
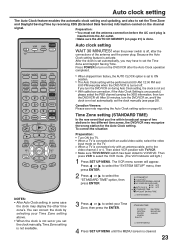
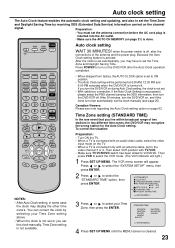
... cord plug is inserted into the AC outlet. • Make sure the AUTO CH MEMORY (on page 21) is not set automatically, set the clock manually, Time Zone setting is cleared. 23 After 30 minutes, turn the DVD/VCR off. Then press VCR to set the Time Zone and Daylight Saving... clock setting and updating, and also to select the VCR mode. (The VCR indicator will light.) 1 Press SET UP MENU. If you set the clock manually (see note regarding the Auto Clock setting option on during Auto Clock setting, the clock is not set the Time Zone and Daylight Saving Time...
... cord plug is inserted into the AC outlet. • Make sure the AUTO CH MEMORY (on page 21) is not set automatically, set the clock manually, Time Zone setting is cleared. 23 After 30 minutes, turn the DVD/VCR off. Then press VCR to set the Time Zone and Daylight Saving... clock setting and updating, and also to select the VCR mode. (The VCR indicator will light.) 1 Press SET UP MENU. If you set the clock manually (see note regarding the Auto Clock setting option on during Auto Clock setting, the clock is not set the Time Zone and Daylight Saving Time...
Instruction Manual
Page 24
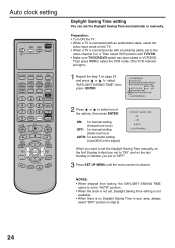
... Time in your area, always select "OFF" position in October you set to select one hour) AUTO: for manual setting (back one of the options, then press ENTER. ON: for manual setting (forward one hour) OFF: for automatic setting (read XDS in the signal) DAYLIGHT SAVING TIME ON OFF ...AUTO á+/Ð/ENTER/MENU ñ When you want to set the Daylight Saving Time manually, on the first Sunday in April you set the Daylight Saving Time automatically or manually. Preparation: • Turn ON the TV. • When a TV is cleared.
... Time in your area, always select "OFF" position in October you set to select one hour) AUTO: for manual setting (back one of the options, then press ENTER. ON: for manual setting (forward one hour) OFF: for automatic setting (read XDS in the signal) DAYLIGHT SAVING TIME ON OFF ...AUTO á+/Ð/ENTER/MENU ñ When you want to set the Daylight Saving Time manually, on the first Sunday in April you set the Daylight Saving Time automatically or manually. Preparation: • Turn ON the TV. • When a TV is cleared.
Instruction Manual
Page 25
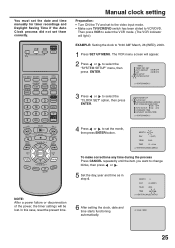
Manual clock setting Preparation: • Turn ON the TV and set to the video input mode. • Make sure TV/VCR/DVD switch has been slided ...;+/Ð/ENTER/CANCEL/MENU ñ 6 After setting the clock, date and time starts functioning automatically. 8 : 30AM WED 25 You must set the date and time manually for timer recordings and Daylight Saving Time if the Auto Clock process did not set the month, then press ENTER button. Then press VCR to...
Manual clock setting Preparation: • Turn ON the TV and set to the video input mode. • Make sure TV/VCR/DVD switch has been slided ...;+/Ð/ENTER/CANCEL/MENU ñ 6 After setting the clock, date and time starts functioning automatically. 8 : 30AM WED 25 You must set the date and time manually for timer recordings and Daylight Saving Time if the Auto Clock process did not set the month, then press ENTER button. Then press VCR to...
Instruction Manual
Page 28
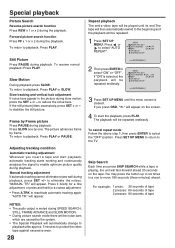
...screen. 4 To start playback, automatic tracking starts working and continuously analyzes the signal to move 180 seconds (three minutes) ahead. "MANUAL TR." Press or to playback: Press PLAY. to playback: Press PLAY or SLOW. To return to stabilize the still picture. ...condition Automatic tracking adjustment Whenever you press SKIP SEARCH while a tape is muted during slow motion, press the SET + or - Manual tracking adjustment If automatic tracking cannot eliminate noises well during playback. to reactivate automatic tracking again. Press it briefly for a fine ...
...screen. 4 To start playback, automatic tracking starts working and continuously analyzes the signal to move 180 seconds (three minutes) ahead. "MANUAL TR." Press or to playback: Press PLAY. to playback: Press PLAY or SLOW. To return to stabilize the still picture. ...condition Automatic tracking adjustment Whenever you press SKIP SEARCH while a tape is muted during slow motion, press the SET + or - Manual tracking adjustment If automatic tracking cannot eliminate noises well during playback. to reactivate automatic tracking again. Press it briefly for a fine ...
Instruction Manual
Page 61
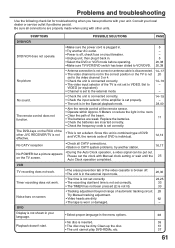
... unit is combined type of DVD and VCR, the remote code of the beam. • The batteries are properly made when using with other JVC RECEIVER/TV is not effective. VCR TV recording does not work . Noise bars on screen. • The erase prevention tab of the video ... the Auto Clock operation, a video signal can be dirty. Problems and troubleshooting Use the following check list for troubleshooting when you have problems with Manual clock setting or wait until the 25 Auto Clock operation completed. The remote control does not function. • Antenna connection is not correct or ...
... unit is combined type of DVD and VCR, the remote code of the beam. • The batteries are properly made when using with other JVC RECEIVER/TV is not effective. VCR TV recording does not work . Noise bars on screen. • The erase prevention tab of the video ... the Auto Clock operation, a video signal can be dirty. Problems and troubleshooting Use the following check list for troubleshooting when you have problems with Manual clock setting or wait until the 25 Auto Clock operation completed. The remote control does not function. • Antenna connection is not correct or ...
Instruction Manual
Page 62
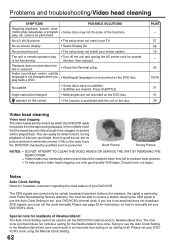
... tape, there is good sound, but no subtitles. • Subtitles are the means by qualified service personnel. Special note for instructions on how to manually set your DVD/VCR's clock. No surround sound • The setup does not match your TV. minutes, then replug it. This can easily be... HEADS OR SERVICE THE UNIT BY REMOVING THE REAR COVER. • Video heads may not do some of your DVD/ VCR's clock using the Manual Clock Setting. 62 Press SUBTITLE. The time zone command does not include a setting for Canadian customers regarding the clock feature of the functions. Audio...
... tape, there is good sound, but no subtitles. • Subtitles are the means by qualified service personnel. Special note for instructions on how to manually set your DVD/VCR's clock. No surround sound • The setup does not match your TV. minutes, then replug it. This can easily be... HEADS OR SERVICE THE UNIT BY REMOVING THE REAR COVER. • Video heads may not do some of your DVD/ VCR's clock using the Manual Clock Setting. 62 Press SUBTITLE. The time zone command does not include a setting for Canadian customers regarding the clock feature of the functions. Audio...

Instruction Manual
Page 65
...Return your bill of sale plus a letter of explanation of the problem to the nearest JVC Factory Service Center, the name and location of the cabinet. Operational adjustments covered in the Owner's Manual, normal maintenance, video and audio head cleaning; 4. WARRANTY (Only in U.S.A.) LIMITED ...WARRANTY CONSUMER VIDEO 1-90 JVC COMPANY OF AMERICA warrants this product and all parts thereof, except as set forth...
...Return your bill of sale plus a letter of explanation of the problem to the nearest JVC Factory Service Center, the name and location of the cabinet. Operational adjustments covered in the Owner's Manual, normal maintenance, video and audio head cleaning; 4. WARRANTY (Only in U.S.A.) LIMITED ...WARRANTY CONSUMER VIDEO 1-90 JVC COMPANY OF AMERICA warrants this product and all parts thereof, except as set forth...
Instruction Manual
Page 4
... for service. 20. REPLACEMENT PARTS When replacement parts are covered by the manufacturer or those controls that are required, be fatal. 15. Read the owner's manual of any connections. 4 IMPORTANT SAFEGUARDS 13. When installing an outside antenna system, extreme care should not be sure the antenna or cable system is closing...
... for service. 20. REPLACEMENT PARTS When replacement parts are covered by the manufacturer or those controls that are required, be fatal. 15. Read the owner's manual of any connections. 4 IMPORTANT SAFEGUARDS 13. When installing an outside antenna system, extreme care should not be sure the antenna or cable system is closing...
Instruction Manual
Page 7
... 3 Power source 5 Features 6 Contents 7 Parts and functions 8 Display 9 Remote control 10 TV multi-brand remote control 12 Control four JVC VCRs 13 Basic connections 14 CATV (CABLE TV) connections 16 Playback connections 18 Setting up the VCR section Setting the video channel 20 Setting the... language 20 Tuner setting 21 To ADD/DELETE channels 22 Noise elimination 22 Auto clock setting 23 Manual clock setting 25 Loading and Unloading a cassette tape ........ 26 Tape playback operation Cassette tape playback 27 Special playback 28 ZERO RETURN...
... 3 Power source 5 Features 6 Contents 7 Parts and functions 8 Display 9 Remote control 10 TV multi-brand remote control 12 Control four JVC VCRs 13 Basic connections 14 CATV (CABLE TV) connections 16 Playback connections 18 Setting up the VCR section Setting the video channel 20 Setting the... language 20 Tuner setting 21 To ADD/DELETE channels 22 Noise elimination 22 Auto clock setting 23 Manual clock setting 25 Loading and Unloading a cassette tape ........ 26 Tape playback operation Cassette tape playback 27 Special playback 28 ZERO RETURN...
Instruction Manual
Page 10
and ENTER) of a remote controllable TV of JVC and the brands listed on page 12 by slide TV/VCR/DVD switch to TV. (The POWER...58 A.MONITOR Switches sound between TV and VCR 20,31 TV POWER Turn the connected TV on the RCU of the other JVC RECEIVER/TV is not effective for the INDEX mark of the connected TV or VCR 10,30,32,36 / Cursor buttons... SET -/+ Setting buttons 33,34 Manual tracking buttons in the VCR menu you press the . To move Up in playback mode 28 / Cursor buttons - Remote control ...
and ENTER) of a remote controllable TV of JVC and the brands listed on page 12 by slide TV/VCR/DVD switch to TV. (The POWER...58 A.MONITOR Switches sound between TV and VCR 20,31 TV POWER Turn the connected TV on the RCU of the other JVC RECEIVER/TV is not effective for the INDEX mark of the connected TV or VCR 10,30,32,36 / Cursor buttons... SET -/+ Setting buttons 33,34 Manual tracking buttons in the VCR menu you press the . To move Up in playback mode 28 / Cursor buttons - Remote control ...

Instruction Manual
Page 18
... Audio (R) Input To Audio (L) Input Connect to a TV with Component Video Output (for the location of video and audio inputs and outputs. Check the Owner's Manual provided with the COMPONENT video cables (not supplied). Playback connections The exact arrangement you use to interconnect various video and audio components to the DVD...
... Audio (R) Input To Audio (L) Input Connect to a TV with Component Video Output (for the location of video and audio inputs and outputs. Check the Owner's Manual provided with the COMPONENT video cables (not supplied). Playback connections The exact arrangement you use to interconnect various video and audio components to the DVD...
Instruction Manual
Page 20
The VCR indicator on the front panel will appear in the display window. 6 Select any channel to receive a TV station in your TV owner's manual for 3 seconds in the display window. 2 Press POWER to turn on the DVD/VCR. 3 Slide TV/VCR/DVD switch to VCR/DVD. The VCR indicator ...
The VCR indicator on the front panel will appear in the display window. 6 Select any channel to receive a TV station in your TV owner's manual for 3 seconds in the display window. 2 Press POWER to turn on the DVD/VCR. 3 Slide TV/VCR/DVD switch to VCR/DVD. The VCR indicator ...
Instruction Manual
Page 22
... you do not want to receive a weak signal broadcast, the Blue back screen can add the channels you want or delete the channels you want manually. SYSTEM SETUP CLOCK SET LANGUAGE/IDIOMA/LANGUE NO NOISE BACKGROUND ON OFF AUTO CLOCK ON OFF STANDARD TIME DAYLIGHT SAVING TIME á+/Ð/ENTER/MENU...
... you do not want to receive a weak signal broadcast, the Blue back screen can add the channels you want or delete the channels you want manually. SYSTEM SETUP CLOCK SET LANGUAGE/IDIOMA/LANGUE NO NOISE BACKGROUND ON OFF AUTO CLOCK ON OFF STANDARD TIME DAYLIGHT SAVING TIME á+/Ð/ENTER/MENU...
Instruction Manual
Page 23
...TIME á+/Ð/ENTER/MENU ñ 3 Press or to select the "STANDARD TIME" option, then press ENTER. when the power switch is set the clock manually, Time Zone setting is not available. After the clock is off . Press or to select the "SYSTEM SETUP" menu, then press ENTER. 2 Press or... turn the DVD/VCR off , after the Auto Clock operation completed. • When shipped from factory, the AUTO CLOCK option is set the clock manually (see note regarding the Auto Clock setting option on page 21) is turned off. Auto clock setting WAIT 30 MINUTES! Time Zone setting (STANDARD TIME...
...TIME á+/Ð/ENTER/MENU ñ 3 Press or to select the "STANDARD TIME" option, then press ENTER. when the power switch is set the clock manually, Time Zone setting is not available. After the clock is off . Press or to select the "SYSTEM SETUP" menu, then press ENTER. 2 Press or... turn the DVD/VCR off , after the Auto Clock operation completed. • When shipped from factory, the AUTO CLOCK option is set the clock manually (see note regarding the Auto Clock setting option on page 21) is turned off. Auto clock setting WAIT 30 MINUTES! Time Zone setting (STANDARD TIME...
