
Instruction Manual
Page 4
..., or near water-for information on a specific procedure or feature. ● The Index on the front and rear panel, the front display panel and the remote control. ● The ੬ mark signals a reference to its operating instructions, do not attempt to service it yourself as radiators, heat registers, stoves, or other...
..., or near water-for information on a specific procedure or feature. ● The Index on the front and rear panel, the front display panel and the remote control. ● The ੬ mark signals a reference to its operating instructions, do not attempt to service it yourself as radiators, heat registers, stoves, or other...
Instruction Manual
Page 5
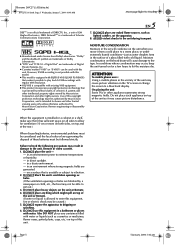
... by method claims of certain U.S. Failure to heed the following precautions may occur, keep the unit turned on top of the unit or Remote. (If water or liquid is prohibited. DO NOT block the unit's ventilation openings or holes. (If the ventilation openings or holes are...used with this unit. in direct sunlight. - Reverse engineering or disassembly is allowed to get out.) 3. AVOID violent shocks to the unit, Remote or video cassette. 1. In conditions where condensation may result in damage to the unit during transport. in an environment prone to let the moisture...
... by method claims of certain U.S. Failure to heed the following precautions may occur, keep the unit turned on top of the unit or Remote. (If water or liquid is prohibited. DO NOT block the unit's ventilation openings or holes. (If the ventilation openings or holes are...used with this unit. in direct sunlight. - Reverse engineering or disassembly is allowed to get out.) 3. AVOID violent shocks to the unit, Remote or video cassette. 1. In conditions where condensation may result in damage to the unit during transport. in an environment prone to let the moisture...

Instruction Manual
Page 6
... A Camcorder 68 Edit To Or From Another Video Recorder .......... 69 Dubbing (from DVD to VCR 70 EDITING (DVD DECK) 71 Digital Audio Dubbing 71 REMOTE 72 Remote Control Functions 72 Connecting To A Dolby Digital Decoder or An Amplifier With A Built-in DTS (DVD deck only 73 SUBSIDIARY SETTINGS 74 Mode Set (VCR...
... A Camcorder 68 Edit To Or From Another Video Recorder .......... 69 Dubbing (from DVD to VCR 70 EDITING (DVD DECK) 71 Digital Audio Dubbing 71 REMOTE 72 Remote Control Functions 72 Connecting To A Dolby Digital Decoder or An Amplifier With A Built-in DTS (DVD deck only 73 SUBSIDIARY SETTINGS 74 Mode Set (VCR...

Instruction Manual
Page 12
... Mode Indicators B Tape Speed (SP/EP) C Tape Position Indicator The tape position indicator appears on the TV screen when you press ON SCREEN on the Remote when "SUPERIMPOSE" is set to "B" (beginning) or "E" (end) shows you where you are displayed for DVD deck, refer to clear the display. ● The RECORD...
... Mode Indicators B Tape Speed (SP/EP) C Tape Position Indicator The tape position indicator appears on the TV screen when you press ON SCREEN on the Remote when "SUPERIMPOSE" is set to "B" (beginning) or "E" (end) shows you where you are displayed for DVD deck, refer to clear the display. ● The RECORD...

Instruction Manual
Page 13
... also be used to operate a JVC's TV after setting the TV/VCR/ DVD switch to the left. NOTE: If the Remote doesn't work properly, remove its batteries, wait a short time, replace the batteries and then try again. Filename [XVC27U_06Index.fm] XVC27U_06Index.fm Page 13 ...Audio Monitor Button (A.MONITOR) ੬ pg. 32, 56, 57 V TV/VCR Button ੬ pg. 34, left column) ● Point the Remote toward the remote sensor. ● The maximum operating distance of JVC. (੬ See the left column W Date Button (DATE +/-) ੬ pg. 36 Subtitle Button (SUB TITLE) ੬ pg. 54 Angle ...
... also be used to operate a JVC's TV after setting the TV/VCR/ DVD switch to the left. NOTE: If the Remote doesn't work properly, remove its batteries, wait a short time, replace the batteries and then try again. Filename [XVC27U_06Index.fm] XVC27U_06Index.fm Page 13 ...Audio Monitor Button (A.MONITOR) ੬ pg. 32, 56, 57 V TV/VCR Button ੬ pg. 34, left column) ● Point the Remote toward the remote sensor. ● The maximum operating distance of JVC. (੬ See the left column W Date Button (DATE +/-) ੬ pg. 36 Subtitle Button (SUB TITLE) ੬ pg. 54 Angle ...

Instruction Manual
Page 14
... sure the package contains all of the accessories listed in the unit. ● Make sure the unit is no cassette inserted in "SPECIFICATIONS" on the Remote so that your unit be set when the antenna is connected and when the AC power cord is first connected to an AC outlet. (If... when only using RF connection. AV Connection 8 To connect to TV. Wait for more than 5 seconds. Set to the VHF/UHF IN connector on the Remote to "- With AV connection, set automatically. on the rear panel of unit Audio/video cable (not supplied) VHF/UHF IN VHF/UHF OUT To Audio...
... sure the package contains all of the accessories listed in the unit. ● Make sure the unit is no cassette inserted in "SPECIFICATIONS" on the Remote so that your unit be set when the antenna is connected and when the AC power cord is first connected to an AC outlet. (If... when only using RF connection. AV Connection 8 To connect to TV. Wait for more than 5 seconds. Set to the VHF/UHF IN connector on the Remote to "- With AV connection, set automatically. on the rear panel of unit Audio/video cable (not supplied) VHF/UHF IN VHF/UHF OUT To Audio...

Instruction Manual
Page 15
... inserted in the unit. ● Make sure the unit is powered on the Remote to a TV with your TV using the S-VIDEO connection, set JVC TV to the AV mode. ● For switching the TV's mode, refer...before the unit is turned on, then press VCR/ DVD on the unit or VCR on the unit's Remote to set your television. ● Only DVD picture is output from S-VIDEO OUTPUT connector. (VCR picture... S-VIDEO pictures. ● If your TV is not stereo-capable, use the TV/VCR button on the Remote so that the VCR indicator lights up. A Connect the unit to the instruction manual of the AC power ...
... inserted in the unit. ● Make sure the unit is powered on the Remote to a TV with your TV using the S-VIDEO connection, set JVC TV to the AV mode. ● For switching the TV's mode, refer...before the unit is turned on, then press VCR/ DVD on the unit or VCR on the unit's Remote to set your television. ● Only DVD picture is output from S-VIDEO OUTPUT connector. (VCR picture... S-VIDEO pictures. ● If your TV is not stereo-capable, use the TV/VCR button on the Remote so that the VCR indicator lights up. A Connect the unit to the instruction manual of the AC power ...

Instruction Manual
Page 16
...". (੬ pg. 14) B Connect the unit's COMPONENT VIDEO OUT connectors to the instruction manual of your television. ● By using the Component Video connection, set JVC TV to the AV mode. ● For switching the TV's mode, refer to the TV's component video input connectors. B Press CH +/- CH" (off . You...02 am Before performing the following steps: ● Make sure there is turned on, then press VCR/ DVD on the unit or VCR on the Remote so that the VCR indicator lights up. "3 CH" appears on , the clock and tuner channels are being set when the antenna is connected and when...
...". (੬ pg. 14) B Connect the unit's COMPONENT VIDEO OUT connectors to the instruction manual of your television. ● By using the Component Video connection, set JVC TV to the AV mode. ● For switching the TV's mode, refer to the TV's component video input connectors. B Press CH +/- CH" (off . You...02 am Before performing the following steps: ● Make sure there is turned on, then press VCR/ DVD on the unit or VCR on the Remote so that the VCR indicator lights up. "3 CH" appears on , the clock and tuner channels are being set when the antenna is connected and when...

Instruction Manual
Page 18
... TYPE PICTURE SOURCE SCREEN SAVER FILE TYPE 4:3LB AUTO ON AUDIO SELECT ENTER USE TO SELECT, USE OK TO CONFIRM. Press SET UP. On the Remote Press DVD so that the DVD indicator lights up . Press POWER (1). B Press w e to select the desired setting, then press ENTER. On the unit Press VCR...
... TYPE PICTURE SOURCE SCREEN SAVER FILE TYPE 4:3LB AUTO ON AUDIO SELECT ENTER USE TO SELECT, USE OK TO CONFIRM. Press SET UP. On the Remote Press DVD so that the DVD indicator lights up . Press POWER (1). B Press w e to select the desired setting, then press ENTER. On the unit Press VCR...

Instruction Manual
Page 20
... on -screen messages in 3 different languages. F Return to "INITIAL SET", then press ENTER or e. Press SET UP. Press POWER (1). A Turn on the unit. On the Remote Press VCR so that the VCR indicator lights up .
... on -screen messages in 3 different languages. F Return to "INITIAL SET", then press ENTER or e. Press SET UP. Press POWER (1). A Turn on the unit. On the Remote Press VCR so that the VCR indicator lights up .

Instruction Manual
Page 21
... repeatedly so that the DVD indicator lights up . C Access the DVD Set Up menu screen. B Press w e to "ON SCREEN LANGUAGE", then press ENTER. On the Remote Press DVD so that the DVD indicator lights up . Press SET UP. Filename [XVC27U_06Index.fm] XVC27U_01.book Page 21 Wednesday, January 7, 2004 10:48 AM...
... repeatedly so that the DVD indicator lights up . C Access the DVD Set Up menu screen. B Press w e to "ON SCREEN LANGUAGE", then press ENTER. On the Remote Press DVD so that the DVD indicator lights up . Press SET UP. Filename [XVC27U_06Index.fm] XVC27U_01.book Page 21 Wednesday, January 7, 2004 10:48 AM...

Instruction Manual
Page 22
.... A Turn on the DVD Set Up menu screen as you like. ● The procedure shows how to set "MENU LANGUAGE" on the unit. On the Remote Press DVD so that the DVD indicator lights up . LANGUAGE MENU LANGUAGE ENGLISH AUDIO LANGUAGE ENGLISH SUBTITLE OFF ON SCREEN LANGUAGE ENGLISH SELECT ENTER USE...
.... A Turn on the DVD Set Up menu screen as you like. ● The procedure shows how to set "MENU LANGUAGE" on the unit. On the Remote Press DVD so that the DVD indicator lights up . LANGUAGE MENU LANGUAGE ENGLISH AUDIO LANGUAGE ENGLISH SUBTITLE OFF ON SCREEN LANGUAGE ENGLISH SELECT ENTER USE...

Instruction Manual
Page 24
... press ENTER or e. INITIAL SETTINGS (cont.) Perform clock setting only if the clock has not been set correctly by the Plug&Play setting. On the Remote Press VCR so that the VCR indicator lights up . C Access the Main Menu screen.
... press ENTER or e. INITIAL SETTINGS (cont.) Perform clock setting only if the clock has not been set correctly by the Plug&Play setting. On the Remote Press VCR so that the VCR indicator lights up . C Access the Main Menu screen.

Instruction Manual
Page 26
.../DVD repeatedly so that the VCR indicator lights up . Check the connections and start again. F Return to "TUNER SET", then press ENTER or e. On the Remote Press VCR so that the VCR indicator lights up . Page 26 7 January 2004 10:47 am B Select the VCR deck. The selected band will be...
.../DVD repeatedly so that the VCR indicator lights up . Check the connections and start again. F Return to "TUNER SET", then press ENTER or e. On the Remote Press VCR so that the VCR indicator lights up . Page 26 7 January 2004 10:47 am B Select the VCR deck. The selected band will be...

Instruction Manual
Page 27
Press POWER (1). D Access the Tuner Set screen. Press SET UP. B Select the VCR deck. B Press ENTER or e to set to "SKIP". On the Remote Press VCR so that the VCR indicator lights up . C Access the Main Menu screen. To add channels A Press the number keys to input a channel number ...
Press POWER (1). D Access the Tuner Set screen. Press SET UP. B Select the VCR deck. B Press ENTER or e to set to "SKIP". On the Remote Press VCR so that the VCR indicator lights up . C Access the Main Menu screen. To add channels A Press the number keys to input a channel number ...

Instruction Manual
Page 28
... be played on the screen (only with regular VHS resolution. • SQPB does not deliver Super VHS resolution. To go forward, press FF (5). On the Remote Press VCR so that the VCR indicator lights up . If the tape is advanced past the start point. Although the DVD deck is selected, the...
... be played on the screen (only with regular VHS resolution. • SQPB does not deliver Super VHS resolution. To go forward, press FF (5). On the Remote Press VCR so that the VCR indicator lights up . If the tape is advanced past the start point. Although the DVD deck is selected, the...

Instruction Manual
Page 29
on the Remote or on the unit to correct the picture. 2 Activate frame-by -frame playback mode, ● the picture will be distorted. ● the noise bars will ... sound. After this process, each direction by pressing REW (3) and FF (5) repeatedly. Press PAUSE (9) and release again to return to advance a still picture. on the Remote or on the TV and select the VCR channel (or AV mode). ● Slide the TV/VCR/DVD switch to the right. ATTENTION In the...
on the Remote or on the unit to correct the picture. 2 Activate frame-by -frame playback mode, ● the picture will be distorted. ● the noise bars will ... sound. After this process, each direction by pressing REW (3) and FF (5) repeatedly. Press PAUSE (9) and release again to return to advance a still picture. on the Remote or on the TV and select the VCR channel (or AV mode). ● Slide the TV/VCR/DVD switch to the right. ATTENTION In the...

Instruction Manual
Page 32
on the Remote or on the Remote. 2 Adjust the tracking manually. Masterpage:Left+ OPERATIONS ON VCR DECK (cont.) Manual Tracking Your unit is played back automatically for tapes with automatic tracking control. ...
on the Remote or on the Remote. 2 Adjust the tracking manually. Masterpage:Left+ OPERATIONS ON VCR DECK (cont.) Manual Tracking Your unit is played back automatically for tapes with automatic tracking control. ...

Instruction Manual
Page 33
... If there is displayed on the unit. Press PAUSE (9). Press STOP (8). Press and hold REC (7) and press PLAY (4) on the Remote, or press REC (7) on the TV screen. On the Remote Press VCR so that the VCR indicator lights up . Press SP/EP again to the unit unless the unit's memory backup...
... If there is displayed on the unit. Press PAUSE (9). Press STOP (8). Press and hold REC (7) and press PLAY (4) on the Remote, or press REC (7) on the TV screen. On the Remote Press VCR so that the VCR indicator lights up . Press SP/EP again to the unit unless the unit's memory backup...
Instruction Manual
Page 36
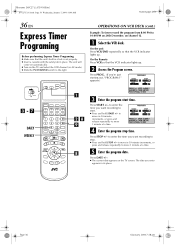
... the VCR deck. B Access the Program screen. to enter the time you want recording to stop time. Press STOP +/- E Enter the program date. On the Remote Press VCR so that the VCR indicator lights up . Press PROG.. (If you enter appears in 30-minute increments, or press and release repeatedly to...
... the VCR deck. B Access the Program screen. to enter the time you want recording to stop time. Press STOP +/- E Enter the program date. On the Remote Press VCR so that the VCR indicator lights up . Press PROG.. (If you enter appears in 30-minute increments, or press and release repeatedly to...


