Instruction Manual
Page 2
.... However, there is no pod ran ser desechados como residuos domesticos. I -~ J 1 This product contains aCR Coin Cell Lithium Battery which can be determined by one or more of labels on , the user is not installed and used in the instruction manual. In compliance with the limits for help. Un tratamiento correcto del reciclaje yIa eliminaci6n de residuos ayuda a conservar...
.... However, there is no pod ran ser desechados como residuos domesticos. I -~ J 1 This product contains aCR Coin Cell Lithium Battery which can be determined by one or more of labels on , the user is not installed and used in the instruction manual. In compliance with the limits for help. Un tratamiento correcto del reciclaje yIa eliminaci6n de residuos ayuda a conservar...

Instruction Manual
Page 4
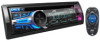
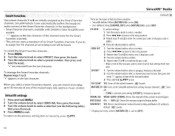
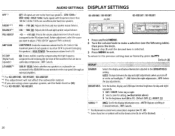
... USE BEFORE USE 2 BASICS 3 GETTING STARTED 4 CD I USB I iPod --- 5 RADIO 7 AUX 8 Pandora® 9 iHeartRadio® 10 SiriusXM® Radio (for KD-AR959BS) 11 BLUETOOTH® 13 -AU-D·I CONNECTION . Replace it only with a cotton swab, being careful not to avoid damaging the speakers by the sudden increase of explosion if replaced incorrectly. TIN-.,GS 19 DISPLAY SETTINGS 20 MORE INFORMATION 21 TROUBLESHOOTING 23 INSTALLATION I -O S-E-T- A ·caution Volume setting: • Adjust...
... USE BEFORE USE 2 BASICS 3 GETTING STARTED 4 CD I USB I iPod --- 5 RADIO 7 AUX 8 Pandora® 9 iHeartRadio® 10 SiriusXM® Radio (for KD-AR959BS) 11 BLUETOOTH® 13 -AU-D·I CONNECTION . Replace it only with a cotton swab, being careful not to avoid damaging the speakers by the sudden increase of explosion if replaced incorrectly. TIN-.,GS 19 DISPLAY SETTINGS 20 MORE INFORMATION 21 TROUBLESHOOTING 23 INSTALLATION I -O S-E-T- A ·caution Volume setting: • Adjust...

Instruction Manual
Page 9
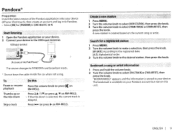
RADIO liST'' lights up when receiving an FM stereo broaqcast with sufficient signal strength. 1 Press 0/SOURCE to select FM or AM. . 2 Press ~/ ~ (or press
RADIO liST'' lights up when receiving an FM stereo broaqcast with sufficient signal strength. 1 Press 0/SOURCE to select FM or AM. . 2 Press ~/ ~ (or press

Instruction Manual
Page 10
... Use a plug head stereo mini plug for AM is selected. (• 4) SSM SSM 01 - 06 I SSM 07- 12 I SSM 13 - 18 to select AUX. 4 Turn on the portable audio player and start playback. RADIO AUX Default: XX RADIO TIMER Turns on the radio at a specific time regardless of the current source. 1 ONCE/ DAILYI WEEKLYI OFF: Select how often the timer will be lost .) ; i h MONO Displayed only when the source is selected in [SRC SELECT...
... Use a plug head stereo mini plug for AM is selected. (• 4) SSM SSM 01 - 06 I SSM 07- 12 I SSM 13 - 18 to select AUX. 4 Turn on the portable audio player and start playback. RADIO AUX Default: XX RADIO TIMER Turns on the radio at a specific time regardless of the current source. 1 ONCE/ DAILYI WEEKLYI OFF: Select how often the timer will be lost .) ; i h MONO Displayed only when the source is selected in [SRC SELECT...
Instruction Manual
Page 11
.... 3 Turn the volume knob to the desired station, then press the knob. Pandora® Preparation: Install the latest version of the Pandora application onto your device (iPhone/ iPod touch), then create an account and log in to Pandora. • Select [ON] for [PANDORA] in [SRC SELEa]. (+ 4) 1 Open the Pandora application on your device. 2 Connect your device to the USB input terminal. . ( V:::=U~S~B:in~piutttJehrmueinaoliPod/iPhone...
.... 3 Turn the volume knob to the desired station, then press the knob. Pandora® Preparation: Install the latest version of the Pandora application onto your device (iPhone/ iPod touch), then create an account and log in to Pandora. • Select [ON] for [PANDORA] in [SRC SELEa]. (+ 4) 1 Open the Pandora application on your device. 2 Connect your device to the USB input terminal. . ( V:::=U~S~B:in~piutttJehrmueinaoliPod/iPhone...
Instruction Manual
Page 13
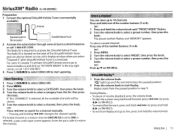
...). Expansion port on "ACTIVATE RADIO" in Canada: To activate Sirius~M Canada service go to activate the SiriusXM Vehicle Tuner. The Radio ID is located on the label of the SiriusXM Vehicle Tuner and can also be shown on the unit's display window when you select ""Channel 0" after SiriusXM Vehicle Tuner is required to www.xmradio.ca and click on the rear panel SiriusXM Vehicle Tuner 2 Activate the subscription through...
...). Expansion port on "ACTIVATE RADIO" in Canada: To activate Sirius~M Canada service go to activate the SiriusXM Vehicle Tuner. The Radio ID is located on the label of the SiriusXM Vehicle Tuner and can also be shown on the unit's display window when you select ""Channel 0" after SiriusXM Vehicle Tuner is required to www.xmradio.ca and click on the rear panel SiriusXM Vehicle Tuner 2 Activate the subscription through...
Instruction Manual
Page 14
... SiriusXM tuner models. • Jl *"appears at the last character. To cancel the Smart Favorites channels... 1 Press MENU. 2 Turn the ~olume knob to sele~t PRESET, then press the knob. 3 Turn the volume knob to default.; Jl*"appears .at the last character of the channel number. 3 Press and hold MENU. 2 Turn the volume knob to select [SIRIUS XM], then press the knob. 3 Turn the volume knob to make a selection (see...
... SiriusXM tuner models. • Jl *"appears at the last character. To cancel the Smart Favorites channels... 1 Press MENU. 2 Turn the ~olume knob to sele~t PRESET, then press the knob. 3 Turn the volume knob to default.; Jl*"appears .at the last character of the channel number. 3 Press and hold MENU. 2 Turn the volume knob to select [SIRIUS XM], then press the knob. 3 Turn the volume knob to make a selection (see...
Instruction Manual
Page 15
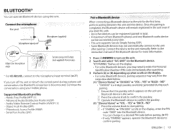
... angle * For KD-AR959BS, connect to the microphone input terminal.(+ 27) If you reset th~ unit. • Up to the unit after pairing. Supported Bluetooth profiles - Once the pairing is completed, the Bluetooth device will remain registered in the unit even if you turn off the unit or detach the control panel during a phone catI conversation, the Bluetooth connection is disconnected. Advanced Audio Distribution Profile (A2DP) -Audio/Video Remote Control Profile (AVRCPl .3) - Hands-Free Profile (HFPl...
... angle * For KD-AR959BS, connect to the microphone input terminal.(+ 27) If you reset th~ unit. • Up to the unit after pairing. Supported Bluetooth profiles - Once the pairing is completed, the Bluetooth device will remain registered in the unit even if you turn off the unit or detach the control panel during a phone catI conversation, the Bluetooth connection is disconnected. Advanced Audio Distribution Profile (A2DP) -Audio/Video Remote Control Profile (AVRCPl .3) - Hands-Free Profile (HFPl...
Instruction Manual
Page 16
... connectivity result flashes on the power again. I \fl or the volume knob. "SEARCH NOW USING PHONE" • "PIN IS 0000" scrolls on the display. 2 Search and select"JVC UNIT" on the Bluetooth device within 3 minutes. 3 Perform (A), (B) or (C) depending on what appears on the Bluetooth device. (C) 11PAIRING": Operate the Bluetooth device to confirm pairing. BLUETOOTH® "PAIRING COMPLETED" appears when pairing is completed. • "~"or"!/" will light up when a Bluetooth audio player is successful, "PAIRING OK" • "[Device Name...
... connectivity result flashes on the power again. I \fl or the volume knob. "SEARCH NOW USING PHONE" • "PIN IS 0000" scrolls on the display. 2 Search and select"JVC UNIT" on the Bluetooth device within 3 minutes. 3 Perform (A), (B) or (C) depending on what appears on the Bluetooth device. (C) 11PAIRING": Operate the Bluetooth device to confirm pairing. BLUETOOTH® "PAIRING COMPLETED" appears when pairing is completed. • "~"or"!/" will light up when a Bluetooth audio player is successful, "PAIRING OK" • "[Device Name...

Instruction Manual
Page 17
... reduction level until the least noise is being heard during aphone conversation. 1 - 10 (4): Adjust the echo cancellation delay time until the least echo is being heard during a phone conversation. 1 Press~ I 1 Press the volume knob to select a name or a phone number. . r j RECENT CALL I 1 1 i L IPHONEBOOK I ~ to enter Bluetooth mode. 2 Turn the volume knob to make a selection (see the following table), then press the knob. 3 Press MENU to...
... reduction level until the least noise is being heard during aphone conversation. 1 - 10 (4): Adjust the echo cancellation delay time until the least echo is being heard during a phone conversation. 1 Press~ I 1 Press the volume knob to select a name or a phone number. . r j RECENT CALL I 1 1 i L IPHONEBOOK I ~ to enter Bluetooth mode. 2 Turn the volume knob to make a selection (see the following table), then press the knob. 3 Press MENU to...
Instruction Manual
Page 18
activate the priority device. (•17, PRIORITY) 2 Speak the name of the contact you want to call or the voice command to the instruction manual of the connected phone for each phone. Refer to control the phone functions. • Supported Voice Recognition features vary for details. • This unit also supports the intelligent personal assistant function of iPhone. .·Sflltct·l.· BlUETOOTH® When the phone receives a text...
activate the priority device. (•17, PRIORITY) 2 Speak the name of the contact you want to call or the voice command to the instruction manual of the connected phone for each phone. Refer to control the phone functions. • Supported Voice Recognition features vary for details. • This unit also supports the intelligent personal assistant function of iPhone. .·Sflltct·l.· BlUETOOTH® When the phone receives a text...

Instruction Manual
Page 19
...: Cancels. ENGLISH I to view JVC car receiver status and perform simple control operations on Android smart phones. pre~s !::> PTY. AUTO CNNCT ON: The unit automatically reconnect when the Bluetooth device is designed to move the entry position. For JVC Smart Music Control operations, visit JVC website: . * 2 Selectable only when the connected phone supports OPP. Press and hold MENU. 2 Turn the volume knob to select [BLUETOOTH], then press the knob. 3 Turn the volume knob to make a selection (see the following...
...: Cancels. ENGLISH I to view JVC car receiver status and perform simple control operations on Android smart phones. pre~s !::> PTY. AUTO CNNCT ON: The unit automatically reconnect when the Bluetooth device is designed to move the entry position. For JVC Smart Music Control operations, visit JVC website: . * 2 Selectable only when the connected phone supports OPP. Press and hold MENU. 2 Turn the volume knob to select [BLUETOOTH], then press the knob. 3 Turn the volume knob to make a selection (see the following...

Instruction Manual
Page 21
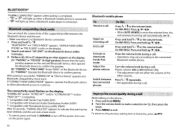
... I OFF: Turns on or off the subwoofer output. SUB.W*2 ON I 02: Boosts low or high frequencies to produce a well-balanced sound at low volume.; SUB.W LPF*l THROUGH: All signals are sent to the subwoofer. *1 Displayed only when [L/0 MODE] is set to [SUB.W] and [SUB.W] is set to [ON]. *2 Displayed only when [L/0 MODE] is selected. 3 Press MENU to [SUB.WJ. LOW 55Hz I MID 85Hz I TREBLE: Select asound tone. 3 Adjust the s~und elements of the selected sound tone...
... I OFF: Turns on or off the subwoofer output. SUB.W*2 ON I 02: Boosts low or high frequencies to produce a well-balanced sound at low volume.; SUB.W LPF*l THROUGH: All signals are sent to the subwoofer. *1 Displayed only when [L/0 MODE] is set to [SUB.W] and [SUB.W] is set to [ON]. *2 Displayed only when [L/0 MODE] is selected. 3 Press MENU to [SUB.WJ. LOW 55Hz I MID 85Hz I TREBLE: Select asound tone. 3 Adjust the s~und elements of the selected sound tone...
Instruction Manual
Page 22
F06 (QQ): Adjusts the front and rear speaker output balance. "' ''"" " ' L/0 MODE*6 SUB.W I REAR: Selects whether rear speakers or a subwoofer are connected to exit. NIGHT: 15) SCROlL * 2 ONCE: Scrolls the display information once.; R06- HIGH POWER: The maximum volume level is selected. 3 Press MENU to the REAR/SW line out terminals on the rear panel (through an external amplifier). 0 *3 For KD-AR959BS / KD-R950BT I KD-AR855BT. *4 This adjustment will be shown correctly (or will not affect the subwoofer output. *S If you are...
F06 (QQ): Adjusts the front and rear speaker output balance. "' ''"" " ' L/0 MODE*6 SUB.W I REAR: Selects whether rear speakers or a subwoofer are connected to exit. NIGHT: 15) SCROlL * 2 ONCE: Scrolls the display information once.; R06- HIGH POWER: The maximum volume level is selected. 3 Press MENU to the REAR/SW line out terminals on the rear panel (through an external amplifier). 0 *3 For KD-AR959BS / KD-R950BT I KD-AR855BT. *4 This adjustment will be shown correctly (or will not affect the subwoofer output. *S If you are...
Instruction Manual
Page 24
... in [HEAD MODE]. • The song order displayed on the Bluetooth version of this unit. · • This unit may differ from the following JVC website: . 22 About Bluetooth • Depending on the selection menu of the device, some operations are subject to browse video files on the "Videos" menu in the U.S., Australia and New Zealand. • Because Pandora is a third-party service, the specifications are available...
... in [HEAD MODE]. • The song order displayed on the Bluetooth version of this unit. · • This unit may differ from the following JVC website: . 22 About Bluetooth • Depending on the selection menu of the device, some operations are subject to browse video files on the "Videos" menu in the U.S., Australia and New Zealand. • Because Pandora is a third-party service, the specifications are available...
Instruction Manual
Page 25
.... I • Connect the antenna firmly. SiriusXM Channel no operations can only display uppercase letters, numbers, and a limited number of the speaker wires are not displayed. "IN DISC" appears. the order in which files were recorded (disc). CD or USB 1 Playing time+ Day/Clock _;-Dj~-~-n-~~:3 + Alb~~--tl~I Playing time+ Day/Clock+ Album title/Artist*?+ Track title*7 +(back to the beginning) - -- - -- If this does not solve the problem, consult your nearest service center...
.... I • Connect the antenna firmly. SiriusXM Channel no operations can only display uppercase letters, numbers, and a limited number of the speaker wires are not displayed. "IN DISC" appears. the order in which files were recorded (disc). CD or USB 1 Playing time+ Day/Clock _;-Dj~-~-n-~~:3 + Alb~~--tl~I Playing time+ Day/Clock+ Album title/Artist*?+ Track title*7 +(back to the beginning) - -- - -- If this does not solve the problem, consult your nearest service center...
Instruction Manual
Page 26
TROUBLESHOOTING "CANNOT PLAY" flashes and/or connected device cannot be If "Explicit Content" in [Account Settings] is checked in again. "READING" keeps flashing. • Do not use too many hierarchical levels and folders. • Reload the disc or reattach the USB device. "STATION LIM" The number of the Pandora application on your device. "UPGRADE APP" -Make sure you have installed the latest version of registered stations has reached its connection are...
TROUBLESHOOTING "CANNOT PLAY" flashes and/or connected device cannot be If "Explicit Content" in [Account Settings] is checked in again. "READING" keeps flashing. • Do not use too many hierarchical levels and folders. • Reload the disc or reattach the USB device. "STATION LIM" The number of the Pandora application on your device. "UPGRADE APP" -Make sure you have installed the latest version of registered stations has reached its connection are...
Instruction Manual
Page 27
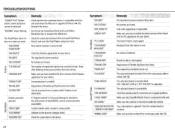
TROUBLESHOOTING No Bluetooth device • Search from both the made. The unit is detected. • Reset the unit.{+ 3) f Pairing cannot be to the unit. • Check whether the connected Bluetooth audio player supports AudioNideo Remote Control Profile controlled. , (AVR(P}. (Refer to connect -.®.r:::. 0 .S ' The connected Bluetooth QJ ~ ' audio player cannot be • Make sure you have tried. "NOT SUPPORT" appears. · The connected phone does not support Voice Recognition feature. If "ERROR" appears again, check if the device supports the...
TROUBLESHOOTING No Bluetooth device • Search from both the made. The unit is detected. • Reset the unit.{+ 3) f Pairing cannot be to the unit. • Check whether the connected Bluetooth audio player supports AudioNideo Remote Control Profile controlled. , (AVR(P}. (Refer to connect -.®.r:::. 0 .S ' The connected Bluetooth QJ ~ ' audio player cannot be • Make sure you have tried. "NOT SUPPORT" appears. · The connected phone does not support Voice Recognition feature. If "ERROR" appears again, check if the device supports the...

Instruction Manual
Page 28
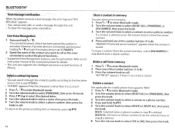
... turned on the car are working properly. • If the fuse blows, first make sure the wires are not touching car's chassis, then replace the old fuse with one that has the same rating. See Installing the unit (in-dash mounting). 4 Connect th~ 8 terminal of the car battery. 5 Reset the unit.(+ 3) 26 Installing the unit (in-dash mounting) 1 2 Bend the appropriate tabs to hold the sleeve firmly in parallel. • Connect speakers with a maximum power...
... turned on the car are working properly. • If the fuse blows, first make sure the wires are not touching car's chassis, then replace the old fuse with one that has the same rating. See Installing the unit (in-dash mounting). 4 Connect th~ 8 terminal of the car battery. 5 Reset the unit.(+ 3) 26 Installing the unit (in-dash mounting) 1 2 Bend the appropriate tabs to hold the sleeve firmly in parallel. • Connect speakers with a maximum power...
Instruction Manual
Page 35
... specific legal rights andyou mayalso have any attachmenl not provided withtheproducts, or if Ihe model or serial number has been altered, lampered wrth, defaced or removed; 2. Operational adjustmenls cove red in basis. and Senal No. Initial installalion, installation and removal fromcabinets or mounting systems 3. There areno express warranties except as set forth below . ("The Warranty Period ") PARTS 2 YRS I LABOR 2 YRS : Car audio...
... specific legal rights andyou mayalso have any attachmenl not provided withtheproducts, or if Ihe model or serial number has been altered, lampered wrth, defaced or removed; 2. Operational adjustmenls cove red in basis. and Senal No. Initial installalion, installation and removal fromcabinets or mounting systems 3. There areno express warranties except as set forth below . ("The Warranty Period ") PARTS 2 YRS I LABOR 2 YRS : Car audio...


