
Instruction Manual
Page 1
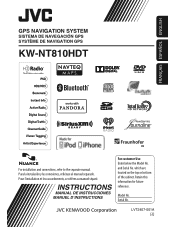
... al manual separado. INSTRUCTIONS MANUAL DE INSTRUCCIONES MANUEL D'INSTRUCTIONS For customer Use: Enter below the Model No. LVT2407-001A [J] Model No. FRANÇAIS ESPAÑOL ENGLISH GPS NAVIGATION SYSTEM SISTEMA DE NAVEGACIÓN GPS SYSTÈME DE NAVIGATION GPS KW-NT810HDT For installation and connections, refer to the separate manual. Pour l'installation et les raccordements, se référer au manuel séparé. Retain this information for...
... al manual separado. INSTRUCTIONS MANUAL DE INSTRUCCIONES MANUEL D'INSTRUCTIONS For customer Use: Enter below the Model No. LVT2407-001A [J] Model No. FRANÇAIS ESPAÑOL ENGLISH GPS NAVIGATION SYSTEM SISTEMA DE NAVEGACIÓN GPS SYSTÈME DE NAVIGATION GPS KW-NT810HDT For installation and connections, refer to the separate manual. Pour l'installation et les raccordements, se référer au manuel séparé. Retain this information for...
Instruction Manual
Page 6
... Installation settings 12 Basic operations 13 • Turning on the power 13 • Turning off/on the screen 13 • Adjust the angle of the front panel 13 • Operations on the touch panel 14 • Using the Quick menu 15 • Extending/shortening the auto antenna 15 Switching screens 16 Navigation System 18 Safety instructions/information for the Navigation System 18 • Information/icons on the map 18 Basic operations 19 • About the current...
... Installation settings 12 Basic operations 13 • Turning on the power 13 • Turning off/on the screen 13 • Adjust the angle of the front panel 13 • Operations on the touch panel 14 • Using the Quick menu 15 • Extending/shortening the auto antenna 15 Switching screens 16 Navigation System 18 Safety instructions/information for the Navigation System 18 • Information/icons on the map 18 Basic operations 19 • About the current...
Instruction Manual
Page 7
... your route 34 • Changing the sequence of the destination/via points 34 • Adjusting the vehicle position 35 Editing registration of home/favorite points 36 Using information service from HD Radio or iHeartRADIO 37 • Using the traffic information service 37 • Using the information service 39 Checking the information of the navigation system 40 Navigation menu items 41 Additional information 43 AV Operations 45 Common operations on source screen 45 • Selecting the playback source 45 • Turning...
... your route 34 • Changing the sequence of the destination/via points 34 • Adjusting the vehicle position 35 Editing registration of home/favorite points 36 Using information service from HD Radio or iHeartRADIO 37 • Using the traffic information service 37 • Using the information service 39 Checking the information of the navigation system 40 Navigation menu items 41 Additional information 43 AV Operations 45 Common operations on source screen 45 • Selecting the playback source 45 • Turning...

Instruction Manual
Page 8
... using Bluetooth® devices 99 Using Bluetooth device 100 • Registering a Bluetooth device 100 • Change the PIN code 102 • Connecting/disconnecting a registered Bluetooth device 102 • Deleting a registered Bluetooth device 102 Using Bluetooth mobile phone 103 • Receiving a call 103 • Adjusting the volume of calls/earpiece 103 • Switching between handsfree mode and phone mode 104 • Making a call 104 • Copying the phone book 105 • Searching for a phone number from phone book 105 • Deleting the phone number memory...
... using Bluetooth® devices 99 Using Bluetooth device 100 • Registering a Bluetooth device 100 • Change the PIN code 102 • Connecting/disconnecting a registered Bluetooth device 102 • Deleting a registered Bluetooth device 102 Using Bluetooth mobile phone 103 • Receiving a call 103 • Adjusting the volume of calls/earpiece 103 • Switching between handsfree mode and phone mode 104 • Making a call 104 • Copying the phone book 105 • Searching for a phone number from phone book 105 • Deleting the phone number memory...
Instruction Manual
Page 12
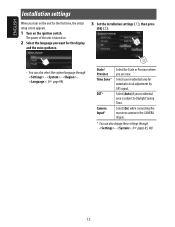
... switch. Select [On] when connecting the rear view camera to Daylight Saving Time. Select [Auto] if your residential area for the display and the voice guidance. 3 Set the installation settings (1), then press [OK] (2). • You can also change these settings through - - . (☞ page 84) State/ Province Time Zone* DST * Camera Input * Select the State or Province where you are now. ENGLISH Installation settings When you turn on the unit for the first time, the initial setup screen appears. 1 Turn on . 2 Select...
... switch. Select [On] when connecting the rear view camera to Daylight Saving Time. Select [Auto] if your residential area for the display and the voice guidance. 3 Set the installation settings (1), then press [OK] (2). • You can also change these settings through - - . (☞ page 84) State/ Province Time Zone* DST * Camera Input * Select the State or Province where you are now. ENGLISH Installation settings When you turn on the unit for the first time, the initial setup screen appears. 1 Turn on . 2 Select...
Instruction Manual
Page 18
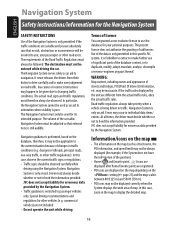
... vehicles (e.g. The present licence does not authorise the granting of streets and bridges, POI (Point Of Interest) information, etc. may not be displayed correctly when the System displays the wide area of the Road Traffic Regulations must always decide whether or not to navigation. At all times, the driver must not be entered while driving the car. Navigation System ENGLISH Safety instructions/information for the Navigation System SAFETY INSTRUCTIONS Use...
... vehicles (e.g. The present licence does not authorise the granting of streets and bridges, POI (Point Of Interest) information, etc. may not be displayed correctly when the System displays the wide area of the Road Traffic Regulations must always decide whether or not to navigation. At all times, the driver must not be entered while driving the car. Navigation System ENGLISH Safety instructions/information for the Navigation System SAFETY INSTRUCTIONS Use...
Instruction Manual
Page 19
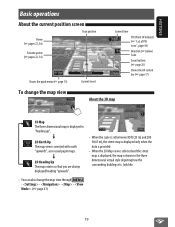
ENGLISH Basic operations About the current position screen Your position Home (☞ pages 22, 36) Favorite points (☞ pages 22, 36) Shows the quick menu (☞ page 15) Current street Current time POI (Point Of Interest) (☞ "List of POI icons", page 44) Direction (☞ below) Scale Zoom buttons (☞ page 20) Shows the AV control bar (☞ page 17) To change the map view through - - - - . (☞ page 41) 19 look like. •...
ENGLISH Basic operations About the current position screen Your position Home (☞ pages 22, 36) Favorite points (☞ pages 22, 36) Shows the quick menu (☞ page 15) Current street Current time POI (Point Of Interest) (☞ "List of POI icons", page 44) Direction (☞ below) Scale Zoom buttons (☞ page 20) Shows the AV control bar (☞ page 17) To change the map view through - - - - . (☞ page 41) 19 look like. •...
Instruction Manual
Page 24
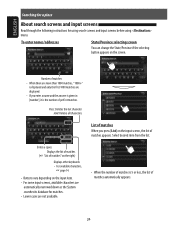
... About search screens and input screens Read through the following instructions for matches. • Lower cases are not available. • When the number of matches is the number of perfect matches. To enter names/addresses State/Province selecting screen You can change the State/Province if the selecting button appears on the input screen, the list of matches automatically appears. 24 Press: Deletes the last character Hold: Deletes all characters List of...
... About search screens and input screens Read through the following instructions for matches. • Lower cases are not available. • When the number of matches is the number of perfect matches. To enter names/addresses State/Province selecting screen You can change the State/Province if the selecting button appears on the input screen, the list of matches automatically appears. 24 Press: Deletes the last character Hold: Deletes all characters List of...
Instruction Manual
Page 40
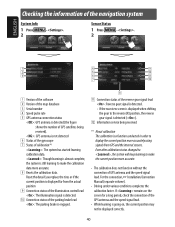
... order to make the calibration data more accurately using signals from the actual position 9 Connection status of the navigation system System Info 1 Press 2 - . Sensor Status 1 Press 2 - . 1 4 9 2 5 p 3 6 q 7 w 1 Version of the software 2 Version of the map database 3 Serial number 4 Speed pulse rate 5 GPS antenna connection status : GPS antenna is detected (the figure shows the number of GPS satellites being received *1 About calibration The calibration is detected (). For the connection, ☞ Installation/Connection Manual (separate volume). • Driving...
... order to make the calibration data more accurately using signals from the actual position 9 Connection status of the navigation system System Info 1 Press 2 - . Sensor Status 1 Press 2 - . 1 4 9 2 5 p 3 6 q 7 w 1 Version of the software 2 Version of the map database 3 Serial number 4 Speed pulse rate 5 GPS antenna connection status : GPS antenna is detected (the figure shows the number of GPS satellites being received *1 About calibration The calibration is detected (). For the connection, ☞ Installation/Connection Manual (separate volume). • Driving...

Instruction Manual
Page 41
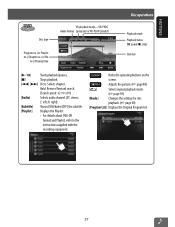
... the corresponding tab Menu items View Mode POI Icon Favorite Icon Vehicle Icon Color configuration Current Street Name Speed Limit Sign Drive Tracks Delete Drive Tracks Selectable settings Initial: Underlined , , (☞page 19) ☞page 21 ☞page 21 , , Change the color of the map for the day and night screens. Press [Delete], then a confirmation message appears. 41 Night Map Mode: Auto: Switches to display the adjustment screen. Show, Hide (☞page 32) Select whether to show...
... the corresponding tab Menu items View Mode POI Icon Favorite Icon Vehicle Icon Color configuration Current Street Name Speed Limit Sign Drive Tracks Delete Drive Tracks Selectable settings Initial: Underlined , , (☞page 19) ☞page 21 ☞page 21 , , Change the color of the map for the day and night screens. Press [Delete], then a confirmation message appears. 41 Night Map Mode: Auto: Switches to display the adjustment screen. Show, Hide (☞page 32) Select whether to show...
Instruction Manual
Page 56
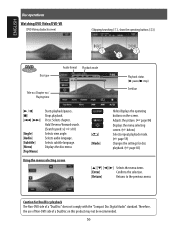
Selects subtitle language. Adjusts the picture. (☞ page 84) Displays the menu selecting screen. (☞ below) Selects repeat playback mode. (☞ page 59) Changes the settings for DualDisc playback The Non-DVD side of a DualDisc on the screen. Selects audio language. Press: Selects chapter. Hold: Reverse/forward search. (Search speed: x2 ] x10) Selects view angle. Using the menu selecting screen [ ] [ ] [ ] [ ] [Mode] Hides/displays the operating buttons on this product may not be recommended. 56 Caution for disc playback...
Selects subtitle language. Adjusts the picture. (☞ page 84) Displays the menu selecting screen. (☞ below) Selects repeat playback mode. (☞ page 59) Changes the settings for DualDisc playback The Non-DVD side of a DualDisc on the screen. Selects audio language. Press: Selects chapter. Hold: Reverse/forward search. (Search speed: x2 ] x10) Selects view angle. Using the menu selecting screen [ ] [ ] [ ] [ ] [Mode] Hides/displays the operating buttons on this product may not be recommended. 56 Caution for disc playback...
Instruction Manual
Page 57
... instructions supplied with the recording equipment. [ ] Hides the operating buttons on the screen. [ ] Adjusts the picture. (☞ page 84) [ ] Selects repeat playback mode. (☞ page 59) [Mode] Changes the settings for disc playback. (☞ page 60) [Program List] Displays the Original Program list. 57 ENGLISH Disc type Program no. (or Playlist no.)/Chapter no. (or file no.)/Playing time VR playback mode-VR-PROG Audio format (program) or VR-PLAY (playlist) Disc operations Playback mode...
... instructions supplied with the recording equipment. [ ] Hides the operating buttons on the screen. [ ] Adjusts the picture. (☞ page 84) [ ] Selects repeat playback mode. (☞ page 59) [Mode] Changes the settings for disc playback. (☞ page 60) [Program List] Displays the Original Program list. 57 ENGLISH Disc type Program no. (or Playlist no.)/Chapter no. (or file no.)/Playing time VR playback mode-VR-PROG Audio format (program) or VR-PLAY (playlist) Disc operations Playback mode...
Instruction Manual
Page 71
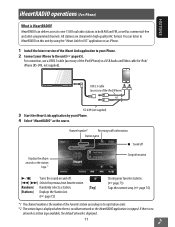
... a USB Audio and Video cable for JVC" application on an iPhone. 1 Install the latest version of the iPod/iPhone) or KS-U49 (not supplied) 3 Start the iHeart Link application by using the "iHeart Link for iPod/ iPhone (KS-U49, not supplied). Channel number*1 Receiving traffic information Station name 7 : Sound off Displays the album artwork or the station logo.*2 Song information [3 / 7] Turns the sound on this unit by your favorite...
... a USB Audio and Video cable for JVC" application on an iPhone. 1 Install the latest version of the iPod/iPhone) or KS-U49 (not supplied) 3 Start the iHeart Link application by using the "iHeart Link for iPod/ iPhone (KS-U49, not supplied). Channel number*1 Receiving traffic information Station name 7 : Sound off Displays the album artwork or the station logo.*2 Song information [3 / 7] Turns the sound on this unit by your favorite...
Instruction Manual
Page 85
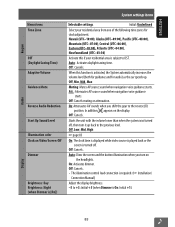
... Dimmer is subject to +5; On: Activates dimmer. Auto : Activates daylight saving time. Off, Low, Mid, High ☞ page 83 On: The clock time is displayed while video source is played back or the screen is required. (☞ Installation/ Connection Manual) Adjust the display brightness. -5 to DST. ENGLISH Region Audio System settings items Menu items Time Zone DST (Daylight Saving Time) Adaptive Volume Guidance Mute Reverse Audio Reduction Start Up Sound Level Illumination color Clock on...
... Dimmer is subject to +5; On: Activates dimmer. Auto : Activates daylight saving time. Off, Low, Mid, High ☞ page 83 On: The clock time is displayed while video source is played back or the screen is required. (☞ Installation/ Connection Manual) Adjust the display brightness. -5 to DST. ENGLISH Region Audio System settings items Menu items Time Zone DST (Daylight Saving Time) Adaptive Volume Guidance Mute Reverse Audio Reduction Start Up Sound Level Illumination color Clock on...
Instruction Manual
Page 86
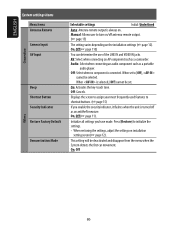
... audio player. On: Activates the key-touch tone. Initialize all settings you enable the security indicator, it flashes when the unit is selected, [Off] cannot be selected. ENGLISH Others Connection System settings items Menu items Antenna Remote Camera Input AV Input Beep Shortcut Button Security Indicator Restore Factory Default Demonstration Mode Selectable settings Initial: Underlined Auto: Antenna remote output is connected. Audio: Select when connecting an audio component such as a camcorder. Off: Select when no component is always on the installation settings (☞...
... audio player. On: Activates the key-touch tone. Initialize all settings you enable the security indicator, it flashes when the unit is selected, [Off] cannot be selected. ENGLISH Others Connection System settings items Menu items Antenna Remote Camera Input AV Input Beep Shortcut Button Security Indicator Restore Factory Default Demonstration Mode Selectable settings Initial: Underlined Auto: Antenna remote output is connected. Audio: Select when connecting an audio component such as a camcorder. Off: Select when no component is always on the installation settings (☞...

Instruction Manual
Page 115
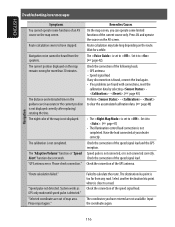
... See also the Installation/Connection Manual. The screen is dark. "System startup failed." Surround noise interferes. The touch panel does not respond properly. Turn on . Adjust the display brightness. (☞ page 85) Sunshine from different angles. • Adjust the angle. (☞ page 13) The fuse has blown out. Check the following points before calling a service center. • For operations with the external components, refer also...
... See also the Installation/Connection Manual. The screen is dark. "System startup failed." Surround noise interferes. The touch panel does not respond properly. Turn on . Adjust the display brightness. (☞ page 85) Sunshine from different angles. • Adjust the angle. (☞ page 13) The fuse has blown out. Check the following points before calling a service center. • For operations with the external components, refer also...
Instruction Manual
Page 116
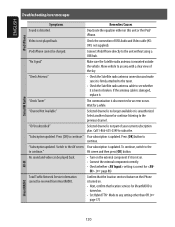
... a while. Navigation voice cannot be heard from any disconnection is close to a road. GPS antenna - Perform - - Check the connection of the following leads. - Alert" function does not work. Failed to have entered are not available. The destination/via point where is found, connect the lead again. • If no problems are found with connections, reset the calibration data by selecting - . (☞ page 40) The distance and estimated time in...
... a while. Navigation voice cannot be heard from any disconnection is close to a road. GPS antenna - Perform - - Check the connection of the following leads. - Alert" function does not work. Failed to have entered are not available. The destination/via point where is found, connect the lead again. • If no problems are found with connections, reset the calibration data by selecting - . (☞ page 40) The distance and estimated time in...
Instruction Manual
Page 120
... the Satellite radio antenna cable to see whether it is turned on . • Next, confirm that the location services feature on the iPhone is turned on . • Set Hybrid TTN+ Mode to the AV screen Your subscription is unauthorized. "Channel Not Available" Selected channel is no longer available or is updated. Connect iPod/iPhone directly to continue." Press [OK] to the unit without using a USB hub. Switch to any setting other than...
... the Satellite radio antenna cable to see whether it is turned on . • Next, confirm that the location services feature on the iPhone is turned on . • Set Hybrid TTN+ Mode to the AV screen Your subscription is unauthorized. "Channel Not Available" Selected channel is no longer available or is updated. Connect iPod/iPhone directly to continue." Press [OK] to the unit without using a USB hub. Switch to any setting other than...
Instruction Manual
Page 125
... from the United States Postal Service ® to publish and sell ZIP+4 ® information. © United States Postal Service ® 2012. You may transfer the Data and all accompanying materials on a permanent basis if you retain no guarantees, representations or warranties of any of which you . 125 Multi-disc sets may not apply to use only and not for service bureau, time-sharing...
... from the United States Postal Service ® to publish and sell ZIP+4 ® information. © United States Postal Service ® 2012. You may transfer the Data and all accompanying materials on a permanent basis if you retain no guarantees, representations or warranties of any of which you . 125 Multi-disc sets may not apply to use only and not for service bureau, time-sharing...
Instruction Manual
Page 142
.... * * * ! Initial installation, installation and removal from our website http://www.jvc.com. Signal reception problems and failures due to rental. ! * 10. Products used for commercial purposes, including, but not limited to line power surge; * : 6. WARRANTY PERIOD SET FORTH ABOVE. : ! For customer use: Enter below . ("The Warranty Period") PARTS 1 YR LABOR 1 YR i * * * * *THIS LIMITED WARRANTY IS VALID ONLY IN THE FIFTY (50) UNITED STATES, THE DISTRICT...
.... * * * ! Initial installation, installation and removal from our website http://www.jvc.com. Signal reception problems and failures due to rental. ! * 10. Products used for commercial purposes, including, but not limited to line power surge; * : 6. WARRANTY PERIOD SET FORTH ABOVE. : ! For customer use: Enter below . ("The Warranty Period") PARTS 1 YR LABOR 1 YR i * * * * *THIS LIMITED WARRANTY IS VALID ONLY IN THE FIFTY (50) UNITED STATES, THE DISTRICT...


