
Instruction Manual
Page 1
.... FRANÇAIS ESPAÑOL ENGLISH GPS NAVIGATION SYSTEM SISTEMA DE NAVEGACIÓN GPS SYSTÈME DE NAVIGATION GPS KW-NT810HDT For installation and connections, refer to the separate manual. Pour l'installation et les raccordements, se référer au manuel séparé. INSTRUCTIONS MANUAL DE INSTRUCCIONES MANUEL D'INSTRUCTIONS For customer...
.... FRANÇAIS ESPAÑOL ENGLISH GPS NAVIGATION SYSTEM SISTEMA DE NAVEGACIÓN GPS SYSTÈME DE NAVIGATION GPS KW-NT810HDT For installation and connections, refer to the separate manual. Pour l'installation et les raccordements, se référer au manuel séparé. INSTRUCTIONS MANUAL DE INSTRUCCIONES MANUEL D'INSTRUCTIONS For customer...
Instruction Manual
Page 2
...which the receiver is not installed and used in hazardous radiation exposure. If this equipment does cause harmful interference to provide reasonable protection against harmful interference in the instruction manual. Location : Top Panel 2 In compliance with the limits for purchasing a JVC product. ENGLISH Thank you for...modification is encouraged to try to correct the interference by one or more of the following are expressly approved in a residential installation. However, there is no guarantee that to which can be determined by turning the equipment off and on, the user ...
...which the receiver is not installed and used in hazardous radiation exposure. If this equipment does cause harmful interference to provide reasonable protection against harmful interference in the instruction manual. Location : Top Panel 2 In compliance with the limits for purchasing a JVC product. ENGLISH Thank you for...modification is encouraged to try to correct the interference by one or more of the following are expressly approved in a residential installation. However, there is no guarantee that to which can be determined by turning the equipment off and on, the user ...
Instruction Manual
Page 3
... the sound or picture quality may obstruct visibility. • DO NOT operate the unit while driving. WARNINGS: To prevent accidents and damage • DO NOT install any unit or wire any interference, including interference that the Industry Canada technical specification were met. Operation is very cold or very hot... - This is...
... the sound or picture quality may obstruct visibility. • DO NOT operate the unit while driving. WARNINGS: To prevent accidents and damage • DO NOT install any unit or wire any interference, including interference that the Industry Canada technical specification were met. Operation is very cold or very hot... - This is...
Instruction Manual
Page 6
ENGLISH Contents How to forcibly eject a disc 5 Introduction 10 Parts identification 10 Installation settings 12 Basic operations 13 • Turning on the power 13 • Turning off/on the screen 13 • Adjust the angle of the front ...
ENGLISH Contents How to forcibly eject a disc 5 Introduction 10 Parts identification 10 Installation settings 12 Basic operations 13 • Turning on the power 13 • Turning off/on the screen 13 • Adjust the angle of the front ...
Instruction Manual
Page 12
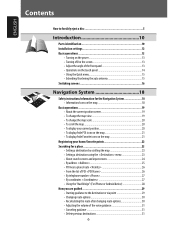
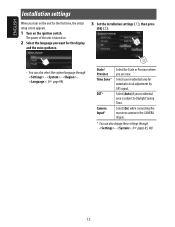
... to the CAMERA IN jack. * You can also select the system language through - . (☞ pages 85, 86) 12 ENGLISH Installation settings When you turn on the ignition switch. Select [On] when connecting the rear view camera to Daylight Saving Time. Select your residential area... language you want for the first time, the initial setup screen appears. 1 Turn on the unit for the display and the voice guidance. 3 Set the installation settings (1), then press [OK] (2). • You can also change these settings through - - . (☞ page 84) State/ Province Time Zone* DST ...
... to the CAMERA IN jack. * You can also select the system language through - . (☞ pages 85, 86) 12 ENGLISH Installation settings When you turn on the ignition switch. Select [On] when connecting the rear view camera to Daylight Saving Time. Select your residential area... language you want for the first time, the initial setup screen appears. 1 Turn on the unit for the display and the voice guidance. 3 Set the installation settings (1), then press [OK] (2). • You can also change these settings through - - . (☞ page 84) State/ Province Time Zone* DST ...
Instruction Manual
Page 28
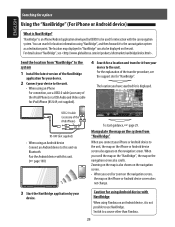
... for location information using an Android device Connect an Android device to a source other than Pandora. 28 Send the location from "NaviBridge" to the system 1 Install the latest version of the transfer procedure, see . For the explanation of the NaviBridge application for your device. 2 Connect your device to the unit. USB...
... for location information using an Android device Connect an Android device to a source other than Pandora. 28 Send the location from "NaviBridge" to the system 1 Install the latest version of the transfer procedure, see . For the explanation of the NaviBridge application for your device. 2 Connect your device to the unit. USB...
Instruction Manual
Page 40
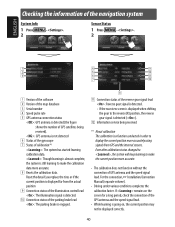
.... • While learning is going on the screen for a long period, check the connection of the navigation system System Info 1 Press 2 - . For the connection, ☞ Installation/Connection Manual (separate volume). • Driving under various conditions completes the calibration faster. Sensor Status 1 Press 2 - . 1 4 9 2 5 p 3 6 q 7 w 1 Version of the software 2 Version of the map database...
.... • While learning is going on the screen for a long period, check the connection of the navigation system System Info 1 Press 2 - . For the connection, ☞ Installation/Connection Manual (separate volume). • Driving under various conditions completes the calibration faster. Sensor Status 1 Press 2 - . 1 4 9 2 5 p 3 6 q 7 w 1 Version of the software 2 Version of the map database...

Instruction Manual
Page 41
... show or hide the tracks you turn on the headlights. Switches the category by the system. The illumination control lead connection must be completed. (☞Installation/Connection Manual) On: Fixes to display the adjustment screen. Press [Delete], then a confirmation message appears. 41 Press [Enter] to the night color screen. Night Map...
... show or hide the tracks you turn on the headlights. Switches the category by the system. The illumination control lead connection must be completed. (☞Installation/Connection Manual) On: Fixes to display the adjustment screen. Press [Delete], then a confirmation message appears. 41 Press [Enter] to the night color screen. Night Map...

Instruction Manual
Page 43
...or right after driving on areas other one (e.g. when starting your car on a road close to connect reverse signal lead (☞ Installation/Connection Manual); when driving for the first time after starting the engine - when changing tires or attaching chains on a long straight road... - private lands or parking lots) - after rotating your car shortly after installing the unit - after driving in the route guidance on a road constructed recently • The route calculated by closely standing trees •...
...or right after driving on areas other one (e.g. when starting your car on a road close to connect reverse signal lead (☞ Installation/Connection Manual); when driving for the first time after starting the engine - when changing tires or attaching chains on a long straight road... - private lands or parking lots) - after rotating your car shortly after installing the unit - after driving in the route guidance on a road constructed recently • The route calculated by closely standing trees •...
Instruction Manual
Page 65
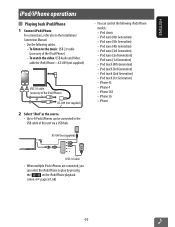
... - iPod touch (2nd Generation) - iPhone 3GS - iPhone 3G - ENGLISH iPod/iPhone operations Playing back iPod/iPhone 1 Connect iPod/iPhone For connections, refer also to the Installation/ Connection Manual. • Use the following iPod/iPhone models: - To listen to the USB cable of the iPod/iPhone) - KS-U49 (not supplied) HUB iPod...
... - iPod touch (2nd Generation) - iPhone 3GS - iPhone 3G - ENGLISH iPod/iPhone operations Playing back iPod/iPhone 1 Connect iPod/iPhone For connections, refer also to the Installation/ Connection Manual. • Use the following iPod/iPhone models: - To listen to the USB cable of the iPod/iPhone) - KS-U49 (not supplied) HUB iPod...
Instruction Manual
Page 71
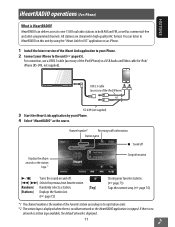
... FM, as well as the source. For connection, use a USB2.0 cable (accessory of the iPod/iPhone) or a USB Audio and Video cable for JVC" application on an iPhone. 1 Install the latest version of the Favorite station according to the unit (☞ page 65). iHeartRADIO can listen to over 1500 local radio stations...
... FM, as well as the source. For connection, use a USB2.0 cable (accessory of the iPod/iPhone) or a USB Audio and Video cable for JVC" application on an iPhone. 1 Install the latest version of the Favorite station according to the unit (☞ page 65). iHeartRADIO can listen to over 1500 local radio stations...
Instruction Manual
Page 75
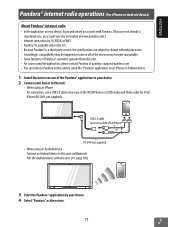
... Connect an Android device to this unit by your device to the unit. • When using the "Pandora" application on an iPhone or Android device. 1 Install the latest version of the iPod/iPhone) or a USB Audio and Video cable for iPod/ iPhone (KS-U49, not supplied). Pair the Android device with...
... Connect an Android device to this unit by your device to the unit. • When using the "Pandora" application on an iPhone or Android device. 1 Install the latest version of the iPod/iPhone) or a USB Audio and Video cable for iPod/ iPhone (KS-U49, not supplied). Pair the Android device with...
Instruction Manual
Page 77
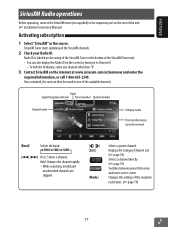
... restrictions. (☞ page 79) 77 While searching, invalid and unsubscribed channels are skipped. [ ][ ] [List] [ ] [ ] [Mode] Selects a preset channel. Changes the settings of the unit. (☞ Installation/Connection Manual) Activating subscription 1 Select "SiriusXM" as the source. SiriusXM Tuner starts updating all the SiriusXM channels. 2 Check your Radio ID. Hold: Changes the channel...
... restrictions. (☞ page 79) 77 While searching, invalid and unsubscribed channels are skipped. [ ][ ] [List] [ ] [ ] [Mode] Selects a preset channel. Changes the settings of the unit. (☞ Installation/Connection Manual) Activating subscription 1 Select "SiriusXM" as the source. SiriusXM Tuner starts updating all the SiriusXM channels. 2 Check your Radio ID. Hold: Changes the channel...
Instruction Manual
Page 82
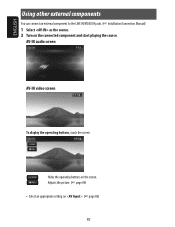
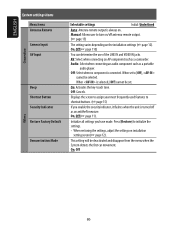
ENGLISH Using other external components You can connect an external component to the LINE IN/VIDEO IN jacks. (☞ Installation/Connection Manual) 1 Select as the source. 2 Turn on . (☞ page 86) 82 AV-IN audio screen AV-IN video screen To display the operating buttons, touch the screen. [ ] Hides the operating buttons on the screen. [ ] Adjusts the picture. (☞ page 84) • Select an appropriate setting on the connected component and start playing the source.
ENGLISH Using other external components You can connect an external component to the LINE IN/VIDEO IN jacks. (☞ Installation/Connection Manual) 1 Select as the source. 2 Turn on . (☞ page 86) 82 AV-IN audio screen AV-IN video screen To display the operating buttons, touch the screen. [ ] Hides the operating buttons on the screen. [ ] Adjusts the picture. (☞ page 84) • Select an appropriate setting on the connected component and start playing the source.
Instruction Manual
Page 85
... the system was turned off . Off, Min, Mid, Max Muting: Mutes AV source sound when navigation voice guidance starts. Initial +5 (when Dimmer is required. (☞ Installation/ Connection Manual) Adjust the display brightness. -5 to +5; In addition, appears on the headlights. Auto: Dims the screen and the button illumination when you shift the...
... the system was turned off . Off, Min, Mid, Max Muting: Mutes AV source sound when navigation voice guidance starts. Initial +5 (when Dimmer is required. (☞ Installation/ Connection Manual) Adjust the display brightness. -5 to +5; In addition, appears on the headlights. Auto: Dims the screen and the button illumination when you shift the...
Instruction Manual
Page 86
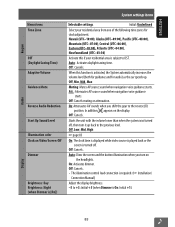
...be selected. On, Off 86 Manual: Allows user to initialize the settings. • When restoring the settings, adjust the settings on installation setting screen (☞ page 12). ENGLISH Others Connection System settings items Menu items Antenna Remote Camera Input AV Input Beep Shortcut Button ...Security Indicator Restore Factory Default Demonstration Mode Selectable settings Initial: Underlined Auto: Antenna remote output is always on the installation settings (☞ page 12). When set . On, Off (☞ page 11). Press [Restore] to turn on/off as an...
...be selected. On, Off 86 Manual: Allows user to initialize the settings. • When restoring the settings, adjust the settings on installation setting screen (☞ page 12). ENGLISH Others Connection System settings items Menu items Antenna Remote Camera Input AV Input Beep Shortcut Button ...Security Indicator Restore Factory Default Demonstration Mode Selectable settings Initial: Underlined Auto: Antenna remote output is always on the installation settings (☞ page 12). When set . On, Off (☞ page 11). Press [Restore] to turn on/off as an...
Instruction Manual
Page 110
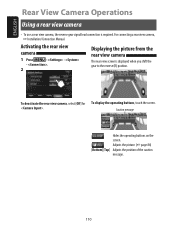
... view camera, the reverse gear signal lead connection is displayed when you shift the gear to the reverse (R) position. For connecting a rear view camera, ☞ Installation/Connection Manual.
... view camera, the reverse gear signal lead connection is displayed when you shift the gear to the reverse (R) position. For connecting a rear view camera, ☞ Installation/Connection Manual.

Instruction Manual
Page 115
.... "WIRING ERROR Please check wiring then restart unit." According to . Surround noise interferes. Turn off , then turn on the next page 115 See also the Installation/Connection Manual.
.... "WIRING ERROR Please check wiring then restart unit." According to . Surround noise interferes. Turn off , then turn on the next page 115 See also the Installation/Connection Manual.
Instruction Manual
Page 117
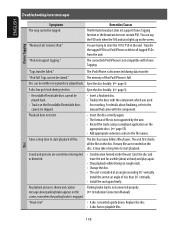
... played back. • Check the playable file format. (☞ page 87) • Add appropriate extension codes to the radio. Remedies/Causes Check the connection. (☞ Installation/Connection Manual) Files cannot be played back. Tag information of the speakers. Sound quality changes when receiving HD Radio stations. Tracks or video are unplayable...
... played back. • Check the playable file format. (☞ page 87) • Add appropriate extension codes to the radio. Remedies/Causes Check the connection. (☞ Installation/Connection Manual) Files cannot be played back. Tag information of the speakers. Sound quality changes when receiving HD Radio stations. Tracks or video are unplayable...
Instruction Manual
Page 118
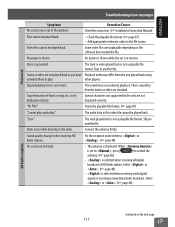
... disc correctly again. • The format of less than 30˚ vertically. • Install the unit again firmly. Parking brake lead is not connected properly. (☞ Installation/Connection Manual) • A disc is installed at an angle of files is engaged. Eject the disc forcibly. (☞ page 5) •...; Recordable/Rewritable discs cannot be played back. • Tracks on the screen. Install the unit at an angle exceeding 30˚ vertically. You are sometimes interrupted or distorted. Disc can tag the PSD only when the ...
... disc correctly again. • The format of less than 30˚ vertically. • Install the unit again firmly. Parking brake lead is not connected properly. (☞ Installation/Connection Manual) • A disc is installed at an angle of files is engaged. Eject the disc forcibly. (☞ page 5) •...; Recordable/Rewritable discs cannot be played back. • Tracks on the screen. Install the unit at an angle exceeding 30˚ vertically. You are sometimes interrupted or distorted. Disc can tag the PSD only when the ...