Instruction Manual
Page 2
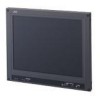
ENGLISH INSTRUCTIONS LCD VIDEO MONITOR LM-17G LM-15G Thank you for future reference. which is located on the rear of the monitor's capabilities. (* "LCD" stands for Liquid Crystal Display.) For Customer Use: Enter below the Serial No. Retain this information for purchasing this JVC LCD video monitor. Model No. : LM-17G LM-15G Serial No. : Before using it, read and follow all instructions carefully to take full advantage of the cabinet.
ENGLISH INSTRUCTIONS LCD VIDEO MONITOR LM-17G LM-15G Thank you for future reference. which is located on the rear of the monitor's capabilities. (* "LCD" stands for Liquid Crystal Display.) For Customer Use: Enter below the Serial No. Retain this information for purchasing this JVC LCD video monitor. Model No. : LM-17G LM-15G Serial No. : Before using it, read and follow all instructions carefully to take full advantage of the cabinet.

Instruction Manual
Page 3
Contents Safety Precautions ...3 Installation...5 Unpacking the Monitor 5 Controls and Features 5 Using Your Monitor 7 Turning the Monitor On and Off 7 Caring for and Cleaning the Monitor 7 Using the Menu ...8 Summary of Control Buttons 8 Menu Operations ...8 Using the Monitor in the PC mode 13 Basic Connection Example 16 Troubleshooting ...17 Specifications ...18 2
Contents Safety Precautions ...3 Installation...5 Unpacking the Monitor 5 Controls and Features 5 Using Your Monitor 7 Turning the Monitor On and Off 7 Caring for and Cleaning the Monitor 7 Using the Menu ...8 Summary of Control Buttons 8 Menu Operations ...8 Using the Monitor in the PC mode 13 Basic Connection Example 16 Troubleshooting ...17 Specifications ...18 2
Instruction Manual
Page 4
... comply with doors closed. ● Do not cover the ventilation slots while in dusty places, - Do not overload wall outlets or power cords as this can radiate radio frequency energy and, if not installed and used in badly ventilated places, - WARNINGS To prevent ...remove the back cover of all the following conditions: - ENGLISH SAFETY PRECAUTIONS In order to service it yourself. Never try to prevent any fatal accidents caused by JVC could obstruct the required ventilation flow. ● When dust accumulates on the screen surface, clean it with a 3-blade grounding-type plug...
... comply with doors closed. ● Do not cover the ventilation slots while in dusty places, - Do not overload wall outlets or power cords as this can radiate radio frequency energy and, if not installed and used in badly ventilated places, - WARNINGS To prevent ...remove the back cover of all the following conditions: - ENGLISH SAFETY PRECAUTIONS In order to service it yourself. Never try to prevent any fatal accidents caused by JVC could obstruct the required ventilation flow. ● When dust accumulates on the screen surface, clean it with a 3-blade grounding-type plug...

Instruction Manual
Page 5
... countries or United Kingdom), the power cord attached conforms to qualified service personnel. ● When replacement parts are required, have the same safety characteristics as opening or removing covers may cause malfunction, electric shock or fire. POWER CONNECTION The power supply voltage rating of each countries. and Canada European countries United Kingdom China Warning: ● Do not use only a correctly rated approved type, re-fit...
... countries or United Kingdom), the power cord attached conforms to qualified service personnel. ● When replacement parts are required, have the same safety characteristics as opening or removing covers may cause malfunction, electric shock or fire. POWER CONNECTION The power supply voltage rating of each countries. and Canada European countries United Kingdom China Warning: ● Do not use only a correctly rated approved type, re-fit...
Instruction Manual
Page 6
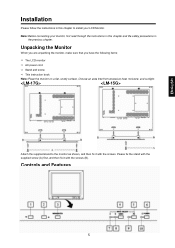
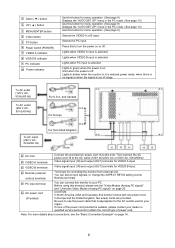
... LCD monitor Ö AC power cord Ö Stand and screw Ö This instruction book Note: Place the monitor on a flat, sturdy surface. Please fix the stand with the supplied screw (A) first, and then fix it with the screws (B). ENGLISH Attach the supplied stand to install your monitor, first read through the instructions in this chapter and the safety precautions in the previous chapter. Controls and Features 5 Note: Before connecting your LCD Monitor. Choose an area free...
... LCD monitor Ö AC power cord Ö Stand and screw Ö This instruction book Note: Place the monitor on a flat, sturdy surface. Please fix the stand with the supplied screw (A) first, and then fix it with the screws (B). ENGLISH Attach the supplied stand to install your monitor, first read through the instructions in this chapter and the safety precautions in the previous chapter. Controls and Features 5 Note: Before connecting your LCD Monitor. Choose an area free...
Instruction Manual
Page 7
..., two power cords are provided. Note: For more details about connections, see the "Video Modes (Analog PC signal)" and "Unknown Video Modes (Analog PC signal)" on page 20. Lights when PC input is off . Unlit when the power is selected. Be sure to use the power cable that is out of range. Press this button for menu operation. (See page 8) Selects the VIDEO A or B input. Lights in amber when the monitor is in a reduced power mode...
..., two power cords are provided. Note: For more details about connections, see the "Video Modes (Analog PC signal)" and "Unknown Video Modes (Analog PC signal)" on page 20. Lights when PC input is off . Unlit when the power is selected. Be sure to use the power cable that is out of range. Press this button for menu operation. (See page 8) Selects the VIDEO A or B input. Lights in amber when the monitor is in a reduced power mode...
Instruction Manual
Page 8
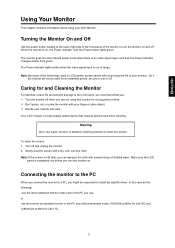
... you connect the monitor to a PC, you use liquid, aerosol, or abrasive cleaning solutions to turn the monitor on , the Power indicator near the Power button lights green. or -set the monitor as standard monitor in LCD panels, screen savers will not be used in the PC menu.Recommended mode, 1024x768 at 60Hz for LM-15G and 1280x1024 at the lower right side of the front panel of range . The monitor goes into the reduced power mode...
... you connect the monitor to a PC, you use liquid, aerosol, or abrasive cleaning solutions to turn the monitor on , the Power indicator near the Power button lights green. or -set the monitor as standard monitor in LCD panels, screen savers will not be used in the PC menu.Recommended mode, 1024x768 at 60Hz for LM-15G and 1280x1024 at the lower right side of the front panel of range . The monitor goes into the reduced power mode...
Instruction Manual
Page 9
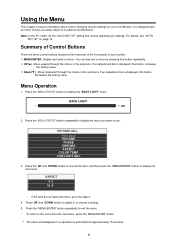
... to changing monitor settings for approximately 15 seconds. 8 Summary of Control Buttons There are three control buttons located at the lower part of the front panel of your LCD Monitor. Press the 'MENU/ENTER' button repeatedly to display the menu you easily adjust to adjust it, or choose a setting. 5. You can also exit a menu by pressing this button decreases the setting value. Press the 'MENU/ENTER' button to use. Next page PICTURE PHASE CHROMA ASPECT COLOR...
... to changing monitor settings for approximately 15 seconds. 8 Summary of Control Buttons There are three control buttons located at the lower part of the front panel of your LCD Monitor. Press the 'MENU/ENTER' button repeatedly to display the menu you easily adjust to adjust it, or choose a setting. 5. You can also exit a menu by pressing this button decreases the setting value. Press the 'MENU/ENTER' button to use. Next page PICTURE PHASE CHROMA ASPECT COLOR...
Instruction Manual
Page 10
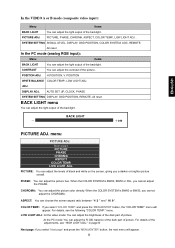
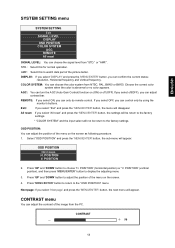
SYSTEM SETTING SIGNAL LEVEL, DISPLAY, OSD POSITION, COLOR SYSTEM, AGC, REMOTE, All reset In the PC mode (analog RGB input): Menu Items BACK LIGHT You can adjust the contrast of the picture. CONTRAST You can adjust the light output of the backlight. POSITION WHITE BALANCE COLOR TEMP., LOW LIGHT ADJ. ADJ. DISPLAY ADJ. menu PICTURE ADJ. . LOW LIGHT ADJ. PICTURE: You can choose the screen aspect ratio between "4 3 " and " 16 9 ". When the COLOR SYSTEM is BW60 or BW50, you cannot adjust the CHOROMA. COLOR TEMP...
SYSTEM SETTING SIGNAL LEVEL, DISPLAY, OSD POSITION, COLOR SYSTEM, AGC, REMOTE, All reset In the PC mode (analog RGB input): Menu Items BACK LIGHT You can adjust the contrast of the picture. CONTRAST You can adjust the light output of the backlight. POSITION WHITE BALANCE COLOR TEMP., LOW LIGHT ADJ. ADJ. DISPLAY ADJ. menu PICTURE ADJ. . LOW LIGHT ADJ. PICTURE: You can choose the screen aspect ratio between "4 3 " and " 16 9 ". When the COLOR SYSTEM is BW60 or BW50, you cannot adjust the CHOROMA. COLOR TEMP...
Instruction Manual
Page 11
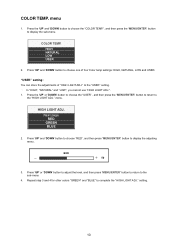
... 'DOWN' button to display the adjusting menu. Press 'UP' or 'DOWN' button to adjust the level, and then press 'MENU/ENTER' button to return to complete the "HIGH LIGHT ADJ." "USER" setting: You can store the adjustments of four Color temp settings: HIGH, NATURAL, LOW and USER. Repeat step 3 and 4 for other colors "GREEN" and "BLUE" to the sub-menu 4. COLOR TEMP. Next page RED GREEN BLUE 2. COLOR TEMP. to display the sub-menu. HIGH LIGHT ADJ...
... 'DOWN' button to display the adjusting menu. Press 'UP' or 'DOWN' button to adjust the level, and then press 'MENU/ENTER' button to return to complete the "HIGH LIGHT ADJ." "USER" setting: You can store the adjustments of four Color temp settings: HIGH, NATURAL, LOW and USER. Repeat step 3 and 4 for other colors "GREEN" and "BLUE" to the sub-menu 4. COLOR TEMP. Next page RED GREEN BLUE 2. COLOR TEMP. to display the sub-menu. HIGH LIGHT ADJ...
Instruction Manual
Page 12
... "OSD POSITION" menu. OSD POSITION Next page H. POSITION" (horizontal position) or "V. ENGLISH SYSTEM SETTING menu SYSTEM SETTING Exit SIGNAL LEVEL DISPLAY OSD POSITION COLOR SYSTEM AGC REMOTE All reset SIGNAL LEVEL: You can choose the signal level from NTSC, PAL, BW60 or BW50. resolution, Horizontal frequency and Vertical frequency. POSITION 2. CONTRAST 50 11 Press 'UP' and 'DOWN' button to display the adjusting menu 3. POSITION" (vertical position), and then press 'MENU/ENTER' button to choose "H. Press 'MENU/ENTER' button to return to the factory settings. * "COLOR...
... "OSD POSITION" menu. OSD POSITION Next page H. POSITION" (horizontal position) or "V. ENGLISH SYSTEM SETTING menu SYSTEM SETTING Exit SIGNAL LEVEL DISPLAY OSD POSITION COLOR SYSTEM AGC REMOTE All reset SIGNAL LEVEL: You can choose the signal level from NTSC, PAL, BW60 or BW50. resolution, Horizontal frequency and Vertical frequency. POSITION 2. CONTRAST 50 11 Press 'UP' and 'DOWN' button to display the adjusting menu 3. POSITION" (vertical position), and then press 'MENU/ENTER' button to choose "H. Press 'MENU/ENTER' button to return to the factory settings. * "COLOR...
Instruction Manual
Page 13
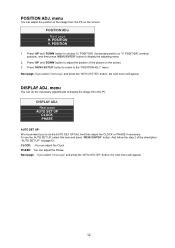
... 2 of the description "AUTO SET UP" on the screen. 3. DISPLAY ADJ. Next page AUTO SET UP CLOCK PHASE AUTO SET UP: We recommend you to do the necessary adjustments to display the image from the PC on the screen. POSITION ADJ. POSITION 1. Press 'UP' and 'DOWN' button to display the adjusting menu 2. menu. DISPLAY ADJ. CLOCK: You can adjust the Phase. menu You can adjust the position of the picture on page13 . POSITION ADJ. POSITION" (horizontal position) or "V. Next...
... 2 of the description "AUTO SET UP" on the screen. 3. DISPLAY ADJ. Next page AUTO SET UP CLOCK PHASE AUTO SET UP: We recommend you to do the necessary adjustments to display the image from the PC on the screen. POSITION ADJ. POSITION 1. Press 'UP' and 'DOWN' button to display the adjusting menu 2. menu. DISPLAY ADJ. CLOCK: You can adjust the Phase. menu You can adjust the position of the picture on page13 . POSITION ADJ. POSITION" (horizontal position) or "V. Next...
Instruction Manual
Page 14
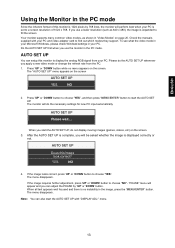
... video mode or change the refresh rate from your PC and video adapter card to choose "YES". AUTO SET UP You can setup this monitor to start the AUTO SET UP. Press 'UP' or 'DOWN' button to choose "YES", and then press 'MENU/ENTER' button to display the analog RGB signal from the PC. 1. After the AUTO SET UP is complete, you use the monitor in the PC mode. YES NO 4. Check the manuals supplied with "DISPLAY ADJ." The "AUTO SET UP" menu appears...
... video mode or change the refresh rate from your PC and video adapter card to choose "YES". AUTO SET UP You can setup this monitor to start the AUTO SET UP. Press 'UP' or 'DOWN' button to choose "YES", and then press 'MENU/ENTER' button to display the analog RGB signal from the PC. 1. After the AUTO SET UP is complete, you use the monitor in the PC mode. YES NO 4. Check the manuals supplied with "DISPLAY ADJ." The "AUTO SET UP" menu appears...

Instruction Manual
Page 15
The menu flowchart of the VIDEO mode *The menu can not be displayed when "No Sync" is displayed. 14
The menu flowchart of the VIDEO mode *The menu can not be displayed when "No Sync" is displayed. 14

Instruction Manual
Page 16
ENGLISH The menu flowchart of the PC mode *The menu cannot be displayed when "No Sync" is displayed. 15
ENGLISH The menu flowchart of the PC mode *The menu cannot be displayed when "No Sync" is displayed. 15
Instruction Manual
Page 17
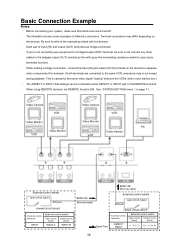
...When making a bridge connection, connect the input (IN) and output (OUT) terminals on the monitor to separate video components.(For example, if both terminals are turned off. Video Camera Video Camera VCR VCR Video Monitor Video Monitor VCR Video Monitor PC VCR Video Monitor External control switch open circuit (open) RCA pin closed circuit (short) External control functions INPUT External control switch Open circuit Closed circuit (open) (short) INPUT A INPUT B REMOTE (Remote cable) REMOTE (Remote cable) External control switch open circuit (open) RCA pin Signal Flow...
...When making a bridge connection, connect the input (IN) and output (OUT) terminals on the monitor to separate video components.(For example, if both terminals are turned off. Video Camera Video Camera VCR VCR Video Monitor Video Monitor VCR Video Monitor PC VCR Video Monitor External control switch open circuit (open) RCA pin closed circuit (short) External control functions INPUT External control switch Open circuit Closed circuit (open) (short) INPUT A INPUT B REMOTE (Remote cable) REMOTE (Remote cable) External control switch open circuit (open) RCA pin Signal Flow...
Instruction Manual
Page 18
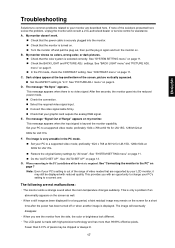
... card outputs the analog RGB signal. F. When you with high-precision technology and has more than 0.01% of Range" appears on the screen for LM-17G. See "CONTRAST menu" on page 11. „ Check the BACK LIGHT and PICTURE ADJ. See "SYSTEM SETTING menu" on page 9. „ In the PC mode, check the CONTRAST setting. The LCD panel is made with an opportunity to change your PC to a supported video mode; ENGLISH Troubleshooting Solutions to common problems...
... card outputs the analog RGB signal. F. When you with high-precision technology and has more than 0.01% of Range" appears on the screen for LM-17G. See "CONTRAST menu" on page 11. „ Check the BACK LIGHT and PICTURE ADJ. See "SYSTEM SETTING menu" on page 9. „ In the PC mode, check the CONTRAST setting. The LCD panel is made with an opportunity to change your PC to a supported video mode; ENGLISH Troubleshooting Solutions to common problems...
Instruction Manual
Page 19
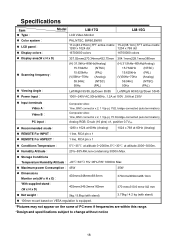
Specifications Item „ Type Model LM-17G LCD Video Monitor LM-15G „ Color system „ LCD panel „ Display colors PAL,NTSC, BW60,BW50 17-in(43.275cm),TFT active matrix 1280 x 1024 dot 16700000 colors 15-in(38.1cm),TFT active matrix 1204 x 768 dot 16700000 colors „ Display area(W x H x D) 337.92mmx270.34mmx432.75mm 304.1mmx228.1mmx380mm „ Scanning frequency (H) 31.5kHz~80kHz(Analog) 15.734kHz (NTSC) 15.625kHz...
Specifications Item „ Type Model LM-17G LCD Video Monitor LM-15G „ Color system „ LCD panel „ Display colors PAL,NTSC, BW60,BW50 17-in(43.275cm),TFT active matrix 1280 x 1024 dot 16700000 colors 15-in(38.1cm),TFT active matrix 1204 x 768 dot 16700000 colors „ Display area(W x H x D) 337.92mmx270.34mmx432.75mm 304.1mmx228.1mmx380mm „ Scanning frequency (H) 31.5kHz~80kHz(Analog) 15.734kHz (NTSC) 15.625kHz...
Instruction Manual
Page 21
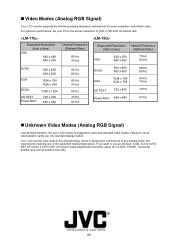
... Power MAC 640 x 480 56 Hz 60 Hz 60 Hz 70 Hz 70 Hz 67 Hz „ Unknown Video Modes (Analog RGB Signal) Like all video/graphic cards use an unknown mode, do the AUTO SET UP at 60 Hz refresh rate. We recommend choosing one of -the-art technology, which is designed to the screen resolution of screen resolution and refresh rates. If AUTO SET UP doesn't make adjustments corrrectly, adjust the CLOCK, PHASE , horizontal position and vertical position manually...
... Power MAC 640 x 480 56 Hz 60 Hz 60 Hz 70 Hz 70 Hz 67 Hz „ Unknown Video Modes (Analog RGB Signal) Like all video/graphic cards use an unknown mode, do the AUTO SET UP at 60 Hz refresh rate. We recommend choosing one of -the-art technology, which is designed to the screen resolution of screen resolution and refresh rates. If AUTO SET UP doesn't make adjustments corrrectly, adjust the CLOCK, PHASE , horizontal position and vertical position manually...

Instruction Manual
Page 22
VICTOR COMPANY OF J APAN, LIMITED ® Registered Trademark owned by VICTOR COMPANY OF JAPAN, LTD. © 2003 VICTOR COMPANY OF JAPAN, LIMITED LM-17G /LM-15G LCD VIDEO MONITOR P/N: 5030054005 1003-MK-TU
VICTOR COMPANY OF J APAN, LIMITED ® Registered Trademark owned by VICTOR COMPANY OF JAPAN, LTD. © 2003 VICTOR COMPANY OF JAPAN, LIMITED LM-17G /LM-15G LCD VIDEO MONITOR P/N: 5030054005 1003-MK-TU

