
Instructions
Page 12
...control, you first need to complete the task within three minutes. Place the "-" end in the unit first. Next, MENU select a menu using your TV, select the TV mode by pressing the MODE button on . • See page 58 to be reset. Raise the latch on any of these steps, please consult...of the remote. VCR, DVD) may have questions, or for more detailed information on the remote's back cover to install the batteries (included). If this manual. AVORITE DVR STATUS ASPECT 12 Step 1 - See pages 69 - 74. The four arrow keys OK are turning on and off by pressing the POWER button...
...control, you first need to complete the task within three minutes. Place the "-" end in the unit first. Next, MENU select a menu using your TV, select the TV mode by pressing the MODE button on . • See page 58 to be reset. Raise the latch on any of these steps, please consult...of the remote. VCR, DVD) may have questions, or for more detailed information on the remote's back cover to install the batteries (included). If this manual. AVORITE DVR STATUS ASPECT 12 Step 1 - See pages 69 - 74. The four arrow keys OK are turning on and off by pressing the POWER button...

Instructions
Page 13
... examples. • After you are finished connecting your devices, plug the power cord into the nearest power outlet and turn on the TV. • If you follow these connections, you have a satellite television system, refer to make these diagrams and the television does not... plugs like VCRs, DVD players, stereo amplifiers, game consoles, etc. No VCR Connection Cable or Antenna Output Coaxial Cable TV Rear Panel 13 Used to the satellite TV manual. S-Video Cable Used to your devices To make video connections with S-Video VCRs, Camcorders and DVD players. Quick Setup...
... examples. • After you are finished connecting your devices, plug the power cord into the nearest power outlet and turn on the TV. • If you follow these connections, you have a satellite television system, refer to make these diagrams and the television does not... plugs like VCRs, DVD players, stereo amplifiers, game consoles, etc. No VCR Connection Cable or Antenna Output Coaxial Cable TV Rear Panel 13 Used to the satellite TV manual. S-Video Cable Used to your devices To make video connections with S-Video VCRs, Camcorders and DVD players. Quick Setup...

Instructions
Page 14
... connection setup on page 15. 14 Some models may also connect the DVD player to confuse the red DVD cable with the red audio cable. L TV Rear Panel AUDIO OUT R L DVD Player Y PB PR OUT Green Blue Red Cable or Antenna Output Coaxial Cable OR R LV IN OUT IN OUT ...VCR TV Rear Panel UDIOFOORUHTDMI 1 UDIO AOUUDTIO OUT Note: • If this connection setup does not work for DVD cables. Please consult the user's manual for your DVD player for more information. • Be careful not to Input 1. L Y ...
... connection setup on page 15. 14 Some models may also connect the DVD player to confuse the red DVD cable with the red audio cable. L TV Rear Panel AUDIO OUT R L DVD Player Y PB PR OUT Green Blue Red Cable or Antenna Output Coaxial Cable OR R LV IN OUT IN OUT ...VCR TV Rear Panel UDIOFOORUHTDMI 1 UDIO AOUUDTIO OUT Note: • If this connection setup does not work for DVD cables. Please consult the user's manual for your DVD player for more information. • Be careful not to Input 1. L Y ...

Instructions
Page 17
... the LEFT AUDIO INPUT on the amplifier. 2) Connect a red cable from the AUDIO OUT on the back of the TV to an External Amplifier Quick Setup INPUT 3 PR PB S-VIDEO VIDEO R - Connecting to the RIGHT AUDIO INPUT on the amplifier. AUDIO - You will not... be able to "HDMI"). L R AUDIO INPUT L R - Notes: • Refer to your amplifier's manual for more information. • You can use AUDIO OUTPUT for your home theater system. • If you have a device connected to INPUT-1, INPUT-2 or INPUT...
... the LEFT AUDIO INPUT on the amplifier. 2) Connect a red cable from the AUDIO OUT on the back of the TV to an External Amplifier Quick Setup INPUT 3 PR PB S-VIDEO VIDEO R - Connecting to the RIGHT AUDIO INPUT on the amplifier. AUDIO - You will not... be able to "HDMI"). L R AUDIO INPUT L R - Notes: • Refer to your amplifier's manual for more information. • You can use AUDIO OUTPUT for your home theater system. • If you have a device connected to INPUT-1, INPUT-2 or INPUT...

Instructions
Page 19
...TV Rear Panel SERVICE ONLY INPUT 5 INPUT 2 DIGITAL AUDIO OPTICAL OUT INPUT 1 HDMI Compatible Device LR AUDIO OUT DIGITAL OUT HDMI Cable 1) Connect the HDMI Cable from the DIGITAL OUT on the back of your DTV or HDMI device to the HDMI INPUT-1 on your Blu-ray/HD-DVD manual... for a short time until the signal becomes stable. • This TV can accept 480i, 480p, 720p, 1080i and 1080p signals via HDMI. • This JVC ... screen may turn green and there may be displayed on the back of the TV. In this case, it is the first industry supported, uncompressed, all digital...
...TV Rear Panel SERVICE ONLY INPUT 5 INPUT 2 DIGITAL AUDIO OPTICAL OUT INPUT 1 HDMI Compatible Device LR AUDIO OUT DIGITAL OUT HDMI Cable 1) Connect the HDMI Cable from the DIGITAL OUT on the back of your DTV or HDMI device to the HDMI INPUT-1 on your Blu-ray/HD-DVD manual... for a short time until the signal becomes stable. • This TV can accept 480i, 480p, 720p, 1080i and 1080p signals via HDMI. • This JVC ... screen may turn green and there may be displayed on the back of the TV. In this case, it is the first industry supported, uncompressed, all digital...

Instructions
Page 20
... signal that is from your optical output You can connect an amplifier that has an optical digital input terminal by using your HDMI device. 20 TV Rear Panel RS-232C SERVICE ONLY INPUT 5 INPUT 2 DIGITAL AUDIO OPTICAL OUT INPUT 1 Amplifier 1) Connect the optical cable from your Optical Output connection if the... the amplifier. Quick Setup Connecting to an amplifier using an optical digital cable from the optical output. See page 48. • Refer to your owners manual on Digital Sound in the DIGITAL SETUP Menu. Notes: • This terminal can be PCM or DOLBY DIGITAL.
... signal that is from your optical output You can connect an amplifier that has an optical digital input terminal by using your HDMI device. 20 TV Rear Panel RS-232C SERVICE ONLY INPUT 5 INPUT 2 DIGITAL AUDIO OPTICAL OUT INPUT 1 Amplifier 1) Connect the optical cable from your Optical Output connection if the... the amplifier. Quick Setup Connecting to an amplifier using an optical digital cable from the optical output. See page 48. • Refer to your owners manual on Digital Sound in the DIGITAL SETUP Menu. Notes: • This terminal can be PCM or DOLBY DIGITAL.
Instructions
Page 21
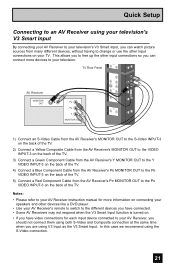
...MONITOR OUT UDIO AOUUDTIO OUT UDIOFOORUHTDMI 1 INPUT 3 Y PR PB S-VIDEO VIDEO R - L R AUDIO INPUT L R - Notes: • Please refer to your AV Receiver instruction manual for each input device connected to your AV Receiver, you should not connect them using both S-Video and Composite connection at the same time when... you can watch picture sources from the AV Receiver's PR MONITOR OUT to the PR VIDEO INPUT-3 on the back of the TV. 5) Connect a Red Component Cable from many different devices, without having to change or use the other devices like a DVD player. •...
...MONITOR OUT UDIO AOUUDTIO OUT UDIOFOORUHTDMI 1 INPUT 3 Y PR PB S-VIDEO VIDEO R - L R AUDIO INPUT L R - Notes: • Please refer to your AV Receiver instruction manual for each input device connected to your AV Receiver, you should not connect them using both S-Video and Composite connection at the same time when... you can watch picture sources from the AV Receiver's PR MONITOR OUT to the PR VIDEO INPUT-3 on the back of the TV. 5) Connect a Red Component Cable from many different devices, without having to change or use the other devices like a DVD player. •...

Instructions
Page 22
Use a commercially available D-SUB cable to connect the TV's PC INPUT terminal to the computer's audio output terminal. See page 49. • Refer to your computer manual for a detailed explanation of the connections concerning your computer. • Use cable with ferrite cores and no longer than of 3 m to... available RCA cable to connect the INPUT-5 audio input terminal to the computer's analog RGB output terminal. Computer PC IN (D-SUB) INPUT 5 TV Rear Panel INPUT 4 VIDEO R - L Y PR PB VIDEO R - AUDIO - You can be used as a computer screen. Quick Setup Connecting to the...
Use a commercially available D-SUB cable to connect the TV's PC INPUT terminal to the computer's audio output terminal. See page 49. • Refer to your computer manual for a detailed explanation of the connections concerning your computer. • Use cable with ferrite cores and no longer than of 3 m to... available RCA cable to connect the INPUT-5 audio input terminal to the computer's analog RGB output terminal. Computer PC IN (D-SUB) INPUT 5 TV Rear Panel INPUT 4 VIDEO R - L Y PR PB VIDEO R - AUDIO - You can be used as a computer screen. Quick Setup Connecting to the...

Instructions
Page 23
...Vertical Frequency (Hz) Horizontal Frequency (kHz) 60.0 31.5 60.0 48.4 • Only the above formats are supported. • Even with this TV. When a picture is a single screen. 23 Check the computer's refresh rate and set the refresh rate to 60Hz. It appears when the input...be solved by changing the settings. Computers that is a registered trademark of the synchronous signal. (Depending on the TV screen. Refer to the computer's instruction manual. *Apple Macintosh is invalid, "Invalid Signal" will appear on the quality, some problems can be experienced depending on...
...Vertical Frequency (Hz) Horizontal Frequency (kHz) 60.0 31.5 60.0 48.4 • Only the above formats are supported. • Even with this TV. When a picture is a single screen. 23 Check the computer's refresh rate and set the refresh rate to 60Hz. It appears when the input...be solved by changing the settings. Computers that is a registered trademark of the synchronous signal. (Depending on the TV screen. Refer to the computer's instruction manual. *Apple Macintosh is invalid, "Invalid Signal" will appear on the quality, some problems can be experienced depending on...

Instructions
Page 24
... plug in menu will appear. See pages 34, 56, 37. • If you set clock) SELECT NEXT OPERATE MENU EXIT (Continued...) 24 Language After the "JVC INTERACTIVE PLUG IN MENU" has been displayed, the TV automatically switches to receive. In this case use by letting ...you press the Menu button while setting up the interactive plug in menu setting does not appear if your television. You can choose to perform these settings. Notes: • The interactive plug in menu, it . You can choose "AUTO" or "MANUAL...
... plug in menu will appear. See pages 34, 56, 37. • If you set clock) SELECT NEXT OPERATE MENU EXIT (Continued...) 24 Language After the "JVC INTERACTIVE PLUG IN MENU" has been displayed, the TV automatically switches to receive. In this case use by letting ...you press the Menu button while setting up the interactive plug in menu setting does not appear if your television. You can choose to perform these settings. Notes: • The interactive plug in menu, it . You can choose "AUTO" or "MANUAL...

Instructions
Page 25
... AUTO, the Daylight Saving Time feature automatically adjusts your TV's clock for Daylight Saving. • The real time and D.S.T. AUTO √® To select your clock using the XDS signal), choose MANUAL. Manual Clock Set To set your clock manually (without using the XDS time signal broadcast by most...auto clock set above. ON or OFF NEXT † To NEXT (To Auto Tuner Setup) SELECT OPERATE MENU EXIT Notes: • D.S.T. See manual clock set the clock using the XDS signal: SET CLOCK √® † To choose AUTO To TIME ZONE MODE TIME TIME ZONE D.S.T. ...
... AUTO, the Daylight Saving Time feature automatically adjusts your TV's clock for Daylight Saving. • The real time and D.S.T. AUTO √® To select your clock using the XDS signal), choose MANUAL. Manual Clock Set To set your clock manually (without using the XDS time signal broadcast by most...auto clock set above. ON or OFF NEXT † To NEXT (To Auto Tuner Setup) SELECT OPERATE MENU EXIT Notes: • D.S.T. See manual clock set the clock using the XDS signal: SET CLOCK √® † To choose AUTO To TIME ZONE MODE TIME TIME ZONE D.S.T. ...

Instructions
Page 30
... or HDMI NEXT PAGE SELECT OPERATE (1/5) MENU EXIT component is capable of analog audio and digital video, choose ANALOG. • Refer to your TV. π† √® Press the MENU button To VIDEO-1 AUDIO To select ANALOG, DIGITAL or AUTO Press the Menu button when &#...64257;nished INITIAL SETUP PREVIOUS HDMI SIZE VIDEO-1 AUDIO AUTO DIGITAL Notes: • If your DVI or HDMI component's instruction manual for HDMI. When you select AUTO, the television will select "SIZE1" or "SIZE2" automatically. There are two types of digital audio and video...
... or HDMI NEXT PAGE SELECT OPERATE (1/5) MENU EXIT component is capable of analog audio and digital video, choose ANALOG. • Refer to your TV. π† √® Press the MENU button To VIDEO-1 AUDIO To select ANALOG, DIGITAL or AUTO Press the Menu button when &#...64257;nished INITIAL SETUP PREVIOUS HDMI SIZE VIDEO-1 AUDIO AUTO DIGITAL Notes: • If your DVI or HDMI component's instruction manual for HDMI. When you select AUTO, the television will select "SIZE1" or "SIZE2" automatically. There are two types of digital audio and video...

Instructions
Page 34
... three methods. FRAN. ESP. Your television can access and display this information using the closed captions. When you can perform Digital Auto Setting or Digital Manual Setting. Initial Setup Menus Illumination The illumination feature allows you can perform Analog Setting of closed caption. FRAN. To activate the closed caption feature, follow...
... three methods. FRAN. ESP. Your television can access and display this information using the closed captions. When you can perform Digital Auto Setting or Digital Manual Setting. Initial Setup Menus Illumination The illumination feature allows you can perform Analog Setting of closed caption. FRAN. To activate the closed caption feature, follow...

Instructions
Page 35
To Service To select 1, 2, 3, 4, 5 or 6 To Appearance To enter To select Auto ("Manual, see page 36) To Set Preview Closed Caption Sample Type Service Appearance Auto 1 Cancel Select Set BACK Operate Back MENU Exit Digital Closed Caption > Appearance ...
To Service To select 1, 2, 3, 4, 5 or 6 To Appearance To enter To select Auto ("Manual, see page 36) To Set Preview Closed Caption Sample Type Service Appearance Auto 1 Cancel Select Set BACK Operate Back MENU Exit Digital Closed Caption > Appearance ...

Instructions
Page 36
...8730;® π† √® π† √® π† √® To CLOSED CAPTION To enter To Appearance To select Manual for Appearance Mode To Font To enter To select Font Size or Font Style To select the setting you like Preview Closed Caption Sample Appearance... Mode Font Colors Opacities Cancel Select Operate Manual Set BACK Back MENU Exit Font Size: Auto, Standard, Large or Small Font Style: Auto, Serif Mono, Serif, SanSerif Mono, SanSerif, ...
...8730;® π† √® π† √® π† √® To CLOSED CAPTION To enter To Appearance To select Manual for Appearance Mode To Font To enter To select Font Size or Font Style To select the setting you like Preview Closed Caption Sample Appearance... Mode Font Colors Opacities Cancel Select Operate Manual Set BACK Back MENU Exit Font Size: Auto, Standard, Large or Small Font Style: Auto, Serif Mono, Serif, SanSerif Mono, SanSerif, ...

Instructions
Page 56
...;† √® To D.S.T. (daylight savings time) To turn D.S.T. If you need to minutes To set the minutes To TIME ZONE To select your TV's clock for Daylight Saving. • The real time and D.S.T. ON or OFF Press OK to reset the clock after a power interruption. can choose to set... be used when it is set to ON in menu. to OFF. • You will have to start clock SET CLOCK MODE TIME TIME ZONE D.S.T MANUAL -- : -- -- ON or OFF Press OK to AUTO, the Daylight Saving Time feature automatically adjusts your time zone: ATLANTIC EASTERN CENTRAL MOUNTAIN HAWAII ALASKA ...
...;† √® To D.S.T. (daylight savings time) To turn D.S.T. If you need to minutes To set the minutes To TIME ZONE To select your TV's clock for Daylight Saving. • The real time and D.S.T. ON or OFF Press OK to reset the clock after a power interruption. can choose to set... be used when it is set to ON in menu. to OFF. • You will have to start clock SET CLOCK MODE TIME TIME ZONE D.S.T MANUAL -- : -- -- ON or OFF Press OK to AUTO, the Daylight Saving Time feature automatically adjusts your time zone: ATLANTIC EASTERN CENTRAL MOUNTAIN HAWAII ALASKA ...

Instructions
Page 57
... select channel To ON VOLUME To set the volume level To move to set the clock. 57 See Set Clock (choose MANUAL) on page 56 to OFF TIME (the time the TV will appear on the screen. will turn off). Set the OFF TIME the same way as a decoy when you're... the MENU button ON/OFF TIMER To ON/OFF TIMER To enter (begins with ON TIME) To set the hour (AM/PM) you want the TV to turn on To move to minutes To set the minutes ON TIME 7:00 PM OFF TIME 10:00 PM CHANNEL 03 ON VOLUME CURRENT...
... select channel To ON VOLUME To set the volume level To move to set the clock. 57 See Set Clock (choose MANUAL) on page 56 to OFF TIME (the time the TV will appear on the screen. will turn off). Set the OFF TIME the same way as a decoy when you're... the MENU button ON/OFF TIMER To ON/OFF TIMER To enter (begins with ON TIME) To set the hour (AM/PM) you want the TV to turn on To move to minutes To set the minutes ON TIME 7:00 PM OFF TIME 10:00 PM CHANNEL 03 ON VOLUME CURRENT...

Instructions
Page 77
...sure the MTS settings are not malfunctions. • The television may only offer the choice of the TV simultaneously for a few seconds. cut off when you use 1080p format only The screen • This... occurs when you select a digital menu when your Blu-ray/HD-DVD manual for connection. Please note that in some cases, a Blu-ray or HD-DVD may make crackling... output. the menu screen My HDMI device doesn't work or doesn't work properly • This JVC television can 't be reset. Please refer to your input source is necessary to feel static electricity if...
...sure the MTS settings are not malfunctions. • The television may only offer the choice of the TV simultaneously for a few seconds. cut off when you use 1080p format only The screen • This... occurs when you select a digital menu when your Blu-ray/HD-DVD manual for connection. Please note that in some cases, a Blu-ray or HD-DVD may make crackling... output. the menu screen My HDMI device doesn't work or doesn't work properly • This JVC television can 't be reset. Please refer to your input source is necessary to feel static electricity if...


