
Instruction Manual
Page 2
... FICHE DANS LA BORNE CORRESPONDANTE DE LA PRISE ET POUSSER JUSQUAU FOND. Il n'y a aucune 3. Avoid direct exposure to radio or television reception, which can be remote controlled. For Canada/pour le Canada THIS DIGITAL APPARATUS DOES NOT EXCEED THE CLASS B LIMITS FOR RADIO NOISE EMISSIONS FROM DIGITAL APPARATUS AS SET OUT...
... FICHE DANS LA BORNE CORRESPONDANTE DE LA PRISE ET POUSSER JUSQUAU FOND. Il n'y a aucune 3. Avoid direct exposure to radio or television reception, which can be remote controlled. For Canada/pour le Canada THIS DIGITAL APPARATUS DOES NOT EXCEED THE CLASS B LIMITS FOR RADIO NOISE EMISSIONS FROM DIGITAL APPARATUS AS SET OUT...
Instruction Manual
Page 3
...AC power cord, and then plug it is then explained. • Basic and common information that is the same for an extended period of our JVC products. DO NOT install the unit in a location near heat sources, or in again. DO NOT disassemble the unit since there are no user serviceable...the unit, it in a place subject to 11. • The following cases: • After starting heating in this occur, the unit may condense on the remote control if they have the same or similar names (or marks) as follows: Power sources • When unplugging from the unit. Also gives you had...
...AC power cord, and then plug it is then explained. • Basic and common information that is the same for an extended period of our JVC products. DO NOT install the unit in a location near heat sources, or in again. DO NOT disassemble the unit since there are no user serviceable...the unit, it in a place subject to 11. • The following cases: • After starting heating in this occur, the unit may condense on the remote control if they have the same or similar names (or marks) as follows: Power sources • When unplugging from the unit. Also gives you had...

Instruction Manual
Page 4
English Contents Location of the Buttons and Controls 3 Front Panel 3 Remote Control 5 Getting Started 6 Unpacking 6 Putting the Batteries into the Remote Control 6 Connecting the Speakers 6 Connecting Other Equipment 7 Power Supply 8 Common Operations 9 Turning On or Off the Power 9 Setting the Clock 9 Selecting the Sources 9 Adjusting the ...
English Contents Location of the Buttons and Controls 3 Front Panel 3 Remote Control 5 Getting Started 6 Unpacking 6 Putting the Batteries into the Remote Control 6 Connecting the Speakers 6 Connecting Other Equipment 7 Power Supply 8 Common Operations 9 Turning On or Off the Power 9 Setting the Clock 9 Selecting the Sources 9 Adjusting the ...

Instruction Manual
Page 6
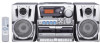
... CLASSIC ROCK POP JAZZ FLAT 9 See pages in the parentheses for deck A (16 - 18) • REC ¶, PLAY 3, REW 1, FF ¡, STOP/EJECT 7/0, PAUSE 8 p SENSOR (Remote sensor) q STANDBY lamp (9) w FM MODE button (12) e 0 OPEN (CD door open/close) (11) r STANDBY/ON button (9) t VOLUME +/- Front Panel 1 Display window 2 Operation buttons • 4 (9, 12...
... CLASSIC ROCK POP JAZZ FLAT 9 See pages in the parentheses for deck A (16 - 18) • REC ¶, PLAY 3, REW 1, FF ¡, STOP/EJECT 7/0, PAUSE 8 p SENSOR (Remote sensor) q STANDBY lamp (9) w FM MODE button (12) e 0 OPEN (CD door open/close) (11) r STANDBY/ON button (9) t VOLUME +/- Front Panel 1 Display window 2 Operation buttons • 4 (9, 12...
Instruction Manual
Page 7
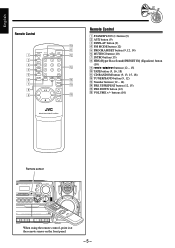
... 1 TAPE CD/ RANDOM TUNER/ BAND p q w 2 3 e 4 5 6 r 7 t 8 9 y Remote Control 1 STANDBY/ON button (9) 2 AUX button (9) 3 DISPLAY button (9) 4 FM MODE button (12) 5 PROGRAM/SET button (9, 12, 14) 6 MUTING button (10) 7 INTRO button (15) 8 HBS (Hyper ... PRESE EC LAY CD SYNCHRO RECORDING AUTO STOP SYSTEM B PLAY PLAY REW FF STOP/EJECT PAUSE PLAY REW FF STOP/EJECT PAUSE When using the remote control, point it at the remote sensor on the front panel. - 5 - buttons (10) Remote sensor CD PORTABLE COMPONENT SYSTEM STANDBY/ON -
... 1 TAPE CD/ RANDOM TUNER/ BAND p q w 2 3 e 4 5 6 r 7 t 8 9 y Remote Control 1 STANDBY/ON button (9) 2 AUX button (9) 3 DISPLAY button (9) 4 FM MODE button (12) 5 PROGRAM/SET button (9, 12, 14) 6 MUTING button (10) 7 INTRO button (15) 8 HBS (Hyper ... PRESE EC LAY CD SYNCHRO RECORDING AUTO STOP SYSTEM B PLAY PLAY REW FF STOP/EJECT PAUSE PLAY REW FF STOP/EJECT PAUSE When using the remote control, point it at the remote sensor on the front panel. - 5 - buttons (10) Remote sensor CD PORTABLE COMPONENT SYSTEM STANDBY/ON -

Instruction Manual
Page 8
... connect the AC power cord until all the following items. The number in the parentheses indicates the quantity of the speaker cord into the remote control, by matching the polarity (+ and -) on the batteries with the same speaker impedance as indicated by the speaker terminals on the battery... on the rear of time. Right speaker Left speaker 1 Hold the clamp of the speaker terminal. 2 Insert the end of the pieces supplied. • Remote control (1) • AC power cord (1) If any is missing, consult your dealer immediately. Match the polarity of the speaker terminals: red (ª) to ...
... connect the AC power cord until all the following items. The number in the parentheses indicates the quantity of the speaker cord into the remote control, by matching the polarity (+ and -) on the batteries with the same speaker impedance as indicated by the speaker terminals on the battery... on the rear of time. Right speaker Left speaker 1 Hold the clamp of the speaker terminal. 2 Insert the end of the pieces supplied. • Remote control (1) • AC power cord (1) If any is missing, consult your dealer immediately. Match the polarity of the speaker terminals: red (ª) to ...
Instruction Manual
Page 12
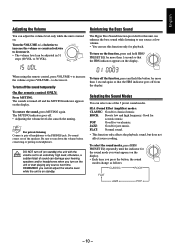
...The sounds is turned off . • Adjusting the volume level also cancels the muting. Be sure to turn off the sound temporarily On the remote control ONLY: Press MUTING. Turn the VOLUME +/- VOLUME + Reinforcing the Bass Sound The Hyper Bass Sound function provided for more than 1 second again...REMEMBER you press the button, the sound modes change as follows: CLASSIC ROCK FLAT JAZZ POP - 10 - HBS HBS/PRESET EQ When using the remote control, press VOLUME + to decrease it . • The volume level can adjust the volume level only while the unit is on . DISPLAY HBS...
...The sounds is turned off . • Adjusting the volume level also cancels the muting. Be sure to turn off the sound temporarily On the remote control ONLY: Press MUTING. Turn the VOLUME +/- VOLUME + Reinforcing the Bass Sound The Hyper Bass Sound function provided for more than 1 second again...REMEMBER you press the button, the sound modes change as follows: CLASSIC ROCK FLAT JAZZ POP - 10 - HBS HBS/PRESET EQ When using the remote control, press VOLUME + to decrease it . • The volume level can adjust the volume level only while the unit is on . DISPLAY HBS...
Instruction Manual
Page 14
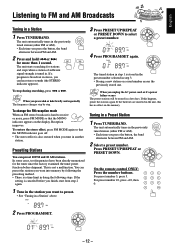
... in a Station 1 Press TUNER/BAND. TUNER FM MHz 2 Press PROGRAM/SET. TUNER PROG FM STEREO MHz 4 Press PROGRAM/SET again. AM/SET PRESE On the remote control ONLY: Press the number buttons. INT T DOWN English Listening to FM and AM Broadcasts Tuning in a Preset Station 1 Press TUNER/BAND. When you unplug...
... in a Station 1 Press TUNER/BAND. TUNER FM MHz 2 Press PROGRAM/SET. TUNER PROG FM STEREO MHz 4 Press PROGRAM/SET again. AM/SET PRESE On the remote control ONLY: Press the number buttons. INT T DOWN English Listening to FM and AM Broadcasts Tuning in a Preset Station 1 Press TUNER/BAND. When you unplug...

Instruction Manual
Page 15
.... 2 Press CD/RANDOM, then 3¥8. Continued use of the next or succeeding tracks. To go to another track directly using the number buttons On the remote control ONLY: Pressing the number button(s) before or during play starts from the first track. • Pressing CD/RANDOM while the source is lower than...
.... 2 Press CD/RANDOM, then 3¥8. Continued use of the next or succeeding tracks. To go to another track directly using the number buttons On the remote control ONLY: Pressing the number button(s) before or during play starts from the first track. • Pressing CD/RANDOM while the source is lower than...
Instruction Manual
Page 16
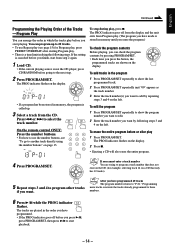
... has 12 tracks). Programming more tracks overwrite the tracks already programmed to select the track number. The PROG indicator flashes on the left . On the remote control ONLY: Press the number buttons. • For how to use Repeat play (see "To go to another track directly using the number buttons" on...
... has 12 tracks). Programming more tracks overwrite the tracks already programmed to select the track number. The PROG indicator flashes on the left . On the remote control ONLY: Press the number buttons. • For how to use Repeat play (see "To go to another track directly using the number buttons" on...
Instruction Manual
Page 22
... display properly etc.), press the reset switch on the unit is scratched or dirty. Unable to operate the unit from the remote control. • The path between the remote control and the remote sensor on the back of the cassette are disabled. x 10 3/4 in .) Mass (approx.): 1.7 kg (3.8 lbs) each - 20 - The disc is...
... display properly etc.), press the reset switch on the unit is scratched or dirty. Unable to operate the unit from the remote control. • The path between the remote control and the remote sensor on the back of the cassette are disabled. x 10 3/4 in .) Mass (approx.): 1.7 kg (3.8 lbs) each - 20 - The disc is...
Instruction Manual
Page 27
... within the product's enclosure that to persons. ATTENTION Afin d'éviter tout risque d'électrocution, d'incendie, etc.: 1. Caution - This equipment generates, uses and can be remote controlled.
... within the product's enclosure that to persons. ATTENTION Afin d'éviter tout risque d'électrocution, d'incendie, etc.: 1. Caution - This equipment generates, uses and can be remote controlled.

Instruction Manual
Page 28
...; Keep the speakers away from the wall outlet, always pull the plug, not the AC power cord. • The manual mainly explains operations using the remote control is different from a cold to direct sunlight, excessive dust or vibration. - 1 - Also gives you information which is not good for a few ...the unit in a location with wet hands. English Introduction We would like to thank you for many functions is grouped in one of our JVC products. If operation using the buttons and controls on the unit. DO NOT disassemble the unit since there are no user serviceable parts inside...
...; Keep the speakers away from the wall outlet, always pull the plug, not the AC power cord. • The manual mainly explains operations using the remote control is different from a cold to direct sunlight, excessive dust or vibration. - 1 - Also gives you information which is not good for a few ...the unit in a location with wet hands. English Introduction We would like to thank you for many functions is grouped in one of our JVC products. If operation using the buttons and controls on the unit. DO NOT disassemble the unit since there are no user serviceable parts inside...

Instruction Manual
Page 29
English Contents Location of the Buttons and Controls 3 Front Panel 3 Remote Control 5 Getting Started 6 Unpacking 6 Putting the Batteries into the Remote Control 6 Connecting the Speakers 6 Connecting Other Equipment 7 Power Supply 8 Common Operations 9 Turning On or Off the Power 9 Setting the Clock 9 Selecting the Sources 9 Adjusting the ...
English Contents Location of the Buttons and Controls 3 Front Panel 3 Remote Control 5 Getting Started 6 Unpacking 6 Putting the Batteries into the Remote Control 6 Connecting the Speakers 6 Connecting Other Equipment 7 Power Supply 8 Common Operations 9 Turning On or Off the Power 9 Setting the Clock 9 Selecting the Sources 9 Adjusting the ...

Instruction Manual
Page 31
... CLASSIC ROCK POP JAZZ FLAT 9 See pages in the parentheses for deck A (16 - 18) • REC ¶, PLAY 3, REW 1, FF ¡, STOP/EJECT 7/0, PAUSE 8 p SENSOR (Remote sensor) q STANDBY lamp (9) w FM MODE button (12) e 0 OPEN (CD door open/close) (13) r STANDBY/ON button (9) t VOLUME +/- Front Panel 1 Display window 2 Operation buttons • 4 (9, 12...
... CLASSIC ROCK POP JAZZ FLAT 9 See pages in the parentheses for deck A (16 - 18) • REC ¶, PLAY 3, REW 1, FF ¡, STOP/EJECT 7/0, PAUSE 8 p SENSOR (Remote sensor) q STANDBY lamp (9) w FM MODE button (12) e 0 OPEN (CD door open/close) (13) r STANDBY/ON button (9) t VOLUME +/- Front Panel 1 Display window 2 Operation buttons • 4 (9, 12...

Instruction Manual
Page 32
... 1 TAPE CD/ RANDOM TUNER/ BAND p q w 2 3 e 4 5 6 r 7 t 8 9 y Remote Control 1 STANDBY/ON button (9) 2 AUX button (9) 3 DISPLAY button (9) 4 FM MODE button (12) 5 PROGRAM/SET button (9, 12, 14) 6 MUTING button (10) 7 INTRO button (15) 8 HBS (Hyper ... PRESE EC LAY CD SYNCHRO RECORDING AUTO STOP SYSTEM B PLAY PLAY REW FF STOP/EJECT PAUSE PLAY REW FF STOP/EJECT PAUSE When using the remote control, point it at the remote sensor on the front panel. - 5 - buttons (10) Remote sensor CD PORTABLE COMPONENT SYSTEM STANDBY/ON -
... 1 TAPE CD/ RANDOM TUNER/ BAND p q w 2 3 e 4 5 6 r 7 t 8 9 y Remote Control 1 STANDBY/ON button (9) 2 AUX button (9) 3 DISPLAY button (9) 4 FM MODE button (12) 5 PROGRAM/SET button (9, 12, 14) 6 MUTING button (10) 7 INTRO button (15) 8 HBS (Hyper ... PRESE EC LAY CD SYNCHRO RECORDING AUTO STOP SYSTEM B PLAY PLAY REW FF STOP/EJECT PAUSE PLAY REW FF STOP/EJECT PAUSE When using the remote control, point it at the remote sensor on the front panel. - 5 - buttons (10) Remote sensor CD PORTABLE COMPONENT SYSTEM STANDBY/ON -

Instruction Manual
Page 33
...into the terminal. Right speaker Left speaker 1 Hold the clamp of the speaker terminal. 2 Insert the end of the speaker cord into the remote control, by the speaker terminals on the battery compartment. IMPORTANT: • Use only speakers with the same speaker impedance as indicated by matching the... of the unit. • DO NOT connect more than one speaker to one . • DO NOT use the remote control for an extended period of the pieces supplied. • Remote control (1) • AC power cord (1) If any is missing, consult your dealer immediately. English Getting Started Do not...
...into the terminal. Right speaker Left speaker 1 Hold the clamp of the speaker terminal. 2 Insert the end of the speaker cord into the remote control, by the speaker terminals on the battery compartment. IMPORTANT: • Use only speakers with the same speaker impedance as indicated by matching the... of the unit. • DO NOT connect more than one speaker to one . • DO NOT use the remote control for an extended period of the pieces supplied. • Remote control (1) • AC power cord (1) If any is missing, consult your dealer immediately. English Getting Started Do not...

Instruction Manual
Page 37
.../PRESET EQ To select the sound modes, press HBS/ PRESET EQ repeatedly until the indicator for vocal music. HBS HBS/PRESET EQ When using the remote control, press VOLUME + to an extremely high level; To turn on . Turn the VOLUME +/- No sound comes out of sound can damage your ...recording. The MUTING indicator goes off the sound temporarily On the remote control ONLY: Press MUTING. Good for more than 1 second so that the HBS indicator goes off the function, press and hold HBS/ PRESET EQ...
.../PRESET EQ To select the sound modes, press HBS/ PRESET EQ repeatedly until the indicator for vocal music. HBS HBS/PRESET EQ When using the remote control, press VOLUME + to an extremely high level; To turn on . Turn the VOLUME +/- No sound comes out of sound can damage your ...recording. The MUTING indicator goes off the sound temporarily On the remote control ONLY: Press MUTING. Good for more than 1 second so that the HBS indicator goes off the function, press and hold HBS/ PRESET EQ...

Instruction Manual
Page 39
... STEREO MHz P/REPEAT PROGR RO PRESET U AM/SET PRESE RO PRESET U AM/SET PRESE The tuned station in a Station" above. AM/SET PRESE On the remote control ONLY: Press the number buttons. INT T DOWN INT T DOWN P/REPEAT PROGR P/REPEAT PROGR TUNER PROG FM STEREO MHz AM/SET PRESE - 12 - To stop...
... STEREO MHz P/REPEAT PROGR RO PRESET U AM/SET PRESE RO PRESET U AM/SET PRESE The tuned station in a Station" above. AM/SET PRESE On the remote control ONLY: Press the number buttons. INT T DOWN INT T DOWN P/REPEAT PROGR P/REPEAT PROGR TUNER PROG FM STEREO MHz AM/SET PRESE - 12 - To stop...

Instruction Manual
Page 40
... CD Track number Elapsed playing time To stop play back the following operations. To go to another track directly using the number buttons On the remote control ONLY: Pressing the number button(s) before or during play , press 3¥8 again. For track number 15, press +10, then 5. CD play starts from the...
... CD Track number Elapsed playing time To stop play back the following operations. To go to another track directly using the number buttons On the remote control ONLY: Pressing the number button(s) before or during play , press 3¥8 again. For track number 15, press +10, then 5. CD play starts from the...

