Instruction Manual
Page 1
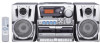
...;ol CD PORTABLE COMPONENT SYSTEM SISTEMA PORTATIL DE COMPONENTES DE CD PC-X290 Consists of the cabinet. VOLUME + INT T DOWN DISPLAY HBS/PRESET EQ P/REPEAT PROGR SENSOR FM MODE STANDBY PHONES TAPE CD/ RANDOM TUNER/ BAND AUX RO PRESET U AM/SET PRESE SP-PCX290 A REC PLAY CD SYNCHRO RECORDING AUTO STOP SYSTEM B PLAY REC PLAY REW FF STOP/EJECT PAUSE PLAY REW FF STOP/EJECT PAUSE TAPE CD/ RANDOM TUNER/ BAND INSTRUCTIONS MANUAL DE INSTRUCCIONES For Customer Use: Enter below the Model...
...;ol CD PORTABLE COMPONENT SYSTEM SISTEMA PORTATIL DE COMPONENTES DE CD PC-X290 Consists of the cabinet. VOLUME + INT T DOWN DISPLAY HBS/PRESET EQ P/REPEAT PROGR SENSOR FM MODE STANDBY PHONES TAPE CD/ RANDOM TUNER/ BAND AUX RO PRESET U AM/SET PRESE SP-PCX290 A REC PLAY CD SYNCHRO RECORDING AUTO STOP SYSTEM B PLAY REC PLAY REW FF STOP/EJECT PAUSE PLAY REW FF STOP/EJECT PAUSE TAPE CD/ RANDOM TUNER/ BAND INSTRUCTIONS MANUAL DE INSTRUCCIONES For Customer Use: Enter below the Model...
Instruction Manual
Page 3
... AC power cord and consult your dealer before operating any further. • If you had better know. DO NOT install the unit in a location near heat sources, or in the following marks are not going to operate the unit for an extended period of our JVC products. If operation using the remote control is not good for obtaining the best possible...
... AC power cord and consult your dealer before operating any further. • If you had better know. DO NOT install the unit in a location near heat sources, or in the following marks are not going to operate the unit for an extended period of our JVC products. If operation using the remote control is not good for obtaining the best possible...

Instruction Manual
Page 4
... Batteries into the Remote Control 6 Connecting the Speakers 6 Connecting Other Equipment 7 Power Supply 8 Common Operations 9 Turning On or Off the Power 9 Setting the Clock 9 Selecting the Sources 9 Adjusting the Volume 10 Reinforcing the Bass Sound 10 Selecting the Sound Modes 10 Ensuring Good FM and AM Reception 11 Listening to FM and AM Broadcasts 12 Tuning in a Station 12 Presetting Stations 12 Tuning in a Preset Station 12 Playing Back CD 13 Loading CD 13 Playing Back the Entire Disc...
... Batteries into the Remote Control 6 Connecting the Speakers 6 Connecting Other Equipment 7 Power Supply 8 Common Operations 9 Turning On or Off the Power 9 Setting the Clock 9 Selecting the Sources 9 Adjusting the Volume 10 Reinforcing the Bass Sound 10 Selecting the Sound Modes 10 Ensuring Good FM and AM Reception 11 Listening to FM and AM Broadcasts 12 Tuning in a Station 12 Presetting Stations 12 Tuning in a Preset Station 12 Playing Back CD 13 Loading CD 13 Playing Back the Entire Disc...

Instruction Manual
Page 6
...) 4 PHONES jack (10) 5 CD/RANDOM button (9, 13, 15, 18) 6 TUNER/BAND button (9, 12) 7 AUX button (9) 8 Deck A cassette holder (16) 9 Operation buttons for deck B (16) • PLAY 3, REW 1, FF ¡, STOP/EJECT 7/0, PAUSE 8 Display Window 1 CD play mode indicators (14, 15) • INTRO, PROG, RANDOM 2 Source indicators (9) • CD, TUNER, TAPE, AUX 3 HBS (Hyper Bass Sound) indicator (10) 4 SYNC REC indicator (18) 5 MUTING indicator (10) 6 Repeat mode indicators (15) • REP 1/ALL 7 Tuner operation indicators (12) • STEREO...
...) 4 PHONES jack (10) 5 CD/RANDOM button (9, 13, 15, 18) 6 TUNER/BAND button (9, 12) 7 AUX button (9) 8 Deck A cassette holder (16) 9 Operation buttons for deck B (16) • PLAY 3, REW 1, FF ¡, STOP/EJECT 7/0, PAUSE 8 Display Window 1 CD play mode indicators (14, 15) • INTRO, PROG, RANDOM 2 Source indicators (9) • CD, TUNER, TAPE, AUX 3 HBS (Hyper Bass Sound) indicator (10) 4 SYNC REC indicator (18) 5 MUTING indicator (10) 6 Repeat mode indicators (15) • REP 1/ALL 7 Tuner operation indicators (12) • STEREO...
Instruction Manual
Page 7
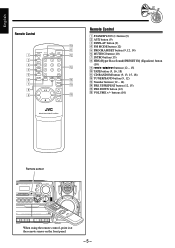
... the remote sensor on the front panel. - 5 - English Remote Control 1 TAPE CD/ RANDOM TUNER/ BAND p q w 2 3 e 4 5 6 r 7 t 8 9 y Remote Control 1 STANDBY/ON button (9) 2 AUX button (9) 3 DISPLAY button (9) 4 FM MODE button (12) 5 PROGRAM/SET button (9, 12, 14) 6 MUTING button (10) 7 INTRO button (15) 8 HBS (Hyper Bass Sound)/PRESET EQ (Equalizer) button (10) 9 4/6/7/¢ buttons (12 - 15) p TAPE button (9, 16, 18) q CD/RANDOM button (9, 13, 15, 18) w TUNER/BAND button (9, 12) e Number buttons (12 - 14) r PRE UP/REPEAT button (12, 15) t PRE DOWN button (12) y VOLUME +/-
... the remote sensor on the front panel. - 5 - English Remote Control 1 TAPE CD/ RANDOM TUNER/ BAND p q w 2 3 e 4 5 6 r 7 t 8 9 y Remote Control 1 STANDBY/ON button (9) 2 AUX button (9) 3 DISPLAY button (9) 4 FM MODE button (12) 5 PROGRAM/SET button (9, 12, 14) 6 MUTING button (10) 7 INTRO button (15) 8 HBS (Hyper Bass Sound)/PRESET EQ (Equalizer) button (10) 9 4/6/7/¢ buttons (12 - 15) p TAPE button (9, 16, 18) q CD/RANDOM button (9, 13, 15, 18) w TUNER/BAND button (9, 12) e Number buttons (12 - 14) r PRE UP/REPEAT button (12, 15) t PRE DOWN button (12) y VOLUME +/-

Instruction Manual
Page 11
... TAPE then press PLAY 3 for the deck you use the batteries for power supply, the backlight of the display dims to show the clock when CD or tuner is selected Press DISPLAY. • Each time you unplug the AC power cord or if a power failure occurs The clock is on with CD or tuner selected, press DISPLAY first to save power consumption. Setting the Clock 3 Press 4 or ¢ to the normal indication.) Before operating...
... TAPE then press PLAY 3 for the deck you use the batteries for power supply, the backlight of the display dims to show the clock when CD or tuner is selected Press DISPLAY. • Each time you unplug the AC power cord or if a power failure occurs The clock is on with CD or tuner selected, press DISPLAY first to save power consumption. Setting the Clock 3 Press 4 or ¢ to the normal indication.) Before operating...
Instruction Manual
Page 12
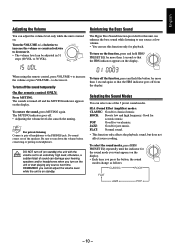
... next time. REMEMBER you turn down the volume before connecting or putting on headphones. Selecting the Sound Modes You can adjust the volume level only while the unit is turned on the unit or start playing any source at low volume. • You can be adjusted in 31 steps (00 VOL to the PHONES jack. to turn on . The sounds is on the display. To turn off the function...
... next time. REMEMBER you turn down the volume before connecting or putting on headphones. Selecting the Sound Modes You can adjust the volume level only while the unit is turned on the unit or start playing any source at low volume. • You can be adjusted in 31 steps (00 VOL to the PHONES jack. to turn on . The sounds is on the display. To turn off the function...
Instruction Manual
Page 14
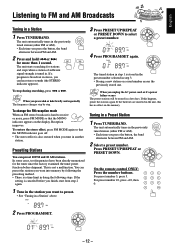
... batteries are inserted in a Station" above. Press PRESET UP/REPEAT or RO PRESETU PRESET DOWN. INT T DOWN English Listening to select a preset number. The unit automatically tunes in the previously tuned station (either FM or AM). • Each time you unplug the AC power cord or if a power failure occurs The preset stations will be erased in a Preset Station 1 Press TUNER/BAND. AM/SET PRESE On the remote control ONLY: Press the number buttons...
... batteries are inserted in a Station" above. Press PRESET UP/REPEAT or RO PRESETU PRESET DOWN. INT T DOWN English Listening to select a preset number. The unit automatically tunes in the previously tuned station (either FM or AM). • Each time you unplug the AC power cord or if a power failure occurs The preset stations will be erased in a Preset Station 1 Press TUNER/BAND. AM/SET PRESE On the remote control ONLY: Press the number buttons...
Instruction Manual
Page 16
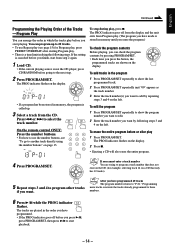
On the remote control ONLY: Press the number buttons. • For how to use Repeat play (see "To go to another track directly using the number buttons" on the left . You can program up . 3 Select a track from the CD. The PROG indicator goes off before you press 3/8, press PROGRAM/SET, then press 3/8 to program a track number that does not exist on a CD that only has 12 tracks). To erase the entire program before or...
On the remote control ONLY: Press the number buttons. • For how to use Repeat play (see "To go to another track directly using the number buttons" on the left . You can program up . 3 Select a track from the CD. The PROG indicator goes off before you press 3/8, press PROGRAM/SET, then press 3/8 to program a track number that does not exist on a CD that only has 12 tracks). To erase the entire program before or...

Instruction Manual
Page 17
... every programmed track of a CD can have the CD, the program or the individual track currently playing repeat as many times as follows, and the REP ALL or REP 1 indicator appears on the display. Repeating Tracks or CD-Repeat Play You can be canceled when you press the button, Repeat play mode changes as you select Random play REP 1 is not the CD player, press CD/RANDOM before playing. INT T DOWN P/REPEAT PROGR To repeat play, press PRESET UP/ REPEAT...
... every programmed track of a CD can have the CD, the program or the individual track currently playing repeat as many times as follows, and the REP ALL or REP 1 indicator appears on the display. Repeating Tracks or CD-Repeat Play You can be canceled when you press the button, Repeat play mode changes as you select Random play REP 1 is not the CD player, press CD/RANDOM before playing. INT T DOWN P/REPEAT PROGR To repeat play, press PRESET UP/ REPEAT...
Instruction Manual
Page 22
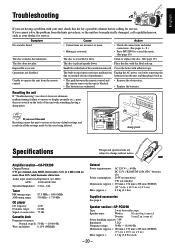
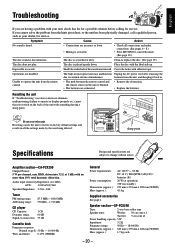
... the settings made by the user being deleted. Place the disc with adhesive tape. Amplifier section-CA-PCX290 Output Power: 5 W per channel, min. x 9 in . Clean or replace the disc. (See page 19.) The disc does not play. Impossible to external electrical interference. The built-in microprocessor may malfunction Unplug the AC power cord after removing the due to record. Speaker section-SP-PCX290 Type: 2-way bass-reflex type Speaker units...
... the settings made by the user being deleted. Place the disc with adhesive tape. Amplifier section-CA-PCX290 Output Power: 5 W per channel, min. x 9 in . Clean or replace the disc. (See page 19.) The disc does not play. Impossible to external electrical interference. The built-in microprocessor may malfunction Unplug the AC power cord after removing the due to record. Speaker section-SP-PCX290 Type: 2-way bass-reflex type Speaker units...
Instruction Manual
Page 23
If you . Operational adjustments covered in -home basis. Batteries (except that occurs in shipment, due to act of purchase); Retain this product is located either on an in the Owner's Manual, normal maintenance, video and audio head cleaning; 4. Parts used for replacement are covered for 90 days from the date of reasonable care, or if repaired or serviced by JVC does not cover: 1. For...
If you . Operational adjustments covered in -home basis. Batteries (except that occurs in shipment, due to act of purchase); Retain this product is located either on an in the Owner's Manual, normal maintenance, video and audio head cleaning; 4. Parts used for replacement are covered for 90 days from the date of reasonable care, or if repaired or serviced by JVC does not cover: 1. For...

Instruction Manual
Page 28
... not repeated in a place which is brought directly from the wall outlet, always pull the plug, not the AC power cord. • The manual mainly explains operations using the buttons and controls on the lens inside . DO NOT install the unit in a location near heat sources, or in again. Precautions Installation • Install in each procedure. In this case, leave the unit turned on...
... not repeated in a place which is brought directly from the wall outlet, always pull the plug, not the AC power cord. • The manual mainly explains operations using the buttons and controls on the lens inside . DO NOT install the unit in a location near heat sources, or in again. Precautions Installation • Install in each procedure. In this case, leave the unit turned on...

Instruction Manual
Page 31
... open/close) (13) r STANDBY/ON button (9) t VOLUME +/- PROGRAM/SET button (9, 12, 14) a INTRO button (15) s Deck B cassette holder (16) d Operation buttons for deck B (16) • PLAY 3, REW 1, FF ¡, STOP/EJECT 7/0, PAUSE 8 Display Window 1 CD play /pause) (13 - 15), 7 (13 - 15), ¢ (9, 12 - 15) 3 TAPE button (9, 16, 18) 4 PHONES jack (10) 5 CD/RANDOM button (9, 13, 15, 18) 6 TUNER/BAND button (9, 12) 7 AUX button (9) 8 Deck A cassette holder (16) 9 Operation buttons for details. control (10) y HBS/PRESET EQ (Equalizer) button (10) u DISPLAY button (9) i PRESET UP/REPEAT button...
... open/close) (13) r STANDBY/ON button (9) t VOLUME +/- PROGRAM/SET button (9, 12, 14) a INTRO button (15) s Deck B cassette holder (16) d Operation buttons for deck B (16) • PLAY 3, REW 1, FF ¡, STOP/EJECT 7/0, PAUSE 8 Display Window 1 CD play /pause) (13 - 15), 7 (13 - 15), ¢ (9, 12 - 15) 3 TAPE button (9, 16, 18) 4 PHONES jack (10) 5 CD/RANDOM button (9, 13, 15, 18) 6 TUNER/BAND button (9, 12) 7 AUX button (9) 8 Deck A cassette holder (16) 9 Operation buttons for details. control (10) y HBS/PRESET EQ (Equalizer) button (10) u DISPLAY button (9) i PRESET UP/REPEAT button...

Instruction Manual
Page 32
... remote sensor on the front panel. - 5 - English Remote Control 1 TAPE CD/ RANDOM TUNER/ BAND p q w 2 3 e 4 5 6 r 7 t 8 9 y Remote Control 1 STANDBY/ON button (9) 2 AUX button (9) 3 DISPLAY button (9) 4 FM MODE button (12) 5 PROGRAM/SET button (9, 12, 14) 6 MUTING button (10) 7 INTRO button (15) 8 HBS (Hyper Bass Sound)/PRESET EQ (Equalizer) button (10) 9 4/6/7/¢ buttons (12 - 15) p TAPE button (9, 16, 18) q CD/RANDOM button (9, 13, 15, 18) w TUNER/BAND button (9, 12) e Number buttons (12 - 14) r PRE UP/REPEAT button (12, 15) t PRE DOWN button (12) y VOLUME +/-
... remote sensor on the front panel. - 5 - English Remote Control 1 TAPE CD/ RANDOM TUNER/ BAND p q w 2 3 e 4 5 6 r 7 t 8 9 y Remote Control 1 STANDBY/ON button (9) 2 AUX button (9) 3 DISPLAY button (9) 4 FM MODE button (12) 5 PROGRAM/SET button (9, 12, 14) 6 MUTING button (10) 7 INTRO button (15) 8 HBS (Hyper Bass Sound)/PRESET EQ (Equalizer) button (10) 9 4/6/7/¢ buttons (12 - 15) p TAPE button (9, 16, 18) q CD/RANDOM button (9, 13, 15, 18) w TUNER/BAND button (9, 12) e Number buttons (12 - 14) r PRE UP/REPEAT button (12, 15) t PRE DOWN button (12) y VOLUME +/-

Instruction Manual
Page 36
... AC power cord or if a power failure occurs The clock is displayed change the display to the normal indication.) Before operating the unit any further, first set the clock again. The hour digits start flashing on the memory. If the batteries are inserted in the unit, this has no effect on the display. TAPE CD/ RANDOM TUNER/ BAND AUX INT T DOWN P/REPEAT PROGR RO PRESET U PM AM/SET PRESE - 9 - Setting the Clock 3 Press...
... AC power cord or if a power failure occurs The clock is displayed change the display to the normal indication.) Before operating the unit any further, first set the clock again. The hour digits start flashing on the memory. If the batteries are inserted in the unit, this has no effect on the display. TAPE CD/ RANDOM TUNER/ BAND AUX INT T DOWN P/REPEAT PROGR RO PRESET U PM AM/SET PRESE - 9 - Setting the Clock 3 Press...

Instruction Manual
Page 37
... VOLUME +/- HBS HBS/PRESET EQ When using the remote control, press VOLUME + to decrease it . • The volume level can select one of sound can damage your recording. The sounds is turned off the function, press and hold HBS/ PRESET EQ for vocal music. FLAT: Normal sound. • This function only affects the playback sound, but does not affect your hearing, speakers and/or headphones when you press the button, the sound modes change...
... VOLUME +/- HBS HBS/PRESET EQ When using the remote control, press VOLUME + to decrease it . • The volume level can select one of sound can damage your recording. The sounds is turned off the function, press and hold HBS/ PRESET EQ for vocal music. FLAT: Normal sound. • This function only affects the playback sound, but does not affect your hearing, speakers and/or headphones when you press the button, the sound modes change...

Instruction Manual
Page 39
... time you can preset 10 FM and 10 AM stations. INT T DOWN P/REPEAT PROGR When you tune in another station. AM/SET PRESE On the remote control ONLY: Press the number buttons. For preset number 10, press +10, then 0. TUNER FM MHz 2 Press PROGRAM/SET. RO PRESET U 3 Press PRESET UP/REPEAT or PRESET DOWN to receive or noisy, press FM MODE so that the MONO indicator goes off. • The stereo effect...
... time you can preset 10 FM and 10 AM stations. INT T DOWN P/REPEAT PROGR When you tune in another station. AM/SET PRESE On the remote control ONLY: Press the number buttons. For preset number 10, press +10, then 0. TUNER FM MHz 2 Press PROGRAM/SET. RO PRESET U 3 Press PRESET UP/REPEAT or PRESET DOWN to receive or noisy, press FM MODE so that the MONO indicator goes off. • The stereo effect...

Instruction Manual
Page 42
... lights up on the display after starting Random play (Random play will be played for Program play and Random play, press the button after starting playback. To skip the currently playing track, press ¢. AM/SET PRESE • Each time you press the button, Repeat play mode changes as you select Random play , press 7. RO PRESET U AM/SET PRESE To stop during play REP 1 is not the CD player, press CD/RANDOM before or after starting playback...
... lights up on the display after starting Random play (Random play will be played for Program play and Random play, press the button after starting playback. To skip the currently playing track, press ¢. AM/SET PRESE • Each time you press the button, Repeat play mode changes as you select Random play , press 7. RO PRESET U AM/SET PRESE To stop during play REP 1 is not the CD player, press CD/RANDOM before or after starting playback...
Instruction Manual
Page 47
... cassette are incorrect or loose. • Muting is discontinuous. Resetting the unit If "Troubleshooting" (see above) does not eliminate malfunctioning (failure to record. Clean or replace the disc. (See page 19.) The disc does not play. Impossible to operate or display properly etc.), press the reset switch on standby) 270 mm x 274 mm x 298 mm (W/H/D) 4.1 kg Supplied accessories See page 6. Speaker section-SP-PCX290 Type: 2-way bass...
... cassette are incorrect or loose. • Muting is discontinuous. Resetting the unit If "Troubleshooting" (see above) does not eliminate malfunctioning (failure to record. Clean or replace the disc. (See page 19.) The disc does not play. Impossible to operate or display properly etc.), press the reset switch on standby) 270 mm x 274 mm x 298 mm (W/H/D) 4.1 kg Supplied accessories See page 6. Speaker section-SP-PCX290 Type: 2-way bass...


