Instructions-Español,Français
Page 1
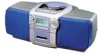
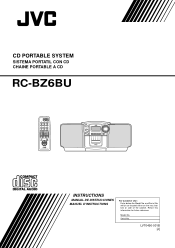
CD PORTABLE SYSTEM SISTEMA PORTATIL CON CD CHAINE PORTABLE A CD RC-BZ6BU REMOTE CONTROL RM-SRCBZ6 INSTRUCTIONS MANUAL DE INSTRUCCIONES MANUEL D'INSTRUCTIONS For Customer Use: Enter below the Model No. which are located either on the rear, bottom or side of the cabinet. Retain this information for future reference. and Serial No. Serial No. LVT0490-001B [J] Model No.
CD PORTABLE SYSTEM SISTEMA PORTATIL CON CD CHAINE PORTABLE A CD RC-BZ6BU REMOTE CONTROL RM-SRCBZ6 INSTRUCTIONS MANUAL DE INSTRUCCIONES MANUEL D'INSTRUCTIONS For Customer Use: Enter below the Model No. which are located either on the rear, bottom or side of the cabinet. Retain this information for future reference. and Serial No. Serial No. LVT0490-001B [J] Model No.
Instructions-Español,Français
Page 2
... a Class B digital device, pursuant to radio communications. leave all servicing to qualified service personnel. 4 CAUTION: The compact disc player uses invisible laser radiation and is equipped with arrowhead symbol, within an equilateral triangle is dangerous to defeat the safety switches. 5 CAUTION: Use of controls for adjustments and the performance of procedures other than those specified herein may cause harmful interference to Part 15 of...
... a Class B digital device, pursuant to radio communications. leave all servicing to qualified service personnel. 4 CAUTION: The compact disc player uses invisible laser radiation and is equipped with arrowhead symbol, within an equilateral triangle is dangerous to defeat the safety switches. 5 CAUTION: Use of controls for adjustments and the performance of procedures other than those specified herein may cause harmful interference to Part 15 of...
Instructions-Español,Français
Page 3
... Hyper Bass) PRO circuitry to use the system. setting the volume - Normal Play. s4. Features Here are written in all the information you years of the things that make them very easy to a Tape) ....7 Using the Cassette Deck (Recording 8 Using the Timers 9 Care And Maintenance 11 Troubleshooting 12 Specifications 12 1 In case of Contents Features 1 How This Manual Is Organized 1 IMPORTANT CAUTIONS 1 Getting Started 2 Common Operations 3 Using the Tuner 5 Using the CD Player 6 Using the Cassette...
... Hyper Bass) PRO circuitry to use the system. setting the volume - Normal Play. s4. Features Here are written in all the information you years of the things that make them very easy to a Tape) ....7 Using the Cassette Deck (Recording 8 Using the Timers 9 Care And Maintenance 11 Troubleshooting 12 Specifications 12 1 In case of Contents Features 1 How This Manual Is Organized 1 IMPORTANT CAUTIONS 1 Getting Started 2 Common Operations 3 Using the Tuner 5 Using the CD Player 6 Using the Cassette...
Instructions-Español,Français
Page 4
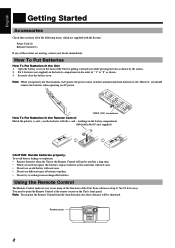
... (AC) power, the power source switches automatically from the slant direction, the above distance will not be shortened. R6P(SUM-3)/AA(15F) (not supplied) CAUTION: Handle batteries properly. Note: If you while pressing the tabs as shown. 3. English ss Getting Started Accessories Check that you operate your dealer immediately. Put 8 batteries (not supplied) in the battery compartment in the battery compartment. Power Cord (1) Remote Control (1) If...
... (AC) power, the power source switches automatically from the slant direction, the above distance will not be shortened. R6P(SUM-3)/AA(15F) (not supplied) CAUTION: Handle batteries properly. Note: If you while pressing the tabs as shown. 3. English ss Getting Started Accessories Check that you operate your dealer immediately. Put 8 batteries (not supplied) in the battery compartment in the battery compartment. Power Cord (1) Remote Control (1) If...
Instructions-Español,Français
Page 5
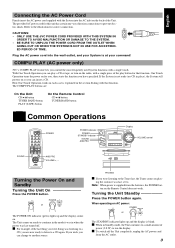
... you can insert a CD. Turning the Unit Standby ------ COMPU PLAY (AC power only) JVC's COMPU PLAY feature lets you are : On the Unit CD 6 button TUNER BAND button PLAY (TAPE) button On the Remote Control CD 6 button TUNER BAND button ss Common Operations POWER POWER indicator POWER STANDBY indicator SOUND AHB PRO Display VOLUME control SOUND REMOTE CONTROL RM-SRCBZ6 AHB PRO VOLUME +, - The provided AC power cord for correct connection. Press the POWER button again. When operating on play a CD or tape, or turn on the back of power (2.8 W) to continue...
... you can insert a CD. Turning the Unit Standby ------ COMPU PLAY (AC power only) JVC's COMPU PLAY feature lets you are : On the Unit CD 6 button TUNER BAND button PLAY (TAPE) button On the Remote Control CD 6 button TUNER BAND button ss Common Operations POWER POWER indicator POWER STANDBY indicator SOUND AHB PRO Display VOLUME control SOUND REMOTE CONTROL RM-SRCBZ6 AHB PRO VOLUME +, - The provided AC power cord for correct connection. Press the POWER button again. When operating on play a CD or tape, or turn on the back of power (2.8 W) to continue...
Instructions-Español,Français
Page 6
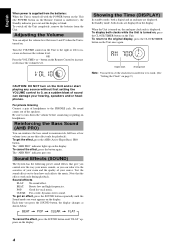
... supplied from the Unit. For private listening Connect a pair of the speakers. Sound effects FLAT: No sound effect. Turn the VOLUME control on headphones. In Standby mode, both a digital and an analogue are displayed on the Unit. Test the sound effects out to increase or decrease the volume level. button on the Remote Control to the original display, press the CLOCK/TIMER button on the display. Digital clock Analog clock Note: You need to set the clock...
... supplied from the Unit. For private listening Connect a pair of the speakers. Sound effects FLAT: No sound effect. Turn the VOLUME control on headphones. In Standby mode, both a digital and an analogue are displayed on the Unit. Test the sound effects out to increase or decrease the volume level. button on the Remote Control to the original display, press the CLOCK/TIMER button on the display. Digital clock Analog clock Note: You need to set the clock...
Instructions-Español,Français
Page 7
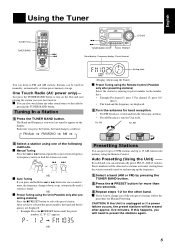
... the radio by pressing the TUNER BAND button. Stations can also switch from preset memory storage. Just press the TUNER BAND button to preset the stations again. Auto Presetting (Using the Unit) -- The Band and Frequency you will need to turn the Unit itself. For channel 15, press +10 then 5. • The band and the frequency are found . Turn the antenna for Manual Presetting. Select a station using the Remote Control (Possible only after presetting stations) Select the station...
... the radio by pressing the TUNER BAND button. Stations can also switch from preset memory storage. Just press the TUNER BAND button to preset the stations again. Auto Presetting (Using the Unit) -- The Band and Frequency you will need to turn the Unit itself. For channel 15, press +10 then 5. • The band and the frequency are found . Turn the antenna for Manual Presetting. Select a station using the Remote Control (Possible only after presetting stations) Select the station...
Instructions-Español,Français
Page 8
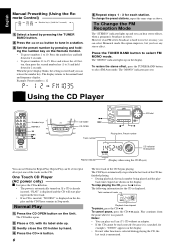
..." indicator goes out. ss Using the CD Player Number keys REPEAT /8 ¢ 7 4 REMOTE CONTROL RM-SRCBZ6 CD holder CD OPEN 4 ¢ Track number JOG dial 7 6 Playing time, Preset number CD indicator/ Analog clock Repeat indicator (Display when using the CD Player) You can select Monaural mode. Normal Play s1. s3. To stop playing the CD, press the 7 button. Play continues from the first track. • If no CD is inserted, "NO DISC" is automatically turned on the Remote Control. • To preset numbers 1 to 10: Press the...
..." indicator goes out. ss Using the CD Player Number keys REPEAT /8 ¢ 7 4 REMOTE CONTROL RM-SRCBZ6 CD holder CD OPEN 4 ¢ Track number JOG dial 7 6 Playing time, Preset number CD indicator/ Analog clock Repeat indicator (Display when using the CD Player) You can select Monaural mode. Normal Play s1. s3. To stop playing the CD, press the 7 button. Play continues from the first track. • If no CD is inserted, "NO DISC" is automatically turned on the Remote Control. • To preset numbers 1 to 10: Press the...
Instructions-Español,Français
Page 9
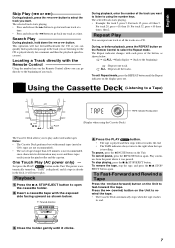
... back one track or all the tracks. For track 32, press +10 three times, then 2. • Press and release the 4 button to fast-forward the tape. Locating a Track directly with normal tapes (metal or CrO2 tapes are listening to the beginning) Remote Control ---------- ss Using the Cassette Deck (Listening to a Tape) TAPE indicator/Analog clock 8 § 1 PLAY ¡ (Display when using the number keys. Just press the PLAY TTAAPPE button on a CD. To cancel...
... back one track or all the tracks. For track 32, press +10 three times, then 2. • Press and release the 4 button to fast-forward the tape. Locating a Track directly with normal tapes (metal or CrO2 tapes are listening to the beginning) Remote Control ---------- ss Using the Cassette Deck (Listening to a Tape) TAPE indicator/Analog clock 8 § 1 PLAY ¡ (Display when using the number keys. Just press the PLAY TTAAPPE button on a CD. To cancel...
Instructions-Español,Français
Page 10
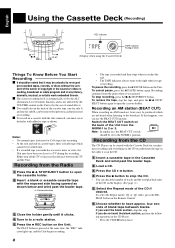
... from the CD The CD Player can check the number of tracks and the total playback time of cassette tapes, there is recorded and then stops when it clicks. The PLAY button is pressed at the same time, the "REC" indicator lights up, and the Unit begins recording. 8 • The tape is leader tape which are not heard when listening to a radio station. s3. Insert a blank or erasable cassette tape with...
... from the CD The CD Player can check the number of tracks and the total playback time of cassette tapes, there is recorded and then stops when it clicks. The PLAY button is pressed at the same time, the "REC" indicator lights up, and the Unit begins recording. 8 • The tape is leader tape which are not heard when listening to a radio station. s3. Insert a blank or erasable cassette tape with...

Instructions-Español,Français
Page 11
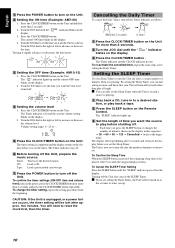
... Continue Recording to open the cassette holder. The synchronous recording will start counting from the beginning. (For 2 seconds) (Display "CLOCK") (Select the time) s1. Press the CLOCK/TIMER button on the display. The Unit's current set time blinks on the Unit and hold for the timers to work. • When setting the timers, you press the ¶ REC button during playback the CD, recording will begin from the beginning of the tape. 1. Turning...
... Continue Recording to open the cassette holder. The synchronous recording will start counting from the beginning. (For 2 seconds) (Display "CLOCK") (Select the time) s1. Press the CLOCK/TIMER button on the display. The Unit's current set time blinks on the Unit and hold for the timers to work. • When setting the timers, you press the ¶ REC button during playback the CD, recording will begin from the beginning of the tape. 1. Turning...
Instructions-Español,Français
Page 12
... when it rapidly advances or decreases the time faster. Setting the volume level 1. s5. s6. Tuner: Tune in to turn the Unit off after a certain number of minutes you set the timer. Press the POWER button to a desired station, or play all night. CAUTION: If the Unit is on the Remote Control. five minutes. s2. The Timer indicator and the CLOCK indicator go out. s1. To Confirm...
... when it rapidly advances or decreases the time faster. Setting the volume level 1. s5. s6. Tuner: Tune in to turn the Unit off after a certain number of minutes you set the timer. Press the POWER button to a desired station, or play all night. CAUTION: If the Unit is on the Remote Control. five minutes. s2. The Timer indicator and the CLOCK indicator go out. s1. To Confirm...
Instructions-Español,Français
Page 13
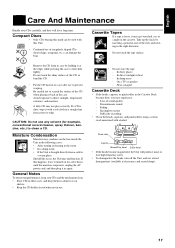
... the surface of sound quality - On a TV or speaker - Fading - Moisture Condensation Moisture may get stretched, cut, or caught in the cassette. Discontinuous sound - Compact Discs • Only CDs bearing this happens, leave it turned on heating in use. • Do not store the tape: - If this mark can damage the Unit. In direct sunlight or heat - Difficulty recording • Clean the...
... the surface of sound quality - On a TV or speaker - Fading - Moisture Condensation Moisture may get stretched, cut, or caught in the cassette. Discontinuous sound - Compact Discs • Only CDs bearing this happens, leave it turned on heating in use. • Do not store the tape: - If this mark can damage the Unit. In direct sunlight or heat - Difficulty recording • Clean the...
Instructions-Español,Français
Page 14
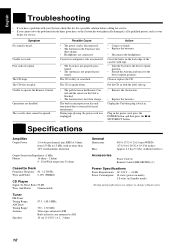
... to operate the Remote Control. Possible Cause • The power cord is blocked. • The batteries have lost their charge. • Headphones are disabled. Poor radio reception The CD skips. Cassette record protect tabs are subject to change without batteries) Accessories Power Cord (1) Remote Control (RM-SRCBZ6) (1) Power Specifications Power Requirements AC 120 V ~ , 60 Hz Power Consumption 18 watts (power on mode) 2.8 watts (in . The CD is upside down. ss Specifications • Remove the obstruction. • Replace the batteries. Amplifier Output Power...
... to operate the Remote Control. Possible Cause • The power cord is blocked. • The batteries have lost their charge. • Headphones are disabled. Poor radio reception The CD skips. Cassette record protect tabs are subject to change without batteries) Accessories Power Cord (1) Remote Control (RM-SRCBZ6) (1) Power Specifications Power Requirements AC 120 V ~ , 60 Hz Power Consumption 18 watts (power on mode) 2.8 watts (in . The CD is upside down. ss Specifications • Remove the obstruction. • Replace the batteries. Amplifier Output Power...
Instructions-Español,Français
Page 39
RC-BZ6BU CD PORTABLE SYSTEM VICTOR COMPANY OF JAPAN, LIMITED EN, SP, FR 0200IMMCREHIT
RC-BZ6BU CD PORTABLE SYSTEM VICTOR COMPANY OF JAPAN, LIMITED EN, SP, FR 0200IMMCREHIT


