Instruction Manual
Page 1
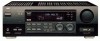
... SOURCE SELECTOR MASTER VOLUME - + DIGITAL DIGITAL INSTRUCTIONS MANUAL D'INSTRUCTIONS For Customer Use: Enter below the Model No. Retain this information for future reference. AUDIO/VIDEO CONTROL RECEIVER RECEPTEUR DE CONTROL AUDIO/VIDEO RX-778VBK DVD TV/DBS VCR STANDBY ON TV/CATV/DBS VCR POWER POWER CD TAPE/MD PHONO FM/AM ANALOG/DIGITAL SLEEP SURROUND ON...
... SOURCE SELECTOR MASTER VOLUME - + DIGITAL DIGITAL INSTRUCTIONS MANUAL D'INSTRUCTIONS For Customer Use: Enter below the Model No. Retain this information for future reference. AUDIO/VIDEO CONTROL RECEIVER RECEPTEUR DE CONTROL AUDIO/VIDEO RX-778VBK DVD TV/DBS VCR STANDBY ON TV/CATV/DBS VCR POWER POWER CD TAPE/MD PHONO FM/AM ANALOG/DIGITAL SLEEP SURROUND ON...

Instruction Manual
Page 3
... 3 Before Installation 3 Checking the Supplied Accessories 3 Connecting the FM and AM Antennas 3 Connecting the Speakers 4 Connecting Audio/Video Components 6 Connecting the Power Cord 8 Putting Batteries in Stations Manually 17 Using Preset Tuning 17 Selecting the FM Reception ...JVC's Audio/Video Components ... 41 Operating Other Manufacturers' Video Equipment 43 Troubleshooting 45 Specifications 46 Using the SEA Modes 19 Selecting Your Favorite SEA Mode 19 Creating Your Own SEA Mode 19 1 One Touch Operation 16 Using the Sleep Timer 16 Recording a Source 16 Receiving...
... 3 Before Installation 3 Checking the Supplied Accessories 3 Connecting the FM and AM Antennas 3 Connecting the Speakers 4 Connecting Audio/Video Components 6 Connecting the Power Cord 8 Putting Batteries in Stations Manually 17 Using Preset Tuning 17 Selecting the FM Reception ...JVC's Audio/Video Components ... 41 Operating Other Manufacturers' Video Equipment 43 Troubleshooting 45 Specifications 46 Using the SEA Modes 19 Selecting Your Favorite SEA Mode 19 Creating Your Own SEA Mode 19 1 One Touch Operation 16 Using the Sleep Timer 16 Recording a Source 16 Receiving...
Instruction Manual
Page 4
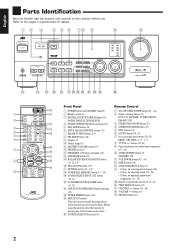
button (10, 11) ; Before using this control actually does depends on the receiver before use. buttons (42, 43) 9 Operating buttons for audio/video components (42 - 44) p AUDIO POWER buttons (9) STANDBY, ON q VCR POWER button (42 - 44) w SLEEP button (16) e ANALOG/DIGITAL button (13) r &#...10 keys for adjusting sound (23 - 26) • 10 keys for details. 12 3 4 5 6 78 9 p STANDBY POWER RX-778V AUDIO/VIDEO CONTROL RECEIVER DIGITAL SOURCE FORMAT DOLBY LINEAR DIGITAL PCM DOLBY SURROUND PHONES COMPULINK Remote SPEAKERS 1 2 DSP MODE SEA MODE INPUT ANALOG/DIGITAL FM/AM TUNING ...
button (10, 11) ; Before using this control actually does depends on the receiver before use. buttons (42, 43) 9 Operating buttons for audio/video components (42 - 44) p AUDIO POWER buttons (9) STANDBY, ON q VCR POWER button (42 - 44) w SLEEP button (16) e ANALOG/DIGITAL button (13) r &#...10 keys for adjusting sound (23 - 26) • 10 keys for details. 12 3 4 5 6 78 9 p STANDBY POWER RX-778V AUDIO/VIDEO CONTROL RECEIVER DIGITAL SOURCE FORMAT DOLBY LINEAR DIGITAL PCM DOLBY SURROUND PHONES COMPULINK Remote SPEAKERS 1 2 DSP MODE SEA MODE INPUT ANALOG/DIGITAL FM/AM TUNING ...

Instruction Manual
Page 5
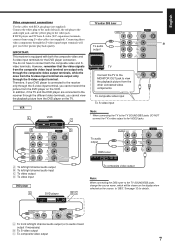
...round wire going to rain or moisture. Note: If reception is good ventilation around the receiver. English Getting Started This section explains how to connect audio/video components and speakers to the receiver, and how to the FM 75Ω COAXIAL terminal. Connecting the FM and AM Antennas...LOAMOP AM EXT FM Antenna ANTENNA Extend the supplied FM antenna horizontally. Before attaching a 75Ω coaxial cable (the kind with the receiver. FM 75 COAXIAL Checking the Supplied Accessories Check to an outdoor antenna), disconnect the supplied FM antenna. 3 The number in a ...
...round wire going to rain or moisture. Note: If reception is good ventilation around the receiver. English Getting Started This section explains how to connect audio/video components and speakers to the receiver, and how to the FM 75Ω COAXIAL terminal. Connecting the FM and AM Antennas...LOAMOP AM EXT FM Antenna ANTENNA Extend the supplied FM antenna horizontally. Before attaching a 75Ω coaxial cable (the kind with the receiver. FM 75 COAXIAL Checking the Supplied Accessories Check to an outdoor antenna), disconnect the supplied FM antenna. 3 The number in a ...
Instruction Manual
Page 8
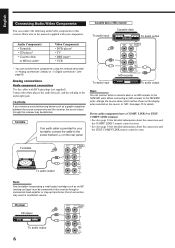
...Audio/Video Components You can connect the following audio/video components to this receiver, the sound output through a commercial head amplifier or step-up transformer. When connecting an MD recorder to the TAPE/MD jacks, change the source name, which will be connected to this receiver through this receiver... Note: Any turntables incorporating a small-output cartridge such as a graphic equalizer between the source components and this receiver. CD player CD player To audio output 6 RIGHT LEFT AUDIO PHONO CD OUT (REC) TAPE /MD IN (PLAY) Refer also to "MD." Cassette deck or MD ...
...Audio/Video Components You can connect the following audio/video components to this receiver, the sound output through a commercial head amplifier or step-up transformer. When connecting an MD recorder to the TAPE/MD jacks, change the source name, which will be connected to this receiver through this receiver... Note: Any turntables incorporating a small-output cartridge such as a graphic equalizer between the source components and this receiver. CD player CD player To audio output 6 RIGHT LEFT AUDIO PHONO CD OUT (REC) TAPE /MD IN (PLAY) Refer also to "MD." Cassette deck or MD ...
Instruction Manual
Page 9
... to the MONITOR OUT jack to view the playback picture from the S-video input terminal are connected to the receiver through the S-video input/output terminals will be shown on the display when selected as the source, to the video jack. AUDIO RIGHT LEFT VIDEO VIDEO S-VIDEO DVD TV SOUND Å To front left jack, the red plug...
... to the MONITOR OUT jack to view the playback picture from the S-video input terminal are connected to the receiver through the S-video input/output terminals will be shown on the display when selected as the source, to the video jack. AUDIO RIGHT LEFT VIDEO VIDEO S-VIDEO DVD TV SOUND Å To front left jack, the red plug...

Instruction Manual
Page 10
... COMPU LINK remote control system, connect the target component also as described in voltage. • Always replace both batteries at the remote sensor on the receiver. 1 2 3 DIGITAL IN PCM/DOLBY DIGITAL DIGITAL 1 (DVD) DIGITAL 2 (CD) 1. For details, see page 7). 3. When you use with two...8226; After connecting the components using digital optical cables (not supplied). For details, see page 6). • When you want to the video jack, you also need to connect it to (+). Before connecting a digital optical cable, unplug the protective plug. If the range or ...
... COMPU LINK remote control system, connect the target component also as described in voltage. • Always replace both batteries at the remote sensor on the receiver. 1 2 3 DIGITAL IN PCM/DOLBY DIGITAL DIGITAL 1 (DVD) DIGITAL 2 (CD) 1. For details, see page 7). 3. When you use with two...8226; After connecting the components using digital optical cables (not supplied). For details, see page 6). • When you want to the video jack, you also need to connect it to (+). Before connecting a digital optical cable, unplug the protective plug. If the range or ...
Instruction Manual
Page 11
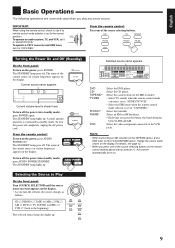
... STANDBY ON Selected source name appears CH- Select an FM or AM broadcast. • Each time you play any sound source. Select the video component connected to the TV SOUND/DBS jacks), change the source name shown on the display. A small amount of the current source (or ... one of the source selecting buttons on the remote control marked above with an asterisk (*), the receiver automatically turns on the display. To operate a CATV converter and DBS tuner, set to "AUDIO/TV/VCR." • Select the DBS tuner when the remote control mode selector is consumed in...
... STANDBY ON Selected source name appears CH- Select an FM or AM broadcast. • Each time you play any sound source. Select the video component connected to the TV SOUND/DBS jacks), change the source name shown on the display. A small amount of the current source (or ... one of the source selecting buttons on the remote control marked above with an asterisk (*), the receiver automatically turns on the display. To operate a CATV converter and DBS tuner, set to "AUDIO/TV/VCR." • Select the DBS tuner when the remote control mode selector is consumed in...

Instruction Manual
Page 12
...the speakers connected to the minimum before starting any of the audio source selecting buttons (CD, TAPE/MD, PHONO, FM/AM), while viewing the picture from another video source. • When you can watch picture from a video component such as the source, this function does not work....volume level can permanently damage your hearing and/or ruin your speakers. Notes: • Once you have selected a video source, pictures of the digital signal comes into the receiver. Press SPEAKERS 1 or SPEAKERS 2 to select the speaker to select the sound (except the TV sound), while the...
...the speakers connected to the minimum before starting any of the audio source selecting buttons (CD, TAPE/MD, PHONO, FM/AM), while viewing the picture from another video source. • When you can watch picture from a video component such as the source, this function does not work....volume level can permanently damage your hearing and/or ruin your speakers. Notes: • Once you have selected a video source, pictures of the digital signal comes into the receiver. Press SPEAKERS 1 or SPEAKERS 2 to select the speaker to select the sound (except the TV sound), while the...
Instruction Manual
Page 13
... . Once it . Press SUBWOOFER -/+ to adjust SUBWOOFER the subwoofer output level (-10 dB 0 FM MODE/MUTING +10 100+ to cancel it has been adjusted, the receiver memorizes the adjustment. Connect a pair of the playing source is canceled before connecting or putting on the front panel. 2. To compensate for the sources connected...
... . Once it . Press SUBWOOFER -/+ to adjust SUBWOOFER the subwoofer output level (-10 dB 0 FM MODE/MUTING +10 100+ to cancel it has been adjusted, the receiver memorizes the adjustment. Connect a pair of the playing source is canceled before connecting or putting on the front panel. 2. To compensate for the sources connected...

Instruction Manual
Page 14
...remote control mode selector is used . YES: NO: Select this when a subwoofer is canceled before you have connected a subwoofer. LOUDNESS SOURCE NAME 12 AUDIO/ TV/VCR CATV/DBS Adjusting the Front Speaker Output Balance If the sounds you start , remember... • There is a time limit in your...the source. DBS" appears on the display. To change the source name shown on the display. On the front panel ONLY: 1. Select this receiver, set to adjust the MULTI JOG balance. • Turning it clockwise decreases the left speakers are unequal, you select the MD recorder or ...
...remote control mode selector is used . YES: NO: Select this when a subwoofer is canceled before you have connected a subwoofer. LOUDNESS SOURCE NAME 12 AUDIO/ TV/VCR CATV/DBS Adjusting the Front Speaker Output Balance If the sounds you start , remember... • There is a time limit in your...the source. DBS" appears on the display. To change the source name shown on the display. On the front panel ONLY: 1. Select this receiver, set to adjust the MULTI JOG balance. • Turning it clockwise decreases the left speakers are unequal, you select the MD recorder or ...
Instruction Manual
Page 15
... text information, such as the source. Press INPUT ANALOG/DIGITAL to change the input mode for which you turn it is a time limit in this receiver. If the power failure occurs. - Press ANALOG/DIGITAL to digital input appears on the display. Turn MULTI JOG to select either MULTI JOG the source...
... text information, such as the source. Press INPUT ANALOG/DIGITAL to change the input mode for which you turn it is a time limit in this receiver. If the power failure occurs. - Press ANALOG/DIGITAL to digital input appears on the display. Turn MULTI JOG to select either MULTI JOG the source...

Instruction Manual
Page 17
... below. Select this crossover frequency level according to show the following: 80Hz 100Hz 120Hz • Use the following : 0dB 10dB 0dB: 10dB: Normally select this receiver automatically reallocate the bass elements, originally assigned to the channel for which you have connected the large speaker). Press SETTING repeatedly until "CROSSOVER FRQ" (Crossover...
... below. Select this crossover frequency level according to show the following: 80Hz 100Hz 120Hz • Use the following : 0dB 10dB 0dB: 10dB: Normally select this receiver automatically reallocate the bass elements, originally assigned to the channel for which you have connected the large speaker). Press SETTING repeatedly until "CROSSOVER FRQ" (Crossover...

Instruction Manual
Page 18
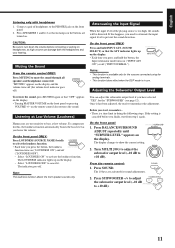
One Touch Operation JVC's One Touch Operation function is used to music and know the receiver will be stored for each source: • Volume level (see page 10) •... minutes. • To change the source. Recording a Source You can record any source playing through the receiver to a cassette deck (or an MD recorder) connected to the TAPE/MD jacks and the VCR connected ...20 30 40 50 60 70 SLEEP 80 90 00 (Canceled) When the shut-off time comes The receiver turns off time, press SLEEP repeatedly. The following can assign a different setting for each band. While ...
One Touch Operation JVC's One Touch Operation function is used to music and know the receiver will be stored for each source: • Volume level (see page 10) •... minutes. • To change the source. Recording a Source You can record any source playing through the receiver to a cassette deck (or an MD recorder) connected to the TAPE/MD jacks and the VCR connected ...20 30 40 50 60 70 SLEEP 80 90 00 (Canceled) When the shut-off time comes The receiver turns off time, press SLEEP repeatedly. The following can assign a different setting for each band. While ...
Instruction Manual
Page 19
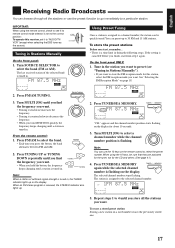
... To erase a stored preset station Storing a new station on the display for about 10 seconds. 3. English Receiving Radio Broadcasts You can browse through all the stations you want. AUDIO/ TV/VCR CATV/DBS Tuning in , the TUNED indicator lights up on the remote control to select the ...quickly, the frequency keeps changing until you find the frequency you want . Repeat steps 1 to see "Tuning in . CH- The last received station of sufficient signal strength is tuned in . 100 1k 10k EON TA NEWS INFO VOLUME 2. SOURCE SELECTOR FM/AM TUNING Using Preset Tuning...
... To erase a stored preset station Storing a new station on the display for about 10 seconds. 3. English Receiving Radio Broadcasts You can browse through all the stations you want. AUDIO/ TV/VCR CATV/DBS Tuning in , the TUNED indicator lights up on the remote control to select the ...quickly, the frequency keeps changing until you find the frequency you want . Repeat steps 1 to see "Tuning in . CH- The last received station of sufficient signal strength is tuned in . 100 1k 10k EON TA NEWS INFO VOLUME 2. SOURCE SELECTOR FM/AM TUNING Using Preset Tuning...
Instruction Manual
Page 20
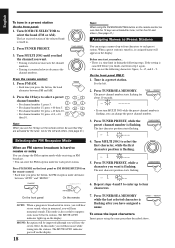
...- VOLUME • If you turn MULTI JOG while the preset channel number is flashing. The first character position starts flashing. Turn MULTI JOG to receive or noisy You can change the preset channel number. 3. VOLUME MULTI JOG CH- 5. Press TUNER PRESET, while a character you use the following... steps. TUNER PRESET CH- Repeat steps 4 and 5 to Preset Stations You can change the FM reception mode while receiving an FM broadcast. • You can use the 10 keys on the display. TUNER/SEA MEMORY To erase the input characters Insert spaces using...
...- VOLUME • If you turn MULTI JOG while the preset channel number is flashing. The first character position starts flashing. Turn MULTI JOG to receive or noisy You can change the preset channel number. 3. VOLUME MULTI JOG CH- 5. Press TUNER PRESET, while a character you use the following... steps. TUNER PRESET CH- Repeat steps 4 and 5 to Preset Stations You can change the FM reception mode while receiving an FM broadcast. • You can use the 10 keys on the display. TUNER/SEA MEMORY To erase the input characters Insert spaces using...
Instruction Manual
Page 21
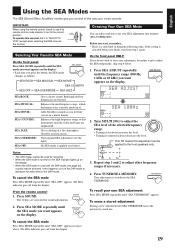
... to sounds so you feel like you do not want to store your music sounds. If this receiver, set to the correct position: To operate this happens, turn off the DAP mode or decrease ...2 above. The 10 keys are in doing the following steps. SOUND 2. Repeat step 1 and 2 to "AUDIO/TV/ VCR" (except when selecting the DBS tuner as follows: SEA MODE SEA ROCK SEA MUSICAL SEA MOVIE ...MOVIE: SEA COUNTRY: SEA JAZZ: SEA USERMODE: SEA OFF: Gives a heavy sound. Press TUNER/SEA MEMORY. AUDIO/ TV/VCR CATV/DBS Selecting Your Favorite SEA Mode On the front panel: Press SEA MODE repeatedly until the ...
... to sounds so you feel like you do not want to store your music sounds. If this receiver, set to the correct position: To operate this happens, turn off the DAP mode or decrease ...2 above. The 10 keys are in doing the following steps. SOUND 2. Repeat step 1 and 2 to "AUDIO/TV/ VCR" (except when selecting the DBS tuner as follows: SEA MODE SEA ROCK SEA MUSICAL SEA MOVIE ...MOVIE: SEA COUNTRY: SEA JAZZ: SEA USERMODE: SEA OFF: Gives a heavy sound. Press TUNER/SEA MEMORY. AUDIO/ TV/VCR CATV/DBS Selecting Your Favorite SEA Mode On the front panel: Press SEA MODE repeatedly until the ...

Instruction Manual
Page 22
... modes Sounds will or will not come out of the subwoofer according to your preference. Note on sound localization technology carried out at JVC for action and war movies - If "FRONT SPK" is set to "LARGE," sound comes out only if the subwoofer channel signals come... With "3D ACTION" selected: No sound comes out. • With "3D DIGITAL" selected: Sound comes out if the subwoofer channel signals come into this receiver ( LFE of the signal indicators lights up - DANCE CLUB: Gives a throbbing bass beat. DAP modes The sound heard in movie theaters. see page 10)...
... modes Sounds will or will not come out of the subwoofer according to your preference. Note on sound localization technology carried out at JVC for action and war movies - If "FRONT SPK" is set to "LARGE," sound comes out only if the subwoofer channel signals come... With "3D ACTION" selected: No sound comes out. • With "3D DIGITAL" selected: Sound comes out if the subwoofer channel signals come into this receiver ( LFE of the signal indicators lights up - DANCE CLUB: Gives a throbbing bass beat. DAP modes The sound heard in movie theaters. see page 10)...

Instruction Manual
Page 23
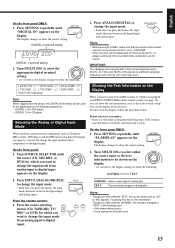
...software encoded with Dolby Digital, you can be selected automatically according to reproduce the soundtracks of the Surround mode. JVC Theater Surround In order to this receiver, you must connect the source component using the digital terminal on the rear of Dolby Laboratories. "Dolby," "Pro... Logic," and the double-D symbol are encoded. DOLBY SURROUND Dolby Digital and Dolby Pro Logic can use JVC Theater Surround. •...
...software encoded with Dolby Digital, you can be selected automatically according to reproduce the soundtracks of the Surround mode. JVC Theater Surround In order to this receiver, you must connect the source component using the digital terminal on the rear of Dolby Laboratories. "Dolby," "Pro... Logic," and the double-D symbol are encoded. DOLBY SURROUND Dolby Digital and Dolby Pro Logic can use JVC Theater Surround. •...

Instruction Manual
Page 24
... that you have set to the Speaker Arrangement Available DSP modes will vary depending on how many speakers are used with Dolby Digital. In this receiver. see page 14). By pressing SURROUND MODE: • DOLBY SURROUND (DOLBY PRO LOGIC, DOLBY DIGITAL) • THEATER (or DIG THEATER) • LIVE CLUB &#... of the signal indicators lights up . Make sure that the lamp on the center speaker sound when using the DAP modes: Sounds come into this receiver ( C of the center speaker only if the following take place at the same time: • If "CENTER SPK" is canceled) To activate ...
... that you have set to the Speaker Arrangement Available DSP modes will vary depending on how many speakers are used with Dolby Digital. In this receiver. see page 14). By pressing SURROUND MODE: • DOLBY SURROUND (DOLBY PRO LOGIC, DOLBY DIGITAL) • THEATER (or DIG THEATER) • LIVE CLUB &#... of the signal indicators lights up . Make sure that the lamp on the center speaker sound when using the DAP modes: Sounds come into this receiver ( C of the center speaker only if the following take place at the same time: • If "CENTER SPK" is canceled) To activate ...


