Instruction Manual
Page 1
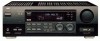
... DVD CD TV SOUND/DBS PHONO VCR TAPE/MD FM AM SOURCE SELECTOR MASTER VOLUME - + DIGITAL DIGITAL INSTRUCTIONS MANUAL D'INSTRUCTIONS For Customer Use: Enter below the Model No. AUDIO/VIDEO CONTROL RECEIVER RECEPTEUR DE CONTROL AUDIO/VIDEO RX-778VBK DVD TV/DBS VCR STANDBY ON TV/CATV/DBS VCR POWER POWER CD TAPE/MD PHONO FM/AM ANALOG...
... DVD CD TV SOUND/DBS PHONO VCR TAPE/MD FM AM SOURCE SELECTOR MASTER VOLUME - + DIGITAL DIGITAL INSTRUCTIONS MANUAL D'INSTRUCTIONS For Customer Use: Enter below the Model No. AUDIO/VIDEO CONTROL RECEIVER RECEPTEUR DE CONTROL AUDIO/VIDEO RX-778VBK DVD TV/DBS VCR STANDBY ON TV/CATV/DBS VCR POWER POWER CD TAPE/MD PHONO FM/AM ANALOG...

Instruction Manual
Page 3
...16 Using the Sleep Timer 16 Recording a Source 16 Receiving Radio Broadcasts 17 Tuning in the Remote Control 8 Basic... Connecting the FM and AM Antennas 3 Connecting the Speakers 4 Connecting Audio/Video Components 6 Connecting the Power Cord 8 Putting Batteries in Stations Manually 17 Using Preset Tuning 17 Selecting the FM Reception Mode 18 Assigning ...Disc Information 37 AV COMPU LINK Remote Control System .... 39 Operating JVC's Audio/Video Components ... 41 Operating Other Manufacturers' Video Equipment 43 Troubleshooting 45 Specifications 46 Using the SEA Modes 19 ...
...16 Using the Sleep Timer 16 Recording a Source 16 Receiving Radio Broadcasts 17 Tuning in the Remote Control 8 Basic... Connecting the FM and AM Antennas 3 Connecting the Speakers 4 Connecting Audio/Video Components 6 Connecting the Power Cord 8 Putting Batteries in Stations Manually 17 Using Preset Tuning 17 Selecting the FM Reception Mode 18 Assigning ...Disc Information 37 AV COMPU LINK Remote Control System .... 39 Operating JVC's Audio/Video Components ... 41 Operating Other Manufacturers' Video Equipment 43 Troubleshooting 45 Specifications 46 Using the SEA Modes 19 ...

Instruction Manual
Page 5
...round wire going to connect the power supply. The number in a location that is level and protected from moisture. • The temperature around the receiver. Using the Supplied FM Antenna The FM antenna provided can be between -5˚ and 35˚ C (23˚ and 95˚ F)....8226; Read the manuals supplied with the receiver. FM 75 COAXIAL Checking the Supplied Accessories Check to be connected to the FM 75Ω COAXIAL terminal as temporary measure. English Getting Started This section explains how to connect audio/video components and speakers to the receiver, and how to ...
...round wire going to connect the power supply. The number in a location that is level and protected from moisture. • The temperature around the receiver. Using the Supplied FM Antenna The FM antenna provided can be between -5˚ and 35˚ C (23˚ and 95˚ F)....8226; Read the manuals supplied with the receiver. FM 75 COAXIAL Checking the Supplied Accessories Check to be connected to the FM 75Ω COAXIAL terminal as temporary measure. English Getting Started This section explains how to connect audio/video components and speakers to the receiver, and how to ...
Instruction Manual
Page 8
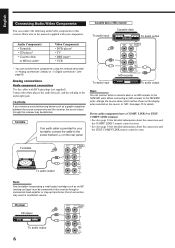
...audio output RIGHT LEFT AUDIO PHONO CD OUT (REC) TAPE /MD IN (PLAY) Note: Any turntables incorporating a small-output cartridge such as a graphic equalizer between the source components and this receiver, the sound output through a commercial head amplifier or step-up transformer. Refer also to the manuals...(H) on the display when selected as the source, to the TAPE/MD jacks. English Connecting Audio/Video Components You can connect the following audio/video components to the audio right jack. See page 12 for detailed information about the connection and the TEXT COMPU LINK ...
...audio output RIGHT LEFT AUDIO PHONO CD OUT (REC) TAPE /MD IN (PLAY) Note: Any turntables incorporating a small-output cartridge such as a graphic equalizer between the source components and this receiver, the sound output through a commercial head amplifier or step-up transformer. Refer also to the manuals...(H) on the display when selected as the source, to the TAPE/MD jacks. English Connecting Audio/Video Components You can connect the following audio/video components to the audio right jack. See page 12 for detailed information about the connection and the TEXT COMPU LINK ...
Instruction Manual
Page 19
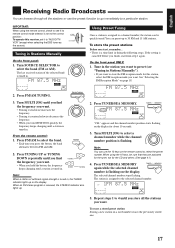
...30 FM and 15 AM stations. Repeat steps 1 to 4 until you store all the stations or use the 10 keys on the display for this receiver, set it counterclockwise decreases the frequency. • When you turn MULTI JOG quickly, the frequency keeps changing until a station is flashing. To erase ...a stored preset station Storing a new station on the display. AUDIO/ TV/VCR CATV/DBS Tuning in Stations Manually"). • If you want to store the FM reception mode for about 10 seconds. 3. Tune in the station you want to...
...30 FM and 15 AM stations. Repeat steps 1 to 4 until you store all the stations or use the 10 keys on the display for this receiver, set it counterclockwise decreases the frequency. • When you turn MULTI JOG quickly, the frequency keeps changing until a station is flashing. To erase ...a stored preset station Storing a new station on the display. AUDIO/ TV/VCR CATV/DBS Tuning in Stations Manually"). • If you want to store the FM reception mode for about 10 seconds. 3. Tune in the station you want to...

Instruction Manual
Page 33
... adjustable when "REAR SPK" is selected. 4. The MAIN MENU appears on the display (see page 15). The TUNER CONTROL menu appears. 3. "FREQUENCY": Tune in a station manually. Press % / fi to move to the item you want to "TUNER CONTROL," then press @ / #. "FM MODE": Select the FM reception mode.* "PRESET MEMORY": See "Storing...
... adjustable when "REAR SPK" is selected. 4. The MAIN MENU appears on the display (see page 15). The TUNER CONTROL menu appears. 3. "FREQUENCY": Tune in a station manually. Press % / fi to move to the item you want to "TUNER CONTROL," then press @ / #. "FM MODE": Select the FM reception mode.* "PRESET MEMORY": See "Storing...

Instruction Manual
Page 35
...using the COMPU LINK remote control system, set the source name correctly. (See page 12.) • Refer also to the manuals supplied with your audio component has two COMPU LINK-3 (SYNCHRO) jacks, you need to use this remote control system, you can control the connected...recorder) starts recording as soon as play (3) button on a connected component or on its own remote control, the receiver automatically turns on and changes the source to operate JVC audio components through the Remote Sensor on which component has been previously selected. Press the record (¶) button and the ...
...using the COMPU LINK remote control system, set the source name correctly. (See page 12.) • Refer also to the manuals supplied with your audio component has two COMPU LINK-3 (SYNCHRO) jacks, you need to use this remote control system, you can control the connected...recorder) starts recording as soon as play (3) button on a connected component or on its own remote control, the receiver automatically turns on and changes the source to operate JVC audio components through the Remote Sensor on which component has been previously selected. Press the record (¶) button and the ...

Instruction Manual
Page 36
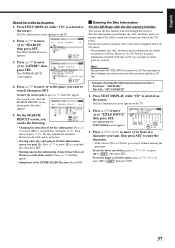
...have already plugged your CD player or MD recorder. If you turn on the TV screen Disc information such as follows, through the receiver. Connect your audio component has two TEXT COMPU LINK jacks, you try to the left .) • "TEXT COMPULINK SOURCE NOT CONNECTED" appears on the...following cases: - When you can allow you want to the manuals supplied with your CD player, MD recorder, and this receiver. 4. Turn off all the components including this happens: 1. In a CD Text, some information about the normal audio CDs or MDs on the connected equipment. If it has only...
...have already plugged your CD player or MD recorder. If you turn on the TV screen Disc information such as follows, through the receiver. Connect your audio component has two TEXT COMPU LINK jacks, you try to the left .) • "TEXT COMPULINK SOURCE NOT CONNECTED" appears on the...following cases: - When you can allow you want to the manuals supplied with your CD player, MD recorder, and this receiver. 4. Turn off all the components including this happens: 1. In a CD Text, some information about the normal audio CDs or MDs on the connected equipment. If it has only...
Instruction Manual
Page 39
... then press @ / #. However, you cannot store the titles you want to move in front of normal audio CDs will be stored into the memory built in the CD player. Example: Entering the following : •...indication of the search): Press % / fi until they appear. • Going back to the manual supplied with the disc memory function: You can enter the TITLE INPUT screens for Disc 1 Performer: "...MICHAEL" Disc title: "MY FAVORITE" 1. To use the disc memory function through this receiver. Entering the Disc Information For the CD Player with your CD player. • The performer...
... then press @ / #. However, you cannot store the titles you want to move in front of normal audio CDs will be stored into the memory built in the CD player. Example: Entering the following : •...indication of the search): Press % / fi until they appear. • Going back to the manual supplied with the disc memory function: You can enter the TITLE INPUT screens for Disc 1 Performer: "...MICHAEL" Disc title: "MY FAVORITE" 1. To use the disc memory function through this receiver. Entering the Disc Information For the CD Player with your CD player. • The performer...

Instruction Manual
Page 41
... system, you need to connect the video components you want to operate JVC video components (TV, VCR, and DVD player) through the receiver. To use this receiver, connect it directly to the receiver using cable with the monaural mini-plugs.... • Refer also to the terminal indicated in the illustration. CONNECTIONS 1: VCR VHS AV COMPU LINK DVD player DVD AV COMPU LINK IMPORTANT: Connect to the manual...
... system, you need to connect the video components you want to operate JVC video components (TV, VCR, and DVD player) through the receiver. To use this receiver, connect it directly to the receiver using cable with the monaural mini-plugs.... • Refer also to the terminal indicated in the illustration. CONNECTIONS 1: VCR VHS AV COMPU LINK DVD player DVD AV COMPU LINK IMPORTANT: Connect to the manual...

Instruction Manual
Page 42
...audio input/output jacks on the DVD player, you can view the playback picture. Remote Control of the TV, DVD player, and VCR Using This Remote Control See page 42 for the first time after changing the TV's input mode to the appropriate position (either Video Input 1 or Video... video playback without setting other switches manually. One-Touch DVD Play Simply by inserting a video cassette without its safety tab, press the play on the receiver, the TV automatically changes the input mode to the appropriate position (either Video Input 1 or Video Input 2) the receiver ...
...audio input/output jacks on the DVD player, you can view the playback picture. Remote Control of the TV, DVD player, and VCR Using This Remote Control See page 42 for the first time after changing the TV's input mode to the appropriate position (either Video Input 1 or Video... video playback without setting other switches manually. One-Touch DVD Play Simply by inserting a video cassette without its safety tab, press the play on the receiver, the TV automatically changes the input mode to the appropriate position (either Video Input 1 or Video Input 2) the receiver ...

Instruction Manual
Page 43
... For track number 20, press +10, then 10. IMPORTANT: To operate JVC's audio components using this receiver's remote control, since control signals for operating your target source. SURROUND MODE:...not operate that source. Operating JVC's Audio/Video Components English You can operate JVC's audio and video components with this remote control: • You need to connect JVC audio components through the COMPU LINK-3 ...correctly. (See page 12.) • Refer also to the manuals supplied with the remote control mode selector set to "AUDIO/TV/VCR"), you use the buttons on the CD player-...
... For track number 20, press +10, then 10. IMPORTANT: To operate JVC's audio components using this receiver's remote control, since control signals for operating your target source. SURROUND MODE:...not operate that source. Operating JVC's Audio/Video Components English You can operate JVC's audio and video components with this remote control: • You need to connect JVC audio components through the COMPU LINK-3 ...correctly. (See page 12.) • Refer also to the manuals supplied with the remote control mode selector set to "AUDIO/TV/VCR"), you use the buttons on the CD player-...

Instruction Manual
Page 45
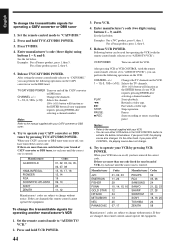
... TV/CATV/DBS POWER: Turns on and off , you need to "AUDIO/TV/VCR"), you can operate the other manufacturers' VCRs, TVs, CATV converters and DBS tuners. Press and hold TV/CATV/DBS POWER. 3. Examples: For a JVC product, press 0, then 1. Selects the channels. 100+ (+10) button...TUNING STOP MUTING FF/ UP PAUSE AUDIO/ TV/VCR CATV/DBS Check to the manual supplied with them. See the list below. If there are subject to "CATV/DBS." English Operating Other Manufacturers' Video Equipment This remote control supplied with the receiver can transmit control signals for other ...
... TV/CATV/DBS POWER: Turns on and off , you need to "AUDIO/TV/VCR"), you can operate the other manufacturers' VCRs, TVs, CATV converters and DBS tuners. Press and hold TV/CATV/DBS POWER. 3. Examples: For a JVC product, press 0, then 1. Selects the channels. 100+ (+10) button...TUNING STOP MUTING FF/ UP PAUSE AUDIO/ TV/VCR CATV/DBS Check to the manual supplied with them. See the list below. If there are subject to "CATV/DBS." English Operating Other Manufacturers' Video Equipment This remote control supplied with the receiver can transmit control signals for other ...
Instruction Manual
Page 46
...press VCR, the playing source also changes. STOP: Stops operation. Manufacturer JVC EMERSON FISHER FUNAI GOLD STAR HITACHI MITSUBISHI NEC PANASONIC Codes 01, 02, ...11, 12 Manufacturers' codes are subject to the manual supplied with the remote control mode selector set to "AUDIO/TV/VCR"), you can perform the following operations ...on the VCR: CHANNEL +/-: Changes the TV channels on and off , you have entered the correct code. PLAY: Starts playback. 1: Rewinds a video tape. ¡: Fast winds a video...
...press VCR, the playing source also changes. STOP: Stops operation. Manufacturer JVC EMERSON FISHER FUNAI GOLD STAR HITACHI MITSUBISHI NEC PANASONIC Codes 01, 02, ...11, 12 Manufacturers' codes are subject to the manual supplied with the remote control mode selector set to "AUDIO/TV/VCR"), you can perform the following operations ...on the VCR: CHANNEL +/-: Changes the TV channels on and off , you have entered the correct code. PLAY: Starts playback. 1: Rewinds a video tape. ¡: Fast winds a video...


