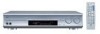
Instruction Manual
Page 2
... marked with the letter E or by a newspaper or cloth, etc., the heat may not be able to the terminal which is coloured brown must be remote controlled. The wire which is marked with the letter N or coloured black. STANDBY/ON button! CAUTION To reduce the risk of these colours may not...
... marked with the letter E or by a newspaper or cloth, etc., the heat may not be able to the terminal which is coloured brown must be remote controlled. The wire which is marked with the letter N or coloured black. STANDBY/ON button! CAUTION To reduce the risk of these colours may not...

Instruction Manual
Page 5
...Parts identification 2 Getting started 4 Before Installation 4 Checking the supplied accessories 4 Putting batteries in the remote control 4 Connecting the FM and AM (MW) antennas 5 Connecting the speakers 6 Connecting video ...Using preset tuning 25 Selecting the FM reception mode 26 Using the Radio Data System (RDS) to receive FM stations 27 Searching for a program by PTY codes 28 Switching to broadcast program of your ... Activating the Surround/DSP modes 35 Operating other JVC products 36 Operating other manufacturers' products ........ 38 Troubleshooting 41 Specifications 42 1
...Parts identification 2 Getting started 4 Before Installation 4 Checking the supplied accessories 4 Putting batteries in the remote control 4 Connecting the FM and AM (MW) antennas 5 Connecting the speakers 6 Connecting video ...Using preset tuning 25 Selecting the FM reception mode 26 Using the Radio Data System (RDS) to receive FM stations 27 Searching for a program by PTY codes 28 Switching to broadcast program of your ... Activating the Surround/DSP modes 35 Operating other JVC products 36 Operating other manufacturers' products ........ 38 Troubleshooting 41 Specifications 42 1

Instruction Manual
Page 6
Parts identification 1 DVR DVD A/V CONTROL STANDBY/ON RECEIVER TEST *FRONT L *FRONT R AUDIO 1 2 3 EFFECT *CENTER *SUBWFR DVR/DVD 2 4 5 6 p C.TONE *SURR L *SURR R VCR 7 8 9 3 4 *D.EQ FREQ*S BACK L *S BACK R TV/STB 10 0 10 RETURN TA/NEWS/INFO ... (36, 37, 39, 40) 4, 3, ¢, 7, 8, REW, FF, REC PAUSE • Operating buttons for operating a JVC DVD recorder or DVD player with your DVD recorder or DVD player. If these buttons do not function normally, use the remote control supplied with the mode selector set the mode selector (1) to "DVR" or "DVD" (see...
Parts identification 1 DVR DVD A/V CONTROL STANDBY/ON RECEIVER TEST *FRONT L *FRONT R AUDIO 1 2 3 EFFECT *CENTER *SUBWFR DVR/DVD 2 4 5 6 p C.TONE *SURR L *SURR R VCR 7 8 9 3 4 *D.EQ FREQ*S BACK L *S BACK R TV/STB 10 0 10 RETURN TA/NEWS/INFO ... (36, 37, 39, 40) 4, 3, ¢, 7, 8, REW, FF, REC PAUSE • Operating buttons for operating a JVC DVD recorder or DVD player with your DVD recorder or DVD player. If these buttons do not function normally, use the remote control supplied with the mode selector set the mode selector (1) to "DVR" or "DVD" (see...

Instruction Manual
Page 7
...cord (11) 2 COMPONENT VIDEO (Y, PB, PR) jacks (8, 9) VIDEO IN, DVR/DVD IN, MONITOR OUT 3 AV IN/OUT terminals (7) TV, VCR, DVR/DVD 4 DIGITAL IN terminals (10) • Coaxial: 1(DVR/DVD) &#...%^ & * ( ) ~ SLEEP indicator (14) ! Front panel 1 2 345 AUDIO/VIDEO CONTROL RECEIVER STANDBY/ON DIMMER SETTING ADJUST SURROUND PHONES USB 6 DVR / DVD VCR VIDEO TV USB FM/AM 78 ...9 MASTER VOLUME control (13) p PHONES jack (13) q USB terminal (10) w Display window (see below) e Remote sensor (4) 6 78 9 0 - =~ ANALOG DUAL MONO AUTO SURR DIGITAL AUTO L C R HEADPHONE LINEAR PCM DIGITAL 96...
...cord (11) 2 COMPONENT VIDEO (Y, PB, PR) jacks (8, 9) VIDEO IN, DVR/DVD IN, MONITOR OUT 3 AV IN/OUT terminals (7) TV, VCR, DVR/DVD 4 DIGITAL IN terminals (10) • Coaxial: 1(DVR/DVD) &#...%^ & * ( ) ~ SLEEP indicator (14) ! Front panel 1 2 345 AUDIO/VIDEO CONTROL RECEIVER STANDBY/ON DIMMER SETTING ADJUST SURROUND PHONES USB 6 DVR / DVD VCR VIDEO TV USB FM/AM 78 ...9 MASTER VOLUME control (13) p PHONES jack (13) q USB terminal (10) w Display window (see below) e Remote sensor (4) 6 78 9 0 - =~ ANALOG DUAL MONO AUTO SURR DIGITAL AUTO L C R HEADPHONE LINEAR PCM DIGITAL 96...

Instruction Manual
Page 8
... • The temperature around the receiver. Remote sensor The receiver has a built-in cooling fan which operates while the receiver is good ventilation around the receiver must be sure you have all of the remote control. 2 Insert batteries. Locations • Install the receiver in a location that look similar ...• Always replace both batteries at the remote sensor on the power cord to be between the receiver and the TV. Handling the receiver • Do not insert any metal object into the receiver. • Do not disassemble the receiver or remove screws, covers, or cabinet. ...
... • The temperature around the receiver. Remote sensor The receiver has a built-in cooling fan which operates while the receiver is good ventilation around the receiver must be sure you have all of the remote control. 2 Insert batteries. Locations • Install the receiver in a location that look similar ...• Always replace both batteries at the remote sensor on the power cord to be between the receiver and the TV. Handling the receiver • Do not insert any metal object into the receiver. • Do not disassemble the receiver or remove screws, covers, or cabinet. ...
Instruction Manual
Page 16
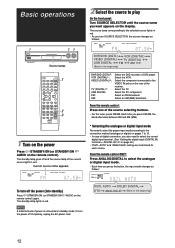
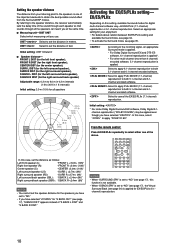
... on page 20.) • "DGTL AUTO" and "ANALOGUE" setting are memorized for each source. Select the PC component. Select an AM (MW) broadcast. From the remote control: Press one of digital connection, you press the button, the input mode changes as follows: ANALOG AUTO SURR L R S.WFR TUNED STEREO AUTO MUTING MHz..., the source changes as follows: AUTO SURR DIGITAL AUTO L C R S.WFR LFE DIGITAL LS RS To turn the power off and the source lamp of the receiver. The standby lamp goes off completely, unplug the AC power cord. The source lamp corresponding to the beginning) 12
... on page 20.) • "DGTL AUTO" and "ANALOGUE" setting are memorized for each source. Select the PC component. Select an AM (MW) broadcast. From the remote control: Press one of digital connection, you press the button, the input mode changes as follows: ANALOG AUTO SURR L R S.WFR TUNED STEREO AUTO MUTING MHz..., the source changes as follows: AUTO SURR DIGITAL AUTO L C R S.WFR LFE DIGITAL LS RS To turn the power off and the source lamp of the receiver. The standby lamp goes off completely, unplug the AC power cord. The source lamp corresponding to the beginning) 12
Instruction Manual
Page 17
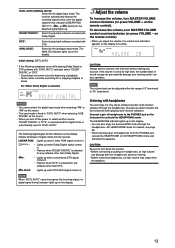
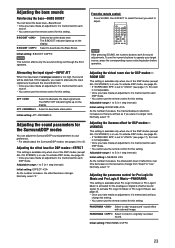
...headphones from the speakers. 13 ANALOG AUTO SURR L R S.WFR Initial setting: DGTL AUTO * If the following digital signal format indicators on the remote control). NOTE The volume level can permanently damage your hearing and/or ruin your hearing. • Before removing headphones, as the source. &#...signal lights up when DTS 96/24 signal comes in . • Flashes when "DOLBY DIGITAL" is fixed to "50" (maximum). The receiver automatically detects the incoming signal format, then the digital signal format indicator (LINEAR PCM, , , or 96/24) for any software other than ...
...headphones from the speakers. 13 ANALOG AUTO SURR L R S.WFR Initial setting: DGTL AUTO * If the following digital signal format indicators on the remote control). NOTE The volume level can permanently damage your hearing and/or ruin your hearing. • Before removing headphones, as the source. &#...signal lights up when DTS 96/24 signal comes in . • Flashes when "DOLBY DIGITAL" is fixed to "50" (maximum). The receiver automatically detects the incoming signal format, then the digital signal format indicator (LINEAR PCM, , , or 96/24) for any software other than ...

Instruction Manual
Page 18
... follows: L: • When digital input is also canceled when you can dim the display-Dimmer. From the remote control ONLY: Press SLEEP repeatedly. • Each time you operate the receiver.) DIMMER OFF: Cancels the Dimmer (normal display). RS: Lights up . ANALOG L R S.WFR AUTO SURR ... the display and the volume turns off. The remaining time (in . Turning off the sounds temporarily From the remote control ONLY: Press MUTING to turn off the receiver. DIMMER 3: Turns off the display. (Temporarily canceled when you press the button, the shut-off time appears....
... follows: L: • When digital input is also canceled when you can dim the display-Dimmer. From the remote control ONLY: Press SLEEP repeatedly. • Each time you operate the receiver.) DIMMER OFF: Cancels the Dimmer (normal display). RS: Lights up . ANALOG L R S.WFR AUTO SURR ... the display and the volume turns off. The remaining time (in . Turning off the sounds temporarily From the remote control ONLY: Press MUTING to turn off the receiver. DIMMER 3: Turns off the display. (Temporarily canceled when you press the button, the shut-off time appears....
Instruction Manual
Page 22
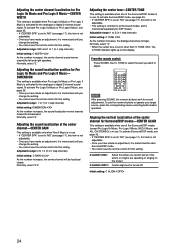
UNIT Select to set the distance in 0.3 m intervals (1 ft to "NO" (see page 17), the Virtual Surround Back (see page 35. From the remote control: Press EX/ES/PLIIx repeatedly to select either one of the above. 4 5 6 7 8 9 10 0 10 In this setting, available Surround ...), this case, select "" to cancel the EX/ES/PLIIx (7.1-channel) reproduction. Select to apply 6.1-channel reproduction to the speaker distance, the receiver automatically sets the delay time of "S BACK L DIST" and "S BACK R DIST." By referring to both 5.1-channel and 6.1-channel encoded software.
UNIT Select to set the distance in 0.3 m intervals (1 ft to "NO" (see page 17), the Virtual Surround Back (see page 35. From the remote control: Press EX/ES/PLIIx repeatedly to select either one of the above. 4 5 6 7 8 9 10 0 10 In this setting, available Surround ...), this case, select "" to cancel the EX/ES/PLIIx (7.1-channel) reproduction. Select to apply 6.1-channel reproduction to the speaker distance, the receiver automatically sets the delay time of "S BACK L DIST" and "S BACK R DIST." By referring to both 5.1-channel and 6.1-channel encoded software.

Instruction Manual
Page 25
... pattern of each band. (22) Boost the bass level. (23) Attenuate the input level of the center channel signals. (24) *1 You can also use the remote control for the selected item appears. Before you have used Quick Speaker Setup on the display. 21 The current setting for the adjustment. *2 If you...
... pattern of each band. (22) Boost the bass level. (23) Attenuate the input level of the center channel signals. (24) *1 You can also use the remote control for the selected item appears. Before you have used Quick Speaker Setup on the display. 21 The current setting for the adjustment. *2 If you...

Instruction Manual
Page 26
... 7 8 9 2 10 0 10 3 4 Repeat steps 2 and 3 to adjust 1 other bands. To use . • If you start from the display. From the remote control: 1 Press SOUND. 2 Press TEST to adjust the output level. • After pressing SOUND, the numeric buttons work for "S BACK OUT" (see page 17), "S BACK... the test tone. Adjust all the speakers' output levels so that you can adjust equalization patterns in doing the following steps. From the remote control: Before you have made an adjustment, it is a time limit in five frequency bands (center frequency: 63 Hz, 250 Hz,...
... 7 8 9 2 10 0 10 3 4 Repeat steps 2 and 3 to adjust 1 other bands. To use . • If you start from the display. From the remote control: 1 Press SOUND. 2 Press TEST to adjust the output level. • After pressing SOUND, the numeric buttons work for "S BACK OUT" (see page 17), "S BACK... the test tone. Adjust all the speakers' output levels so that you can adjust equalization patterns in doing the following steps. From the remote control: Before you have made an adjustment, it is a time limit in five frequency bands (center frequency: 63 Hz, 250 Hz,...
Instruction Manual
Page 27
.... To activate Pro Logic IIx Music or Pro Logic II Music, see page 17), this setting. PANORAMA Select to 5 (in use the remote control for each DSP mode. • You cannot use . Initial setting: B BOOST NOTE This function affects only the sound coming out through... Once you have made an adjustment, it is in 1 step intervals) Initial setting: EFFECT As the number increases, the effect becomes stronger. From the remote control: Press SOUND, then EFFECT to select the level you want to 5 (in use the numeric buttons to 35. Normally, select "3." Normally, select...
.... To activate Pro Logic IIx Music or Pro Logic II Music, see page 17), this setting. PANORAMA Select to 5 (in use the remote control for each DSP mode. • You cannot use . Initial setting: B BOOST NOTE This function affects only the sound coming out through... Once you have made an adjustment, it is in 1 step intervals) Initial setting: EFFECT As the number increases, the effect becomes stronger. From the remote control: Press SOUND, then EFFECT to select the level you want to 5 (in use the numeric buttons to 35. Normally, select "3." Normally, select...
Instruction Manual
Page 28
... analogue or digital 2-channel sound signal. Normally, select "0.3." TONE to select the level you change the setting. • You cannot use the remote control for sound adjustments. To activate Surround/DSP mode, see page 35. • If "CENTER SPK" is set to all Surround modes, ...moves toward the left and right speakers. C ALIGN C ALIGN Select this when you change the setting. • You cannot use the remote control for Surround/DSP modes-CENTER ALIGN This setting is available when one of the center channel for this setting. Adjusting the sound localization ...
... analogue or digital 2-channel sound signal. Normally, select "0.3." TONE to select the level you change the setting. • You cannot use the remote control for sound adjustments. To activate Surround/DSP mode, see page 35. • If "CENTER SPK" is set to all Surround modes, ...moves toward the left and right speakers. C ALIGN C ALIGN Select this when you change the setting. • You cannot use the remote control for Surround/DSP modes-CENTER ALIGN This setting is available when one of the center channel for this setting. Adjusting the sound localization ...

Instruction Manual
Page 29
... 9 or ( TUNING until a station is tuned in. • When a station of the selected band is a time limit in . • Each time you start from the remote control. 1 2 3 4 5 6 7 8 9 10 0 10 TUNING/REW FF/TUNING MEMORY FM MODE FM/AM NOTE When you have selected "FM" or "AM" by using ...up . See "Selecting the FM reception mode" on the front panel, the remote control may not work for tuner operations, select "FM" or "AM" by selecting the number. The last received station of sufficient signal strength is received, the STEREO indicator also lights up to 30 FM and 15 AM (MW)...
... 9 or ( TUNING until a station is tuned in. • When a station of the selected band is a time limit in . • Each time you start from the remote control. 1 2 3 4 5 6 7 8 9 10 0 10 TUNING/REW FF/TUNING MEMORY FM MODE FM/AM NOTE When you have selected "FM" or "AM" by using ...up . See "Selecting the FM reception mode" on the front panel, the remote control may not work for tuner operations, select "FM" or "AM" by selecting the number. The last received station of sufficient signal strength is received, the STEREO indicator also lights up to 30 FM and 15 AM (MW)...

Instruction Manual
Page 30
...R S.WFR TUNED STEREO AUTO MUTING MHz 4 Press MEMORY again while the selected channel number is a time limit in a preset station From the remote control: 1 Press FM/AM to suppress static noise between stations. Selecting the FM reception mode When an FM stereo broadcast is broadcast in stereo... For channel number 30, press +10, +10, then 10. To erase a stored preset station Storing a new station on the display. The last received station of the selected band is canceled before you press the button, the band alternates between "AUTO MUTING" and "MONO." when in . 2 Press TUNER...
...R S.WFR TUNED STEREO AUTO MUTING MHz 4 Press MEMORY again while the selected channel number is a time limit in a preset station From the remote control: 1 Press FM/AM to suppress static noise between stations. Selecting the FM reception mode When an FM stereo broadcast is broadcast in stereo... For channel number 30, press +10, +10, then 10. To erase a stored preset station Storing a new station on the display. The last received station of the selected band is canceled before you press the button, the band alternates between "AUTO MUTING" and "MONO." when in . 2 Press TUNER...

Instruction Manual
Page 31
...accented "A's" like and â." Press DISPLAY MODE while listening to an FM station. • Each time you can receive the following information: PS PTY Frequency RT (Normal indication) PS (Program Service): FM/AM While searching, "PS"... appears if no signal is tuned in, the RDS indicator lights up on the display. With the receiver, you press the button, the display changes to send an additional signal along with their station names,... display. 27 Using the Radio Data System (RDS) to receive FM stations Only the buttons on the remote control are used for RDS operations.
...accented "A's" like and â." Press DISPLAY MODE while listening to an FM station. • Each time you can receive the following information: PS PTY Frequency RT (Normal indication) PS (Program Service): FM/AM While searching, "PS"... appears if no signal is tuned in, the RDS indicator lights up on the display. With the receiver, you press the button, the display changes to send an additional signal along with their station names,... display. 27 Using the Radio Data System (RDS) to receive FM stations Only the buttons on the remote control are used for RDS operations.

Instruction Manual
Page 39
... effect in the following settings: CENTER WIDTH (see page 24) DIMENSION (see page 24) PANORAMA (see page 23) Selecting the Surround/DSP modes From the remote control: 2 1 1 Select and play any source. • Make sure you have selected the input mode (analogue or digital) correctly. 2 Press SURROUND. For details, see page...
... effect in the following settings: CENTER WIDTH (see page 24) DIMENSION (see page 24) PANORAMA (see page 23) Selecting the Surround/DSP modes From the remote control: 2 1 1 Select and play any source. • Make sure you have selected the input mode (analogue or digital) correctly. 2 Press SURROUND. For details, see page...

Instruction Manual
Page 40
...on the TV. After pressing VCR, you can accept four types of the control signals-remote codes "A" and "B." Pause playback. To release it, press 3. To start recording, press this receiver but also other JVC products. • Refer also to the manuals supplied with the DVD recorder. •...; To operate other products, aim the remote control directly at the remote sensor on the target product. 7 TV You can always perform...
...on the TV. After pressing VCR, you can accept four types of the control signals-remote codes "A" and "B." Pause playback. To release it, press 3. To start recording, press this receiver but also other JVC products. • Refer also to the manuals supplied with the DVD recorder. •...; To operate other products, aim the remote control directly at the remote sensor on the target product. 7 TV You can always perform...
Instruction Manual
Page 41
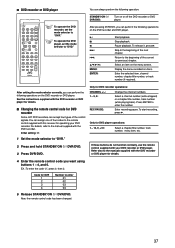
... recorder operations: CHANNEL +/-: 1 - 9, 0: REC PAUSE: Change the channel numbers. Stop playback. You can assign one of four codes to the remote control supplied with this receiver for DVD player operations: 1 - 10, 0, +10: Select a chapter/title number, track number, menu item, etc. 1 Set the mode ...ENTER to "DVR." Enter recording pause. If these buttons do not function normally, use the remote control supplied with the DVD recorder or DVD player for DVD recorder Some JVC DVD recorders can perform the following operations on the DVD recorder or DVD player. Refer also to...
... recorder operations: CHANNEL +/-: 1 - 9, 0: REC PAUSE: Change the channel numbers. Stop playback. You can assign one of four codes to the remote control supplied with this receiver for DVD player operations: 1 - 10, 0, +10: Select a chapter/title number, track number, menu item, etc. 1 Set the mode ...ENTER to "DVR." Enter recording pause. If these buttons do not function normally, use the remote control supplied with the DVD recorder or DVD player for DVD recorder Some JVC DVD recorders can perform the following operations on the DVD recorder or DVD player. Refer also to...

Instruction Manual
Page 42
...STB. 2 Press TV. 3 Enter the manufacturer's code using buttons 1 - 9, and 0. See "Manufacturers' codes for TV" on the TV. See the instructions supplied with the remote control, first you need to set the manufacturers' codes each one until the correct one code is entered. If more than one is listed for...on the TV. After pressing TV, you can perform the following operations on the right. 4 Release STANDBY/ON TV/STB. Manufacturers' codes for TV Manufacturer JVC Daewoo Grundig Panasonic Philips Samsung Sony Thomson Codes 01 03, 19, 20 02 06, 07 03 08, 09, 20 09, 10, 11, 12, ...
...STB. 2 Press TV. 3 Enter the manufacturer's code using buttons 1 - 9, and 0. See "Manufacturers' codes for TV" on the TV. See the instructions supplied with the remote control, first you need to set the manufacturers' codes each one until the correct one code is entered. If more than one is listed for...on the TV. After pressing TV, you can perform the following operations on the right. 4 Release STANDBY/ON TV/STB. Manufacturers' codes for TV Manufacturer JVC Daewoo Grundig Panasonic Philips Samsung Sony Thomson Codes 01 03, 19, 20 02 06, 07 03 08, 09, 20 09, 10, 11, 12, ...


