
Instruction Manual
Page 5
...of existing theaters and halls. By using Precise Surround Setup, you can be able to the receiver. Features Hybrid Feedback Digital Amplifier RX-D411S features the JVC-exclusive Hybrid Feedback Digital Amplifier. DCDi technology DCDi (Directional Correlational Deinterlacing) technology, developed by Digital ...object or liquid fall into the receiver, unplug the receiver and consult your JVC dealer. 1 Before operating this unit, read this receiver. * HDMI, the HDMI logo and High-Definition Multimedia Interface are trademarks or registered trademarks of HDMI Licensing LLC. **HDCP is the ...
...of existing theaters and halls. By using Precise Surround Setup, you can be able to the receiver. Features Hybrid Feedback Digital Amplifier RX-D411S features the JVC-exclusive Hybrid Feedback Digital Amplifier. DCDi technology DCDi (Directional Correlational Deinterlacing) technology, developed by Digital ...object or liquid fall into the receiver, unplug the receiver and consult your JVC dealer. 1 Before operating this unit, read this receiver. * HDMI, the HDMI logo and High-Definition Multimedia Interface are trademarks or registered trademarks of HDMI Licensing LLC. **HDCP is the ...

Instruction Manual
Page 6
...1/2/3 33 Setting the Audio delay level-AUDIO DELAY 33 Selecting the source for HDMI terminal and COMPONENT VIDEO jacks-HDMI SELECT/CMPNT SELECT 34 Selecting the output video signals-VIDEO OUTPUT....... 34 Selecting ...41 Using the Surround/DSP modes 42 Activating the Surround/DSP modes 43 Operating other JVC products 45 Operating other manufacturers' products 47 Tuner operations 24 Tuning in to stations manually... 24 Selecting the FM reception mode 25 Using the Radio Data System to receive FM stations ........ 26 Searching for a program by PTY codes 26 Switching to broadcast program ...
...1/2/3 33 Setting the Audio delay level-AUDIO DELAY 33 Selecting the source for HDMI terminal and COMPONENT VIDEO jacks-HDMI SELECT/CMPNT SELECT 34 Selecting the output video signals-VIDEO OUTPUT....... 34 Selecting ...41 Using the Surround/DSP modes 42 Activating the Surround/DSP modes 43 Operating other JVC products 45 Operating other manufacturers' products 47 Tuner operations 24 Tuning in to stations manually... 24 Selecting the FM reception mode 25 Using the Radio Data System to receive FM stations ........ 26 Searching for a program by PTY codes 26 Switching to broadcast program ...
Instruction Manual
Page 8
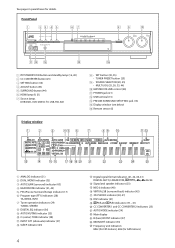
... AM stations) Front Panel 1 STANDBY/ON button and standby lamp (16, 20) 2 CC CONVERTER button (23) 3 SETTING button (30) 4 ADJUST button (35) 5 SURROUND button (44) 6 HDMI lamp (9, 21) 7 Source lamps DVR/DVD, VCR, VIDEO, TV, USB, FM, AM Display window 8 • SET button (30, 35) • TUNER PRESET button (25) 9 •...
... AM stations) Front Panel 1 STANDBY/ON button and standby lamp (16, 20) 2 CC CONVERTER button (23) 3 SETTING button (30) 4 ADJUST button (35) 5 SURROUND button (44) 6 HDMI lamp (9, 21) 7 Source lamps DVR/DVD, VCR, VIDEO, TV, USB, FM, AM Display window 8 • SET button (30, 35) • TUNER PRESET button (25) 9 •...
Instruction Manual
Page 9
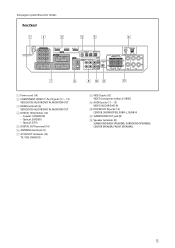
... (11 - 13) VIDEO(VCR) IN, DVR/DVD IN, MONITOR OUT 3 HDMI terminals (9) VIDEO(VCR) IN, DVR/DVD IN, MONITOR OUT 4 DIGITAL IN terminals (14) • Coaxial: 1(DVR/DVD) • Optical: 2(VIDEO) • Optical: 3(TV) 5 DIGITAL OUT terminal (14) 6 ANTENNA terminals (7) 7 AV IN/OUT terminals (10) TV, VCR, DVR/DVD 8 VIDEO jacks (13...
... (11 - 13) VIDEO(VCR) IN, DVR/DVD IN, MONITOR OUT 3 HDMI terminals (9) VIDEO(VCR) IN, DVR/DVD IN, MONITOR OUT 4 DIGITAL IN terminals (14) • Coaxial: 1(DVR/DVD) • Optical: 2(VIDEO) • Optical: 3(TV) 5 DIGITAL OUT terminal (14) 6 ANTENNA terminals (7) 7 AV IN/OUT terminals (10) TV, VCR, DVR/DVD 8 VIDEO jacks (13...

Instruction Manual
Page 13
...connected to the equipment you change the audio input setting to other connections have been made. 7 HDMI connection IMPORTANT: The HDMI video signals from the speakers connected to this receiver with an HDMI cable, the sound coming in the beginning for example). • When connecting a VCR or another... audio input setting (see page 21) when you can connect the source components or the TV with an HDMI cable, the following procedure beforehand: 1 Connect your TV and this receiver. • When connecting a TV to the connection method for each video component. See page 12 for ...
...connected to the equipment you change the audio input setting to other connections have been made. 7 HDMI connection IMPORTANT: The HDMI video signals from the speakers connected to this receiver with an HDMI cable, the sound coming in the beginning for example). • When connecting a VCR or another... audio input setting (see page 21) when you can connect the source components or the TV with an HDMI cable, the following procedure beforehand: 1 Connect your TV and this receiver. • When connecting a TV to the connection method for each video component. See page 12 for ...

Instruction Manual
Page 14
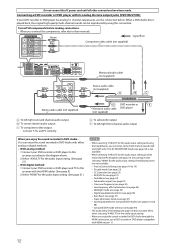
... (not supplied) TV SCART cable (not supplied) VCR DVD recorder or DVD player For an analog decoder To watch through the receiver. For details on the JVC's T-V LINK compatible TV for the T-V LINK function are always going through or to record a scrambled program on your VCR. NOTE... to this receiver. 10 Select a setting other connections have been made. 7 SCART connection You can use the T-V LINK function if you record a playback picture with a DVD recorder or VCR connected to EXT-2 terminal on T-V LINK, refer also to the manuals supplied with the HDMI or component video...
... (not supplied) TV SCART cable (not supplied) VCR DVD recorder or DVD player For an analog decoder To watch through the receiver. For details on the JVC's T-V LINK compatible TV for the T-V LINK function are always going through or to record a scrambled program on your VCR. NOTE... to this receiver. 10 Select a setting other connections have been made. 7 SCART connection You can use the T-V LINK function if you record a playback picture with a DVD recorder or VCR connected to EXT-2 terminal on T-V LINK, refer also to the manuals supplied with the HDMI or component video...
Instruction Manual
Page 15
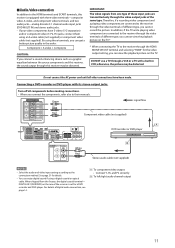
...8226; When you connect a sound-enhancing device such as a graphic equalizer between the source components and this receiver, the sound output through the HDMI MONITOR OUT terminal and selecting "HDMI" for a DVD recorder and DVD player. IMPORTANT: The video signals from the factory, the digital coaxial terminal... set for the video output setting, you cannot record the picture. 7 Audio/video connection In addition to the HDMI terminals and SCART terminals, this receiver may be distorted. Green Blue Red Component video cable (not supplied) : signal flow DVD recorder or DVD player...
...8226; When you connect a sound-enhancing device such as a graphic equalizer between the source components and this receiver, the sound output through the HDMI MONITOR OUT terminal and selecting "HDMI" for a DVD recorder and DVD player. IMPORTANT: The video signals from the factory, the digital coaxial terminal... set for the video output setting, you cannot record the picture. 7 Audio/video connection In addition to the HDMI terminals and SCART terminals, this receiver may be distorted. Green Blue Red Component video cable (not supplied) : signal flow DVD recorder or DVD player...
Instruction Manual
Page 16
... their manuals. Turn off all other connections have been made. With digital method: 1.Connect your DVD recorder or DVD player and TV to this receiver with either analog or digital methods. - Precise Surround Setup (see page 23) - CC Converter (see pages 16 to the diagram above. 2.Select... your DVD recorder or DVD player has analog 5.1 channel output jacks, use a DVD recorder or DVD player compatible with selecting "HDMI" for the audio input setting and using this receiver according to 19) - The 3D HEADPHONE mode (see pages 37 and 38) - Midnight mode (see page 37) - Input...
... their manuals. Turn off all other connections have been made. With digital method: 1.Connect your DVD recorder or DVD player and TV to this receiver with either analog or digital methods. - Precise Surround Setup (see page 23) - CC Converter (see pages 16 to the diagram above. 2.Select... your DVD recorder or DVD player has analog 5.1 channel output jacks, use a DVD recorder or DVD player compatible with selecting "HDMI" for the audio input setting and using this receiver according to 19) - The 3D HEADPHONE mode (see pages 37 and 38) - Midnight mode (see page 37) - Input...
Instruction Manual
Page 18
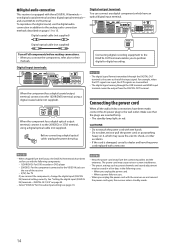
...power failure occurs. • When you to perform digital-to their manuals. one DIGITAL OUT terminal. To reproduce the digital sound, use with the receiver on page 33. • Select "DIGITAL" for use the digital audio connection in the following components: - 1(DVR/DVD): For DVD recorder or...DIGITAL OUT terminal is equipped with three DIGITAL IN terminals- NOTES • The digital signal format transmitted through the USB terminal and HDMI input terminal cannot be erased in a few days in addition to the analog audio connection methods described on pages 11 to the ...
...power failure occurs. • When you to perform digital-to their manuals. one DIGITAL OUT terminal. To reproduce the digital sound, use with the receiver on page 33. • Select "DIGITAL" for use the digital audio connection in the following components: - 1(DVR/DVD): For DVD recorder or...DIGITAL OUT terminal is equipped with three DIGITAL IN terminals- NOTES • The digital signal format transmitted through the USB terminal and HDMI input terminal cannot be erased in a few days in addition to the analog audio connection methods described on pages 11 to the ...

Instruction Manual
Page 20
...-in less than 1 minute: • Speaker size* • Speaker distance* • Speaker output level* • Crossover frequency* • Frequency response The receiver generates test tones from the speakers to measure your listening environment with a monaural extension cord. Precise Surround Setup By using Precise Surround Setup, you can... microphones and speakers while the microphones are picking up test tones from the Surround/ DSP modes, set up with selecting "HDMI" for the audio input setting (see page 12) - The microphones feedback the test tones to the medium. -
...-in less than 1 minute: • Speaker size* • Speaker distance* • Speaker output level* • Crossover frequency* • Frequency response The receiver generates test tones from the speakers to measure your listening environment with a monaural extension cord. Precise Surround Setup By using Precise Surround Setup, you can... microphones and speakers while the microphones are picking up test tones from the Surround/ DSP modes, set up with selecting "HDMI" for the audio input setting (see page 12) - The microphones feedback the test tones to the medium. -

Instruction Manual
Page 22
... left front speaker Current speaker Frequency response +9 dB Optimizing level -9 dB Low Frequency High EX. 2: When a test tone comes from that the receiver fails to optimize the speaker settings. • Depending on the display. After "COMPLETE" is displayed, the Precise Surround Setup results are coming in ...each speaker in with test tones from speakers and the indications on the remote control or the front panel of the frequency responses with selecting "HDMI" for the audio input setting (see page 41) are applied to the normal operation mode. - NOTES • Do not press any...
... left front speaker Current speaker Frequency response +9 dB Optimizing level -9 dB Low Frequency High EX. 2: When a test tone comes from that the receiver fails to optimize the speaker settings. • Depending on the display. After "COMPLETE" is displayed, the Precise Surround Setup results are coming in ...each speaker in with test tones from speakers and the indications on the remote control or the front panel of the frequency responses with selecting "HDMI" for the audio input setting (see page 41) are applied to the normal operation mode. - NOTES • Do not press any...

Instruction Manual
Page 24
... starting any sources. NOTE When you connect a video component other than DVD recorder and DVD player to the HDMI VIDEO(VCR) IN terminal or COMPONENT VIDEO jacks on the rear of the receiver, you connect (see page 34). 3 Adjust the volume To increase the volume, turn SOURCE SELECTOR, the...set the volume to the component you need to select either "VIDEO" or "VCR" for each terminal according to the minimum before turning the receiver on the remote control). Current source name appears. Select this for the AM (MW) broadcast. The source lamp corresponding to the selected source...
... starting any sources. NOTE When you connect a video component other than DVD recorder and DVD player to the HDMI VIDEO(VCR) IN terminal or COMPONENT VIDEO jacks on the rear of the receiver, you connect (see page 34). 3 Adjust the volume To increase the volume, turn SOURCE SELECTOR, the...set the volume to the component you need to select either "VIDEO" or "VCR" for each terminal according to the minimum before turning the receiver on the remote control). Current source name appears. Select this for the AM (MW) broadcast. The source lamp corresponding to the selected source...

Instruction Manual
Page 25
...when connecting a DVD recorder or DVD player to DVD MULTI IN jacks (see page 42). • Disconnecting a pair of the receiver, you also need to "HDMI" (see page 33). • Once you press the button, the input setting changes as the source, only "DIGITAL" and ".... See page 33 for the detected signal lights up on the display. Audio input HDMI ANALOG HDMI DIGITAL DIGITAL (fixed) ANALOGUE (fixed) ANALOGUE (fixed) 21 The HEADPHONE indicator lights up . The receiver automatically detects the incoming signal format, then the digital signal format indicator (LINEAR PCM,...
...when connecting a DVD recorder or DVD player to DVD MULTI IN jacks (see page 42). • Disconnecting a pair of the receiver, you also need to "HDMI" (see page 33). • Once you press the button, the input setting changes as the source, only "DIGITAL" and ".... See page 33 for the detected signal lights up on the display. Audio input HDMI ANALOG HDMI DIGITAL DIGITAL (fixed) ANALOGUE (fixed) ANALOGUE (fixed) 21 The HEADPHONE indicator lights up . The receiver automatically detects the incoming signal format, then the digital signal format indicator (LINEAR PCM,...

Instruction Manual
Page 26
... the display. (Temporarily canceled when you turn off the sound through all connected speakers and headphones. DIMMER 3 Turns off the receiver. - When you operate the receiver.) DIMMER OFF Cancels the Dimmer (normal display). From the remote control ONLY: Press DIMMER repeatedly. • Each time you press...Turning off the sounds temporarily From the remote control ONLY: Press MUTING to "DIGITAL AUTO" in . Selecting the digital decode mode When "HDMI" or "DIGITAL" is selected for the audio input setting (see page 21). From the remote control ONLY: Press DECODE to 41 for ...
... the display. (Temporarily canceled when you turn off the sound through all connected speakers and headphones. DIMMER 3 Turns off the receiver. - When you operate the receiver.) DIMMER OFF Cancels the Dimmer (normal display). From the remote control ONLY: Press DIMMER repeatedly. • Each time you press...Turning off the sounds temporarily From the remote control ONLY: Press MUTING to "DIGITAL AUTO" in . Selecting the digital decode mode When "HDMI" or "DIGITAL" is selected for the audio input setting (see page 21). From the remote control ONLY: Press DECODE to 41 for ...

Instruction Manual
Page 27
... SLEEP once. The remaining time (in minutes) until the shut-off the power with HDMI connection (see page 30. • The other speaker indicators light up when the left... Press SLEEP repeatedly so that "SLEEP OFF" appears on the display. Making sounds natural JVC's CC (Compression Compensative) Converter eliminates jitter and ripples, achieving a drastic reduction in digital...8226; Each time you can fall asleep while listening to the beginning) When the shut-off time comes: The receiver turns off time changes in . SLEEP indicator 10min = 20min = 30min = 40min =50min = 60min = 70min...
... SLEEP once. The remaining time (in minutes) until the shut-off the power with HDMI connection (see page 30. • The other speaker indicators light up when the left... Press SLEEP repeatedly so that "SLEEP OFF" appears on the display. Making sounds natural JVC's CC (Compression Compensative) Converter eliminates jitter and ripples, achieving a drastic reduction in digital...8226; Each time you can fall asleep while listening to the beginning) When the shut-off time comes: The receiver turns off time changes in . SLEEP indicator 10min = 20min = 30min = 40min =50min = 60min = 70min...

Instruction Manual
Page 33
... (33) AUDIO DELAY Set the audio delay time to correct synchronization between video and audio signals. (33) HDMI SELECT Select the source for HDMI VIDEO(VCR) IN terminal. (34) CMPNT SELECT Select the source for COMPONENT VIDEO(VCR) IN jacks. ...to 18, these items directly from the remote control. For example, when "S BACK SPK" is not available with selecting "HDMI" for the audio input setting (see page 12) - When multi-channel PCM signals (see page 12) 29 From pages...back speaker to your surround back speaker size. (30) Register the number of the receiver are completed.
... (33) AUDIO DELAY Set the audio delay time to correct synchronization between video and audio signals. (33) HDMI SELECT Select the source for HDMI VIDEO(VCR) IN terminal. (34) CMPNT SELECT Select the source for COMPONENT VIDEO(VCR) IN jacks. ...to 18, these items directly from the remote control. For example, when "S BACK SPK" is not available with selecting "HDMI" for the audio input setting (see page 12) - When multi-channel PCM signals (see page 12) 29 From pages...back speaker to your surround back speaker size. (30) Register the number of the receiver are completed.

Instruction Manual
Page 34
... MONO Ô SUBWOOFER OUT Ô CROSSOVER Ô LFE ATT Ô MIDNIGHT MODE Ô DIGITAL IN 1 Ô DIGITAL IN 2 Ô DIGITAL IN 3 Ô AUDIO DELAY Ô HDMI SELECT Ô CMPNT SELECT Ô VIDEO OUTPUT Ô AUTO MODE Ô (Back to select the appropriate setting. Ex.: When setting the DIGITAL IN 1 terminal 1 Press...
... MONO Ô SUBWOOFER OUT Ô CROSSOVER Ô LFE ATT Ô MIDNIGHT MODE Ô DIGITAL IN 1 Ô DIGITAL IN 2 Ô DIGITAL IN 3 Ô AUDIO DELAY Ô HDMI SELECT Ô CMPNT SELECT Ô VIDEO OUTPUT Ô AUTO MODE Ô (Back to select the appropriate setting. Ex.: When setting the DIGITAL IN 1 terminal 1 Press...

Instruction Manual
Page 38
...You cannot adjust directly from the remote control. AUTO AUTO1 The auto function mode works when the receiver is selected as the source, only turning on the display. For the HDMI terminal: HDMI VIDEO HDMI VCR Initial setting: Select this when connecting a video component (DBS tuner, for each setting:...turning on the TV. • You cannot adjust directly from the remote control. When the receiver is off , the receiver changes the source to any video jack other than the HDMI terminal. Initial setting: MANUAL For the source selection and TV input mode selection in each ...
...You cannot adjust directly from the remote control. AUTO AUTO1 The auto function mode works when the receiver is selected as the source, only turning on the display. For the HDMI terminal: HDMI VIDEO HDMI VCR Initial setting: Select this when connecting a video component (DBS tuner, for each setting:...turning on the TV. • You cannot adjust directly from the remote control. When the receiver is off , the receiver changes the source to any video jack other than the HDMI terminal. Initial setting: MANUAL For the source selection and TV input mode selection in each ...
Instruction Manual
Page 39
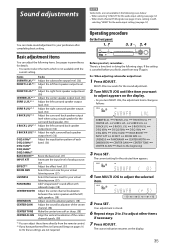
... liveness level for the audio input setting (see page 12) - Ex.: When adjusting subwoofer output level. 1 Press ADJUST. Your adjustment is not available with selecting "HDMI" for your preference after completing basic setting. There is canceled before you turn MULTI JOG, the adjustment items change as follows: SUBWFR LVL Ô FRONT...
... liveness level for the audio input setting (see page 12) - Ex.: When adjusting subwoofer output level. 1 Press ADJUST. Your adjustment is not available with selecting "HDMI" for your preference after completing basic setting. There is canceled before you turn MULTI JOG, the adjustment items change as follows: SUBWFR LVL Ô FRONT...
Instruction Manual
Page 54
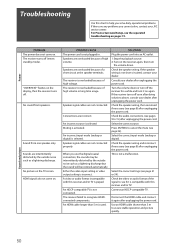
...see the separated troubleshooting on . Turn on . Consult your JVC service center. Select the correct input mode (analog or digital). The receiver is overloaded because of high voltage. HDMI signals do not come on the receiver again, then turn it again after doing solutions above, consult...cord. Select the correct settings (see pages 9 to assure stable operation and picture quality. The receiver is overloaded because of high volume or long time usage. Use an HDMI cable shorter than 5 m is incorrect. Press MUTING to recognize HDMIconnected components. No sound from ...
...see the separated troubleshooting on . Turn on . Consult your JVC service center. Select the correct input mode (analog or digital). The receiver is overloaded because of high voltage. HDMI signals do not come on the receiver again, then turn it again after doing solutions above, consult...cord. Select the correct settings (see pages 9 to assure stable operation and picture quality. The receiver is overloaded because of high volume or long time usage. Use an HDMI cable shorter than 5 m is incorrect. Press MUTING to recognize HDMIconnected components. No sound from ...
