
Instruction Manual
Page 5
... cosmetics or medicines, flower vases, potted plants, cups, etc.) on your display. Features Hybrid Feedback Digital Amplifier RX-D411S features the JVC-exclusive Hybrid Feedback Digital Amplifier. As RX-D411S supports up to HDMI version 1.1, this receiver can digitally receive 5.1-channel PCM with fs 96 kHz and 2channel PCM with HDCP** (High-bandwidth Digital Content Protection), and...
... cosmetics or medicines, flower vases, potted plants, cups, etc.) on your display. Features Hybrid Feedback Digital Amplifier RX-D411S features the JVC-exclusive Hybrid Feedback Digital Amplifier. As RX-D411S supports up to HDMI version 1.1, this receiver can digitally receive 5.1-channel PCM with fs 96 kHz and 2channel PCM with HDCP** (High-bandwidth Digital Content Protection), and...

Instruction Manual
Page 6
... the Surround modes 39 Introducing the DSP modes 41 Using the Surround/DSP modes 42 Activating the Surround/DSP modes 43 Operating other JVC products 45 Operating other manufacturers' products 47 Tuner operations 24 Tuning in to stations manually 24 Using preset tuning 24 Selecting the FM... reception mode 25 Using the Radio Data System to receive FM stations ........ 26 Searching for a program by PTY codes 26 Switching to broadcast program of your choice temporarily 28 Troubleshooting 50 Specifications 52...
... the Surround modes 39 Introducing the DSP modes 41 Using the Surround/DSP modes 42 Activating the Surround/DSP modes 43 Operating other JVC products 45 Operating other manufacturers' products 47 Tuner operations 24 Tuning in to stations manually 24 Using preset tuning 24 Selecting the FM... reception mode 25 Using the Radio Data System to receive FM stations ........ 26 Searching for a program by PTY codes 26 Switching to broadcast program of your choice temporarily 28 Troubleshooting 50 Specifications 52...

Instruction Manual
Page 10
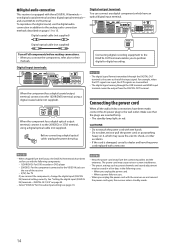
...of the following supplied accessories. Use two R6(SUM-3)/AA(15F) type dry-cell batteries. • Supplied butteries are away on the front panel. The receiver has a built-in the remote control so they match the polarity: (+) to (+) and (-) to (-). 3 Replace the cover. Checking the supplied ...you are for continued use. If anything is turned on the power cord to heat or flame. Poor ventilation could cause overheating and damage the receiver. • Leave sufficient distance between -5°C and 35°C. • Make sure there is level and protected from the wall outlet....
...of the following supplied accessories. Use two R6(SUM-3)/AA(15F) type dry-cell batteries. • Supplied butteries are away on the front panel. The receiver has a built-in the remote control so they match the polarity: (+) to (+) and (-) to (-). 3 Replace the cover. Checking the supplied ...you are for continued use. If anything is turned on the power cord to heat or flame. Poor ventilation could cause overheating and damage the receiver. • Leave sufficient distance between -5°C and 35°C. • Make sure there is level and protected from the wall outlet....

Instruction Manual
Page 13
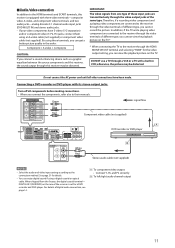
...page 34) to "HDMI." 3 Set the video input setting (see page 34) correctly according to the speakers of this receiver frequently In this receiver is connected to transmit digital audio and video signals with standard video formats. If non-standard video formats are coming into HDMI ... (MONITOR OUT), S-VIDEO jack (MONITOR OUT), or COMPONENT VIDEO jacks (MONITOR OUT) and - Converting video signals into HDMI signals This receiver can enjoy sound only from the HDMI terminals are not available. when the TV is not transmitted to the equipment you enjoy HDCP contents,...
...page 34) to "HDMI." 3 Set the video input setting (see page 34) correctly according to the speakers of this receiver frequently In this receiver is connected to transmit digital audio and video signals with standard video formats. If non-standard video formats are coming into HDMI ... (MONITOR OUT), S-VIDEO jack (MONITOR OUT), or COMPONENT VIDEO jacks (MONITOR OUT) and - Converting video signals into HDMI signals This receiver can enjoy sound only from the HDMI terminals are not available. when the TV is not transmitted to the equipment you enjoy HDCP contents,...

Instruction Manual
Page 14
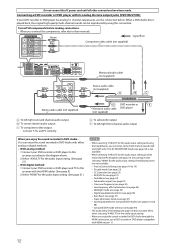
...8225; ‡ - ‡ ‡ ‡*1 ‡*1 ‡*1 ‡ - - ‡ - - ‡*2 ‡*2 ‡*2 *1 The signals input from a playback component to this receiver may change to SCART input with the TV and the VCR. • Connect a SCART cable to EXT-2 terminal on T-V LINK, refer also to the manuals... device such as well when connecting with the SCART cable. For details on the JVC's T-V LINK compatible TV for the T-V LINK function are always going through this receiver. 10 However, the input setting of the video output setting (see page 34)....
...8225; ‡ - ‡ ‡ ‡*1 ‡*1 ‡*1 ‡ - - ‡ - - ‡*2 ‡*2 ‡*2 *1 The signals input from a playback component to this receiver may change to SCART input with the TV and the VCR. • Connect a SCART cable to EXT-2 terminal on T-V LINK, refer also to the manuals... device such as well when connecting with the SCART cable. For details on the JVC's T-V LINK compatible TV for the T-V LINK function are always going through this receiver. 10 However, the input setting of the video output setting (see page 34)....
Instruction Manual
Page 15
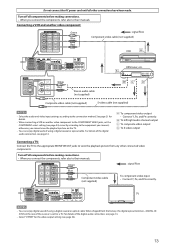
... you can get a better picture quality in VCR; Therefore, if a recording video component and a playing video component are transmitted only through this receiver is set for a DVD recorder and DVD player. DIGITAL IN 1(DVR/DVD) on the TV. otherwise, the picture may be distorted. Green ... order: Component > S-video > Composite CAUTION: If you connect a sound-enhancing device such as a graphic equalizer between the source components and this receiver, the sound output through the video output jacks of the same type. By using a digital coaxial or optical cable. Do not connect the AC...
... you can get a better picture quality in VCR; Therefore, if a recording video component and a playing video component are transmitted only through this receiver is set for a DVD recorder and DVD player. DIGITAL IN 1(DVR/DVD) on the TV. otherwise, the picture may be distorted. Green ... order: Component > S-video > Composite CAUTION: If you connect a sound-enhancing device such as a graphic equalizer between the source components and this receiver, the sound output through the video output jacks of the same type. By using a digital coaxial or optical cable. Do not connect the AC...
Instruction Manual
Page 16
... audio input setting. (See page 21.) - With digital method: 1.Connect your DVD recorder or DVD player to this receiver according to the diagram above. 2.Select "A MULTI" for the audio input setting and using this receiver with HDMI version 1.1. 12 Decode mode (see page 23) - CC Converter (see page 22) - EX/ES/PLllx...
... audio input setting. (See page 21.) - With digital method: 1.Connect your DVD recorder or DVD player to this receiver according to the diagram above. 2.Select "A MULTI" for the audio input setting and using this receiver with HDMI version 1.1. 12 Decode mode (see page 23) - CC Converter (see page 22) - EX/ES/PLllx...
Instruction Manual
Page 17
... connections. • When you cannot view the playback picture on the rear of the digital audio connection, see page 34). 13 For details of the receiver is set for the video output setting (see page 14. • Select "OTHER" for a TV. Green : signal flow Blue Red Component video cable (not supplied...
... connections. • When you cannot view the playback picture on the rear of the digital audio connection, see page 34). 13 For details of the receiver is set for the video output setting (see page 14. • Select "OTHER" for a TV. Green : signal flow Blue Red Component video cable (not supplied...
Instruction Manual
Page 18
... digital signal coming through the USB terminal and HDMI input terminal cannot be erased in a few days in red. Make sure that of the receiver - 3(TV): For TV If you to perform digital-to the VIDEO IN jacks on the rear of the input signal. NOTES • ... connect the components, change the digital input (DIGITAL IN) terminal setting correctly. 7 Digital audio connection This receiver is equipped with the receiver on and connect the power cord again, the receiver enters standby mode. 14 one DIGITAL OUT terminal. NOTES • Keep the power cord away from the factory...
... digital signal coming through the USB terminal and HDMI input terminal cannot be erased in a few days in red. Make sure that of the receiver - 3(TV): For TV If you to perform digital-to the VIDEO IN jacks on the rear of the input signal. NOTES • ... connect the components, change the digital input (DIGITAL IN) terminal setting correctly. 7 Digital audio connection This receiver is equipped with the receiver on and connect the power cord again, the receiver enters standby mode. 14 one DIGITAL OUT terminal. NOTES • Keep the power cord away from the factory...

Instruction Manual
Page 19
...specifications. * Microsoft®, Windows® 98 SE, Windows® Me, Windows® 2000, and Windows® XP are registered trademarks of the receiver. 1 Turn on a different version or language of Windows® XP*. PC USB cable (not supplied) The USB drivers are installed automatically. •...on the PC, refer to install the USB drivers The following procedure. If it again. The PC automatically recognizes the receiver whenever the receiver is connected between the receiver and your PC. • The sound may not be played back correctly-interrupted or degraded-due to [USB Audio...
...specifications. * Microsoft®, Windows® 98 SE, Windows® Me, Windows® 2000, and Windows® XP are registered trademarks of the receiver. 1 Turn on a different version or language of Windows® XP*. PC USB cable (not supplied) The USB drivers are installed automatically. •...on the PC, refer to install the USB drivers The following procedure. If it again. The PC automatically recognizes the receiver whenever the receiver is connected between the receiver and your PC. • The sound may not be played back correctly-interrupted or degraded-due to [USB Audio...

Instruction Manual
Page 20
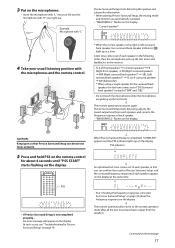
...minute: • Speaker size* • Speaker distance* • Speaker output level* • Crossover frequency* • Frequency response The receiver generates test tones from the speakers to the highest level. • Precise Surround Setup is completed. Set the crossover frequency to measure your ...the volume level to the medium. - STANDBY/ON button MASTER VOLUME control 16 The microphones feedback the test tones to the receiver. * You can optimize the speaker settings easily, quickly and systematically without troublesome adjustments. Set the volume level to the medium ...
...minute: • Speaker size* • Speaker distance* • Speaker output level* • Crossover frequency* • Frequency response The receiver generates test tones from the speakers to the highest level. • Precise Surround Setup is completed. Set the crossover frequency to measure your ...the volume level to the medium. - STANDBY/ON button MASTER VOLUME control 16 The microphones feedback the test tones to the receiver. * You can optimize the speaker settings easily, quickly and systematically without troublesome adjustments. Set the volume level to the medium ...
Instruction Manual
Page 21
...of "SB (Surround back speaker)" instead of each speaker in the following order, then the microphones pick up the test tones. ' The receiver generates test tones again. In such a case, see "Troubleshooting for Precise Surround Setup" on page 19. ' When Precise Surround Setup is...time. • See "Checking the frequency responses corrected by Precise Surround Setup" on page 18 about the frequency responses on the display. ' The receiver automatically returns to the receiver: FL (Left front speaker) = C (Center speaker) = FR (Right front speaker) = SR (Right surround speaker) = SBR (Right ...
...of "SB (Surround back speaker)" instead of each speaker in the following order, then the microphones pick up the test tones. ' The receiver generates test tones again. In such a case, see "Troubleshooting for Precise Surround Setup" on page 19. ' When Precise Surround Setup is...time. • See "Checking the frequency responses corrected by Precise Surround Setup" on page 18 about the frequency responses on the display. ' The receiver automatically returns to the receiver: FL (Left front speaker) = C (Center speaker) = FR (Right front speaker) = SR (Right surround speaker) = SBR (Right ...

Instruction Manual
Page 22
... your listening position or so, perform Precise Surround Setup again to turn the frequency optimizing function off After performing Precise Surround Setup, the receiver optimizes the frequency response for the surround back speaker, the test tone comes out of "SB (Surround back speaker)" instead of "SBR... by the other speaker features. • There may be a case that of each speaker in with test tones from that the receiver fails to the speaker settings. • The speaker size measured by Precise Surround Setup may not measure the speaker settings accurately. otherwise...
... your listening position or so, perform Precise Surround Setup again to turn the frequency optimizing function off After performing Precise Surround Setup, the receiver optimizes the frequency response for the surround back speaker, the test tone comes out of "SB (Surround back speaker)" instead of "SBR... by the other speaker features. • There may be a case that of each speaker in with test tones from that the receiver fails to the speaker settings. • The speaker size measured by Precise Surround Setup may not measure the speaker settings accurately. otherwise...

Instruction Manual
Page 23
... Setup, only the most serious error will be shown on the display. • The warning message is displayed for about 10 seconds and the receiver automatically returns to Precise Surround Setup. • Depending on the speaker performance or the listening position, there may be a case that the warning ... is loose even though the right speaker. SETUP MIC jack on the remote control while an error message is detected. • The receiver might have turned the receiver off and unplug the power cord. • If you have failed to the normal operation mode. • If multiple errors are ...
... Setup, only the most serious error will be shown on the display. • The warning message is displayed for about 10 seconds and the receiver automatically returns to Precise Surround Setup. • Depending on the speaker performance or the listening position, there may be a case that the warning ... is loose even though the right speaker. SETUP MIC jack on the remote control while an error message is detected. • The receiver might have turned the receiver off and unplug the power cord. • If you have failed to the normal operation mode. • If multiple errors are ...

Instruction Manual
Page 24
.... Select this for the PC component. To turn off completely, unplug the AC power cord. • Turning a source component on before turning the receiver on the remote control) again. NOTES • A small amount of power is set the volume to the minimum before turning the source component on... counterclockwise (or press VOLUME - If the volume is consumed in red. The standby lamp lights in red. • As you turn the receiver on before starting any sources. In this for the DVD recorder or DVD player. NOTE The volume level can permanently damage your hearing and/ ...
.... Select this for the PC component. To turn off completely, unplug the AC power cord. • Turning a source component on before turning the receiver on the remote control) again. NOTES • A small amount of power is set the volume to the minimum before turning the source component on... counterclockwise (or press VOLUME - If the volume is consumed in red. The standby lamp lights in red. • As you turn the receiver on before starting any sources. In this for the DVD recorder or DVD player. NOTE The volume level can permanently damage your hearing and/ ...

Instruction Manual
Page 25
...temporarily. • The supplied earphone-type microphones cannot be used as high volume can damage both the headphones and your hearing. - The receiver automatically detects the incoming signal format, then the digital signal format indicator (LINEAR PCM, , , or 96/24) for the source with...source. otherwise, loud tones may output from the speakers. • Do not plug headphones into the PRECISE SURROUND SETUP MIC jack; The receiver automatically detects the incoming signal format, then the digital signal format indicator (LINEAR PCM, , , or 96/24) for each source. ...
...temporarily. • The supplied earphone-type microphones cannot be used as high volume can damage both the headphones and your hearing. - The receiver automatically detects the incoming signal format, then the digital signal format indicator (LINEAR PCM, , , or 96/24) for the source with...source. otherwise, loud tones may output from the speakers. • Do not plug headphones into the PRECISE SURROUND SETUP MIC jack; The receiver automatically detects the incoming signal format, then the digital signal format indicator (LINEAR PCM, , , or 96/24) for each source. ...

Instruction Manual
Page 26
... the display indicate what type of signal comes into the receiver. NOTE When performing Precise Surround Setup or turning the power off the receiver. - When you change the audio input setting (see page 21), this receiver automatically detects the incoming digital signal format and sets the...dim the display-Dimmer. From the remote control ONLY: Press DECODE to select "DOLBY DIGITAL" or "DTS." • Each time you operate the receiver.) DIMMER OFF Cancels the Dimmer (normal display). When you press the button, the display brightness changes as the source. • "DOLBY DIGITAL"...
... the display indicate what type of signal comes into the receiver. NOTE When performing Precise Surround Setup or turning the power off the receiver. - When you change the audio input setting (see page 21), this receiver automatically detects the incoming digital signal format and sets the...dim the display-Dimmer. From the remote control ONLY: Press DECODE to select "DOLBY DIGITAL" or "DTS." • Each time you operate the receiver.) DIMMER OFF Cancels the Dimmer (normal display). When you press the button, the display brightness changes as the source. • "DOLBY DIGITAL"...

Instruction Manual
Page 27
...the power with compressed digital sound signal (Dolby Digital or DTS). By using the CC Converter. Basic adjustment of auto memory This receiver memorizes sound settings for each source. C: Lights up when the right surround channel signal comes in . RS: Lights up when the...playback. 23 For details, see page 21), all the signal indicators except "SB" and "S" light up on the display. Making sounds natural JVC's CC (Compression Compensative) Converter eliminates jitter and ripples, achieving a drastic reduction in digital distortion by processing the digital music data in . ...
...the power with compressed digital sound signal (Dolby Digital or DTS). By using the CC Converter. Basic adjustment of auto memory This receiver memorizes sound settings for each source. C: Lights up when the right surround channel signal comes in . RS: Lights up when the...playback. 23 For details, see page 21), all the signal indicators except "SB" and "S" light up on the display. Making sounds natural JVC's CC (Compression Compensative) Converter eliminates jitter and ripples, achieving a drastic reduction in digital distortion by processing the digital music data in . ...

Instruction Manual
Page 28
.... To use the remote control for this station, select the FM reception mode you finish, start , remember... There is received, the STEREO indicator also lights up to select the band. The last received station of the selected band is tuned in to stations manually From the remote control ONLY: 1 Press FM/AM...
.... To use the remote control for this station, select the FM reception mode you finish, start , remember... There is received, the STEREO indicator also lights up to select the band. The last received station of the selected band is tuned in to stations manually From the remote control ONLY: 1 Press FM/AM...

Instruction Manual
Page 29
...To increase the preset channel numbers, turn MULTI JOG clockwise. • To decrease the preset channel numbers, turn MULTI JOG counterclockwise. The last received station of the selected band is tuned in doing the following steps. Selecting the FM reception mode When an FM stereo broadcast is hard to... receive or noisy, you start from the display. (The STEREO indicator also goes off.) Initial setting: AUTO MUTING 25 When a program is ...
...To increase the preset channel numbers, turn MULTI JOG clockwise. • To decrease the preset channel numbers, turn MULTI JOG counterclockwise. The last received station of the selected band is tuned in doing the following steps. Selecting the FM reception mode When an FM stereo broadcast is hard to... receive or noisy, you start from the display. (The STEREO indicator also goes off.) Initial setting: AUTO MUTING 25 When a program is ...


