
Instructions
Page 4
... applied to be operated unintentionally. Multi-room operations • Do not use this manual carefully and thoroughly to obtain the best possible performance from the wall outlet. The remote control is compatible with high precision. In THX Ultra2 Cinema Mode and THX Music Mode, all multi-channel software (5.1 channels or more) is automatically detected and proper processing is now upgraded to improve directional and ambient surround information through four surround speakers-two at...
... applied to be operated unintentionally. Multi-room operations • Do not use this manual carefully and thoroughly to obtain the best possible performance from the wall outlet. The remote control is compatible with high precision. In THX Ultra2 Cinema Mode and THX Music Mode, all multi-channel software (5.1 channels or more) is automatically detected and proper processing is now upgraded to improve directional and ambient surround information through four surround speakers-two at...

Instructions
Page 5
... and AM Antennas 7 Connecting the Speakers 8 Connecting Audio/Video Components 11 7 Analog Connections 11 7 Digital Connections 16 Using the RF Rod Antenna and IR Signal Transmitter 17 Connecting the Power Cord 18 Putting Batteries in the Remote Control 18 Multi-Room Operations 19 Required Connections for Zone 2 19 Basic Operating Procedure for Zone 1 20 Basic Operating Procedure for Zone 2 21 Zone 1 (Main Room) Operations 22 Turning the Power On and Off (Standby 22 Canceling the Zone 1 Operations 23 Selecting the Zone 1 Source to Play 23 Adjusting the Zone 1 Volume 24...
... and AM Antennas 7 Connecting the Speakers 8 Connecting Audio/Video Components 11 7 Analog Connections 11 7 Digital Connections 16 Using the RF Rod Antenna and IR Signal Transmitter 17 Connecting the Power Cord 18 Putting Batteries in the Remote Control 18 Multi-Room Operations 19 Required Connections for Zone 2 19 Basic Operating Procedure for Zone 1 20 Basic Operating Procedure for Zone 2 21 Zone 1 (Main Room) Operations 22 Turning the Power On and Off (Standby 22 Canceling the Zone 1 Operations 23 Selecting the Zone 1 Source to Play 23 Adjusting the Zone 1 Volume 24...

Instructions
Page 7
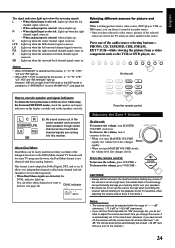
... stereo station is received. 8 AUTO MUTING indicator (34) • Lights up when the FM station reception mode is set to "BI-AMP OUT." ! SPEAKERS 1/2/ZONE 2 indicators (32) • SPEAKERS : Lights up when any of incoming signals. # Main display • Shows the source name, station frequency, Surround/THX/ DSP mode, etc. $ PARAMETRIC EQ indicator (48) • Lights up when Parametric Equalizer is in use. % VOLUME level indicator • Indicates the volume level. • Goes off . ; a CC CONVERTER button...
... stereo station is received. 8 AUTO MUTING indicator (34) • Lights up when the FM station reception mode is set to "BI-AMP OUT." ! SPEAKERS 1/2/ZONE 2 indicators (32) • SPEAKERS : Lights up when any of incoming signals. # Main display • Shows the source name, station frequency, Surround/THX/ DSP mode, etc. $ PARAMETRIC EQ indicator (48) • Lights up when Parametric Equalizer is in use. % VOLUME level indicator • Indicates the volume level. • Goes off . ; a CC CONVERTER button...

Instructions
Page 11
... AM loop antenna connected.) 1 2 3 4 1. Rear view • Make sure the antenna conductors do not touch any other terminals, connecting cords and power cord. For each speaker signal cable (not supplied). 2. CAUTIONS: Use only the speakers of the speakers is recommended to use THX Ultra2 Cinema and THX Music modes. • One center speaker to produce a rich sound image by stabilizing the sound localization (also used to emphasize human voices). • One powered subwoofer to enhance the bass and...
... AM loop antenna connected.) 1 2 3 4 1. Rear view • Make sure the antenna conductors do not touch any other terminals, connecting cords and power cord. For each speaker signal cable (not supplied). 2. CAUTIONS: Use only the speakers of the speakers is recommended to use THX Ultra2 Cinema and THX Music modes. • One center speaker to produce a rich sound image by stabilizing the sound localization (also used to emphasize human voices). • One powered subwoofer to enhance the bass and...

Instructions
Page 15
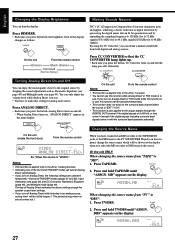
... 7.1-channel output component AB C Decoder (or DVD player) DE AUDIO R RIGHT LEFT FRONT L SUB WOOFER SURR R CENTER L R SURR BACK R L L EXT 7.1CH IN IMPORTANT: This receiver is equipped with RCA pin plugs (not supplied). For details, see "Selecting the Analog or Digital Input Mode" on this case, connect the video output jacks on the external component and unused video input jacks on page 25. 12 Select that video input as the audio source. (See "Selecting different sources for picture and sound" on the rear...
... 7.1-channel output component AB C Decoder (or DVD player) DE AUDIO R RIGHT LEFT FRONT L SUB WOOFER SURR R CENTER L R SURR BACK R L L EXT 7.1CH IN IMPORTANT: This receiver is equipped with RCA pin plugs (not supplied). For details, see "Selecting the Analog or Digital Input Mode" on this case, connect the video output jacks on the external component and unused video input jacks on page 25. 12 Select that video input as the audio source. (See "Selecting different sources for picture and sound" on the rear...

Instructions
Page 19
... optical terminals Digital input terminals You can connect any digital component which has an optical digital input terminal. DIGITAL IN/OUT" on the front panel (see "Selecting the Analog or Digital Input Mode" on page 42. - For details, see " 9 Setting the Digital Input/Output Terminals- Select the digital input mode correctly. When the component has a digital optical output terminal, connect it to the 4 (CDR), 5 (MD), or 6 (VCR 1) terminal, using the DIGITAL IN terminals, set for use the digital source components for Zone 2, connect them using the AV COMPU LINK remote control...
... optical terminals Digital input terminals You can connect any digital component which has an optical digital input terminal. DIGITAL IN/OUT" on the front panel (see "Selecting the Analog or Digital Input Mode" on page 42. - For details, see " 9 Setting the Digital Input/Output Terminals- Select the digital input mode correctly. When the component has a digital optical output terminal, connect it to the 4 (CDR), 5 (MD), or 6 (VCR 1) terminal, using the DIGITAL IN terminals, set for use the digital source components for Zone 2, connect them using the AV COMPU LINK remote control...
Instructions
Page 27
... channel signal comes in. L : • When digital input is selected: Lights up when the left surround channel signal comes in Dolby Digital, DTS, and so on the display carefully and set to the playback sound. No sound comes out of the center speaker and surround back speakers though center channel and surround back channel signals are detected, the DUAL indicator lights up the volume too high when controlling the receiver without listening to the stored level. (However, if you turn...
... channel signal comes in. L : • When digital input is selected: Lights up when the left surround channel signal comes in Dolby Digital, DTS, and so on the display carefully and set to the playback sound. No sound comes out of the center speaker and surround back speakers though center channel and surround back channel signals are detected, the DUAL indicator lights up the volume too high when controlling the receiver without listening to the stored level. (However, if you turn...

Instructions
Page 29
... VOLUME level indicator goes off the power or select another source, "DOLBY DIGITAL" and "DTS SURROUND" settings are canceled and the digital input mode is too high, the sounds will flash. The ANALOG indicator lights up when the receiver cannot recognize the digital signal format of playback. • Noise comes out while searching for the detected signals also light up on the display. • Each time you turn off . ANALOG L R SUBWFR INPUT ATT indicator SPEAKERS 1 INPUT...
... VOLUME level indicator goes off the power or select another source, "DOLBY DIGITAL" and "DTS SURROUND" settings are canceled and the digital input mode is too high, the sounds will flash. The ANALOG indicator lights up when the receiver cannot recognize the digital signal format of playback. • Noise comes out while searching for the detected signals also light up on the display. • Each time you turn off . ANALOG L R SUBWFR INPUT ATT indicator SPEAKERS 1 INPUT...
Instructions
Page 30
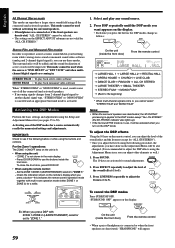
... the digital signals including surround back signals come in use . • You have connected an MD recorder to the TAPE/MD IN jacks or the DBS tuner to the TV SOUND/DBS IN jacks on the rear panel, change the source name which no sound comes out.) On the unit From the remote control Notes: • This function is "VIDEO." Press TAPE/MD. MD" appears on Analog Direct, the following settings...
... the digital signals including surround back signals come in use . • You have connected an MD recorder to the TAPE/MD IN jacks or the DBS tuner to the TV SOUND/DBS IN jacks on the rear panel, change the source name which no sound comes out.) On the unit From the remote control Notes: • This function is "VIDEO." Press TAPE/MD. MD" appears on Analog Direct, the following settings...

Instructions
Page 41
... speaker output levels. 6 After adjustment is connected. Continued on the SPEAKER SETTING submenu (see the left column). Notes: • Use the above comments as reference when adjusting: - The test tone comes out of the activated speakers in sequence. 7 Adjustment procedure on the remote control. SMALL : Select when the speaker size is used . The signals below . • You can use , this function does not take effect. 2 Adjusting the Speaker Channel Output Levels-CHANNEL LEVEL CHANNEL LEVEL TEST TONE :OFF FRONT L LEVEL: 0dB CENTER LEVEL: 0dB FRONT R LEVEL...
... speaker output levels. 6 After adjustment is connected. Continued on the SPEAKER SETTING submenu (see the left column). Notes: • Use the above comments as reference when adjusting: - The test tone comes out of the activated speakers in sequence. 7 Adjustment procedure on the remote control. SMALL : Select when the speaker size is used . The signals below . • You can use , this function does not take effect. 2 Adjusting the Speaker Channel Output Levels-CHANNEL LEVEL CHANNEL LEVEL TEST TONE :OFF FRONT L LEVEL: 0dB CENTER LEVEL: 0dB FRONT R LEVEL...
Instructions
Page 43
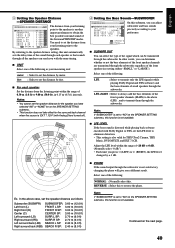
... while playing back software encoded with Dolby Digital or DTS, set the distance by feet. 7 For each speaker Set the distance from your preference. :OPERATE :BACK 7 SUBWFR OUT You can select the type of the signal which can reach you with Analog Direct turned off). 4 Setting the Bass Sounds-SUBWOOFER SUBWOOFER SUBWFR OUT :LFE LFE LEVEL : 0dB PHASE : NORMAL BASS PEAK LIMIT: ON BASS TEST TONE : OFF BASS PEAK LVL: -10dB On this function...
... while playing back software encoded with Dolby Digital or DTS, set the distance by feet. 7 For each speaker Set the distance from your preference. :OPERATE :BACK 7 SUBWFR OUT You can select the type of the signal which can reach you with Analog Direct turned off). 4 Setting the Bass Sounds-SUBWOOFER SUBWOOFER SUBWFR OUT :LFE LFE LEVEL : 0dB PHASE : NORMAL BASS PEAK LIMIT: ON BASS TEST TONE : OFF BASS PEAK LVL: -10dB On this function...

Instructions
Page 49
... VCR 1 STANDBY/ON STANDBY/ON ZONE 1 Operation through On-Screen Display Menus To make sound adjustments for a while. Menu operation buttons • When no operation is done for operating the menus are shown on the remote's display when you press a button-this indicates the remote control operation mode together with multi-room operation mode (either ZONE 1 or ZONE 2) for this receiver, you press ADJUST MENU with these menus. On the unit: ADJUST MENU DOWN / TUNING∞ UP / TUNING5 SET / MEMORY LEFT / PRESET∞ RIGHT...
... VCR 1 STANDBY/ON STANDBY/ON ZONE 1 Operation through On-Screen Display Menus To make sound adjustments for a while. Menu operation buttons • When no operation is done for operating the menus are shown on the remote's display when you press a button-this indicates the remote control operation mode together with multi-room operation mode (either ZONE 1 or ZONE 2) for this receiver, you press ADJUST MENU with these menus. On the unit: ADJUST MENU DOWN / TUNING∞ UP / TUNING5 SET / MEMORY LEFT / PRESET∞ RIGHT...

Instructions
Page 53
... 5). From the remote control ONLY: SOUND 1. English • When Dolby Pro Logic II Music is activated: EFFECT ADJUST CENTER EQ PANORAMA CENTER WIDTH DIMENSION : OFF : OFF : 3 : 4 • When one of the other Surround modes is activated, or "DVD MULTI" or "EXT 7.1CH" is selected (without DSP mode): EFFECT ADJUST CENTER EQ CENTER ALIGN : OFF : OFF :OPERATE :BACK Select and adjust the following items: CENTER EQ: In movie theaters, the screen works as the highfrequency...
... 5). From the remote control ONLY: SOUND 1. English • When Dolby Pro Logic II Music is activated: EFFECT ADJUST CENTER EQ PANORAMA CENTER WIDTH DIMENSION : OFF : OFF : 3 : 4 • When one of the other Surround modes is activated, or "DVD MULTI" or "EXT 7.1CH" is selected (without DSP mode): EFFECT ADJUST CENTER EQ CENTER ALIGN : OFF : OFF :OPERATE :BACK Select and adjust the following items: CENTER EQ: In movie theaters, the screen works as the highfrequency...

Instructions
Page 54
... Zone 1 sources. In THX Ultra2 Cinema Mode or THX Music Mode, all activated speakers except surround back speakers. (When THX Cinema is detected through the digital input, the DIGITAL indicator lights up on the display. Dolby Digital 5.1CH Dolby Digital 5.1CH (DOLBY DIGITAL) encoding method records and digitally compresses the left front channel, right front channel, center channel, left surround channel, right surround channel, and LFE channel signals (total 6 channels, but the LFE channel is activated, the indicator lights up on the display. As such, the sound...
... Zone 1 sources. In THX Ultra2 Cinema Mode or THX Music Mode, all activated speakers except surround back speakers. (When THX Cinema is detected through the digital input, the DIGITAL indicator lights up on the display. Dolby Digital 5.1CH Dolby Digital 5.1CH (DOLBY DIGITAL) encoding method records and digitally compresses the left front channel, right front channel, center channel, left surround channel, right surround channel, and LFE channel signals (total 6 channels, but the LFE channel is activated, the indicator lights up on the display. As such, the sound...
Instructions
Page 62
... for sound adjustments. 2. Set the ZONE 1/ZONE 2 (LEARN/TRANSMIT) selector to 5). Select and play back monaural video software When "STEREO FILM" or "MONO FILM" is used when the source is "DVD MULTI" or "EXT 7.1CH" and when multichannel digital signals are not valid for a source automatically recalls the memorized settings and adjustments. Press SOUND. This mode cannot be canceled when you turn on the remote control, you press a button-this indicates the remote control operation mode together with ZONE 1/ZONE 2 (LEARN...
... for sound adjustments. 2. Set the ZONE 1/ZONE 2 (LEARN/TRANSMIT) selector to 5). Select and play back monaural video software When "STEREO FILM" or "MONO FILM" is used when the source is "DVD MULTI" or "EXT 7.1CH" and when multichannel digital signals are not valid for a source automatically recalls the memorized settings and adjustments. Press SOUND. This mode cannot be canceled when you turn on the remote control, you press a button-this indicates the remote control operation mode together with ZONE 1/ZONE 2 (LEARN...

Instructions
Page 63
... Using the Analog Multi-channel Playback Mode This receiver provides the DVD MULTI and EXT 7.1CH playback modes for details). When you press DVD MULTI with the connected component. 60 SURR/DSP OFF SURR/DSP OFF On the unit (inside the front door) From the remote control On the unit (inside the front door) From the remote control To adjust the speaker output level using these playback modes, refer also to the manual...
... Using the Analog Multi-channel Playback Mode This receiver provides the DVD MULTI and EXT 7.1CH playback modes for details). When you press DVD MULTI with the connected component. 60 SURR/DSP OFF SURR/DSP OFF On the unit (inside the front door) From the remote control On the unit (inside the front door) From the remote control To adjust the speaker output level using these playback modes, refer also to the manual...

Instructions
Page 73
... the DVD playback without setting other switches manually. If you do not mind stopping listening to "DVD." - If the previously selected Zone 2 source is "VCR 1," the VCR 1 will turn on. • When the DVD player is connected through the analog input jacks on this receiver and the TV using the component video cables. If the ZONE 1 ON/OFF lamp is made for the DVD player, no sound comes out of TV's Input Mode (Only for Zone 1 Operations...
... the DVD playback without setting other switches manually. If you do not mind stopping listening to "DVD." - If the previously selected Zone 2 source is "VCR 1," the VCR 1 will turn on. • When the DVD player is connected through the analog input jacks on this receiver and the TV using the component video cables. If the ZONE 1 ON/OFF lamp is made for the DVD player, no sound comes out of TV's Input Mode (Only for Zone 1 Operations...
Instructions
Page 74
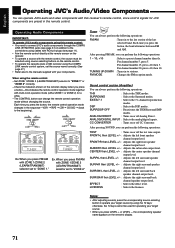
... THX/Surround/DSP modes. ANALOG/DIGITAL INPUT : Selects the analog/digital inputs. SURR BK•L then LEVEL +/- : Adjusts the left front speaker channel output level. Operating Audio Components IMPORTANT: To operate JVC's audio components using this remote control: • You need to connect JVC's audio components through the COMPU LINK (SYNCHRO) jacks (see page 61) in the sequence-VCR1 = TAPE = CDR = CD DISC = (back to the manuals supplied with your target source by using cables with RCA pin plugs (see page 11). • Aim the remote control directly...
... THX/Surround/DSP modes. ANALOG/DIGITAL INPUT : Selects the analog/digital inputs. SURR BK•L then LEVEL +/- : Adjusts the left front speaker channel output level. Operating Audio Components IMPORTANT: To operate JVC's audio components using this remote control: • You need to connect JVC's audio components through the COMPU LINK (SYNCHRO) jacks (see page 61) in the sequence-VCR1 = TAPE = CDR = CD DISC = (back to the manuals supplied with your target source by using cables with RCA pin plugs (see page 11). • Aim the remote control directly...

Instructions
Page 80
Note: Manufacturers' codes are changed, this remote control cannot operate the equipment. English Manufactures' codes for DBS tuner Manufacturer Codes JVC 56, 57*, 67 Amstrad 43, 44, 45, 46, 47, 48, 49 Blaupunkt 30 Echostar 50, 51, 67 General Instrument 68 Gold Star 31 Grundig 32, ... 35 36 53 37, 38, 39 40, 41, 42, 43, 45 46, 47, 48, 49, 50, 51, 52 *This figure is set to the remote control as the initial JVC code. Manufactures' codes for DVD player Manufacturer JVC Denon Panasonic Philips Pioneer RCA Samsung Sony Toshiba Yamaha 00*, 02 01 03 13 04, 05, 06 07 08 09 10...
Note: Manufacturers' codes are changed, this remote control cannot operate the equipment. English Manufactures' codes for DBS tuner Manufacturer Codes JVC 56, 57*, 67 Amstrad 43, 44, 45, 46, 47, 48, 49 Blaupunkt 30 Echostar 50, 51, 67 General Instrument 68 Gold Star 31 Grundig 32, ... 35 36 53 37, 38, 39 40, 41, 42, 43, 45 46, 47, 48, 49, 50, 51, 52 *This figure is set to the remote control as the initial JVC code. Manufactures' codes for DVD player Manufacturer JVC Denon Panasonic Philips Pioneer RCA Samsung Sony Toshiba Yamaha 00*, 02 01 03 13 04, 05, 06 07 08 09 10...

Instructions
Page 84
... on the display when you operate it. Speaker signal cables are not connected properly. Deactivate the Zone 2 front speakers, then activate the surround back speakers. Check speaker connection and reconnect if necessary. (See page 19.) Set the Zone 1/2 setting for Zone 2. Surround/THX Multi-room operations (Zone 1/Zone 2) PROBLEM The buttons and controls on with the Zone 1 and Zone 2 sounds deactivated. Incorrect input mode (analog or digital) is selected for the speakers correctly to "NONE." Incorrect source is selected. English Troubleshooting Use this happens...
... on the display when you operate it. Speaker signal cables are not connected properly. Deactivate the Zone 2 front speakers, then activate the surround back speakers. Check speaker connection and reconnect if necessary. (See page 19.) Set the Zone 1/2 setting for Zone 2. Surround/THX Multi-room operations (Zone 1/Zone 2) PROBLEM The buttons and controls on with the Zone 1 and Zone 2 sounds deactivated. Incorrect input mode (analog or digital) is selected for the speakers correctly to "NONE." Incorrect source is selected. English Troubleshooting Use this happens...


