Instruction Manual
Page 3
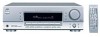
... Batteries in to Play 11 Changing the Source Name 12 Selecting Different Sources for RX-5030VBK/RX-5032VSL BASSBOOST button DVD MULTI button 1 VIDEO IN DVD, VIDEO IN VCR 16 Selecting the Analog or Digital Input Mode 17 Sound Adjustments 18 Attenuating the Input Signal 18 Turning Off the Subwoofer 18 Reinforcing the Bass 18 Sound Adjustments Using MULTI JOG Dial 19 Sound Adjustments Using Remote Control 20 Adjusting Speaker Output Levels Using Test Tone 20 Adjusting Subwoofer Output Level 21 Tuner Operations 22 Tuning in to Stations Manually 22 Using Preset Tuning...
... Batteries in to Play 11 Changing the Source Name 12 Selecting Different Sources for RX-5030VBK/RX-5032VSL BASSBOOST button DVD MULTI button 1 VIDEO IN DVD, VIDEO IN VCR 16 Selecting the Analog or Digital Input Mode 17 Sound Adjustments 18 Attenuating the Input Signal 18 Turning Off the Subwoofer 18 Reinforcing the Bass 18 Sound Adjustments Using MULTI JOG Dial 19 Sound Adjustments Using Remote Control 20 Adjusting Speaker Output Levels Using Test Tone 20 Adjusting Subwoofer Output Level 21 Tuner Operations 22 Tuning in to Stations Manually 22 Using Preset Tuning...
Instruction Manual
Page 4
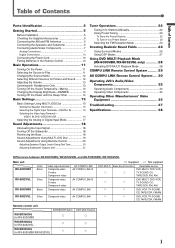
... p STANDBY STANDBY/ON PHONES SURROUND DSP SURROUND/DSP OFF RX-6030V AUDIO/VIDEO CONTROL RECEIVER DIGITAL PRO LOGIC SPEAKERS SUBWOOFER OUT ON/OFF ON/OFF FM/AM TUNING FM/AM PRESET FM MODE MEMORY MASTER VOLUME DIMMER INPUT DIGITAL INPUT ANALOG INPUT ATT SETTING MULTI JOG ADJUST SET EXIT q we r t y u io ; MULTI JOG dial (15, 19) a EXIT button (15, 19) s ADJUST button (19) d For RX-6030VBK and RX-6032VSL • Source selection buttons (11) DVD MULTI, DVD, VCR, TV SOUND, CD, TAPE/CDR...
... p STANDBY STANDBY/ON PHONES SURROUND DSP SURROUND/DSP OFF RX-6030V AUDIO/VIDEO CONTROL RECEIVER DIGITAL PRO LOGIC SPEAKERS SUBWOOFER OUT ON/OFF ON/OFF FM/AM TUNING FM/AM PRESET FM MODE MEMORY MASTER VOLUME DIMMER INPUT DIGITAL INPUT ANALOG INPUT ATT SETTING MULTI JOG ADJUST SET EXIT q we r t y u io ; MULTI JOG dial (15, 19) a EXIT button (15, 19) s ADJUST button (19) d For RX-6030VBK and RX-6032VSL • Source selection buttons (11) DVD MULTI, DVD, VCR, TV SOUND, CD, TAPE/CDR...
Instruction Manual
Page 9
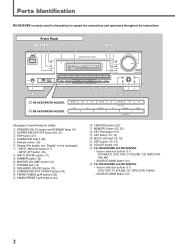
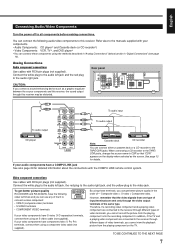
... to the manuals supplied with the COMPU LINK remote control system. When connecting a CD recorder to the TAPE/ CDR jacks, change the source name to CDR so that the video signals from one type of input terminals are connected to the audio right jack. Connect the white plug to the audio left jack and the red plug to the receiver through the video output terminals of - You can connect either a cassette deck or a CD recorder to all components before making connections.
... to the manuals supplied with the COMPU LINK remote control system. When connecting a CD recorder to the TAPE/ CDR jacks, change the source name to CDR so that the video signals from one type of input terminals are connected to the audio right jack. Connect the white plug to the audio left jack and the red plug to the receiver through the video output terminals of - You can connect either a cassette deck or a CD recorder to all components before making connections.
Instruction Manual
Page 12
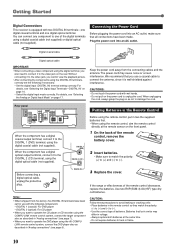
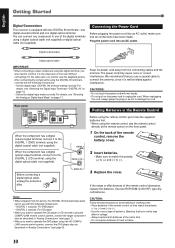
...the rear. Plug the power cord into an AC outlet, make sure that you want to operate the DVD player using the remote control, aim the remote control directly at the same time. • Do not expose batteries to the video jack on the power cord to the DIGITAL 1 (DVD) terminal, using the digital terminal, you cannot view the playback picture. • After connecting the components using the digital optical cable (not supplied). Digital coaxial cable Digital optical cable IMPORTANT: • When connecting a video component using the digital coaxial cable (not supplied). Without...
...the rear. Plug the power cord into an AC outlet, make sure that you want to operate the DVD player using the remote control, aim the remote control directly at the same time. • Do not expose batteries to the video jack on the power cord to the DIGITAL 1 (DVD) terminal, using the digital terminal, you cannot view the playback picture. • After connecting the components using the digital optical cable (not supplied). Digital coaxial cable Digital optical cable IMPORTANT: • When connecting a video component using the digital coaxial cable (not supplied). Without...

Instruction Manual
Page 13
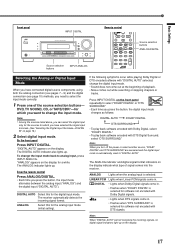
... DVD player. Select the CD player. Notes: • When connecting a CD recorder to the TAPE/CDR jacks, change the source name to Play TAPE/CDR*: Select the cassette deck (or the CD recorder). DIMMER INPUT DIGITAL INPUT ANALOG INPUT ATT DIGITAL DIGITAL SURROUND PRO LOGIC SPEAKERS SUBWOOFER OUT ON/OFF ON/OFF FM/AM TUNING FM/AM RESET FM MODE MEMORY Source selection buttons Remote control A/V CONTROL RECEIVER 1 2 3 4 5 6 7/P 8 9 10 0 10 TA/NEWS/INFO DISPLAY MODE STANDBY/ON AUDIO Source selection buttons Turning On the Power Press STANDBY/ON (or STANDBY/ON AUDIO...
... DVD player. Select the CD player. Notes: • When connecting a CD recorder to the TAPE/CDR jacks, change the source name to Play TAPE/CDR*: Select the cassette deck (or the CD recorder). DIMMER INPUT DIGITAL INPUT ANALOG INPUT ATT DIGITAL DIGITAL SURROUND PRO LOGIC SPEAKERS SUBWOOFER OUT ON/OFF ON/OFF FM/AM TUNING FM/AM RESET FM MODE MEMORY Source selection buttons Remote control A/V CONTROL RECEIVER 1 2 3 4 5 6 7/P 8 9 10 0 10 TA/NEWS/INFO DISPLAY MODE STANDBY/ON AUDIO Source selection buttons Turning On the Power Press STANDBY/ON (or STANDBY/ON AUDIO...
Instruction Manual
Page 19
... to "DIGITAL AUTO." DIGITAL • Lights when Dolby Digital signals come in. • Flashes when "DOLBY DIGITAL" is selected for the digital input mode. DVD, TV SOUND, CD, or TAPE/CDR*-for which you turn off the power or select another source, "DOLBY DIGITAL" and "DTS SURROUND" are canceled and the digital input mode is automatically reset to change the digital input mode. • Sound does not come in . • Flashes when "DTS SURROUND" is selected. From the remote control Press ANALOG/DIGITAL. • Each time you have connected digital source components using both...
... to "DIGITAL AUTO." DIGITAL • Lights when Dolby Digital signals come in. • Flashes when "DOLBY DIGITAL" is selected for the digital input mode. DVD, TV SOUND, CD, or TAPE/CDR*-for which you turn off the power or select another source, "DOLBY DIGITAL" and "DTS SURROUND" are canceled and the digital input mode is automatically reset to change the digital input mode. • Sound does not come in . • Flashes when "DTS SURROUND" is selected. From the remote control Press ANALOG/DIGITAL. • Each time you have connected digital source components using both...
Instruction Manual
Page 20
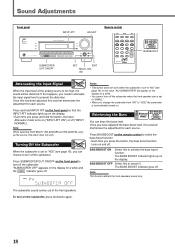
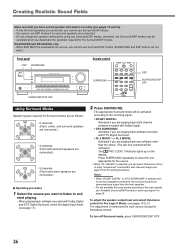
... work when the subwoofer is automatically turned on the display for each source. The BASS BOOST indicator goes off the subwoofer when the front speaker size is set to prevent the distortion. PHONES DIGITAL DIGITAL SURROUND PRO LOGIC DVD MULTI DVD SPEAKERS ON/OFF VCR TV SOUND FM/AM TUNING CD TAPE/CDR SOURCE NAME FM/AM RESET FM FM MODE AM MEMORY DIMMER INPUT DIGITAL INPUT ANALOG INPUT ATT SETTING SUBWOOFER OUT ON/OFF SET EXIT MULTI JOG dial Remote control REMOTE CONTROL...
... work when the subwoofer is automatically turned on the display for each source. The BASS BOOST indicator goes off the subwoofer when the front speaker size is set to prevent the distortion. PHONES DIGITAL DIGITAL SURROUND PRO LOGIC DVD MULTI DVD SPEAKERS ON/OFF VCR TV SOUND FM/AM TUNING CD TAPE/CDR SOURCE NAME FM/AM RESET FM FM MODE AM MEMORY DIMMER INPUT DIGITAL INPUT ANALOG INPUT ATT SETTING SUBWOOFER OUT ON/OFF SET EXIT MULTI JOG dial Remote control REMOTE CONTROL...
Instruction Manual
Page 24
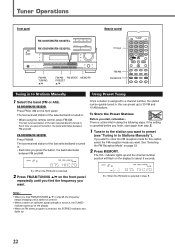
... DVD MULTI DVD SPEAKERS ON/OFF ON/OFF VCR TV SOUND CD SOURCE NAME TAPE/CDR FM/AM SOURCE NAME DIMMER INPUT DIGITAL INPUT ANALOG INPUT ATT FM/AM TUNING 5/∞ FM/AM FM MODE MEMORY PRESET 5/∞ Remote control 10 keys A/V CONTROL RECEIVER FM/AM FM MODE DISPLAY MODE Tuning in step 1. 22 You can be quickly tuned in . • Each time you press the button, the band alternates between FM and AM. indicator lights up to Stations Manually Using Preset Tuning...
... DVD MULTI DVD SPEAKERS ON/OFF ON/OFF VCR TV SOUND CD SOURCE NAME TAPE/CDR FM/AM SOURCE NAME DIMMER INPUT DIGITAL INPUT ANALOG INPUT ATT FM/AM TUNING 5/∞ FM/AM FM MODE MEMORY PRESET 5/∞ Remote control 10 keys A/V CONTROL RECEIVER FM/AM FM MODE DISPLAY MODE Tuning in step 1. 22 You can be quickly tuned in . • Each time you press the button, the band alternates between FM and AM. indicator lights up to Stations Manually Using Preset Tuning...
Instruction Manual
Page 28
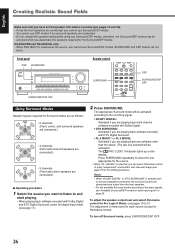
... RX-6030V AUDIO/VIDEO CONTROL RECEIVER DIGITAL AUTO ANALOG LINEAR PCM DIGITAL SPK 1 2 ONE TOUCH OPERATION BASS BOOST INPUT ATT EON RDS SLEEP L C R PRO LOGIC DSP H.PHONE AUTO MUTING TUNED STEREO TA NEWS INFO VOLUME S.WFR LFE LS S RS CH- The adjustment is selected as follows: • 5 channels (Front, center, and surround speakers are connected.) • 4 channels (Front and surround speakers are connected.) • 3 channels (Front and center speakers are connected.) 7 Operating procedure 1 Select the source you are playing back any Surround/DSP modes;
... RX-6030V AUDIO/VIDEO CONTROL RECEIVER DIGITAL AUTO ANALOG LINEAR PCM DIGITAL SPK 1 2 ONE TOUCH OPERATION BASS BOOST INPUT ATT EON RDS SLEEP L C R PRO LOGIC DSP H.PHONE AUTO MUTING TUNED STEREO TA NEWS INFO VOLUME S.WFR LFE LS S RS CH- The adjustment is selected as follows: • 5 channels (Front, center, and surround speakers are connected.) • 4 channels (Front and surround speakers are connected.) • 3 channels (Front and center speakers are connected.) 7 Operating procedure 1 Select the source you are playing back any Surround/DSP modes;
Instruction Manual
Page 31
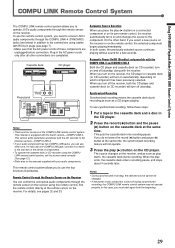
... a tape in the cassette deck and a disc in the series of components. • To operate the cassette deck or CD recorder using the COMPU LINK remote control system, set the source name correctly. (See page 12.) • Refer also to the manuals supplied with the CD recorder to the connections using this remote control. When you can control the connected audio components through the Remote Sensor on the receiver, and as soon as a CD begins playing. Automatic Power On...
... a tape in the cassette deck and a disc in the series of components. • To operate the cassette deck or CD recorder using the COMPU LINK remote control system, set the source name correctly. (See page 12.) • Refer also to the manuals supplied with the CD recorder to the connections using this remote control. When you can control the connected audio components through the Remote Sensor on the receiver, and as soon as a CD begins playing. Automatic Power On...
Instruction Manual
Page 33
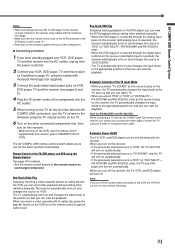
... AC power cords first. 2 Connect your VCR, DVD player, TV and this receiver as illustrated on page 30, using the cables with monaural mini-plugs (not supplied). 3 Connect the audio/video input/output jacks on VCR, DVD player, TV and this receiver (see pages 8 and 9). 4 Plug the AC power cords of the components into the VCR, you can start video playback without setting other connected components first, then turn on this receiver. • When turning on the VCR, use the remote control supplied with this receiver (press STANDBY...
... AC power cords first. 2 Connect your VCR, DVD player, TV and this receiver as illustrated on page 30, using the cables with monaural mini-plugs (not supplied). 3 Connect the audio/video input/output jacks on VCR, DVD player, TV and this receiver (see pages 8 and 9). 4 Plug the AC power cords of the components into the VCR, you can start video playback without setting other connected components first, then turn on this receiver. • When turning on the VCR, use the remote control supplied with this receiver (press STANDBY...

Instruction Manual
Page 34
... PAUSE DISPLAY MODE CD-DISC TAPE/CDR CD DVD FM/AM TV SOUND VCR ANALOG /DIGITAL FM MODE SURROUND DSP DIMMER TV/VIDEO SURROUND /DSP OFF MUTING VCR CH TV/CATV CH TV VOLUME VOLUME REMOTE CONTROL RM-SRX6030J Sound Adjustment You can use the remote control to connect JVC's audio components through the COMPU LINK-4 (SYNCHRO) jacks (see page 7). • Aim the remote control directly at the remote sensor on and select the DSP modes. Adjust the left front speaker output level. Note: When you use...
... PAUSE DISPLAY MODE CD-DISC TAPE/CDR CD DVD FM/AM TV SOUND VCR ANALOG /DIGITAL FM MODE SURROUND DSP DIMMER TV/VIDEO SURROUND /DSP OFF MUTING VCR CH TV/CATV CH TV VOLUME VOLUME REMOTE CONTROL RM-SRX6030J Sound Adjustment You can use the remote control to connect JVC's audio components through the COMPU LINK-4 (SYNCHRO) jacks (see page 7). • Aim the remote control directly at the remote sensor on and select the DSP modes. Adjust the left front speaker output level. Note: When you use...
Instruction Manual
Page 39
... turn off the receiver. An incorrect source is not ready for your JVC service center. An incorrect input mode (analog or digital) is activated. For digital connections, see page 13). Press SPEAKERS ON/OFF on the front panel to use. (See pages 32 - 36). 37 Remove the obstruction. Muting is selected. Press MUTING on the front panel, then check the speaker wiring. Check connections. Select a new station. Press STANDBY/ON on the remote control...
... turn off the receiver. An incorrect source is not ready for your JVC service center. An incorrect input mode (analog or digital) is activated. For digital connections, see page 13). Press SPEAKERS ON/OFF on the front panel to use. (See pages 32 - 36). 37 Remove the obstruction. Muting is selected. Press MUTING on the front panel, then check the speaker wiring. Check connections. Select a new station. Press STANDBY/ON on the remote control...
Instruction Manual
Page 42
... TO THE REFURBISHED PRODUCT WARRANTY INFORMATION PACKAGED WITH EACH REFURBISHED PRODUCT. Retain this information for repair; 3. Operational adjustments covered in -home basis. Signal reception problems and failures due to you by JVC to render such service, or if affixed to a JVC authorized service center on an in the Owner's Manual, normal maintenance, video and audio head cleaning; 4. There are covered for Television sets having a screen size 25 inches...
... TO THE REFURBISHED PRODUCT WARRANTY INFORMATION PACKAGED WITH EACH REFURBISHED PRODUCT. Retain this information for repair; 3. Operational adjustments covered in -home basis. Signal reception problems and failures due to you by JVC to render such service, or if affixed to a JVC authorized service center on an in the Owner's Manual, normal maintenance, video and audio head cleaning; 4. There are covered for Television sets having a screen size 25 inches...
Instruction Manual
Page 47
... 10 Basic Operations 11 Turning On the Power 11 Selecting the Source to a Preset Station 23 Selecting the FM Reception Mode 23 Creating Realistic Sound Fields 24 Using Surround Modes 26 Using DSP Modes 27 Using DVD MULTI Playback Mode (RX-6030VBK/RX-6032VSL only 28 Activating DVD MULTI Playback Mode 28 COMPU LINK Remote Control System ......... 29 AV COMPU LINK Remote Control System .... 30 Operating JVC's Audio/Video Components 32 Operating Audio Components 32 Operating Video Components 35 Operating Other Manufacturers' Video Equipment 36 Troubleshooting 38 Specifications 39...
... 10 Basic Operations 11 Turning On the Power 11 Selecting the Source to a Preset Station 23 Selecting the FM Reception Mode 23 Creating Realistic Sound Fields 24 Using Surround Modes 26 Using DSP Modes 27 Using DVD MULTI Playback Mode (RX-6030VBK/RX-6032VSL only 28 Activating DVD MULTI Playback Mode 28 COMPU LINK Remote Control System ......... 29 AV COMPU LINK Remote Control System .... 30 Operating JVC's Audio/Video Components 32 Operating Audio Components 32 Operating Video Components 35 Operating Other Manufacturers' Video Equipment 36 Troubleshooting 38 Specifications 39...
Instruction Manual
Page 53
... audio/video components to the receiver through this receiver. Rear panel CAUTION: If you can use any of video terminals, you cannot view the playback picture from the playing component on the display when selected as a graphic equalizer between the source components and this receiver, the sound output through different types of - When connecting a CD recorder to the TAPE/ CDR jacks, change the source name to the audio right jack. Analog Connections Audio component connections Use cables with RCA pin plugs (not supplied...
... audio/video components to the receiver through this receiver. Rear panel CAUTION: If you can use any of video terminals, you cannot view the playback picture from the playing component on the display when selected as a graphic equalizer between the source components and this receiver, the sound output through different types of - When connecting a CD recorder to the TAPE/ CDR jacks, change the source name to the audio right jack. Analog Connections Audio component connections Use cables with RCA pin plugs (not supplied...
Instruction Manual
Page 56
... the digital input mode correctly. Without connecting it to operate the DVD player using the DIGITAL IN terminals, correctly set for use a coaxial cable to the DIGITAL 1 (DVD) terminal, using the digital optical cable (not supplied). When unplugging the cord, always grasp the plug so as described in the Remote Control When the component has a digital coaxial output terminal, connect it to connect the antenna, since it to damage the cord. Connecting the Power Cord Before plugging the power cord into an AC outlet. Plug the power cord into...
... the digital input mode correctly. Without connecting it to operate the DVD player using the DIGITAL IN terminals, correctly set for use a coaxial cable to the DIGITAL 1 (DVD) terminal, using the digital optical cable (not supplied). When unplugging the cord, always grasp the plug so as described in the Remote Control When the component has a digital coaxial output terminal, connect it to connect the antenna, since it to damage the cord. Connecting the Power Cord Before plugging the power cord into an AC outlet. Plug the power cord into...
Instruction Manual
Page 62
... connect the DVD player and/or VCR to the S-video or composite video input terminal (initial setting). 7 Low Frequency Effect attenuator-LFE ATTENUATE If the bass sound is useful when using Dolby Digital. Example: In this when you higher picture quality for the center and surround speakers. 7 Crossover frequency-CROSSOVER Small speakers cannot reproduce the bass sounds efficiently. DIGITAL IN When you have been set the speaker distance for the DVD player and VCR. COMPONENT...
... connect the DVD player and/or VCR to the S-video or composite video input terminal (initial setting). 7 Low Frequency Effect attenuator-LFE ATTENUATE If the bass sound is useful when using Dolby Digital. Example: In this when you higher picture quality for the center and surround speakers. 7 Crossover frequency-CROSSOVER Small speakers cannot reproduce the bass sounds efficiently. DIGITAL IN When you have been set the speaker distance for the DVD player and VCR. COMPONENT...
Instruction Manual
Page 72
... cannot use Surround/DSP modes (SURROUND and DSP buttons do not work). Front panel DSP SURROUND STANDBY STANDBY/ON SURROUND DSP SURROUND/DSP OFF RX-6030V AUDIO/VIDEO CONTROL RECEIVER DIGITAL AUTO ANALOG LINEAR PCM DIGITAL SPK 1 2 ONE TOUCH OPERATION BASS BOOST INPUT ATT EON RDS SLEEP L C R PRO LOGIC DSP H.PHONE AUTO MUTING TUNED STEREO TA NEWS INFO VOLUME S.WFR LFE LS S RS CH- PHONES DIGITAL DIGITAL SURROUND PRO LOGIC DVD MULTI DVD VCR TV SOUND SPEAKERS SUBWOOFER OUT ON/OFF ON/OFF FM/AM TUNING CD TAPE/CDR SOURCE...
... cannot use Surround/DSP modes (SURROUND and DSP buttons do not work). Front panel DSP SURROUND STANDBY STANDBY/ON SURROUND DSP SURROUND/DSP OFF RX-6030V AUDIO/VIDEO CONTROL RECEIVER DIGITAL AUTO ANALOG LINEAR PCM DIGITAL SPK 1 2 ONE TOUCH OPERATION BASS BOOST INPUT ATT EON RDS SLEEP L C R PRO LOGIC DSP H.PHONE AUTO MUTING TUNED STEREO TA NEWS INFO VOLUME S.WFR LFE LS S RS CH- PHONES DIGITAL DIGITAL SURROUND PRO LOGIC DVD MULTI DVD VCR TV SOUND SPEAKERS SUBWOOFER OUT ON/OFF ON/OFF FM/AM TUNING CD TAPE/CDR SOURCE...
Instruction Manual
Page 84
... connections. After unplugging the power cord, consult your dealer. The remote control is not functioning correctly. For analog connections, see page 13). Connect an outdoor FM antenna or contact your JVC service center. "OVERLOAD" starts flashing on the front panel to help you solve daily operational problems. If there is any problem you intend. Speakers are overloaded because of short circuit of high volume. Sounds from automobiles. English Troubleshooting Use this chart to turn...
... connections. After unplugging the power cord, consult your dealer. The remote control is not functioning correctly. For analog connections, see page 13). Connect an outdoor FM antenna or contact your JVC service center. "OVERLOAD" starts flashing on the front panel to help you solve daily operational problems. If there is any problem you intend. Speakers are overloaded because of short circuit of high volume. Sounds from automobiles. English Troubleshooting Use this chart to turn...


