
Instructions
Page 1
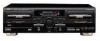
...) TD-W354 DOUBLE CASSETTE DECK A PLAYBACK COMPULINK Component POWER AUTO REVERSE PITCH CONTROL STANDBY DOLBY B-C NR HX PRO COUNTER RESET MUSIC SCAN PLAY PHONES INPUT LEVEL 5 4 6 COMPU CAL COUNTER RESET 3 7 2 8 1 9 MIN MAX PITCH CONTROL MIX LEVEL MUSIC SCAN PLAY MIC SLOW FAST MIN MAX DECK A COMPU CALIBRATION B AUTO REVERSE REC/PLAYBACK REC/REC MUTE PAUSE DOLBY NR REVERSEA B SYNCHRO DUBBING B C MODE NORM SPEED HIGH SPEED (J version) INSTRUCTIONS For Customer Use: Enter below the Model No. Serial No. DOUBLE CASSETTE DECK TD...
...) TD-W354 DOUBLE CASSETTE DECK A PLAYBACK COMPULINK Component POWER AUTO REVERSE PITCH CONTROL STANDBY DOLBY B-C NR HX PRO COUNTER RESET MUSIC SCAN PLAY PHONES INPUT LEVEL 5 4 6 COMPU CAL COUNTER RESET 3 7 2 8 1 9 MIN MAX PITCH CONTROL MIX LEVEL MUSIC SCAN PLAY MIC SLOW FAST MIN MAX DECK A COMPU CALIBRATION B AUTO REVERSE REC/PLAYBACK REC/REC MUTE PAUSE DOLBY NR REVERSEA B SYNCHRO DUBBING B C MODE NORM SPEED HIGH SPEED (J version) INSTRUCTIONS For Customer Use: Enter below the Model No. Serial No. DOUBLE CASSETTE DECK TD...
Instructions
Page 2
... approved extension lead or consult your home or the cable is cut off ensure to remove the fuse and dispose of the plug immediately, to which the receiver is connected. - DO NOT make any copyright musical or literary work embodied in order to the terminal which is marked with the letter L or coloured red. The wires in your dealer. Consult the dealer...
... approved extension lead or consult your home or the cable is cut off ensure to remove the fuse and dispose of the plug immediately, to which the receiver is connected. - DO NOT make any copyright musical or literary work embodied in order to the terminal which is marked with the letter L or coloured red. The wires in your dealer. Consult the dealer...
Instructions
Page 3
... trademarks of parts and their functions 6 Playback 7 Multi music scan 8 Recording 8 Compu link control system 11 Dubbing 12 Maintenance 13 Troubleshooting 14 Specifications 15 FEATURES 1. Double auto-reverse mechanism for purchasing a JVC product. Auto tape select mechanism (decks A and B) 11. INTRODUCTION Thank you for recording/playback in deck B and playback in deck A 2. Read this unit has certain one-way direction connections to the reverse direction. Digital tape counter...
... trademarks of parts and their functions 6 Playback 7 Multi music scan 8 Recording 8 Compu link control system 11 Dubbing 12 Maintenance 13 Troubleshooting 14 Specifications 15 FEATURES 1. Double auto-reverse mechanism for purchasing a JVC product. Auto tape select mechanism (decks A and B) 11. INTRODUCTION Thank you for recording/playback in deck B and playback in deck A 2. Read this unit has certain one-way direction connections to the reverse direction. Digital tape counter...
Instructions
Page 4
... some types of time. 2. Remove slack by the amplifier. Also do not match this set . 2) Avoid installing the unit in a location subject to high temperatures or humidity. 5. Operations 1) Noise may become tangled in the cassette. Use the unit only after being erased accidentally, remove the tab(s) with the deck set the POWER switch to OFF, so that heat can function correctly. -4- If this...
... some types of time. 2. Remove slack by the amplifier. Also do not match this set . 2) Avoid installing the unit in a location subject to high temperatures or humidity. 5. Operations 1) Noise may become tangled in the cassette. Use the unit only after being erased accidentally, remove the tab(s) with the deck set the POWER switch to OFF, so that heat can function correctly. -4- If this...

Instructions
Page 5
.... Notes: 1. A AUTO REVERSE Load the cassette with an amplifier and a CD player which have the COMPU LINK-1/SYNCHRO jacks for COMPU LINK performance. (See page 11 for COMPU LINK • By connecting a remote cable, COMPU LINK functions (auto- Otherwise, the automatic power on again before setting the POWER switch to remove the cassette. If they are employed, always connect the white plug to remove the cassette. -5- matic power on/STANDBY, automatic source selection, synchronized...
.... Notes: 1. A AUTO REVERSE Load the cassette with an amplifier and a CD player which have the COMPU LINK-1/SYNCHRO jacks for COMPU LINK performance. (See page 11 for COMPU LINK • By connecting a remote cable, COMPU LINK functions (auto- Otherwise, the automatic power on again before setting the POWER switch to remove the cassette. If they are employed, always connect the white plug to remove the cassette. -5- matic power on/STANDBY, automatic source selection, synchronized...
Instructions
Page 6
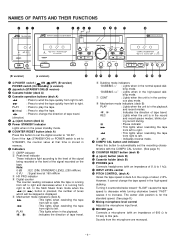
...REC : Lights when the unit is for the standard speed. (See page 8.) y Mixing microphone level control Adjusts the microphone input level. NAMES OF PARTS AND THEIR FUNCTIONS 2 11 3 45 67 TD-W354 DOUBLE CASSETTE DECK TD-W354 DOUBLE CASSETTE DECK STANDBY STANDBY 8 90 q DOLBY B-C NR HX PRO w DOLBY B-C NR HX PRO A PLAYBACK COMPULINK Component STANDBY / ON AUTO REVERSE PITCH CONTROL POWER A PLAYBACK COMPULINK Component POWER COUNTER RESET AUTO REVERSE PITCH CONTROL MUSIC SCAN PLAY PHONES ON OFF INPUT LEVEL 5 4 6 COCMOPUUNCTAELR RCEOSUENTTER RESET INPUT LEVEL 5 4 6 COMPU...
...REC : Lights when the unit is for the standard speed. (See page 8.) y Mixing microphone level control Adjusts the microphone input level. NAMES OF PARTS AND THEIR FUNCTIONS 2 11 3 45 67 TD-W354 DOUBLE CASSETTE DECK TD-W354 DOUBLE CASSETTE DECK STANDBY STANDBY 8 90 q DOLBY B-C NR HX PRO w DOLBY B-C NR HX PRO A PLAYBACK COMPULINK Component STANDBY / ON AUTO REVERSE PITCH CONTROL POWER A PLAYBACK COMPULINK Component POWER COUNTER RESET AUTO REVERSE PITCH CONTROL MUSIC SCAN PLAY PHONES ON OFF INPUT LEVEL 5 4 6 COCMOPUUNCTAELR RCEOSUENTTER RESET INPUT LEVEL 5 4 6 COMPU...
Instructions
Page 7
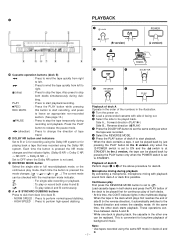
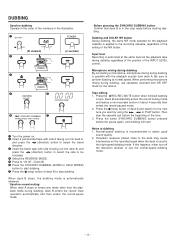
... enters the standby mode. Load cassette tapes in the other deck starts playback. Each time the button is pressed the NR mode changes and the indicator lights. (Dolby B NR -> Dolby C NR -> NR OFF -> Dolby B NR ...) Set to OFF when the Dolby NR system is playing back, the cassette in both decks and press the PLAY button of the deck to be replaced. Continuous play of background music. These operations continue between decks A and B. •...
... enters the standby mode. Load cassette tapes in the other deck starts playback. Each time the button is pressed the NR mode changes and the indicator lights. (Dolby B NR -> Dolby C NR -> NR OFF -> Dolby B NR ...) Set to OFF when the Dolby NR system is playing back, the cassette in both decks and press the PLAY button of the deck to be replaced. Continuous play of background music. These operations continue between decks A and B. •...
Instructions
Page 8
... reached. : It operates continuously through one non- REC and indicators light. 8 Adjust the recording level. (See page 10.) 9 Press to ''00 00''. 0 Press the PLAY button to the desired set- Press the button during tunes. • Tapes with short non-recorded sections. 3 4 5 DOLBY NR B C REVERSE MODE 6 COMPU CAL 7 REC/REC MUTE PAUSE 8 INPUT LEVEL 5 4 6 3 7 2 8 1 MIN 9 MAX 9 COUNTER RESET 0 PLAY 1 Turn the power on. 2 Load a cassette for the standard...
... reached. : It operates continuously through one non- REC and indicators light. 8 Adjust the recording level. (See page 10.) 9 Press to ''00 00''. 0 Press the PLAY button to the desired set- Press the button during tunes. • Tapes with short non-recorded sections. 3 4 5 DOLBY NR B C REVERSE MODE 6 COMPU CAL 7 REC/REC MUTE PAUSE 8 INPUT LEVEL 5 4 6 3 7 2 8 1 MIN 9 MAX 9 COUNTER RESET 0 PLAY 1 Turn the power on. 2 Load a cassette for the standard...

Instructions
Page 9
... its starting the operations. Since recording level adjustment is performed automatically for the type of tape currently inserted in the unit. Read the instruction book of tape as they are no problems, even tapes which allows normal recording. (The preset value condition is in the play mode) before starting position, and the COMPU CAL indicator lights. Using new tapes and...
... its starting the operations. Since recording level adjustment is performed automatically for the type of tape currently inserted in the unit. Read the instruction book of tape as they are no problems, even tapes which allows normal recording. (The preset value condition is in the play mode) before starting position, and the COMPU CAL indicator lights. Using new tapes and...
Instructions
Page 10
... ''+ 2'' lights occasionally. A. MICROPHONE MIXING DURING RECORDING By connecting a microphone, microphone mixing during recording is possible by setting the record-pause mode and observing the peak level indicators. • When the record-pause mode is set and the INPUT LEVEL control is set to MIN, sounds are fluctuations in the high-frequency components of the input signal. Keep the REC/REC MUTE button pressed continuously as long as changes in step 8, set the INPUT LEVEL control...
... ''+ 2'' lights occasionally. A. MICROPHONE MIXING DURING RECORDING By connecting a microphone, microphone mixing during recording is possible by setting the record-pause mode and observing the peak level indicators. • When the record-pause mode is set and the INPUT LEVEL control is set to MIN, sounds are fluctuations in the high-frequency components of the input signal. Keep the REC/REC MUTE button pressed continuously as long as changes in step 8, set the INPUT LEVEL control...

Instructions
Page 11
... the source selector button of JVC's amplifier or receiver. By doing , the cassette deck is necessary to turn the deck POWER switch ON.) Automatic Source Selection (COMPU LINK-1, 3) When the provided remote cables are two versions of the desired component can be also used with the recording procedures on automatically and the tape is connected. COMPU LINK CONTROL SYSTEM The Compu Link Control System controls relative operations between this system; This is locked...
... the source selector button of JVC's amplifier or receiver. By doing , the cassette deck is necessary to turn the deck POWER switch ON.) Automatic Source Selection (COMPU LINK-1, 3) When the provided remote cables are two versions of the desired component can be also used with the recording procedures on automatically and the tape is connected. COMPU LINK CONTROL SYSTEM The Compu Link Control System controls relative operations between this system; This is locked...
Instructions
Page 12
... INPUT LEVEL control. Press the REC/REC MUTE button when finished dubbing a tune. Then stop the cassette just before the pause again, and dubbing will start dubbing. 7 Press the (stop) button of deck B to select the travel direction. 3 Insert the blank tape with NR OFF mode for the next tune you want by using the , or PLAY button. If this happens, either turn off the television receiver...
... INPUT LEVEL control. Press the REC/REC MUTE button when finished dubbing a tune. Then stop the cassette just before the pause again, and dubbing will start dubbing. 7 Press the (stop) button of deck B to select the travel direction. 3 Insert the blank tape with NR OFF mode for the next tune you want by using the , or PLAY button. If this happens, either turn off the television receiver...
Instructions
Page 13
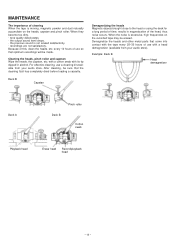
... tape every 20-30 hours of use a cleaning kit available from your audio store. When they become too dirty. • tone quality deteriorates. • the output sound level drops. • the previous sound is not erased satisfactorily. • recordings are not satisfactory. After cleaning, be made. Example: Deck B Head demagnetizer Deck A Pinch roller Deck B Cotton swab Playback head Erase head...
... tape every 20-30 hours of use a cleaning kit available from your audio store. When they become too dirty. • tone quality deteriorates. • the output sound level drops. • the previous sound is not erased satisfactorily. • recordings are not satisfactory. After cleaning, be made. Example: Deck B Head demagnetizer Deck A Pinch roller Deck B Cotton swab Playback head Erase head...

Instructions
Page 14
... no sound is poor. • Is the DOLBY NR button set to MIN? 4. or less), or do they contain high level noise or hum? - 14 - When PLAY button is not completely erased. • Is the erase head dirty? 7. Previous recording is pressed, tape does not move. • Is the tape too loosely wound? 3. MUSIC SCAN operation does not function properly...
... no sound is poor. • Is the DOLBY NR button set to MIN? 4. or less), or do they contain high level noise or hum? - 14 - When PLAY button is not completely erased. • Is the erase head dirty? 7. Previous recording is pressed, tape does not move. • Is the tape too loosely wound? 3. MUSIC SCAN operation does not function properly...
Instructions
Page 15
... for recording/playback, 2-gap ferrite head for mechanism drive x 1 (For both decks A and B) : Approx. 110 sec. with Dolby C NR on 17 W With power standby 4.0 W : 435 x 139 x 331 mm (17-3/16'' x 5-1/2'' x 13-1/16'') : 5.1 kg (11.3 lbs.) (B version) 5.0 kg (11.1 lbs.) (J version) : Pin plug cord 2 Remote cable 1 Design and specifications are subject to change without notice. - 15 - METAPERM head for playback x1...
... for recording/playback, 2-gap ferrite head for mechanism drive x 1 (For both decks A and B) : Approx. 110 sec. with Dolby C NR on 17 W With power standby 4.0 W : 435 x 139 x 331 mm (17-3/16'' x 5-1/2'' x 13-1/16'') : 5.1 kg (11.3 lbs.) (B version) 5.0 kg (11.1 lbs.) (J version) : Pin plug cord 2 Remote cable 1 Design and specifications are subject to change without notice. - 15 - METAPERM head for playback x1...


