
Instructions
Page 4
... components with the remote control 14 Operating the TV 14 Operating the DBS tuner or CATV converter 15 Operating the VCR 15 Basic operations 16 Turning the system on/off 16 Selecting the source to play 17 Adjusting the volume [VOLUME 17 Listening with headphones (not supplied 17... Turning off the sound temporarily [MUTING 17 Adjusting the brightness of the indications [DIMMER] ... 17 Sleep Timer [SLEEP 18 Adjusting the output level of the subwoofer ...
... components with the remote control 14 Operating the TV 14 Operating the DBS tuner or CATV converter 15 Operating the VCR 15 Basic operations 16 Turning the system on/off 16 Selecting the source to play 17 Adjusting the volume [VOLUME 17 Listening with headphones (not supplied 17... Turning off the sound temporarily [MUTING 17 Adjusting the brightness of the indications [DIMMER] ... 17 Sleep Timer [SLEEP 18 Adjusting the output level of the subwoofer ...

Instructions
Page 5
...too hot nor too cold; Label sticker Sticker Paste Note about copyguard system The discs are no user-serviceable parts inside the system Turn the system off and disconnect the power cord plug from the wall outlet, always pull on the plug, not the power cord.../right) and center speakers (3) 10 m: For satellite speakers (surround left/right) (2) • Screws TH-C60: M5 x 40 mm (4) M4 x 20 mm (8) TH-C50: M5 x 40 mm (2) M4 x 20 mm (4) • Speaker cord clamps TH-C60 (4) TH-C50 (2) 2 between 5°C and 35°C. • Leave sufficient distance between the system and the ...
...too hot nor too cold; Label sticker Sticker Paste Note about copyguard system The discs are no user-serviceable parts inside the system Turn the system off and disconnect the power cord plug from the wall outlet, always pull on the plug, not the power cord.../right) and center speakers (3) 10 m: For satellite speakers (surround left/right) (2) • Screws TH-C60: M5 x 40 mm (4) M4 x 20 mm (8) TH-C50: M5 x 40 mm (2) M4 x 20 mm (4) • Speaker cord clamps TH-C60 (4) TH-C50 (2) 2 between 5°C and 35°C. • Leave sufficient distance between the system and the ...
Instructions
Page 11
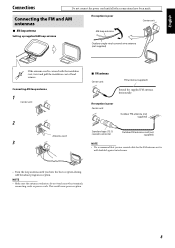
... is poor AM loop antenna Center unit Outdoor single vinyl-covered wire antenna (not supplied) If the antenna cord is well-shielded against interference. • Turn the loop antenna until all other terminals, connecting cords or power cords. Connecting AM loop antenna 1 Center unit 2 Antenna cord 3 7 FM antenna Center unit FM...
... is poor AM loop antenna Center unit Outdoor single vinyl-covered wire antenna (not supplied) If the antenna cord is well-shielded against interference. • Turn the loop antenna until all other terminals, connecting cords or power cords. Connecting AM loop antenna 1 Center unit 2 Antenna cord 3 7 FM antenna Center unit FM...

Instructions
Page 15
... If your TV supports progressive video input, you can select the type of your TV are located nearby the TV or monitor, it before turning on page 35. Speaker layout To obtain the best possible sound from this system outputs only progressive signals from the component video jacks. However,... flat and level surface. • The front and center speakers are ready to send and receive signals. • When you need to set , turn off the TV's main power switch or unplug it will probably cause color distortion on TVs. Some TVs may cause color distortions. By connecting this...
... If your TV supports progressive video input, you can select the type of your TV are located nearby the TV or monitor, it before turning on page 35. Speaker layout To obtain the best possible sound from this system outputs only progressive signals from the component video jacks. However,... flat and level surface. • The front and center speakers are ready to send and receive signals. • When you need to set , turn off the TV's main power switch or unplug it will probably cause color distortion on TVs. Some TVs may cause color distortions. By connecting this...

Instructions
Page 17
Number buttons Remote control mode selector (play button) NOTE • Manufacturers' codes are available: F TV: Turns TV on and off. Examples: For a Hitachi TV: Press 1, then 0. CH +/-: Changes the channels. 1-10, 0, h10 (100+): Selects the channel. TV RETURN: ... Set the remote control mode selector to TV. 2 Press and hold F TV. The following buttons are subject to enter the manufacturer's code (2 digits). Manufacturer JVC Hitachi Magnavox Mitsubishi Panasonic Philips RCA Code Manufacturer 01* Samsung 10 Sanyo 02 Sharp 03 Sony 04, 11 Toshiba 15 Zenith 05 Code 12 13...
Number buttons Remote control mode selector (play button) NOTE • Manufacturers' codes are available: F TV: Turns TV on and off. Examples: For a Hitachi TV: Press 1, then 0. CH +/-: Changes the channels. 1-10, 0, h10 (100+): Selects the channel. TV RETURN: ... Set the remote control mode selector to TV. 2 Press and hold F TV. The following buttons are subject to enter the manufacturer's code (2 digits). Manufacturer JVC Hitachi Magnavox Mitsubishi Panasonic Philips RCA Code Manufacturer 01* Samsung 10 Sanyo 02 Sharp 03 Sony 04, 11 Toshiba 15 Zenith 05 Code 12 13...

Instructions
Page 18
... for button locations. CH +/-: Changes the TV channels on and off . For a Sony product: Press 2, then 0. The following buttons are available: F VCR/DBS: Turns VCR on the VCR. y: Fast forwards video tape. 1: Rewinds video tape. NOTE • When operating a VCR or DBS tuner/CATV converter; - CH +/-: Changes...7 To set the manufacturer's code 1 Slide the remote control mode selector to VCR/DBS. 2 Press DBS. 3 Press and hold F VCR/DBS. Manufacturer JVC Emerson Fisher Funai Gold Star Hitachi Mitsubishi NEC Panasonic Code 01*, 02, 03 11, 26 29 10, 14, 15, 16 12 04 13 25 07...
... for button locations. CH +/-: Changes the TV channels on and off . For a Sony product: Press 2, then 0. The following buttons are available: F VCR/DBS: Turns VCR on the VCR. y: Fast forwards video tape. 1: Rewinds video tape. NOTE • When operating a VCR or DBS tuner/CATV converter; - CH +/-: Changes...7 To set the manufacturer's code 1 Slide the remote control mode selector to VCR/DBS. 2 Press DBS. 3 Press and hold F VCR/DBS. Manufacturer JVC Emerson Fisher Funai Gold Star Hitachi Mitsubishi NEC Panasonic Code 01*, 02, 03 11, 26 29 10, 14, 15, 16 12 04 13 25 07...

Instructions
Page 19
.... • You can use the buttons on the center unit same as the source (see page 17), the following buttons; - You can also turn on the system by pressing the following messages will appear on the TV screen. Source selecting buttons Cursor (3/2)/ ENTER Remote control mode selector • "OPEN...power is called standby mode and the STANDBY lamp lights in this mode. The lamp goes off when the power is turned on. • The power supply to the subwoofer is turned off On the remote control: Press F AUDIO. One of the operations in this manual. Basic operations The buttons ...
.... • You can use the buttons on the center unit same as the source (see page 17), the following buttons; - You can also turn on the system by pressing the following messages will appear on the TV screen. Source selecting buttons Cursor (3/2)/ ENTER Remote control mode selector • "OPEN...power is called standby mode and the STANDBY lamp lights in this mode. The lamp goes off when the power is turned on. • The power supply to the subwoofer is turned off On the remote control: Press F AUDIO. One of the operations in this manual. Basic operations The buttons ...

Instructions
Page 20
...display window. PHONE" appears on the center unit, the system automatically cancels the surround mode (see page 23) currently selected, deactivates the speakers, turns the subwoofer's power off the sound temporarily [MUTING] Press MUTING. VCR: To select the source from a component connected to the VCR IN ...starting any source. Basic operations See page 16 for button locations. NOTE • When AM, FM or DBS is set the volume to turn down -mixed and output from the speakers. Headphone mode When using the headphones, the following : • Press MUTING again. • Press VOL...
...display window. PHONE" appears on the center unit, the system automatically cancels the surround mode (see page 23) currently selected, deactivates the speakers, turns the subwoofer's power off the sound temporarily [MUTING] Press MUTING. VCR: To select the source from a component connected to the VCR IN ...starting any source. Basic operations See page 16 for button locations. NOTE • When AM, FM or DBS is set the volume to turn down -mixed and output from the speakers. Headphone mode When using the headphones, the following : • Press MUTING again. • Press VOL...

Instructions
Page 21
... the speakers changes as the source and stopped 1 Press and hold SCAN MODE for all sources. To cancel Press SLEEP repeatedly until "SLEEP - -" appears. • Turning off ) Z 10 Z 20 Z 30 Z 60 Z 90 Z 120 Z 150 Z (back to the beginning) 2 Press LEVEL +/- Adjusting the sound 1 Press TREBLE/BASS... 18 In such a case, change the remaining time Press SLEEP repeatedly. To change the scan mode to the interlace mode. • All JVC progressive TVs and High-Definition TVs are not fully compatible with progressive format. • Generally, you press the button, the scan mode changes as...
... the speakers changes as the source and stopped 1 Press and hold SCAN MODE for all sources. To cancel Press SLEEP repeatedly until "SLEEP - -" appears. • Turning off ) Z 10 Z 20 Z 30 Z 60 Z 90 Z 120 Z 150 Z (back to the beginning) 2 Press LEVEL +/- Adjusting the sound 1 Press TREBLE/BASS... 18 In such a case, change the remaining time Press SLEEP repeatedly. To change the scan mode to the interlace mode. • All JVC progressive TVs and High-Definition TVs are not fully compatible with progressive format. • Generally, you press the button, the scan mode changes as...

Instructions
Page 22
... an 8 cm disc Number buttons Cursor (3/2)/ ENTER 19 Remote control mode selector (play a disc 1 Press the desired DISC (1-5) 0 on the center unit. • The system turns on the TV screen for . DISC(1-5) 3 or 3 on the center unit. • The system plays back available discs sequentially until the disc loaded on the...
... an 8 cm disc Number buttons Cursor (3/2)/ ENTER 19 Remote control mode selector (play a disc 1 Press the desired DISC (1-5) 0 on the center unit. • The system turns on the TV screen for . DISC(1-5) 3 or 3 on the center unit. • The system plays back available discs sequentially until the disc loaded on the...

Instructions
Page 27
...mode selector to automatically select the optimal surround mode for button locations. Storing adjustments - The memorized mode is automatically recalled when you turn the power on the display window Digital signal format indicators LPCM: Lights when Linear PCM signal comes in . GD: Lights when...in . Normal stereo sound All Channel Stereo 7 Indicators on . Selecting the surround mode The system is activated. auto memory When you turn the power off the surround mode Press SURROUND repeatedly until "OFF" appears on the display window. Light to select the desired mode. ...
...mode selector to automatically select the optimal surround mode for button locations. Storing adjustments - The memorized mode is automatically recalled when you turn the power on the display window Digital signal format indicators LPCM: Lights when Linear PCM signal comes in . GD: Lights when...in . Normal stereo sound All Channel Stereo 7 Indicators on . Selecting the surround mode The system is activated. auto memory When you turn the power off the surround mode Press SURROUND repeatedly until "OFF" appears on the display window. Light to select the desired mode. ...
Instructions
Page 31
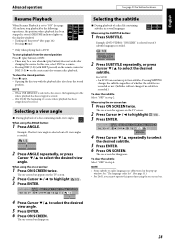
... subtitle. 5 Press ENTER. 6 Press ON SCREEN. For SVCD • An SVCD can contain up window. The on-screen bar appears on the display window.) • Turning off the power* (See page 16.) • Pressing 7 once * Only when playing back a DVD. The on -screen bar disappears. Resume Playback When Resume Playback is...
... subtitle. 5 Press ENTER. 6 Press ON SCREEN. For SVCD • An SVCD can contain up window. The on-screen bar appears on the display window.) • Turning off the power* (See page 16.) • Pressing 7 once * Only when playing back a DVD. The on -screen bar disappears. Resume Playback When Resume Playback is...

Instructions
Page 33
... buttons in the middle of the procedure, the setting at that time will be a case that affect picture appearance. To clear the programs one by turning off the system. 3 Press 3 (play button). If all programs Press 7. To quit the Program mode While stopped, press PLAY MODE repeatedly until program window appears...
... buttons in the middle of the procedure, the setting at that time will be a case that affect picture appearance. To clear the programs one by turning off the system. 3 Press 3 (play button). If all programs Press 7. To quit the Program mode While stopped, press PLAY MODE repeatedly until program window appears...
Instructions
Page 34
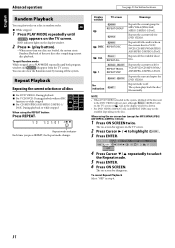
Advanced operations Random Playback You can also clear the Random mode by turning off . See page 23 for DVD VIDEO. Repeat mode is shown. • For DVD VIDEO, REPEAT ALL and REPEAT DISC may not be available depending ...
Advanced operations Random Playback You can also clear the Random mode by turning off . See page 23 for DVD VIDEO. Repeat mode is shown. • For DVD VIDEO, REPEAT ALL and REPEAT DISC may not be available depending ...

Instructions
Page 35
... part by which you try to eject the disc, "LOCKED" appears to repeat (point A). NOTE • Before you want to indicate that the tray is turned off See page 23 for the built-in step 4, then press ENTER. Advanced operations Repeating a desired part [A-B Repeat] You can lock the tray and prohibit...
... part by which you try to eject the disc, "LOCKED" appears to repeat (point A). NOTE • Before you want to indicate that the tray is turned off See page 23 for the built-in step 4, then press ENTER. Advanced operations Repeating a desired part [A-B Repeat] You can lock the tray and prohibit...

Instructions
Page 41
...playback picture. One-touch video play on the remote control to a TV and VCR using the TV volume control on the TV. • When turning on automatically. Automatic selection of TV input mode, select the correct "MON." (Monitor Out) setting. (See page 32.) Available functions The AV...AV COMPU LINK remote control system The AV COMPU LINK remote control system allows you to operate JVC's video components via the video components terminals. This system is "VCR", the TV and VCR will turn on the VCR, use the functions listed following. To use this system. (Press F VCR/...
...playback picture. One-touch video play on the remote control to a TV and VCR using the TV volume control on the TV. • When turning on automatically. Automatic selection of TV input mode, select the correct "MON." (Monitor Out) setting. (See page 32.) Available functions The AV...AV COMPU LINK remote control system The AV COMPU LINK remote control system allows you to operate JVC's video components via the video components terminals. This system is "VCR", the TV and VCR will turn on the VCR, use the functions listed following. To use this system. (Press F VCR/...

Instructions
Page 42
... wipe it with a soft cloth. DO NOT allow any volatile substance such as insecticides to it back in its paint peeled off the system and turn off , be careful about the following. - Connect the power cord and system cord correctly. (See page 13.) The remote control does The batteries are distorted... see if it back on the TV screen. DO NOT wipe it again. The power cord and/or system cord is used. not work properly, turn it is connected through component video, S-video, or composite video jacks (see page 12), then set to "480p" though the center unit is not playable...
... wipe it with a soft cloth. DO NOT allow any volatile substance such as insecticides to it back in its paint peeled off the system and turn off , be careful about the following. - Connect the power cord and system cord correctly. (See page 13.) The remote control does The batteries are distorted... see if it back on the TV screen. DO NOT wipe it again. The power cord and/or system cord is used. not work properly, turn it is connected through component video, S-video, or composite video jacks (see page 12), then set to "480p" though the center unit is not playable...


