Instructions
Page 3
...can radiate radio frequency energy and, if not installed and used in accordance with the instructions, may not be able to provide reasonable protection against harmful interference in a particular installation. CET ...part 15 of the following measures: Reorient or relocate the receiving antenna. - Connect the equipment into an outlet on the apparatus. This equipment generates, uses and can cause hearing loss. However, there is no objects filled with the limits for help. Consult the dealer or an experienced radio/TV technician for a Class B digital device, pursuant to operate...
...can radiate radio frequency energy and, if not installed and used in accordance with the instructions, may not be able to provide reasonable protection against harmful interference in a particular installation. CET ...part 15 of the following measures: Reorient or relocate the receiving antenna. - Connect the equipment into an outlet on the apparatus. This equipment generates, uses and can cause hearing loss. However, there is no objects filled with the limits for help. Consult the dealer or an experienced radio/TV technician for a Class B digital device, pursuant to operate...
Instructions
Page 5
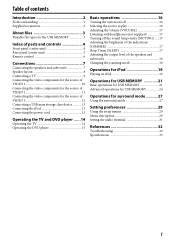
... 17 Sleep Timer [SLEEP 17 Adjusting the output level of the speakers and subwoofer 18 Changing the scanning mode 18 Operations for iPod 19 Playing an iPod 19 Operations for USB MEMORY 21 Basic operations for USB MEMORY 21 Advanced operations for USB MEMORY 24 Operations for surround mode 27 Using the surround mode 27 Setting preferences 29 Using the setup menus 29 Menu description 29 Setting the audio terminal 31 References 32 Troubleshooting 32 Specifications 33 I 1
... 17 Sleep Timer [SLEEP 17 Adjusting the output level of the speakers and subwoofer 18 Changing the scanning mode 18 Operations for iPod 19 Playing an iPod 19 Operations for USB MEMORY 21 Basic operations for USB MEMORY 21 Advanced operations for USB MEMORY 24 Operations for surround mode 27 Using the surround mode 27 Setting preferences 29 Using the setup menus 29 Menu description 29 Setting the audio terminal 31 References 32 Troubleshooting 32 Specifications 33 I 1

Instructions
Page 6
... other limited viewing uses only unless otherwise authorized by U.S. The number in the U.S. When you made your dealer immediately. • Remote control (1) • Batteries (2) • Composite Video cord (1) • Connection cable for iPod (1) • Stand for a long time. Care of the cabinet • Stains on the system should be authorized by Digital Content Protection, LLC. Introduction Notes on handling 7 Important cautions Installation of...
... other limited viewing uses only unless otherwise authorized by U.S. The number in the U.S. When you made your dealer immediately. • Remote control (1) • Batteries (2) • Composite Video cord (1) • Connection cable for iPod (1) • Stand for a long time. Care of the cabinet • Stains on the system should be authorized by Digital Content Protection, LLC. Introduction Notes on handling 7 Important cautions Installation of...

Instructions
Page 11
... use speakers of the same speaker impedance (SPEAKER IMPEDANCE) indicated on the rear of the center unit. • DO NOT connect more than one speaker terminal. • When installing the satellite speakers on the wall; - otherwise, the speakers may result if the speakers installed interfere with daily activities. Connections Do not connect the power cord until all other than the supplied ones, use • When moving the speakers, do not pull the speaker cords; otherwise, the speakers...
... use speakers of the same speaker impedance (SPEAKER IMPEDANCE) indicated on the rear of the center unit. • DO NOT connect more than one speaker terminal. • When installing the satellite speakers on the wall; - otherwise, the speakers may result if the speakers installed interfere with daily activities. Connections Do not connect the power cord until all other than the supplied ones, use • When moving the speakers, do not pull the speaker cords; otherwise, the speakers...

Instructions
Page 12
... may cause color distortions. Speaker layout To obtain the best possible sound from this system, you have been made. Front left speaker Center speaker Front right speaker Subwoofer Surround left speaker Surround right speaker If your speakers cannot be affected even though you need to place all other connections have followed the above. Connections Do not connect the power cord until all the speakers except the subwoofer at the same distance...
... may cause color distortions. Speaker layout To obtain the best possible sound from this system, you have been made. Front left speaker Center speaker Front right speaker Subwoofer Surround left speaker Surround right speaker If your speakers cannot be affected even though you need to place all other connections have followed the above. Connections Do not connect the power cord until all the speakers except the subwoofer at the same distance...
Instructions
Page 13
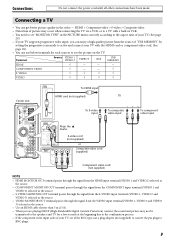
...; √ √ √ Center unit To HDMI input HDMI cord (not supplied) TV To S-video input To composite video input To component video input Align the 5 marks. HDMI > Component video > S-video > Composite video. • Distortion of "USB MEMORY" by setting the progressive scan mode to active and connect your TV are playing HDCP (High-Bandwidth Digital Content Protection) content, the sound and picture may...
...; √ √ √ Center unit To HDMI input HDMI cord (not supplied) TV To S-video input To composite video input To component video input Align the 5 marks. HDMI > Component video > S-video > Composite video. • Distortion of "USB MEMORY" by setting the progressive scan mode to active and connect your TV are playing HDCP (High-Bandwidth Digital Content Protection) content, the sound and picture may...
Instructions
Page 14
... 1" have been made. If you connect the components with digital optical audio cord, change the audio input (VIDEO 1) setting to "Digital." (See page 31.) • Before connecting a digital optical cable, unplug the protective plug from DIGITAL IN VIDEO 1 terminal. • If you are playing HDCP (High-Bandwidth Digital Content Protection) content, the sound and picture may not be transmitted to the speakers and TV for a few seconds at...
... 1" have been made. If you connect the components with digital optical audio cord, change the audio input (VIDEO 1) setting to "Digital." (See page 31.) • Before connecting a digital optical cable, unplug the protective plug from DIGITAL IN VIDEO 1 terminal. • If you are playing HDCP (High-Bandwidth Digital Content Protection) content, the sound and picture may not be transmitted to the speakers and TV for a few seconds at...

Instructions
Page 15
... component video output jacks of your video components of the BNC type, use a plug adapter (not supplied) to convert the pin plugs to BNC plugs. • When shipped from the component is not sent to the TV. • The audio signal through the HDMI VIDEO 2 IN terminal is not reproduced on the TV connected with digital coaxial audio cord, change the audio input (VIDEO 2) setting to "Digital." (See page...
... component video output jacks of your video components of the BNC type, use a plug adapter (not supplied) to convert the pin plugs to BNC plugs. • When shipped from the component is not sent to the TV. • The audio signal through the HDMI VIDEO 2 IN terminal is not reproduced on the TV connected with digital coaxial audio cord, change the audio input (VIDEO 2) setting to "Digital." (See page...

Instructions
Page 16
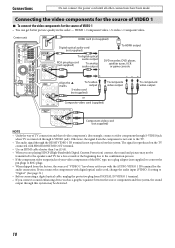
... video components for the source of "VIDEO 3" have been made. Otherwise, the signal from the component is connected through this system, the sound output through S-VIDEO jack). Connections Do not connect the power cord until all other connections have been set for use with digital optical audio cord, change the audio input (VIDEO 3) setting to "Digital." (See page 31.) 12 Center unit Digital optical audio cord (not supplied) Align the 5 marks. S-video > Composite video.
... video components for the source of "VIDEO 3" have been made. Otherwise, the signal from the component is connected through this system, the sound output through S-VIDEO jack). Connections Do not connect the power cord until all other connections have been set for use with digital optical audio cord, change the audio input (VIDEO 3) setting to "Digital." (See page 31.) 12 Center unit Digital optical audio cord (not supplied) Align the 5 marks. S-video > Composite video.

Instructions
Page 17
... turned on the front panel) USB cable (not supplied) NOTE • Connect one USB mass storage class device to the connector part. • Do not touch or hit the iPod terminal pins or connector pins directly. It might cause damages to the system at a time. When unplugging the cord, always grasp and pull the plug so as the source, the file control display...
... turned on the front panel) USB cable (not supplied) NOTE • Connect one USB mass storage class device to the connector part. • Do not touch or hit the iPod terminal pins or connector pins directly. It might cause damages to the system at a time. When unplugging the cord, always grasp and pull the plug so as the source, the file control display...
Instructions
Page 18
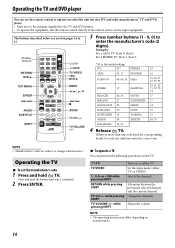
... DVD player. • To operate the equipment, aim the remote control directly at the remote sensor on the target equipment. TV TV/VIDEO 1 - 9, 0, or +100 while pressing SHIFT RETURN while pressing SHIFT TV CH +/- Examples: For a AKAI TV: Press 0, then 2. NOTE • Manufacturers' codes are used on manufacturers. 14 Alternates between the previously selected channel and the current channel. Set the input mode (either...
... DVD player. • To operate the equipment, aim the remote control directly at the remote sensor on the target equipment. TV TV/VIDEO 1 - 9, 0, or +100 while pressing SHIFT RETURN while pressing SHIFT TV CH +/- Examples: For a AKAI TV: Press 0, then 2. NOTE • Manufacturers' codes are used on manufacturers. 14 Alternates between the previously selected channel and the current channel. Set the input mode (either...

Instructions
Page 20
... when the power is turned off On the remote control: Press AUDIO. USB MEMORY 6: To play back a file in this manual. shows the file types the operation is called standby mode and the STANDBY lamp lights in a USB mass storage class device. (See page 21.) iPod 6: To start play On the remote control: Press one of the source selecting buttons on the remote control (VIDEO1, VIDEO2, VIDEO3, iPod 6 and USB...
... when the power is turned off On the remote control: Press AUDIO. USB MEMORY 6: To play back a file in this manual. shows the file types the operation is called standby mode and the STANDBY lamp lights in a USB mass storage class device. (See page 21.) iPod 6: To start play On the remote control: Press one of the source selecting buttons on the remote control (VIDEO1, VIDEO2, VIDEO3, iPod 6 and USB...

Instructions
Page 21
... the speakers, and activates the headphone mode. Each time you press the button, you press the button, the shut-off time changes as follows: 10 Z 20 Z 30 Z 60 Z 90 Z 120 Z 150 Z 180 Z - - (Canceled) Z (back to turn down the volume; • Before connecting or putting on the display. Press SLEEP repeatedly. On the remote control: Press AUDIO VOLUME +/-. While connecting a pair of the speakers. Turning off...
... the speakers, and activates the headphone mode. Each time you press the button, you press the button, the shut-off time changes as follows: 10 Z 20 Z 30 Z 60 Z 90 Z 120 Z 150 Z 180 Z - - (Canceled) Z (back to turn down the volume; • Before connecting or putting on the display. Press SLEEP repeatedly. On the remote control: Press AUDIO VOLUME +/-. While connecting a pair of the speakers. Turning off...

Instructions
Page 22
... supports the interlaced scanning mode only. • PROGRESS: Select when your TV's scanning mode when playing back a JPEG/ MPEG-1/MPEG-2/ASF file in INT-LACE mode. 3 Press ENTER while the selected mode is required that are not fully compatible with this system. 18 Adjusting the output level of the speakers changes as follows: FRNT L (Front left speaker) Z FRNT R (Front right speaker) Z CENTER (Center speaker) Z SURR L (Surround left speaker) Z SURR R (Surround...
... supports the interlaced scanning mode only. • PROGRESS: Select when your TV's scanning mode when playing back a JPEG/ MPEG-1/MPEG-2/ASF file in INT-LACE mode. 3 Press ENTER while the selected mode is required that are not fully compatible with this system. 18 Adjusting the output level of the speakers changes as follows: FRNT L (Front left speaker) Z FRNT R (Front right speaker) Z CENTER (Center speaker) Z SURR L (Surround left speaker) Z SURR R (Surround...
Instructions
Page 23
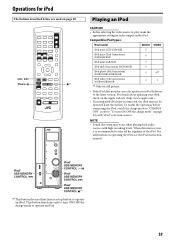
... to turn ON/OFF the charge mode" on page 20) with high recording levels. For information on operating the iPod, see the iPod instruction manual. *1 This button does not function as source. Playing an iPod CAUTION • Before selecting the video source to play correctly, update your iPod, check on the Apple web site . • If incompatible iPod type is recommended to operate an iPod. NOTE • Sound distortion...
... to turn ON/OFF the charge mode" on page 20) with high recording levels. For information on operating the iPod, see the iPod instruction manual. *1 This button does not function as source. Playing an iPod CAUTION • Before selecting the video source to play correctly, update your iPod, check on the Apple web site . • If incompatible iPod type is recommended to operate an iPod. NOTE • Sound distortion...

Instructions
Page 24
... playback. On the remote control: Press and hold iPod 6. Starting playback 1 Connect an iPod (see page 16) "iPod CONNECT" appears on standby mode) or selecting another source also turns off the iPod. 20 On the center unit: Press and hold 4 or x during playback. On the center unit: Press and hold iPod/USB MEMORY CONTROL ‹/8. If an iPod is turned off the iPod On the remote control: Press and hold...
... playback. On the remote control: Press and hold iPod 6. Starting playback 1 Connect an iPod (see page 16) "iPod CONNECT" appears on standby mode) or selecting another source also turns off the iPod. 20 On the center unit: Press and hold 4 or x during playback. On the center unit: Press and hold iPod/USB MEMORY CONTROL ‹/8. If an iPod is turned off the iPod On the remote control: Press and hold...

Instructions
Page 32
... channel signal comes in. : Lights when the surround left channel signal comes in. : Lights when the surround right channel signal comes in. : Lights when the monaural surround channel signal or 2 channel Dolby Surround signal comes in . Dolby Surround mode indicator GPLII: Lights when Dolby Pro Logic II is ineffective. 28 When playing back a 2 channel source, you press the button, the surround mode changes. All Channel Stereo can reproduce a larger stereo sound field using all the connected (and activated) speakers...
... channel signal comes in. : Lights when the surround left channel signal comes in. : Lights when the surround right channel signal comes in. : Lights when the monaural surround channel signal or 2 channel Dolby Surround signal comes in . Dolby Surround mode indicator GPLII: Lights when Dolby Pro Logic II is ineffective. 28 When playing back a 2 channel source, you press the button, the surround mode changes. All Channel Stereo can reproduce a larger stereo sound field using all the connected (and activated) speakers...
Instructions
Page 33
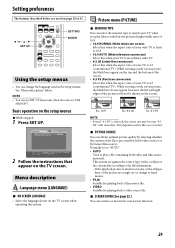
..., try to change the language used on page 29 to play files recorded in the setup menus. Normally set to "AUTO". • AUTO Used to 31. Basic operation on the setup menus 7While stopped 1 Press SET UP. 2 Follow the instructions that appear on the TV screen when operating this system. : Picture menu (PICTURE) 7 MONITOR TYPE You can activate or deactivate screen saver function. 29 While viewing a wide...
..., try to change the language used on page 29 to play files recorded in the setup menus. Normally set to "AUTO". • AUTO Used to 31. Basic operation on the setup menus 7While stopped 1 Press SET UP. 2 Follow the instructions that appear on the TV screen when operating this system. : Picture menu (PICTURE) 7 MONITOR TYPE You can activate or deactivate screen saver function. 29 While viewing a wide...
Instructions
Page 36
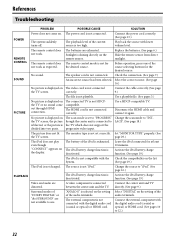
The playback level of the audio terminals. The remote control mode is too high. The speaker cord is divided into two parts. Check the connection. (See page 7.) An incorrect source has been selected. Use a HDCP-compatible TV. No picture is displayed on the TV screen, the picture is blurred, or the picture is not connected. Change the scan mode to 12.) 32 Activate the iPod battery charge function...
The playback level of the audio terminals. The remote control mode is too high. The speaker cord is divided into two parts. Check the connection. (See page 7.) An incorrect source has been selected. Use a HDCP-compatible TV. No picture is displayed on the TV screen, the picture is blurred, or the picture is not connected. Change the scan mode to 12.) 32 Activate the iPod battery charge function...

Instructions
Page 37
... V , 60 Hz Power supply to iPod: 5 V/500 mA Power Consumption: 50 W (at operation) 0.8 W (in standby mode) Dimensions (W M H M D): 118 mm M 276 mm M 246 mm (4-11/16 inches M 10-15/16 inches M 9-11/16 inches) Mass: 2.9 kg (6.4 lbs) 7 Subwoofer (SP-THL1W) Type: 1-way Bass-Reflex Type (Magnetically-Shielded Type) Speaker: 16 cm (6-5/16 inches) cone M 1 Power Handling Capacity: 100 W Impedance: 4 Ω Frequency Range: 30 Hz to 1.5 kHz Sound Pressure Level: 84 dB...
... V , 60 Hz Power supply to iPod: 5 V/500 mA Power Consumption: 50 W (at operation) 0.8 W (in standby mode) Dimensions (W M H M D): 118 mm M 276 mm M 246 mm (4-11/16 inches M 10-15/16 inches M 9-11/16 inches) Mass: 2.9 kg (6.4 lbs) 7 Subwoofer (SP-THL1W) Type: 1-way Bass-Reflex Type (Magnetically-Shielded Type) Speaker: 16 cm (6-5/16 inches) cone M 1 Power Handling Capacity: 100 W Impedance: 4 Ω Frequency Range: 30 Hz to 1.5 kHz Sound Pressure Level: 84 dB...


