

Instruction Manual
Page 4
...buttons and controls on the lenses inside the System in the sections "Learning More about the functions, go to operate the System for purchasing a JVC product. DO NOT disassemble the System since there are not going to these sections and you will find the answers. In this manual, the ...operations using the remote control. Indicates that you press the button briefly. Indicates that you press one of the buttons. 2 sec. Introduction Thank you for an extended...
...buttons and controls on the lenses inside the System in the sections "Learning More about the functions, go to operate the System for purchasing a JVC product. DO NOT disassemble the System since there are not going to these sections and you will find the answers. In this manual, the ...operations using the remote control. Indicates that you press the button briefly. Indicates that you press one of the buttons. 2 sec. Introduction Thank you for an extended...

Instruction Manual
Page 5
Contents Getting Started 3 Step 1: Unpack 3 Step 2: Prepare the Remote Control 3 Step 3: Hook Up 4 Before Operating the System 6 Daily Operations-Playback 7 Listening to the Radio 8 Playable Media and Files 9 Playing Back a Disc 9 Playing Back a USB ...
Contents Getting Started 3 Step 1: Unpack 3 Step 2: Prepare the Remote Control 3 Step 3: Hook Up 4 Before Operating the System 6 Daily Operations-Playback 7 Listening to the Radio 8 Playable Media and Files 9 Playing Back a Disc 9 Playing Back a USB ...
Instruction Manual
Page 6
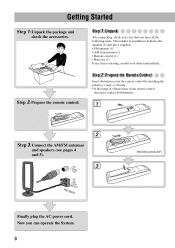
...Unpack After unpacking, check to be sure that you can operate the System. 3 R03(UM-4)/AAA(24F) Step 2: Prepare the Remote Control Insert the batteries into the remote control by matching the polarity (+ and -) correctly. • If the range or effectiveness of each piece supplied. • FM... antenna (1) • AM loop antenna (1) • Remote control (1) • Batteries (2) If any item is missing, consult your dealer immediately. CO7F5AMΩXL 3 ALMOAEMOXPT ANTENNA Finally plug the AC power ...
...Unpack After unpacking, check to be sure that you can operate the System. 3 R03(UM-4)/AAA(24F) Step 2: Prepare the Remote Control Insert the batteries into the remote control by matching the polarity (+ and -) correctly. • If the range or effectiveness of each piece supplied. • FM... antenna (1) • AM loop antenna (1) • Remote control (1) • Batteries (2) If any item is missing, consult your dealer immediately. CO7F5AMΩXL 3 ALMOAEMOXPT ANTENNA Finally plug the AC power ...

Instruction Manual
Page 11
... preset number for the station. 1 2 3 To select a number, see "How to select numbers" on the display. If the received FM station is lost. From the remote control: FM/AM/ AUDIO IN FM FM MONO A_IN AM (AUDIO IN) On the main unit: FM FM MONO AM 2 Select a number of the preset... numbers" on page 7. 4 5 6 • You can also use 4 or x. 7 8 9 The PROG. To restore the stereo effect, press the button repeatedly to listen From the remote control: FM/AM/ AUDIO IN FM FM MONO A_IN AM (AUDIO IN) On the main unit: FM FM MONO AM Reception will stop searching manually...
... preset number for the station. 1 2 3 To select a number, see "How to select numbers" on the display. If the received FM station is lost. From the remote control: FM/AM/ AUDIO IN FM FM MONO A_IN AM (AUDIO IN) On the main unit: FM FM MONO AM 2 Select a number of the preset... numbers" on page 7. 4 5 6 • You can also use 4 or x. 7 8 9 The PROG. To restore the stereo effect, press the button repeatedly to listen From the remote control: FM/AM/ AUDIO IN FM FM MONO A_IN AM (AUDIO IN) On the main unit: FM FM MONO AM Reception will stop searching manually...

Instruction Manual
Page 13
..." on the display. To select a group (MP3/WMA only): TUNING/GROUP Selects the next groups. Fast-reverses the track. To select AUDIO IN From the remote control: FM/AM/ AUDIO IN FM A_IN (AUDIO IN) On the main unit: FM MONO AM • When you play ONLY 1 2 3 To select a number... such as a portable audio player. PRESET Fast-forwards the track. Playing Back Other Equipment To connect other equipment. To locate a track directly and Remote start play back an MP3/WMA file, you want is shown on page 7. 4 5 6 7 8 9 0 10 Portable audio player, etc.
..." on the display. To select a group (MP3/WMA only): TUNING/GROUP Selects the next groups. Fast-reverses the track. To select AUDIO IN From the remote control: FM/AM/ AUDIO IN FM A_IN (AUDIO IN) On the main unit: FM MONO AM • When you play ONLY 1 2 3 To select a number... such as a portable audio player. PRESET Fast-forwards the track. Playing Back Other Equipment To connect other equipment. To locate a track directly and Remote start play back an MP3/WMA file, you want is shown on page 7. 4 5 6 7 8 9 0 10 Portable audio player, etc.

Instruction Manual
Page 14
CLOCK/ SLEEP VOLUME +/- No sound effects are applied. 11 Good for jazztype music. Adjusting the Sound To reinforce the bass sound-HBS Remote ONLY You can select one of 4 SEA (Sound Effect Amplifier) modes. HBS HBS Canceled (No indication) To select Sound Mode You can enjoy... Accented lower frequencies for classical music. Boosts low and high frequencies. (initial setting) Good for vocal music. Daily Operations-Sound & Other Adjustments Remote control CLOCK/ SLEEP Adjusting the Volume You can adjust the volume level from level 0 ("VOL MIN") to level 31 ("VOL MAX...
CLOCK/ SLEEP VOLUME +/- No sound effects are applied. 11 Good for jazztype music. Adjusting the Sound To reinforce the bass sound-HBS Remote ONLY You can select one of 4 SEA (Sound Effect Amplifier) modes. HBS HBS Canceled (No indication) To select Sound Mode You can enjoy... Accented lower frequencies for classical music. Boosts low and high frequencies. (initial setting) Good for vocal music. Daily Operations-Sound & Other Adjustments Remote control CLOCK/ SLEEP Adjusting the Volume You can adjust the volume level from level 0 ("VOL MIN") to level 31 ("VOL MAX...

Instruction Manual
Page 16
.... CD For MP3/WMA: (1) Select a group. PRESET 4, x CD 6 STOP 7 13 TUNING/ GROUP DISPLAY/ PROGRAM USB MEMORY 6 PROG. Advanced Disc/USB Mass Storage Class Device Operations Remote control Number buttons CD 6 4, x TUNING/ GROUP K, 5 RANDOM DISPLAY/ PROGRAM USB MEMORY 6 STOP 7 REPEAT Programming the Playing Order- CD or USB MEMORY STOP 2 Before starting playback...
.... CD For MP3/WMA: (1) Select a group. PRESET 4, x CD 6 STOP 7 13 TUNING/ GROUP DISPLAY/ PROGRAM USB MEMORY 6 PROG. Advanced Disc/USB Mass Storage Class Device Operations Remote control Number buttons CD 6 4, x TUNING/ GROUP K, 5 RANDOM DISPLAY/ PROGRAM USB MEMORY 6 STOP 7 REPEAT Programming the Playing Order- CD or USB MEMORY STOP 2 Before starting playback...

Instruction Manual
Page 18
...REPEAT REPEAT1 REPEAT Canceled REPEAT GROUP (No indication)* REPEAT1 REPEAT REPEAT GROUP* Repeats the current track. Repeats all the tracks at Random-Random Play Remote ONLY You can play back tracks repeatedly. To exit from Random Play RANDOM • You can also exit from Random Play by pressing STOP... 7. 15 To skip a track: To pause: CD To stop: STOP or USB MEMORY Playing Repeatedly-Repeat Play Remote ONLY You can play back all the tracks in the random order. Repeats all tracks are played. Playing at random. 1 Select the source....
...REPEAT REPEAT1 REPEAT Canceled REPEAT GROUP (No indication)* REPEAT1 REPEAT REPEAT GROUP* Repeats the current track. Repeats all the tracks at Random-Random Play Remote ONLY You can play back tracks repeatedly. To exit from Random Play RANDOM • You can also exit from Random Play by pressing STOP... 7. 15 To skip a track: To pause: CD To stop: STOP or USB MEMORY Playing Repeatedly-Repeat Play Remote ONLY You can play back all the tracks in the random order. Repeats all tracks are played. Playing at random. 1 Select the source....

Instruction Manual
Page 19
.../AM PRESET TIMER (2) Set the minutes as required. 1 Activate the Daily Timer setting. 2 sec. TIMER USB MEMORY 6 STOP 7 TIMER Continued on the next page 16 Remote control TIMER USB MEMORY 6 CD 6 4, x Daily Timer Operations FM/AM/ AUDIO IN STOP 7 Setting the Daily Timer Using the Daily Timer, you can wake up...
.../AM PRESET TIMER (2) Set the minutes as required. 1 Activate the Daily Timer setting. 2 sec. TIMER USB MEMORY 6 STOP 7 TIMER Continued on the next page 16 Remote control TIMER USB MEMORY 6 CD 6 4, x Daily Timer Operations FM/AM/ AUDIO IN STOP 7 Setting the Daily Timer Using the Daily Timer, you can wake up...

Instruction Manual
Page 22
..." appears on a disc that does not exist on the disc (for service. Troubleshooting If you finish. ] There is heard from the remote control. ] The path between the remote control and the remote sensor on the front panel. ] Move closer to the System. ] The batteries are connected (see page 5). ] Headphones are exhausted. General: Adjustments... you set the clock. • The clock may malfunction due to external electrical interference. Unplug the AC power cord and then plug it at the remote sensor on the System is not properly extended or positioned. 19
..." appears on a disc that does not exist on the disc (for service. Troubleshooting If you finish. ] There is heard from the remote control. ] The path between the remote control and the remote sensor on the front panel. ] Move closer to the System. ] The batteries are connected (see page 5). ] Headphones are exhausted. General: Adjustments... you set the clock. • The clock may malfunction due to external electrical interference. Unplug the AC power cord and then plug it at the remote sensor on the System is not properly extended or positioned. 19

Instruction Manual
Page 25
Remote control 16, 17 12 7, 8, 10 7, 9, 13 - 15, 17 10, 12 - 17 8, 10, 13 15 11 11 USB MEMORY AUDIO IN 7, 12, 17 8, 10, 13, 14 7, 8, 10, 17 7, 9, 13 - 15, 17 9, 13 - 16 11 15 7, 11 Main unit 7, 12, 17 10, 12 - 14, 16, 17 8, 10, 13 7, 8, 17 7, 9, 13, 14, 17 7, 10 9, 13, 14, 16 7 9 Remote sensor 6 16, 17 12 8, 10, 13, 14 7, 11 7, 9, 13, 14, 17 11 9, 10 22 Parts Index Refer to the pages to see how to use the buttons and controls.
Remote control 16, 17 12 7, 8, 10 7, 9, 13 - 15, 17 10, 12 - 17 8, 10, 13 15 11 11 USB MEMORY AUDIO IN 7, 12, 17 8, 10, 13, 14 7, 8, 10, 17 7, 9, 13 - 15, 17 9, 13 - 16 11 15 7, 11 Main unit 7, 12, 17 10, 12 - 14, 16, 17 8, 10, 13 7, 8, 17 7, 9, 13, 14, 17 7, 10 9, 13, 14, 16 7 9 Remote sensor 6 16, 17 12 8, 10, 13, 14 7, 11 7, 9, 13, 14, 17 11 9, 10 22 Parts Index Refer to the pages to see how to use the buttons and controls.


