Instructions
Page 2
... when open the top cover or cabinet. The power can cause hearing loss. Warnings, Cautions and Others CAUTION The button in any naked flame sources, such as the disconnect device, the disconnect device shall remain readily operable. • When the System is on standby, the STANDBY lamp lights red. • When the System is used as lighted candles, on the apparatus. • When discarding batteries, environmental problems...
... when open the top cover or cabinet. The power can cause hearing loss. Warnings, Cautions and Others CAUTION The button in any naked flame sources, such as the disconnect device, the disconnect device shall remain readily operable. • When the System is on standby, the STANDBY lamp lights red. • When the System is used as lighted candles, on the apparatus. • When discarding batteries, environmental problems...
Instructions
Page 4
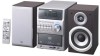
... around the System. Remote ONLY Main Unit ONLY Indicates that you for purchasing a JVC product. Should this operation is only possible using the remote control. Introduction Thank you press and hold DEMO button on standby. • Refer to cancel the demonstration Press and hold the button for a specified period. If anything goes wrong, unplug the power cord and consult your dealer before operation, to ensure...
... around the System. Remote ONLY Main Unit ONLY Indicates that you for purchasing a JVC product. Should this operation is only possible using the remote control. Introduction Thank you press and hold DEMO button on standby. • Refer to cancel the demonstration Press and hold the button for a specified period. If anything goes wrong, unplug the power cord and consult your dealer before operation, to ensure...

Instructions
Page 5
... Control Screen Operations 32 Daily Timer Operations 34 Setting the Daily Timer 34 Setup Menu Operations 36 Initial Settings 36 Additional Information 38 Learning More about This System 38 Maintenance 40 Troubleshooting 41 Display Messages for Recording or Editing Operations 42 Language Code List 43 Optical Digital Out Signals 44 Operating JVC's TVs Using the Remote Control 44 Specifications 45 Parts Index 46 Advanced Playback Operations 22 Programming the Playing Order-Program Play........... 22 Playing at Random-Random Play 23 Playing Repeatedly 24 Prohibiting Disc...
... Control Screen Operations 32 Daily Timer Operations 34 Setting the Daily Timer 34 Setup Menu Operations 36 Initial Settings 36 Additional Information 38 Learning More about This System 38 Maintenance 40 Troubleshooting 41 Display Messages for Recording or Editing Operations 42 Language Code List 43 Optical Digital Out Signals 44 Operating JVC's TVs Using the Remote Control 44 Specifications 45 Parts Index 46 Advanced Playback Operations 22 Programming the Playing Order-Program Play........... 22 Playing at Random-Random Play 23 Playing Repeatedly 24 Prohibiting Disc...

Instructions
Page 6
... written in the DVD Video format. See "Setup Menu Operations" on the display. • In this product may not be shown on page 36. Playable Disc/File Types DIGITAL VIDEO SUPER VIDEO COMPACT DIGITAL AUDIO • CD-R/-RW: Recorded in either system. If " " appears on page 45. • "RG ERROR" appears if DVD with other Region Code is loaded. DVD indicator lights on the rear. Therefore, the use of the Non-DVD side of...
... written in the DVD Video format. See "Setup Menu Operations" on the display. • In this product may not be shown on page 36. Playable Disc/File Types DIGITAL VIDEO SUPER VIDEO COMPACT DIGITAL AUDIO • CD-R/-RW: Recorded in either system. If " " appears on page 45. • "RG ERROR" appears if DVD with other Region Code is loaded. DVD indicator lights on the rear. Therefore, the use of the Non-DVD side of...

Instructions
Page 7
... AC plug, use the supplied AC plug adapter (not supplied for Australia, Thailand, Hong Kong region and the Middle East. From the powered subwoofer See page 6. ⁄ From the digital input of digital audio component See page 5. @ From the input of your dealer immediately. ~ From AM/FM antenna See page 5. Rear panel Supplied accessories Check to be sure that you have all connections have been made. • Connect VIDEO OUT directly to...
... AC plug, use the supplied AC plug adapter (not supplied for Australia, Thailand, Hong Kong region and the Middle East. From the powered subwoofer See page 6. ⁄ From the digital input of digital audio component See page 5. @ From the input of your dealer immediately. ~ From AM/FM antenna See page 5. Rear panel Supplied accessories Check to be sure that you have all connections have been made. • Connect VIDEO OUT directly to...

Instructions
Page 8
Digital audio component FM outdoor antenna (not supplied) Protective cap Optical digital cord (not supplied) Disconnect the supplied FM antenna, and connect to an outdoor FM antenna using a 75 Ω wire with vinyl, remove the vinyl to expose the tip of the speakers. ! Insert Press and hold Release Red If the cords are covered with coaxial type connector. • Set "DIGITAL AUDIO OUTPUT" in the "AUDIO" menu correctly according to the connected digital audio equipment (see page 37). • The...
Digital audio component FM outdoor antenna (not supplied) Protective cap Optical digital cord (not supplied) Disconnect the supplied FM antenna, and connect to an outdoor FM antenna using a 75 Ω wire with vinyl, remove the vinyl to expose the tip of the speakers. ! Insert Press and hold Release Red If the cords are covered with coaxial type connector. • Set "DIGITAL AUDIO OUTPUT" in the "AUDIO" menu correctly according to the connected digital audio equipment (see page 37). • The...

Instructions
Page 9
... Component video cord (not supplied) • This connection allows you want to the USB memory terminal ( ) of the remote control decreases, replace both batteries. to this case, disconnect and connect the USB mass storage class device again after turning off . @ TV/monitor Connect the COMPONENT jacks, S-VIDEO jack, or VIDEO jack; See "Changing the Color System and Scanning Mode" on page 16. Caution Battery shall not be shorter. 6 When using the remote control Point the top of - When connecting a digital audio player...
... Component video cord (not supplied) • This connection allows you want to the USB memory terminal ( ) of the remote control decreases, replace both batteries. to this case, disconnect and connect the USB mass storage class device again after turning off . @ TV/monitor Connect the COMPONENT jacks, S-VIDEO jack, or VIDEO jack; See "Changing the Color System and Scanning Mode" on page 16. Caution Battery shall not be shorter. 6 When using the remote control Point the top of - When connecting a digital audio player...
Instructions
Page 10
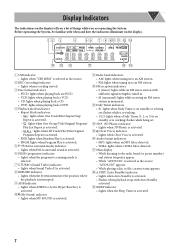
... FM station. Before operating the System, be familiar with Auto Standby activated. w FM reception indicators • S (stereo): lights while an FM stereo station with sufficient signal strength is tuned in. • M (monaural): lights while receiving an FM stereo station in to the radio: band (or preset number) and station frequency appear. • While "AUDIO IN" is selected as the source. 2 REC (recording) indicator • Lights when recording started. 3 Disc format indicators • SVCD: lights when playing...
... FM station. Before operating the System, be familiar with Auto Standby activated. w FM reception indicators • S (stereo): lights while an FM stereo station with sufficient signal strength is tuned in. • M (monaural): lights while receiving an FM stereo station in to the radio: band (or preset number) and station frequency appear. • While "AUDIO IN" is selected as the source. 2 REC (recording) indicator • Lights when recording started. 3 Disc format indicators • SVCD: lights when playing...

Instructions
Page 11
... speakers. The STANDBY lamp on the main unit turns off (standby) the System with the volume set at an extremely high level; Be sure to the PHONES jack on the System or start playback. 8 For details, see page 17. 3 Adjust the volume. Daily Operations-Playback In this manual, operations using the remote control are mainly explained; DO NOT turn down the volume before connecting or putting on by pressing one of the source buttons...
... speakers. The STANDBY lamp on the main unit turns off (standby) the System with the volume set at an extremely high level; Be sure to the PHONES jack on the System or start playback. 8 For details, see page 17. 3 Adjust the volume. Daily Operations-Playback In this manual, operations using the remote control are mainly explained; DO NOT turn down the volume before connecting or putting on by pressing one of the source buttons...

Instructions
Page 15
... a number" on the display. Moves to turn down the volume on the disc menu. (while holding ...) • As the number of the level increases, the preset input level is turned on the menu. Playing Back a Digital Audio Player • For connecting a digital audio player, see page 9). Playback of the current menu: Moves to the next page. Remote To adjust the audio input level ONLY If the sound from the device connected to select a number" on page 9. Playback starts with...
... a number" on the display. Moves to turn down the volume on the disc menu. (while holding ...) • As the number of the level increases, the preset input level is turned on the menu. Playing Back a Digital Audio Player • For connecting a digital audio player, see page 9). Playback of the current menu: Moves to the next page. Remote To adjust the audio input level ONLY If the sound from the device connected to select a number" on page 9. Playback starts with...
Instructions
Page 18
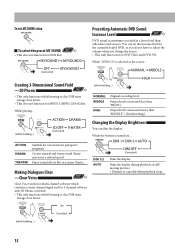
... function for DVD Video and DVD-VR. ACTION DRAMA THEATER Suitable for 2-channel software with 3D Phonic activated. • This only functions while listening to disc/USB mass storage class device. Enjoy movies in a major theater. DIM 1/2 AUTO (Canceled) Dims the display. Output level is increased (more than "HIGH"). Making Dialogues Clear Remote -Clear Voice ONLY Clear Voice works for multi-channel software which contains a center channel signal and...
... function for DVD Video and DVD-VR. ACTION DRAMA THEATER Suitable for 2-channel software with 3D Phonic activated. • This only functions while listening to disc/USB mass storage class device. Enjoy movies in a major theater. DIM 1/2 AUTO (Canceled) Dims the display. Output level is increased (more than "HIGH"). Making Dialogues Clear Remote -Clear Voice ONLY Clear Voice works for multi-channel software which contains a center channel signal and...

Instructions
Page 19
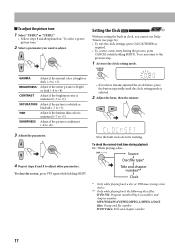
Changing the Color System and Scanning Mode INFO Remote ONLY You can select the video output to match it and store your TV (NTSC or PAL). • If you connect a progressive TV through the VIDEO OUT (COMPONENT) jacks, you to the color system of your own preference. To select a preset picture tone 1 While playing, display VFP setting screen. Setting the ECO (ecology) Mode Setting the ECO mode allows you can enjoy...
Changing the Color System and Scanning Mode INFO Remote ONLY You can select the video output to match it and store your TV (NTSC or PAL). • If you connect a progressive TV through the VIDEO OUT (COMPONENT) jacks, you to the color system of your own preference. To select a preset picture tone 1 While playing, display VFP setting screen. Setting the ECO (ecology) Mode Setting the ECO mode allows you can enjoy...
Instructions
Page 20
... the current clock time during the process, press CANCEL (while holding SHIFT. * Only while playing back a disc or USB mass storage class device. ** Only while playing back the following discs/files: DVD-VR: Program number/Play List number and chapter number. MP3/WMA/WAV/JPEG/MPEG-1/MPEG-2/DivX files: Group and file number. CONTRAST Adjust if the brightness ratio is unnatural (-7 to the previous step. 1 Activate the clock setting mode. You...
... the current clock time during the process, press CANCEL (while holding SHIFT. * Only while playing back a disc or USB mass storage class device. ** Only while playing back the following discs/files: DVD-VR: Program number/Play List number and chapter number. MP3/WMA/WAV/JPEG/MPEG-1/MPEG-2/DivX files: Group and file number. CONTRAST Adjust if the brightness ratio is unnatural (-7 to the previous step. 1 Activate the clock setting mode. You...
Instructions
Page 32
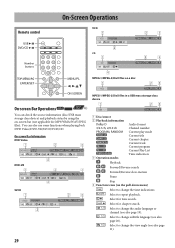
... MP3/WMA/WAV/JPEG files). On-Screen Operations Remote control USB 6 DVD/CD 6 Number buttons ON SCREEN Remote On-screen Bar Operations INFO ONLY You can also use some functions when playing back DVD Video/DVD-VR/SVCD/VCD/CD. CHAP. 1/3 Select for chapter search. You can check the source information (disc/USB mass storage class device) and playback status by using the on the pull-down menu) TIME Select to change the view angle (see also...
... MP3/WMA/WAV/JPEG files). On-Screen Operations Remote control USB 6 DVD/CD 6 Number buttons ON SCREEN Remote On-screen Bar Operations INFO ONLY You can also use some functions when playing back DVD Video/DVD-VR/SVCD/VCD/CD. CHAP. 1/3 Select for chapter search. You can check the source information (disc/USB mass storage class device) and playback status by using the on the pull-down menu) TIME Select to change the view angle (see also...
Instructions
Page 39
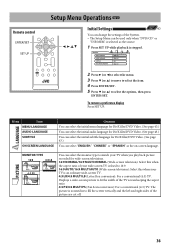
...screen TV is fixed to 16:9. 16:9 AUTO/16:9 MULTI AUTO (Wide-screen television): Select this when your TV when you play back picture recorded for DivX files/DVD Video. (See page 43.) You can select "ENGLISH," "CHINESE" or "SPANISH" as the source. 1 Press SET...To remove a preference display Press SET UP. Remote control SET UP Setup Menu Operations INFO Initial Settings Remote ONLY You can change the settings of the System. • The Setup Menu can be used only when "DVD/CD" or "USB MEM' is selected as the on-screen language. LANGUAGE MENU LANGUAGE AUDIO LANGUAGE SUBTITLE ON SCREEN ...
...screen TV is fixed to 16:9. 16:9 AUTO/16:9 MULTI AUTO (Wide-screen television): Select this when your TV when you play back picture recorded for DivX files/DVD Video. (See page 43.) You can select "ENGLISH," "CHINESE" or "SPANISH" as the source. 1 Press SET...To remove a preference display Press SET UP. Remote control SET UP Setup Menu Operations INFO Initial Settings Remote ONLY You can change the settings of the System. • The Setup Menu can be used only when "DVD/CD" or "USB MEM' is selected as the on-screen language. LANGUAGE MENU LANGUAGE AUDIO LANGUAGE SUBTITLE ON SCREEN ...
Instructions
Page 41
... to the System at a bit rate of the System, connecting cords, and the power cord. This System can play only a disc of the System. • The speakers are larger than 1 Gigabyte. • For DVD-VR playback... - It is reading a disc, the source may take some USB mass storage class devices and does not support DRM (Digital Rights Management). - However, if not installed properly, it before turning on the rear of UDF...
... to the System at a bit rate of the System, connecting cords, and the power cord. This System can play only a disc of the System. • The speakers are larger than 1 Gigabyte. • For DVD-VR playback... - It is reading a disc, the source may take some USB mass storage class devices and does not support DRM (Digital Rights Management). - However, if not installed properly, it before turning on the rear of UDF...

Instructions
Page 42
... following symptoms may not display properly. • If you have not connected your TV does not support the progressive video input. - Setting the Clock: • "0:00" will take a long time to MPEG1 Audio Layer-2 or MPEG2 Audio Layer-2. • For DivX playback... - It is more than 640 x 480, it will flash on the display until you set to MPEG system/ program stream. - 720 x 576 pixels...
... following symptoms may not display properly. • If you have not connected your TV does not support the progressive video input. - Setting the Clock: • "0:00" will take a long time to MPEG1 Audio Layer-2 or MPEG2 Audio Layer-2. • For DivX playback... - It is more than 640 x 480, it will flash on the display until you set to MPEG system/ program stream. - 720 x 576 pixels...

Instructions
Page 43
... specify the preset station or track number correctly while setting a timer, the currently selected station or the first track will be played when the timer is activated. • When you set to "OFF." LANGUAGE menu: • When the language you give a title to the track, delete that title first, then enter your discs and mechanism clean. Speaker grille OTHERS menu-ON SCREEN GUIDE: • The setup menu and...
... specify the preset station or track number correctly while setting a timer, the currently selected station or the first track will be played when the timer is activated. • When you set to "OFF." LANGUAGE menu: • When the language you give a title to the track, delete that title first, then enter your discs and mechanism clean. Speaker grille OTHERS menu-ON SCREEN GUIDE: • The setup menu and...

Instructions
Page 44
... power cord and then plug it again. Place the disc with the label side facing up. It depends on the TV screen. ] The video cord connections are incorrect or loose. If this case, reload the disc or disconnect the USB mass storage class device and connect it back in. Radio Operations Hard to display any subtitle initially. The disc tray does not open or close to always use . Troubleshooting General Adjustments...
... power cord and then plug it again. Place the disc with the label side facing up. It depends on the TV screen. ] The video cord connections are incorrect or loose. If this case, reload the disc or disconnect the USB mass storage class device and connect it back in. Radio Operations Hard to display any subtitle initially. The disc tray does not open or close to always use . Troubleshooting General Adjustments...

Instructions
Page 45
... TV SET COMPATIBILITY WITH THIS MODEL 525p AND 625p DVD PLAYER, PLEASE CONTACT OUR CUSTOMER SERVICE CENTER." Daily Timer does not start playback. ] The loaded disc is entered (blank) when editing the file/group name. IN CASE OF 525 OR 625 PROGRESSIVE SCAN PICTURE PROBLEMS, IT IS RECOMMENDED THAT THE USER SWITCH THE CONNECTION TO THE 'STANDARD DEFINITION' OUTPUT. NO NAME • No name is a DVD Video. Display...
... TV SET COMPATIBILITY WITH THIS MODEL 525p AND 625p DVD PLAYER, PLEASE CONTACT OUR CUSTOMER SERVICE CENTER." Daily Timer does not start playback. ] The loaded disc is entered (blank) when editing the file/group name. IN CASE OF 525 OR 625 PROGRESSIVE SCAN PICTURE PROBLEMS, IT IS RECOMMENDED THAT THE USER SWITCH THE CONNECTION TO THE 'STANDARD DEFINITION' OUTPUT. NO NAME • No name is a DVD Video. Display...


