

Instructions
Page 3
... component video input jacks 15 To connect to an audio amplifier or receiver 16 To connect to audio equipment with a digital input ...........17 To connect the power cord 17 Using the remote control unit 18 To install batteries in the remote control unit 18 B To use the remote control unit for TV operation 19 Basic operations Page 21 Turning on/off the unit 21 Inserting and removing discs 21 Basic playback 22 To start playback 22 To stop playback completely 22 To stop playback...
... component video input jacks 15 To connect to an audio amplifier or receiver 16 To connect to audio equipment with a digital input ...........17 To connect the power cord 17 Using the remote control unit 18 To install batteries in the remote control unit 18 B To use the remote control unit for TV operation 19 Basic operations Page 21 Turning on/off the unit 21 Inserting and removing discs 21 Basic playback 22 To start playback 22 To stop playback completely 22 To stop playback...

Instructions
Page 4
... STANDBDYV/OTDVN RETURN DVD CH - 5 V+OL MENU CHOICE RM-SXVM50J REMOTE CONTROL ON SCREEN • R6P(SUM-3)/AA(15F) batteries (x 2) • Instruction manual (x 1) • AC power cord (x 1) 2 Picture functions 7Progressive Scan system Supports the Progressive scan system, as well as adult or violent films. Audio functions 7High quality digital sound You can enjoy high quality sound with Linear-PCM. 7Surround function* The unit accommodates the Dolby Digital and, DTS surround systems. (These surround signals are output only from the...
... STANDBDYV/OTDVN RETURN DVD CH - 5 V+OL MENU CHOICE RM-SXVM50J REMOTE CONTROL ON SCREEN • R6P(SUM-3)/AA(15F) batteries (x 2) • Instruction manual (x 1) • AC power cord (x 1) 2 Picture functions 7Progressive Scan system Supports the Progressive scan system, as well as adult or violent films. Audio functions 7High quality digital sound You can enjoy high quality sound with Linear-PCM. 7Surround function* The unit accommodates the Dolby Digital and, DTS surround systems. (These surround signals are output only from the...
Instructions
Page 6
..., use any non-standard shape disc available on the market, because it near a heating device. Do not insert foreign objects into the unit. Care of copyrighted material may cause a fire or electrical shock. All rights reserved. Manufactured under license from Digital Theater Systems, Inc. When you are no user-serviceable parts inside the unit Turn off the power switch and remove...
..., use any non-standard shape disc available on the market, because it near a heating device. Do not insert foreign objects into the unit. Care of copyrighted material may cause a fire or electrical shock. All rights reserved. Manufactured under license from Digital Theater Systems, Inc. When you are no user-serviceable parts inside the unit Turn off the power switch and remove...
Instructions
Page 7
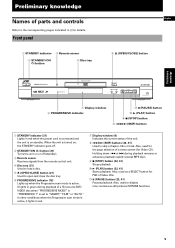
... power cord is connected and the unit is active. Also, used to open and close the disc tray. 6 PROGRESSIVE indicator (15) Lights up when the Progressive scan mode is on or off . 2 STANDBY/ON button (21) Turns the unit on standby. Also, used as a SELECT button for Video CD). When the unit is turned on, the STANDBY indicator goes off (standby). 3 Remote sensor Receives signals from the remote control unit. 4 Disc tray (21) Used to load a disc. 5 0 (OPEN/CLOSE) button (21) Used to display nine continuous still pictures (STROBE function). 5 Front panel 1 STANDBY...
... power cord is connected and the unit is active. Also, used to open and close the disc tray. 6 PROGRESSIVE indicator (15) Lights up when the Progressive scan mode is on or off . 2 STANDBY/ON button (21) Turns the unit on standby. Also, used as a SELECT button for Video CD). When the unit is turned on, the STANDBY indicator goes off (standby). 3 Remote sensor Receives signals from the remote control unit. 4 Disc tray (21) Used to load a disc. 5 0 (OPEN/CLOSE) button (21) Used to display nine continuous still pictures (STROBE function). 5 Front panel 1 STANDBY...
Instructions
Page 9
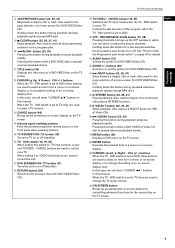
... buttons are used to select an item from a menu or on-screen display, or to DVD. & VFP - VOL (+/-) buttons When the TV - ON SCREEN button Brings up the VFP window in this button during playback reverses playback rapidly (except MP3 disc). 9 7/CLEAR button (22, 24, 31, 41) Stops playback. Pressing this button during playback reverses playback rapidly. DVD switch is set to change the TV audio volume. See "How to control your TV. Also used to make the Progressive scan mode active...
... buttons are used to select an item from a menu or on-screen display, or to DVD. & VFP - VOL (+/-) buttons When the TV - ON SCREEN button Brings up the VFP window in this button during playback reverses playback rapidly (except MP3 disc). 9 7/CLEAR button (22, 24, 31, 41) Stops playback. Pressing this button during playback reverses playback rapidly. DVD switch is set to change the TV audio volume. See "How to control your TV. Also used to make the Progressive scan mode active...
Instructions
Page 10
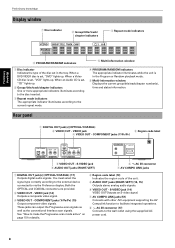
Rear panel 1 DIGITAL OUT jack(s) (OPTICAL/COAXIAL) 2 VIDEO OUT - You must select the signal type correctly according to the external device connected to the wall outlet using the suppplied AC power cord. 8 S-VIDEO jack (14) VIDEO OUT-Outputs an S-video signal. 7 AV COMPU LINK jacks (51) Connects with other JVC equipment supporting the AV Compulink function to facilitate integrated operations. 8 AC IN connector (17) Connects to via the Preference display. When an Audio CD is in...
Rear panel 1 DIGITAL OUT jack(s) (OPTICAL/COAXIAL) 2 VIDEO OUT - You must select the signal type correctly according to the external device connected to the wall outlet using the suppplied AC power cord. 8 S-VIDEO jack (14) VIDEO OUT-Outputs an S-video signal. 7 AV COMPU LINK jacks (51) Connects with other JVC equipment supporting the AV Compulink function to facilitate integrated operations. 8 AC IN connector (17) Connects to via the Preference display. When an Audio CD is in...
Instructions
Page 12
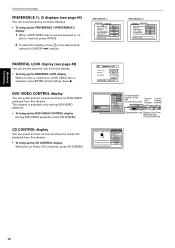
... up the CD CONTROL display Whenever an Audio CD is inserted, press CHOICE. 2 To select the display, move to the desired tab using the CURSOR 2/3 buttons. (PREFERENCE 1) PREFERENCE1 PREFERENCE2 MENU LANGUAGE AUDIO LANGUAGE SUBTITLE ON SCREEN LANGUAGE ON SCREEN GUIDE MONITOR TYPE PROGRESSIVE MODE PRESS KEY ENGLISH ENGLISH OFF ENGLISH ON 4:3 LB AUTO (PREFERENCE 2) PREFERENCE1 PREFERENCE2 DIGITAL AUDIO OUTPUT DOWN MIX COMPRESSION AUTO STANDBY SCREEN SAVER AV COMPULINK MODE STREAM/PCM Lo / Ro ON OFF MODE 1 DVD1 PRESS KEY PARENTAL LOCK display (see page 44...
... up the CD CONTROL display Whenever an Audio CD is inserted, press CHOICE. 2 To select the display, move to the desired tab using the CURSOR 2/3 buttons. (PREFERENCE 1) PREFERENCE1 PREFERENCE2 MENU LANGUAGE AUDIO LANGUAGE SUBTITLE ON SCREEN LANGUAGE ON SCREEN GUIDE MONITOR TYPE PROGRESSIVE MODE PRESS KEY ENGLISH ENGLISH OFF ENGLISH ON 4:3 LB AUTO (PREFERENCE 2) PREFERENCE1 PREFERENCE2 DIGITAL AUDIO OUTPUT DOWN MIX COMPRESSION AUTO STANDBY SCREEN SAVER AV COMPULINK MODE STREAM/PCM Lo / Ro ON OFF MODE 1 DVD1 PRESS KEY PARENTAL LOCK display (see page 44...
Instructions
Page 16
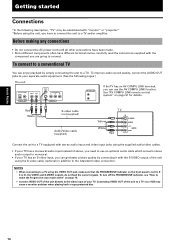
... with the S-VIDEO output of the unit using the supplied audio/video cables. • If your TV has a monaural audio input instead of the unit to a TV via a VCR may cause a monitor problem when playing back a copy-protected disc. 14 To turn off the PROGRESSIVE indicator, see "How to a TV and/or amplifier. Before making any connections • Do not connect the AC power cord until all other connections have been...
... with the S-VIDEO output of the unit using the supplied audio/video cables. • If your TV has a monaural audio input instead of the unit to a TV via a VCR may cause a monitor problem when playing back a copy-protected disc. 14 To turn off the PROGRESSIVE indicator, see "How to a TV and/or amplifier. Before making any connections • Do not connect the AC power cord until all other connections have been...
Instructions
Page 17
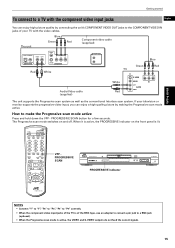
... with the component video input jacks English You can enjoy high picture quality by making the Progressive scan mode active. PROGRESSIVE SCAN button for a few seconds. When it is active, the PROGRESSIVE indicator on and off. The Progressive scan mode switches on the front panel is active, the VIDEO and S-VIDEO outputs do not feed the correct signals. 15 ON SCREEN REMOTE CONTROL VFP PROGRESSIVE SCAN STANDBY STANDBY/ON PROGRESSIVE DVD/CD PLAYER PROGRESSIVE indicator OPEN/CLOSE 0 4 SKIP ¢ STOP 7 PLAY 3 PAUSE 8 DVD/VIDEO CD/CD NOTES • Connect " Y" to...
... with the component video input jacks English You can enjoy high picture quality by making the Progressive scan mode active. PROGRESSIVE SCAN button for a few seconds. When it is active, the PROGRESSIVE indicator on and off. The Progressive scan mode switches on the front panel is active, the VIDEO and S-VIDEO outputs do not feed the correct signals. 15 ON SCREEN REMOTE CONTROL VFP PROGRESSIVE SCAN STANDBY STANDBY/ON PROGRESSIVE DVD/CD PLAYER PROGRESSIVE indicator OPEN/CLOSE 0 4 SKIP ¢ STOP 7 PLAY 3 PAUSE 8 DVD/VIDEO CD/CD NOTES • Connect " Y" to...
Instructions
Page 18
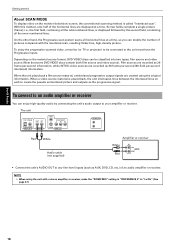
... MIX" setting in " PREFERENCE 2" to the unit must have the Progressive inputs. The unit PCM / STREAM RIGHT LEFT OPTICAL COAXIAL DIGITAL OUT AUDIO OUT VIDEO COMPONENT Y PB PR S-VIDEO VIDEO OUT AV COMPU LINK Red White Audio cable (not supplied) Amplifier or receiver White Red IN LEFT AUDIO RIGHT • Connect the unit's AUDIO OUT to create the pseudo uninterlaced picture and outputs as the progressive signal. When a video source material is played back...
... MIX" setting in " PREFERENCE 2" to the unit must have the Progressive inputs. The unit PCM / STREAM RIGHT LEFT OPTICAL COAXIAL DIGITAL OUT AUDIO OUT VIDEO COMPONENT Y PB PR S-VIDEO VIDEO OUT AV COMPU LINK Red White Audio cable (not supplied) Amplifier or receiver White Red IN LEFT AUDIO RIGHT • Connect the unit's AUDIO OUT to create the pseudo uninterlaced picture and outputs as the progressive signal. When a video source material is played back...
Instructions
Page 19
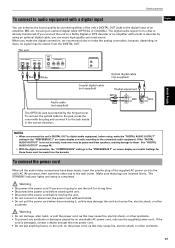
... digital audio signal from speakers, causing damage to the digital input of the unit's DIGITAL OUT jacks to them. If you can enhance the sound quality by using an optional digital cable (OPTICAL or COAXIAL). The STANDBY indicator lights and setup is directly transferred. If the cord is damaged, contact a dealer and get the new power cord. • Do not put anything heavy, or the unit, on discs...
... digital audio signal from speakers, causing damage to the digital input of the unit's DIGITAL OUT jacks to them. If you can enhance the sound quality by using an optional digital cable (OPTICAL or COAXIAL). The STANDBY indicator lights and setup is directly transferred. If the cord is damaged, contact a dealer and get the new power cord. • Do not put anything heavy, or the unit, on discs...
Instructions
Page 29
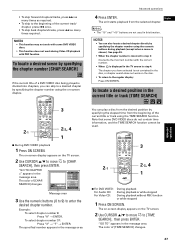
... to a desired chapter by specifying the chapter number using the TIME SEARCH function. Note that some DVD VIDEO discs. • This function does not work on -screen display. 2-1 OPEN /CLOSE TV DVD STANDBY/ON TV DVD 3D TV/VIDEO REPEAT PHONIC CANCEL RETURN TV1 1 TV4 4 TV7 7 TV -/-- 10 TV2 TV3 2 3 TV5 TV6 5 6 TV8 TV9 8 9 TV0 MUTING 0 +10 ANGLE SUBTITLE AUDIO VFP DIGEST PROGRESSIVE SCAN - CH+ 5 ENTER MENU VOL + CHOICE ∞ CH- " GO TO...
... to a desired chapter by specifying the chapter number using the TIME SEARCH function. Note that some DVD VIDEO discs. • This function does not work on -screen display. 2-1 OPEN /CLOSE TV DVD STANDBY/ON TV DVD 3D TV/VIDEO REPEAT PHONIC CANCEL RETURN TV1 1 TV4 4 TV7 7 TV -/-- 10 TV2 TV3 2 3 TV5 TV6 5 6 TV8 TV9 8 9 TV0 MUTING 0 +10 ANGLE SUBTITLE AUDIO VFP DIGEST PROGRESSIVE SCAN - CH+ 5 ENTER MENU VOL + CHOICE ∞ CH- " GO TO...

Instructions
Page 40
... number St. ON SCREEN RM-SXVM50J REMOTE CONTROL 1 2 7 During playback 1 Press VFP - See the step below. 2 To define a user setting, select a parameter to the type of programming, picture tone or personal preferences. 3 OPEN /CLOSE TV DVD STANDBY/ON TV DVD 3D TV/VIDEO REPEAT PHONIC CANCEL RETURN TV1 1 TV4 4 TV7 7 TV -/-- 10 TV2 TV3 2 3 TV5 TV6 5 6 TV8 TV9 8 9 TV0 MUTING 0 +10 ANGLE SUBTITLE AUDIO VFP DIGEST PROGRESSIVE SCAN - End TITLE 3 CHAPTER 3 0 10Mb TIME...
... number St. ON SCREEN RM-SXVM50J REMOTE CONTROL 1 2 7 During playback 1 Press VFP - See the step below. 2 To define a user setting, select a parameter to the type of programming, picture tone or personal preferences. 3 OPEN /CLOSE TV DVD STANDBY/ON TV DVD 3D TV/VIDEO REPEAT PHONIC CANCEL RETURN TV1 1 TV4 4 TV7 7 TV -/-- 10 TV2 TV3 2 3 TV5 TV6 5 6 TV8 TV9 8 9 TV0 MUTING 0 +10 ANGLE SUBTITLE AUDIO VFP DIGEST PROGRESSIVE SCAN - End TITLE 3 CHAPTER 3 0 10Mb TIME...
Instructions
Page 41
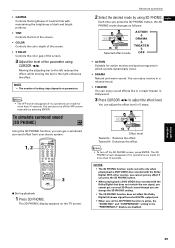
... 2/3 to the right enhances the effect. English Each time you can also turn off the VFP screen manually by using CURSOR 2/3. CH+ 5 ENTER 5 MENU VOL + CHOICE ∞ CH- You can change the 3D PHONIC setting. • The 3D PHONIC function does not affect the Dolby Digital bitstream signal from your stereo system. 1, 2 OPEN /CLOSE TV DVD STANDBY/ON TV DVD 3D TV/VIDEO REPEAT PHONIC CANCEL RETURN TV1 1 TV4 4 TV7...
... 2/3 to the right enhances the effect. English Each time you can also turn off the VFP screen manually by using CURSOR 2/3. CH+ 5 ENTER 5 MENU VOL + CHOICE ∞ CH- You can change the 3D PHONIC setting. • The 3D PHONIC function does not affect the Dolby Digital bitstream signal from your stereo system. 1, 2 OPEN /CLOSE TV DVD STANDBY/ON TV DVD 3D TV/VIDEO REPEAT PHONIC CANCEL RETURN TV1 1 TV4 4 TV7...
Instructions
Page 43
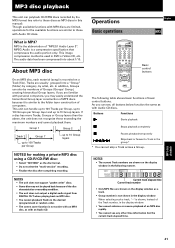
... because of the disc characteristics or recording condition. • The unit does not output a digital audio signal from DIGITAL OUT when playing back an MP3 disc. • You cannot playback Tracks in the following table shows basic functions of the Track number, in this manual). VCDVD GROUP TITLE TRACK CHAP 1 A-B PROGRAM RANDOM Current track elapsed time Current track number • Only MP3 files are similar to those...
... because of the disc characteristics or recording condition. • The unit does not output a digital audio signal from DIGITAL OUT when playing back an MP3 disc. • You cannot playback Tracks in the following table shows basic functions of the Track number, in this manual). VCDVD GROUP TITLE TRACK CHAP 1 A-B PROGRAM RANDOM Current track elapsed time Current track number • Only MP3 files are similar to those...
Instructions
Page 50
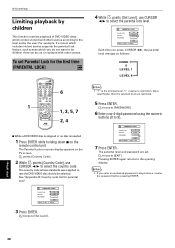
... selected. See " Appendix B: Country code list for the first time [PARENTAL LOCK] 1 OPEN /CLOSE TV DVD STANDBY/ON TV DVD 3D TV/VIDEO REPEAT PHONIC CANCEL RETURN TV1 1 TV4 4 TV7 7 TV -/-- 10 TV2 TV3 2 3 TV5 TV6 5 6 TV8 TV9 8 9 TV0 MUTING 0 +10 ANGLE SUBTITLE AUDIO VFP DIGEST - EXIT ENTER 3 Press ENTER. PARENTAL LOCK Country Code Set Level PASSWORD PRESS KEY CA LEVEL 1 - - - - moves to [PASSWORD]. 6 Enter your 4-digit password using the numeric buttons (0 to [EXIT]. The parental...
... selected. See " Appendix B: Country code list for the first time [PARENTAL LOCK] 1 OPEN /CLOSE TV DVD STANDBY/ON TV DVD 3D TV/VIDEO REPEAT PHONIC CANCEL RETURN TV1 1 TV4 4 TV7 7 TV -/-- 10 TV2 TV3 2 3 TV5 TV6 5 6 TV8 TV9 8 9 TV0 MUTING 0 +10 ANGLE SUBTITLE AUDIO VFP DIGEST - EXIT ENTER 3 Press ENTER. PARENTAL LOCK Country Code Set Level PASSWORD PRESS KEY CA LEVEL 1 - - - - moves to [PASSWORD]. 6 Enter your 4-digit password using the numeric buttons (0 to [EXIT]. The parental...

Instructions
Page 53
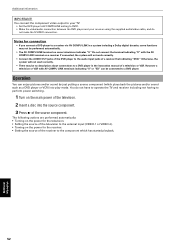
...; When connecting to VIDEO-2 input terminal of the television: DVD3 To AV COMPU LINK (II or EX) To AV COMPU LINK TV DVD player VCR (Video Cassette Recorder) • If you connect a DVD player to a television and receiver via AV COMPU LINK, set the DVD player's AV COMPU LINK setting to one another. English Connection and setup Using the AV COMPU LINK cable, connect the AV COMPU LINK terminals of each component to...
...; When connecting to VIDEO-2 input terminal of the television: DVD3 To AV COMPU LINK (II or EX) To AV COMPU LINK TV DVD player VCR (Video Cassette Recorder) • If you connect a DVD player to a television and receiver via AV COMPU LINK, set the DVD player's AV COMPU LINK setting to one another. English Connection and setup Using the AV COMPU LINK cable, connect the AV COMPU LINK terminals of each component to...
Instructions
Page 54
.... • Make the video/audio connection between the DVD player and your TV: • Set the DVD player's AV COMPULINK setting to perform power switching. 1 Turn on the power for connection • If you connect a DVD player to a receiver via AV COMPU LINK in the instruction manual of the television. 2 Insert a disc into play mode. You connect the component video output to your receiver using the supplied audio/video cable, and do not make the S-VIDEO connection. Operation You can be no description about connections to the audio input jacks...
.... • Make the video/audio connection between the DVD player and your TV: • Set the DVD player's AV COMPULINK setting to perform power switching. 1 Turn on the power for connection • If you connect a DVD player to a receiver via AV COMPU LINK in the instruction manual of the television. 2 Insert a disc into play mode. You connect the component video output to your receiver using the supplied audio/video cable, and do not make the S-VIDEO connection. Operation You can be no description about connections to the audio input jacks...
Instructions
Page 56
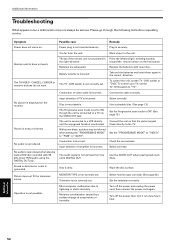
DVD switch is not correctly set . Replace the batteries with 96 kHz, linear PCM audio using the DIGITAL OUT jack. No picture is incorrect. Input selection of TV is displayed on a few hours later. Use a playable disc. (See page 13.) Set the Progressive scan mode to OFF. (See page 15.) Picture is incorrect. Set the " PROGRESSIVE MODE" to " TV". Connection is noisy or blurred. Select correctly. Moisture condensation caused by a sudden change of video cable is dirty. Additional information...
DVD switch is not correctly set . Replace the batteries with 96 kHz, linear PCM audio using the DIGITAL OUT jack. No picture is incorrect. Input selection of TV is displayed on a few hours later. Use a playable disc. (See page 13.) Set the Progressive scan mode to OFF. (See page 15.) Picture is incorrect. Set the " PROGRESSIVE MODE" to " TV". Connection is noisy or blurred. Select correctly. Moisture condensation caused by a sudden change of video cable is dirty. Additional information...
Instructions
Page 57
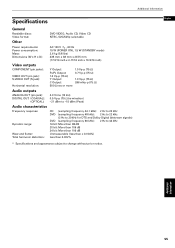
English Additional information 55 Additional information Specifications General Readable discs: Video format: DVD VIDEO, Audio CD, Video CD NTSC, 525i/525p selectable Other Power requirements: Power consumption: Mass: Dimensions (W x H x D): AC 120 V , 60 Hz 15 W (POWER ON), 1.5 W (STANDBY mode) 2.6 kg (5.8 lbs) 435 mm x 68 mm x 267.5 mm (17-3/16 inch x 2-11/16 inch x 10-9/16 inch) Video outputs COMPONENT (pin jacks): VIDEO OUT (pin jack): S-VIDEO OUT (S jack): Horizontal resolution: Y Output: PB/PR Output: 1.0 Vp...
English Additional information 55 Additional information Specifications General Readable discs: Video format: DVD VIDEO, Audio CD, Video CD NTSC, 525i/525p selectable Other Power requirements: Power consumption: Mass: Dimensions (W x H x D): AC 120 V , 60 Hz 15 W (POWER ON), 1.5 W (STANDBY mode) 2.6 kg (5.8 lbs) 435 mm x 68 mm x 267.5 mm (17-3/16 inch x 2-11/16 inch x 10-9/16 inch) Video outputs COMPONENT (pin jacks): VIDEO OUT (pin jack): S-VIDEO OUT (S jack): Horizontal resolution: Y Output: PB/PR Output: 1.0 Vp...


