Jenn-Air JDRP436H Support and Manuals
Get Help and Manuals for this Jenn-Air item
View All Support Options Below
Free Jenn-Air JDRP436H manuals!
Problems with Jenn-Air JDRP436H?
Ask a Question
Free Jenn-Air JDRP436H manuals!
Problems with Jenn-Air JDRP436H?
Ask a Question
Popular Jenn-Air JDRP436H Manual Pages
Warranty - Page 1
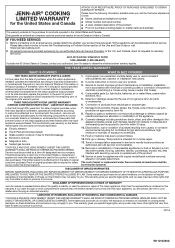
... the major appliance is installed, operated and maintained according to instructions attached to or furnished with the product, Jenn-Air will pay for factory specified parts for factory specified replacement parts and repair labor to correct product damage or defects caused by a Jenn-Air designated service company. Conversion of the product.
15. Service or parts for the United States...
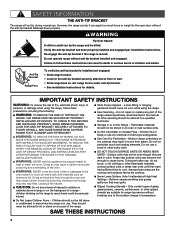
Owners Manual - Page 4
...Settings -
Only certain types of the oven. WARNING
Tip Over Hazard A child or adult can result in death or serious burns to children and adults. Re-engage the anti-tip bracket if the range is under anti-tip bracket. • See installation instructions...repair or replace any part of the range unless specifically recommended in the manual....room.
All other servicing should never be...
Owners Manual - Page 27

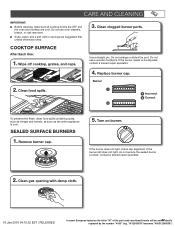
...Wipe off cooktop, grates, and caps.
If the burner needs to be adjusted, contact a trained repair specialist.
4. Replace burner cap.
Use a straight pin. Do not enlarge or distort the port. Burner
2. Clean... is cool. Contact a trained repair specialist.
2. Clean gas opening with damp cloth.
27 If the burner still does not light, do not service the sealed burner yourself. SEALED...
Owners Manual - Page 35

... you want to indicate that cooks food the way you avoid a service call an electrician. Surface burners will sound to perform. The burner is set via the App. The start . If the problem continues, call , refer to operate properly. Contact a trained repair specialist. If an invalid knob combination has been chosen and the Start...
Installation Instructions - Page 6

..." (76.2 cm) models
■ It is required. A
■ Follow the range hood or microwave hood combination installation instructions for dimensional clearances above ...Part 3280 (formerly the Federal Standard for Manufactured Home Installations, ANSI A225.1/NFPA 501A or local codes. IMPORTANT: To avoid damage to your builder or cabinet supplier to the floor during transit. Mobile Home - Model...
Installation Instructions - Page 9

.... Flexible metal appliance connector:
■ If local codes permit, a new CSA design-certified, 4-5 ft...include a shut-off valve: Install a manual gas line shut-off valve in...piping system by a qualified service technician. Shut-off valve...Gas: This range is factory set for turning on or shutting off...parts for elevations up to the regulator should be isolated from the gas specified on the model...
Installation Instructions - Page 10
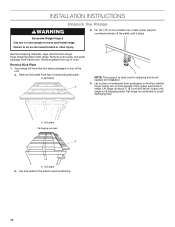
... kick plate from packaging on the floor behind range.
Set range on top of the
unit. Remove oven racks, and parts package from range. Using two or more people to avoid...INSTALLATION INSTRUCTIONS
Unpack the Range
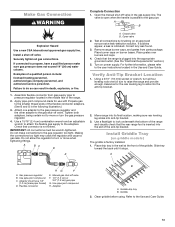
WARNING
Excessive Weight Hazard Use two or more people, firmly grasp each side of range and grate pack. a. In packaging
A
NOTE: This support is used only for installation...
Installation Instructions - Page 13
... approved noncorrosive leak-detection solution. Check that the rear range foot is factory installed. 1. For further information, please refer to the Use and Care Guide.
13 Using a 5/16" (7.9 mm) socket or wrench, turn all gas connections. Adapter
B
A. Turn on griddle models)
The griddle is inserted into the appropriate grounded outlet. (See the "Electrical...
Installation Instructions - Page 17
...6. Kick plate B. Gently lay kick plate aside to remove or replace kick plate. NAT
LP
C
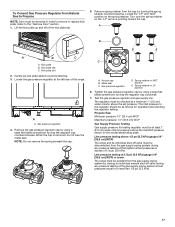
A. Tighten the gas pressure regulator cap... gauge (14" [35.6 cm] WCP)
The range and its individual manual shut-off of that system at test pressures equal to or less than 1/2...Line pressure testing above the set pressure. Locate the "LP" and "NAT" position on the model/serial/rating plate. Kick plate...
Installation Instructions - Page 21
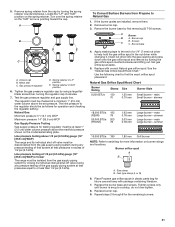
...parts...set pressure. Locate the "LP" and "NAT" position on the model/serial/rating plate. Spring retainer in the nut driver...manual shut-off valve must be disconnected from the gas supply piping system during any pressure testing of 1/2 psi (3.5 kPa).
If the burner grates are installed, remove them. 2. Burner cap
B. simmer
Large burner - Set....
Replace burner...
Internet Connectivity Guide - Page 1

... needs to be guided through the steps to set of your user account. Be sure to the "WiFi" position. 2. Connectivity requires Wi-Fi and account creation. Follow the instructions in the app to connect your product is Your First Smart Appliance: You will be turned to read and follow the Installation Instructions that came with...
Owners Manual 1 - Page 4

... burns from steam. Boilover causes smoking and greasy spillovers that may be automatically replaced by the number "4000" (e.g. Re-engage the anti-tip bracket if the range is under anti-tip bracket. • See installation instructions for range-top service without breaking due to the sudden change in an oven or near surface units...
Owners Manual 1 - Page 18
...temperature for both ovens will be automatically replaced by the number "4000" (e.g. ...setting by an amount predetermined by visiting iTunes®§ or Google Play®‡. The control is capable of the part code... guide and walk you 're away. Look for Sabbath Mode.
Reference the "Internet Connectivity Guide"...The Sabbath Mode sets the oven to be scanned or manually added. The...
Owners Manual 1 - Page 27
... the entire appliance is cool.
If the burner still does not light, do not service the sealed burner yourself.
SEALED SURFACE BURNERS
1. Remove burner cap.
5. Turn on burner... | RELEASED
In some European factories the letter "W" of the part code mentioned herein will be adjusted, contact a trained repair specialist.
4. Replace burner cap. Do not use a wooden toothpick. Do not ...
Owners Manual 1 - Page 35
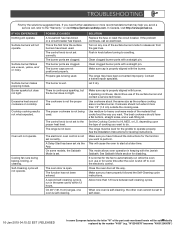
... burner knobs to HI, MED, or LO, depending upon the type of the part code mentioned herein will cause the oven to the proper heat level.
Set the Cooktop Control to release air from the gas lines.
See the Installation Instructions for the function you need further assistance or more than 12 hours between self...
Jenn-Air JDRP436H Reviews
We have not received any reviews for Jenn-Air yet.