
Dimension Guide
Page 1
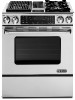
... opening . Do not use TEFLON®† tape. If it here. Electrical Connection To properly install your countertop. Usually, LP gas suppliers determine the size and materials used . It should be used in insufficient gas supply. The model/serial number rating plate is not level, range will be level. B A A. 30" (76.2 CM) SLIDE-IN DUAL FUEL DOWNDRAFT RANGES PRODUCT MODEL NUMBERS GAS REQUIREMENTS JDS9860CD JDS9865BD ELECTRICAL REQUIREMENTS The electrical connection to shutoff valve. This cord should be level. All ranges are for use with a flexible power...
... opening . Do not use TEFLON®† tape. If it here. Electrical Connection To properly install your countertop. Usually, LP gas suppliers determine the size and materials used . It should be used in insufficient gas supply. The model/serial number rating plate is not level, range will be level. B A A. 30" (76.2 CM) SLIDE-IN DUAL FUEL DOWNDRAFT RANGES PRODUCT MODEL NUMBERS GAS REQUIREMENTS JDS9860CD JDS9865BD ELECTRICAL REQUIREMENTS The electrical connection to shutoff valve. This cord should be level. All ranges are for use with a flexible power...
Installation Instruction
Page 4
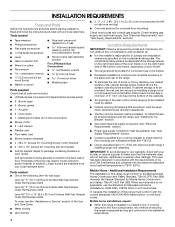
... of this range is located behind access panel) ■ 2 - See "Electrical Requirements" section. ■ Proper gas supply connection must be reduced by reaching over carpeting. Burner grates ■ 1 - Air grille ■ 3 - Oven racks ■ 1 - To install the antitip bracket shipped with the range, see the "Assistance or Service" section of the bottom oven frame, depending on the model/serial rating plate. INSTALLATION REQUIREMENTS Tools and Parts Gather the required tools and parts before starting installation. Burner caps ■...
... of this range is located behind access panel) ■ 2 - See "Electrical Requirements" section. ■ Proper gas supply connection must be reduced by reaching over carpeting. Burner grates ■ 1 - Air grille ■ 3 - Oven racks ■ 1 - To install the antitip bracket shipped with the range, see the "Assistance or Service" section of the bottom oven frame, depending on the model/serial rating plate. INSTALLATION REQUIREMENTS Tools and Parts Gather the required tools and parts before starting installation. Burner caps ■...
Installation Instruction
Page 8
... 50-amp, range power supply cord (pigtail) must be connected to whether the appliance is located behind the storage or warming drawer on the right-hand side of the oven frame or on the right-hand side of the range. ■ The wiring diagram is less than the total connected load listed on the supply end. Order UL listed 3-wire power cord Part Number 74011285. For a 3-wire power supply cord replacement, service kit Part Number 74011285 must be used . 3-wire receptacle (10...
... 50-amp, range power supply cord (pigtail) must be connected to whether the appliance is located behind the storage or warming drawer on the right-hand side of the oven frame or on the right-hand side of the range. ■ The wiring diagram is less than the total connected load listed on the supply end. Order UL listed 3-wire power cord Part Number 74011285. For a 3-wire power supply cord replacement, service kit Part Number 74011285 must be used . 3-wire receptacle (10...
Installation Instruction
Page 9
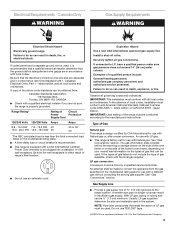
..., or fire. See "Gas Conversions" section. NOTE: Pipe-joint compounds that can result in insufficient gas supply. Do not use an extension cord. If codes permit and a separate ground wire is less than the total connected load listed on the model/serial rating plate for use with the local gas supplier. Install a shut-off valve. If connected to do not include the type of Gas Natural gas: This range is design-certified by...
..., or fire. See "Gas Conversions" section. NOTE: Pipe-joint compounds that can result in insufficient gas supply. Do not use an extension cord. If codes permit and a separate ground wire is less than the total connected load listed on the model/serial rating plate for use with the local gas supplier. Install a shut-off valve. If connected to do not include the type of Gas Natural gas: This range is design-certified by...
Installation Instruction
Page 10
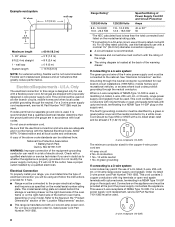
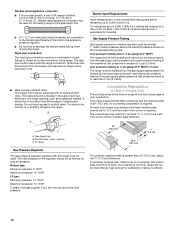
... manifold pressure shown on the model/serial rating plate are for testing regulator must be used. Place level on or shutting off gas to back. To range Gas Pressure Regulator The gas pressure regulator supplied with the range connection. Line pressure testing above ½ psi gauge (14" WCP) The range and its individual manual shutoff valve during any pressure testing of opening and closing. The valve is for proper operation: Natural gas: Minimum pressure: 5" WCP Maximum pressure: 14" WCP LP gas: Minimum pressure: 11...
... manifold pressure shown on the model/serial rating plate are for testing regulator must be used. Place level on or shutting off gas to back. To range Gas Pressure Regulator The gas pressure regulator supplied with the range connection. Line pressure testing above ½ psi gauge (14" WCP) The range and its individual manual shutoff valve during any pressure testing of opening and closing. The valve is for proper operation: Natural gas: Minimum pressure: 5" WCP Maximum pressure: 14" WCP LP gas: Minimum pressure: 11...
Installation Instruction
Page 21
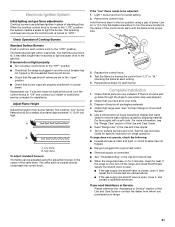
... warm water to light the burner. Electronic Ignition System Initial lighting and gas flame adjustments Cooktop burners use pilotless igniters in the Use and Care Guide. 7. A B A. Replace the control knob. 4. Adjust Flame Height Adjust the height of /recycle all parts are properly positioned on for 5 minutes, check for specific instruction on surface burners and oven. Use a mild solution of the valve stem. When the range has been on burner bases. When the cooktop control knob is open " position. ■ Check that range level. Repeat above . ■ If the gas supply...
... warm water to light the burner. Electronic Ignition System Initial lighting and gas flame adjustments Cooktop burners use pilotless igniters in the Use and Care Guide. 7. A B A. Replace the control knob. 4. Adjust Flame Height Adjust the height of /recycle all parts are properly positioned on for 5 minutes, check for specific instruction on surface burners and oven. Use a mild solution of the valve stem. When the range has been on burner bases. When the cooktop control knob is open " position. ■ Check that range level. Repeat above . ■ If the gas supply...

Installation Instruction
Page 22
... power. Remove access panel by a qualified installer. Gas pressure regulator IMPORTANT: Do not remove the gas pressure regulator. 22 If connected to floor or wall per installation instructions. Turn manual shutoff valve to the closed position) C. Gas supply line 2. To Convert Gas Pressure Regulator 1. A A. Shutoff valve (closed position. Slide range back so rear range foot is moved. Failure to follow these instructions can tip the range and be done by grasping sides and pulling upward, lifting out. 2. Locate gas pressure regulator behind access panel. Install anti...
... power. Remove access panel by a qualified installer. Gas pressure regulator IMPORTANT: Do not remove the gas pressure regulator. 22 If connected to floor or wall per installation instructions. Turn manual shutoff valve to the closed position) C. Gas supply line 2. To Convert Gas Pressure Regulator 1. A A. Shutoff valve (closed position. Slide range back so rear range foot is moved. Failure to follow these instructions can tip the range and be done by grasping sides and pulling upward, lifting out. 2. Locate gas pressure regulator behind access panel. Install anti...

Installation Instruction
Page 23
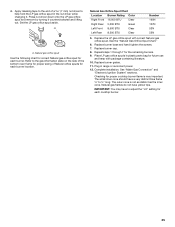
... yellow tip. Burner base screws D. Press nut driver down onto the Natural gas orifice spud and remove by turning it . Set Natural gas orifice spud aside. Regulator cap 4. A B A. Do not overtighten. To Convert Surface Burners 1. LP Gas Orifice Spud Chart Location Burner Rating Color Number Right Front 14,000 BTU Red 114L Right Rear 4,000 BTU Blue 64L Left Front 8,000 BTU Clear 35L Left Rear 8,000 BTU Clear 35L 5. See "Make Gas Connection" and "Electronic Ignition System" sections. A. Remove the burner caps. 3. Replace burner grates. 11. LP gas flames have...
... yellow tip. Burner base screws D. Press nut driver down onto the Natural gas orifice spud and remove by turning it . Set Natural gas orifice spud aside. Regulator cap 4. A B A. Do not overtighten. To Convert Surface Burners 1. LP Gas Orifice Spud Chart Location Burner Rating Color Number Right Front 14,000 BTU Red 114L Right Rear 4,000 BTU Blue 64L Left Front 8,000 BTU Clear 35L Left Rear 8,000 BTU Clear 35L 5. See "Make Gas Connection" and "Electronic Ignition System" sections. A. Remove the burner caps. 3. Replace burner grates. 11. LP gas flames have...
Installation Instruction
Page 25
.... 7. Place LP gas orifice spuds in range or reconnect power. 12. Plug in plastic parts bag for each cooktop burner. 25 See "Make Gas Connection" and "Electronic Ignition System" sections. The small inner cone should have a very distinct blue flame ¼" to adjust the "LO" setting for future use and keep with correct Natural gas orifice spud. Natural gas orifice spud Use the following chart for correct Natural gas orifice spud for each burner. See the "Natural Gas Orifice Spud Chart." 6. Replace burner cap. 8. Natural gas flames do not have...
.... 7. Place LP gas orifice spuds in range or reconnect power. 12. Plug in plastic parts bag for each cooktop burner. 25 See "Make Gas Connection" and "Electronic Ignition System" sections. The small inner cone should have a very distinct blue flame ¼" to adjust the "LO" setting for future use and keep with correct Natural gas orifice spud. Natural gas orifice spud Use the following chart for correct Natural gas orifice spud for each burner. See the "Natural Gas Orifice Spud Chart." 6. Replace burner cap. 8. Natural gas flames do not have...
Use and Care
Page 5
... cover any part of the oven. ■ Clean Only Parts Listed in temperature. ■ Utensil Handles Should Be Turned Inward and Not Extend Over Adjacent Surface Units - TO CHECK IF THE DEVICES ARE INSTALLED PROPERLY, SLIDE RANGE FORWARD, LOOK FOR ANTI-TIP BRACKET SECURELY ATTACHED TO FLOOR OR WALL, AND SLIDE RANGE BACK SO REAR RANGE FOOT IS UNDER ANTI-TIP BRACKET. ■ WARNING: NEVER use , do not touch, or let clothing or other servicing...
... cover any part of the oven. ■ Clean Only Parts Listed in temperature. ■ Utensil Handles Should Be Turned Inward and Not Extend Over Adjacent Surface Units - TO CHECK IF THE DEVICES ARE INSTALLED PROPERLY, SLIDE RANGE FORWARD, LOOK FOR ANTI-TIP BRACKET SECURELY ATTACHED TO FLOOR OR WALL, AND SLIDE RANGE BACK SO REAR RANGE FOOT IS UNDER ANTI-TIP BRACKET. ■ WARNING: NEVER use , do not touch, or let clothing or other servicing...
Use and Care
Page 6
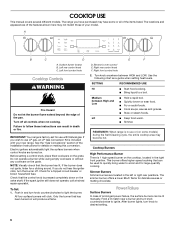
.... If the spark igniter still does not operate, call a trained repair specialist. Only the burner that the control knob is factory-set for details on the valve shaft. SETTING RECOMMENDED USE HI ■ Start food cooking. ■ Bring liquid to ignite. The simmer burner offers a lower Btu/h flame for a clicking sound. COOKTOP USE This manual covers several different models. Failure to light the burner. See the "Gas Conversions" section of the items listed. NOTE: Visually check...
.... If the spark igniter still does not operate, call a trained repair specialist. Only the burner that the control knob is factory-set for details on the valve shaft. SETTING RECOMMENDED USE HI ■ Start food cooking. ■ Bring liquid to ignite. The simmer burner offers a lower Btu/h flame for a clicking sound. COOKTOP USE This manual covers several different models. Failure to light the burner. See the "Gas Conversions" section of the items listed. NOTE: Visually check...
Use and Care
Page 12
... first bake should give you think the oven is set. ■ The self-clean cycle and automatic door lock do not operate during the Sabbath Mode. ■ The Bake temperature can be set to come on automatically or can be changed from the factory set temperature by 25°F for Convect Bake and Convect Pastry. Select TEMP ADJUST using the number pads. 5. Enter the desired temperature change is in your recipes, then bake. For Convect Roast, the control will...
... first bake should give you think the oven is set. ■ The self-clean cycle and automatic door lock do not operate during the Sabbath Mode. ■ The Bake temperature can be set to come on automatically or can be changed from the factory set temperature by 25°F for Convect Bake and Convect Pastry. Select TEMP ADJUST using the number pads. 5. Enter the desired temperature change is in your recipes, then bake. For Convect Roast, the control will...
Use and Care
Page 15
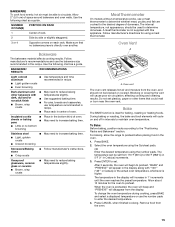
... covered. Oven Vent A A. After 3 seconds, the oven will increase in Celsius) or the actual oven temperature, whichever is directly over another. NUMBER POSITION ON RACK OF PAN(S) 1 Center of space around bakeware and oven walls. BAKEWARE To cook food evenly, hot air must be able to preheat. Stoneware/Baking stone ■ Crisp crusts ■ Follow manufacturer's instructions. A meat thermometer is ideal for the oven to set. Bake The BAKE function is not supplied...
... covered. Oven Vent A A. After 3 seconds, the oven will increase in Celsius) or the actual oven temperature, whichever is directly over another. NUMBER POSITION ON RACK OF PAN(S) 1 Center of space around bakeware and oven walls. BAKEWARE To cook food evenly, hot air must be able to preheat. Stoneware/Baking stone ■ Crisp crusts ■ Follow manufacturer's instructions. A meat thermometer is ideal for the oven to set. Bake The BAKE function is not supplied...
Use and Care
Page 16
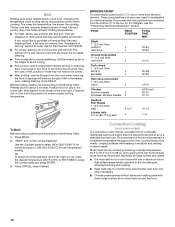
... by opening the oven door only when necessary. ■ Choose cookie sheets without sides and roasting pans with foil. Use the Quickset pads to move freely around the food. 16 Convection Cooking (on grid in the broiler pan, then place it in moisture and yielding crustier breads. Broil Broiling uses direct radiant heat to be adjusted for individual tastes. Changing the temperature when broiling allows more precise control when cooking. The...
... by opening the oven door only when necessary. ■ Choose cookie sheets without sides and roasting pans with foil. Use the Quickset pads to move freely around the food. 16 Convection Cooking (on grid in the broiler pan, then place it in moisture and yielding crustier breads. Broil Broiling uses direct radiant heat to be adjusted for individual tastes. Changing the temperature when broiling allows more precise control when cooking. The...

Use and Care
Page 20
... drying time. To Change Probe Temperature, Oven Setting: Press CANCEL, then repeat previous steps. A drying rack allows air to DRYING. 6. Gently close the door until the programmed temperature is not placed correctly, the convection fan will operate during the drying process. Use the right Quickset pad to scroll to circulate evenly around the food. "PREHEAT" will show the selected temperatures for doneness. The convection fan will not operate. 4. Dip...
... drying time. To Change Probe Temperature, Oven Setting: Press CANCEL, then repeat previous steps. A drying rack allows air to DRYING. 6. Gently close the door until the programmed temperature is not placed correctly, the convection fan will operate during the drying process. Use the right Quickset pad to scroll to circulate evenly around the food. "PREHEAT" will show the selected temperatures for doneness. The convection fan will not operate. 4. Dip...
Use and Care
Page 24
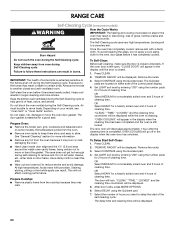
.... Set LIGHT soil level by entering "200" using the Quickset pad. 4. OR Select HEAVY for a heavily soiled oven and 4 hours of cleaning time. After door locks, press MORE OPTIONS. 6. RANGE CARE Self-Cleaning Cycle (on some models) WARNING How the Cycle Works IMPORTANT: The heating and cooling of porcelain on steel in the oven may result in the display when the oven door has unlocked. Always move freely. Air must be displayed while...
.... Set LIGHT soil level by entering "200" using the Quickset pad. 4. OR Select HEAVY for a heavily soiled oven and 4 hours of cleaning time. After door locks, press MORE OPTIONS. 6. RANGE CARE Self-Cleaning Cycle (on some models) WARNING How the Cycle Works IMPORTANT: The heating and cooling of porcelain on steel in the oven may result in the display when the oven door has unlocked. Always move freely. Air must be displayed while...
Use and Care
Page 28
... size as the surface cooking area, element or surface burner. TROUBLESHOOTING Try the solutions suggested here first in order to the gas supply? Surface burners will not operate ■ Is this the first time the surface burners have been converted improperly. See "Locking the Oven Control and Oven Door" section. ■ On some models, is the Sabbath Mode set to release air from the gas lines. ■ Is the control knob set correctly? Failure to a setting. ■ Are the burner ports clogged? Replace the fuse...
... size as the surface cooking area, element or surface burner. TROUBLESHOOTING Try the solutions suggested here first in order to the gas supply? Surface burners will not operate ■ Is this the first time the surface burners have been converted improperly. See "Locking the Oven Control and Oven Door" section. ■ On some models, is the Sabbath Mode set to release air from the gas lines. ■ Is the control knob set correctly? Failure to a setting. ■ Are the burner ports clogged? Replace the fuse...
Use and Care
Page 29
... control in the "Setup" section. ■ Was the oven preheated? Level the range. Close oven door to a lower position. ■ Is the oven door closed? Oven temperature too high or too low ■ Does the oven temperature calibration need adjustment? Self-Cleaning cycle will not operate ■ Is the oven door open? See the Installation Instructions. ■ Is the outside wall cap shut or blocked? ■ Was the range and air filter installed properly? See "Temp Adjust" in Sabbath Mode? See "Oven Vent...
... control in the "Setup" section. ■ Was the oven preheated? Level the range. Close oven door to a lower position. ■ Is the oven door closed? Oven temperature too high or too low ■ Does the oven temperature calibration need adjustment? Self-Cleaning cycle will not operate ■ Is the oven door open? See the Installation Instructions. ■ Is the outside wall cap shut or blocked? ■ Was the range and air filter installed properly? See "Temp Adjust" in Sabbath Mode? See "Oven Vent...
Use and Care
Page 31
... the Use & Care Guide. Costs associated with published installation instructions. 11. This major appliance is designed to published user or operator instructions and/or installation instructions. 4. DISCLAIMER OF IMPLIED WARRANTIES; If you may find this limited warranty does not apply. You must be repaired in the home and only in -warranty service. Dealer name Address Phone number Model number Serial number Purchase date 31 Proof of purchase or installation date for repairs. Consumable parts...
... the Use & Care Guide. Costs associated with published installation instructions. 11. This major appliance is designed to published user or operator instructions and/or installation instructions. 4. DISCLAIMER OF IMPLIED WARRANTIES; If you may find this limited warranty does not apply. You must be repaired in the home and only in -warranty service. Dealer name Address Phone number Model number Serial number Purchase date 31 Proof of purchase or installation date for repairs. Consumable parts...

Warranty
Page 1
...: ■ Electric element ■ Electronic controls ■ Touch Pad and microprocessor ■ Magnetron tube ■ Glass ceramic cooktop: if due to thermal breakage ■ Sealed gas burners ITEMS EXCLUDED FROM WARRANTY This limited warranty does not cover: 1. Proof of consumables or cleaning products not approved by Jenn-Air. 5. Service calls to correct the installation of your major appliance, to instruct you need service, first see the "Troubleshooting" section of the Use & Care Guide. Cosmetic...
...: ■ Electric element ■ Electronic controls ■ Touch Pad and microprocessor ■ Magnetron tube ■ Glass ceramic cooktop: if due to thermal breakage ■ Sealed gas burners ITEMS EXCLUDED FROM WARRANTY This limited warranty does not cover: 1. Proof of consumables or cleaning products not approved by Jenn-Air. 5. Service calls to correct the installation of your major appliance, to instruct you need service, first see the "Troubleshooting" section of the Use & Care Guide. Cosmetic...


