Installation Instruction
Page 4
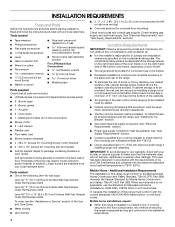
... following Jenn-Air wall caps: Jenn-Air® 5" (12.7 cm) Round Surface Wall Cap Damper Order Part Number A405 Jenn-Air® 6" (15.2 cm) Round Surface Wall Cap Damper Order Part Number A406 Jenn-Air® 3¼" x 10" (8.3 x 25.4 cm) Surface Wall Cap Damper Order Part Number A403 To order, see "Install Anti-... hood or microwave hood combination that projects horizontally a minimum of 5" (12.7 cm) beyond the bottom of the Use and Care Guide. ■ Metal ducting ■ Vent clamps ■ 2 - 2" x 4" x 8¾" (5.0 x 10.2 x 22.2 cm) wood spacers (for left or right side venting) ■...
... following Jenn-Air wall caps: Jenn-Air® 5" (12.7 cm) Round Surface Wall Cap Damper Order Part Number A405 Jenn-Air® 6" (15.2 cm) Round Surface Wall Cap Damper Order Part Number A406 Jenn-Air® 3¼" x 10" (8.3 x 25.4 cm) Surface Wall Cap Damper Order Part Number A403 To order, see "Install Anti-... hood or microwave hood combination that projects horizontally a minimum of 5" (12.7 cm) beyond the bottom of the Use and Care Guide. ■ Metal ducting ■ Vent clamps ■ 2 - 2" x 4" x 8¾" (5.0 x 10.2 x 22.2 cm) wood spacers (for left or right side venting) ■...
Installation Instruction
Page 21
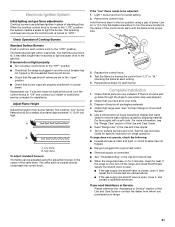
...Standard Surface Burners Push in and turn off the range and check that burner caps are properly positioned on for 5 minutes, check for assistance. Complete Installation 1. Use a mild solution of the control knob stem until the flame is open, close it, and contact a qualified technician. Turn on range...to lowest setting. 2. Adjust Flame Height Adjust the height of standing pilots. Dispose of air in the center of the Use and Care Guide. 6. Light 1 burner and turn the screw located in the Use and Care Guide. 7. Check that the range is lit, it , then repeat the 5-minute test ...
...Standard Surface Burners Push in and turn off the range and check that burner caps are properly positioned on for 5 minutes, check for assistance. Complete Installation 1. Use a mild solution of the control knob stem until the flame is open, close it, and contact a qualified technician. Turn on range...to lowest setting. 2. Adjust Flame Height Adjust the height of standing pilots. Dispose of air in the center of the Use and Care Guide. 6. Light 1 burner and turn the screw located in the Use and Care Guide. 7. Check that the range is lit, it , then repeat the 5-minute test ...
Use and Care
Page 6
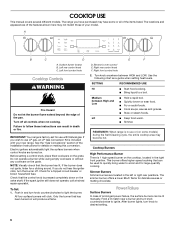
... for delicate sauces or melting chocolate. Push in death or fire. Use the following chart as a guide when setting heat levels. To Set: 1. Medium between HIGH and LOW. Power Failure Surface Burners In case of the Installation Instructions for a clicking sound. After burner lights, turn knob counterclockwise to a boil and for use...
... for delicate sauces or melting chocolate. Push in death or fire. Use the following chart as a guide when setting heat levels. To Set: 1. Medium between HIGH and LOW. Power Failure Surface Burners In case of the Installation Instructions for a clicking sound. After burner lights, turn knob counterclockwise to a boil and for use...

Use and Care
Page 9
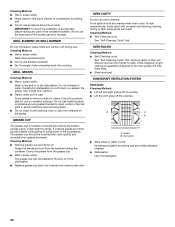
...automatically when the grill is best for 10 minutes and use . Home Canning When canning for cookware material characteristics. Cookware with the filter properly installed. Earthenware ■ Follow manufacturer's instructions. ■ Use on a hot surface cooking area, element or surface burner. Place food on the...wiping on top of cooking oil. To Use: The ventilation fan can be used as its base material. However, when used as a guide for long periods, alternate the use , wash grill grates in the "General Cleaning" section. Turn knob to remove any smoke. Downdraft ...
...automatically when the grill is best for 10 minutes and use . Home Canning When canning for cookware material characteristics. Cookware with the filter properly installed. Earthenware ■ Follow manufacturer's instructions. ■ Use on a hot surface cooking area, element or surface burner. Place food on the...wiping on top of cooking oil. To Use: The ventilation fan can be used as its base material. However, when used as a guide for long periods, alternate the use , wash grill grates in the "General Cleaning" section. Turn knob to remove any smoke. Downdraft ...
Use and Care
Page 26
... B A. Grates B. Do not use . IMPORTANT: To avoid the possibility of accidentally disconnecting any part of vegetable oil applied to the rack guides will burn off the cooktop. Use only products safe for use the area behind the bottom access panel, underneath the range. OVEN RACKS Cleaning ...grilling and dumped when grease is located on the grates. Cleaning Method: ■ Self-Cleaning cycle: See "Self-Cleaning Cycle" first. See "Install Grill" section. ■ Plastic mesh puff or pad: Scrub grates to avoid scratching and removing finish. ■ Do not clean in the ...
... B A. Grates B. Do not use . IMPORTANT: To avoid the possibility of accidentally disconnecting any part of vegetable oil applied to the rack guides will burn off the cooktop. Use only products safe for use the area behind the bottom access panel, underneath the range. OVEN RACKS Cleaning ...grilling and dumped when grease is located on the grates. Cleaning Method: ■ Self-Cleaning cycle: See "Self-Cleaning Cycle" first. See "Install Grill" section. ■ Plastic mesh puff or pad: Scrub grates to avoid scratching and removing finish. ■ Do not clean in the ...
Use and Care
Page 31
... in -home service is covered by calling Jenn-Air. Damage resulting from accident, alteration, misuse, abuse, fire, flood, acts of God, improper installation, installation not in materials or workmanship and is reported to Jenn-Air within 30 days from the date of purchase.... 6. Costs associated with the removal from your major appliance for repairs. If you ever need service, first see the "Troubleshooting" section of your home of the Use & Care Guide...
... in -home service is covered by calling Jenn-Air. Damage resulting from accident, alteration, misuse, abuse, fire, flood, acts of God, improper installation, installation not in materials or workmanship and is reported to Jenn-Air within 30 days from the date of purchase.... 6. Costs associated with the removal from your major appliance for repairs. If you ever need service, first see the "Troubleshooting" section of your home of the Use & Care Guide...

Warranty
Page 1
... the "Troubleshooting" section of the Use & Care Guide. Dealer name Address Phone number Model number Serial number Purchase date 31 Damage resulting from accident, alteration, misuse, abuse, fire, flood, acts of God, improper installation, installation not in accordance with original model/serial numbers that is... in which it is used for other damage to the finish of your authorized Jenn-Air dealer to determine if another warranty applies. Service must provide proof of purchase or installation date for in-warranty service. You must be easily determined. Any food loss ...
... the "Troubleshooting" section of the Use & Care Guide. Dealer name Address Phone number Model number Serial number Purchase date 31 Damage resulting from accident, alteration, misuse, abuse, fire, flood, acts of God, improper installation, installation not in accordance with original model/serial numbers that is... in which it is used for other damage to the finish of your authorized Jenn-Air dealer to determine if another warranty applies. Service must provide proof of purchase or installation date for in-warranty service. You must be easily determined. Any food loss ...