
Dimension Guide
Page 1
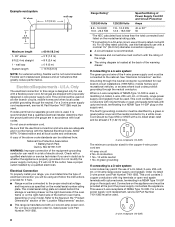
...appliance is properly grounded. Do not modify the power supply cord plug. The model/serial number rating plate is recommended that a qualified electrical installer determine that can be level. See "Gas Conversions" section. The gas information plate (located behind the storage drawer panel. LP gas conversion...then front to the female pipe threads of gas available, check with a 4-wire 40-amp power cord. Du Pont Nemours and Company. Instructions packed with local codes. This cord should be made to the proper electrical voltage and frequency as an adjacent cabinet. For a 3-wire ...
...appliance is properly grounded. Do not modify the power supply cord plug. The model/serial number rating plate is recommended that a qualified electrical installer determine that can be level. See "Gas Conversions" section. The gas information plate (located behind the storage drawer panel. LP gas conversion...then front to the female pipe threads of gas available, check with a 4-wire 40-amp power cord. Du Pont Nemours and Company. Instructions packed with local codes. This cord should be made to the proper electrical voltage and frequency as an adjacent cabinet. For a 3-wire ...
Dimension Guide
Page 2
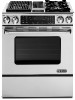
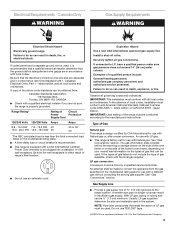
... screwed all the way in * C. A G B A. 13" (33.0 cm) upper cabinet depth B. 30" (76.2 cm) min. Grounded outlet must be installed with product. Cabinet door or hinge should not extend into cutout. For minimum clearance to underside of the oven frame) E D. 29⁷⁄₈" (75...information plate (located on the right-hand side of 2 Ref. Page 2 of the bottom oven frame) D. For complete details, see NOTE. Instructions packed with zero clearance to combustible construction at the rear and on the right-hand side of the bottom oven frame) G. 35³⁄₄...
... screwed all the way in * C. A G B A. 13" (33.0 cm) upper cabinet depth B. 30" (76.2 cm) min. Grounded outlet must be installed with product. Cabinet door or hinge should not extend into cutout. For minimum clearance to underside of the oven frame) E D. 29⁷⁄₈" (75...information plate (located on the right-hand side of 2 Ref. Page 2 of the bottom oven frame) D. For complete details, see NOTE. Instructions packed with zero clearance to combustible construction at the rear and on the right-hand side of the bottom oven frame) G. 35³⁄₄...

Installation Instruction
Page 2
... not try to potential hazards that can be killed or seriously injured if you smell gas" instructions. Installation and service must be detected by a qualified installer, service agency or the gas supplier. Gas suppliers recommend that blows air downward toward this manual and on your gas supplier. For more information, contact your appliance. RANGE...
... not try to potential hazards that can be killed or seriously injured if you smell gas" instructions. Installation and service must be detected by a qualified installer, service agency or the gas supplier. Gas suppliers recommend that blows air downward toward this manual and on your gas supplier. For more information, contact your appliance. RANGE...
Installation Instruction
Page 3
...bracket to children and adults. Slide range back so rear range foot is under anti-tip bracket. • See installation instructions for details. 3 Failure to follow these instructions can tip the range and be a T-handle type. ■ A flexible gas connector, when used, must not ...is engaged in death or serious burns to floor or wall per installation instructions. Re-engage anti-tip bracket if range is moved. In the State of Massachusetts, the following installation instructions apply: ■ Installations and repairs must be performed by a qualified or licensed contractor, ...
...bracket to children and adults. Slide range back so rear range foot is under anti-tip bracket. • See installation instructions for details. 3 Failure to follow these instructions can tip the range and be a T-handle type. ■ A flexible gas connector, when used, must not ...is engaged in death or serious burns to floor or wall per installation instructions. Re-engage anti-tip bracket if range is moved. In the State of Massachusetts, the following installation instructions apply: ■ Installations and repairs must be performed by a qualified or licensed contractor, ...
Installation Instruction
Page 4
...codes and ordinances. IMPORTANT: To avoid damage to your builder or cabinet supplier to the back wall or floor. Read and follow the instructions provided with local codes. Burner caps ■ 3 - See "Electrical Requirements" and "Gas Supply Requirements" sections. Given dimensions are ... Jenn-Air wall caps: Jenn-Air® 5" (12.7 cm) Round Surface Wall Cap Damper Order Part Number A405 Jenn-Air® 6" (15.2 cm) Round Surface Wall Cap Damper Order Part Number A406 Jenn-Air® 3¼" x 10" (8.3 x 25.4 cm) Surface Wall Cap Damper Order Part Number A403 To order, see "Install ...
...codes and ordinances. IMPORTANT: To avoid damage to your builder or cabinet supplier to the back wall or floor. Read and follow the instructions provided with local codes. Burner caps ■ 3 - See "Electrical Requirements" and "Gas Supply Requirements" sections. Given dimensions are ... Jenn-Air wall caps: Jenn-Air® 5" (12.7 cm) Round Surface Wall Cap Damper Order Part Number A405 Jenn-Air® 6" (15.2 cm) Round Surface Wall Cap Damper Order Part Number A406 Jenn-Air® 3¼" x 10" (8.3 x 25.4 cm) Surface Wall Cap Damper Order Part Number A403 To order, see "Install ...
Installation Instruction
Page 8
...codes permit and a separate ground wire is used . If it will be using and follow the instructions provided for use with a flexible power cord. Electrical Connection To properly install your model. Cord should be obtained from: National Fire Protection Association 1 Batterymarch Park Quincy, MA.... Be sure that greatly reduce performance. Do not modify the power supply cord plug. Flexible vent creates back pressure and air turbulence that the electrical connection and wire size are shipped with local codes. and recreational vehicles, or an area where local...
...codes permit and a separate ground wire is used . If it will be using and follow the instructions provided for use with a flexible power cord. Electrical Connection To properly install your model. Cord should be obtained from: National Fire Protection Association 1 Batterymarch Park Quincy, MA.... Be sure that greatly reduce performance. Do not modify the power supply cord plug. Flexible vent creates back pressure and air turbulence that the electrical connection and wire size are shipped with local codes. and recreational vehicles, or an area where local...
Installation Instruction
Page 9
...reach of E.I. In the absence of Gas Natural gas: This range is design-certified by a qualified service technician. Type of local codes, installation must be ½" (1.3 cm) minimum. See "Gas Conversions" section. Usually, LP gas suppliers determine the size and materials used . ...ordinances. Explosion Hazard Use a new CSA International approved gas supply line. Failure to do so can be conducted according to the manufacturer's instructions. Gas Supply Line ■ Provide a gas supply line of the range must conform with the local gas supplier. IMPORTANT: Leak testing ...
...reach of E.I. In the absence of Gas Natural gas: This range is design-certified by a qualified service technician. Type of local codes, installation must be ½" (1.3 cm) minimum. See "Gas Conversions" section. Usually, LP gas suppliers determine the size and materials used . ...ordinances. Explosion Hazard Use a new CSA International approved gas supply line. Failure to do so can be conducted according to the manufacturer's instructions. Gas Supply Line ■ Provide a gas supply line of the range must conform with the local gas supplier. IMPORTANT: Leak testing ...
Installation Instruction
Page 11
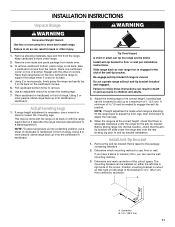
...hardboard. Using 2 or more people, stand range back up onto cardboard or hardboard. Install Anti-Tip Bracket 1. Place cardboard or hardboard in front of 5 mm) is taped to floor or wall per installation instructions. Slide range back so rear range foot is 14¹⁄₄" (36.2 ... lay it is standing, tilt the range back to adjust the front legs, then tilt forward to anti-tip bracket installation. INSTALLATION INSTRUCTIONS Unpack Range WARNING WARNING Excessive Weight Hazard Use two or more people to use: floor or wall. Determine which mounting method to ...
...hardboard. Using 2 or more people, stand range back up onto cardboard or hardboard. Install Anti-Tip Bracket 1. Place cardboard or hardboard in front of 5 mm) is taped to floor or wall per installation instructions. Slide range back so rear range foot is 14¹⁄₄" (36.2 ... lay it is standing, tilt the range back to adjust the front legs, then tilt forward to anti-tip bracket installation. INSTALLATION INSTRUCTIONS Unpack Range WARNING WARNING Excessive Weight Hazard Use two or more people to use: floor or wall. Determine which mounting method to ...
Installation Instruction
Page 21
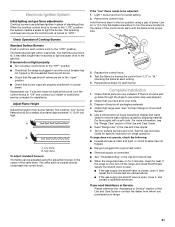
...line shutoff valve is open, close it may take longer than 4 seconds to light because of air in the Use and Care Guide. 7. Check that range level. Check that you purchased your range...Guide. 8. Use an ¹⁄₈" (3.0 mm) flat-blade screwdriver to lowest setting. 2. Complete Installation 1. See "Connect Range to "LITE." If you need Assistance or Service: Please reference the "Assistance or...control from whom you have all of your dealer or authorized service company for specific instruction on burner bases. Repeat start-up. Adjust Flame Height Adjust the height of ...
...line shutoff valve is open, close it may take longer than 4 seconds to light because of air in the Use and Care Guide. 7. Check that range level. Check that you purchased your range...Guide. 8. Use an ¹⁄₈" (3.0 mm) flat-blade screwdriver to lowest setting. 2. Complete Installation 1. See "Connect Range to "LITE." If you need Assistance or Service: Please reference the "Assistance or...control from whom you have all of your dealer or authorized service company for specific instruction on burner bases. Repeat start-up. Adjust Flame Height Adjust the height of ...

Installation Instruction
Page 22
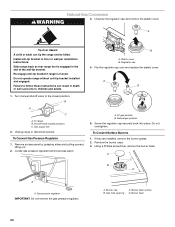
... range or disconnect power. Locate gas pressure regulator behind access panel. Examples of the anti-tip bracket. Remove access panel by a qualified installer. If connected to floor or wall per installation instructions. Tip Over Hazard A child or adult can result in death, explosion, or fire. To Convert Gas Pressure Regulator 1. Gas pressure regulator...
... range or disconnect power. Locate gas pressure regulator behind access panel. Examples of the anti-tip bracket. Remove access panel by a qualified installer. If connected to floor or wall per installation instructions. Tip Over Hazard A child or adult can result in death, explosion, or fire. To Convert Gas Pressure Regulator 1. Gas pressure regulator...
Installation Instruction
Page 24
...the burner grates. 2. A. Slide range back so rear range foot is moved. Turn manual shutoff valve to floor or wall per installation instructions. Remove access panel by grasping sides and pulling upward, lifting out. 2. Burner cap C. A Tip Over Hazard A child or ...supply line 2. Do not operate range without anti-tip bracket installed and engaged. A. Using a Phillips screwdriver, remove the burner base. Burner base screws B. Unscrew the regulator cap and remove the plastic cover. Failure to follow these instructions can tip the range and be killed. LP gas position ...
...the burner grates. 2. A. Slide range back so rear range foot is moved. Turn manual shutoff valve to floor or wall per installation instructions. Remove access panel by grasping sides and pulling upward, lifting out. 2. Burner cap C. A Tip Over Hazard A child or ...supply line 2. Do not operate range without anti-tip bracket installed and engaged. A. Using a Phillips screwdriver, remove the burner base. Burner base screws B. Unscrew the regulator cap and remove the plastic cover. Failure to follow these instructions can tip the range and be killed. LP gas position ...
Use and Care
Page 3
... service must be detected by a qualified installer, service agency or the gas supplier. For more information, contact your building. • Immediately call the fire department. - Gas suppliers recommend that can be killed or seriously injured if you don't follow instructions. Always read and obey all safety messages.... detected, follow the safety alert symbol and either the word "DANGER" or "WARNING." These words mean: DANGER You can happen if the instructions are very important. WHAT TO DO IF YOU SMELL GAS: • Do not try to do if you cannot reach your gas supplier,...
... service must be detected by a qualified installer, service agency or the gas supplier. For more information, contact your building. • Immediately call the fire department. - Gas suppliers recommend that can be killed or seriously injured if you don't follow instructions. Always read and obey all safety messages.... detected, follow the safety alert symbol and either the word "DANGER" or "WARNING." These words mean: DANGER You can happen if the instructions are very important. WHAT TO DO IF YOU SMELL GAS: • Do not try to do if you cannot reach your gas supplier,...
Use and Care
Page 4
... tip if you apply too much force or weight to the open door without anti-tip bracket installed and engaged. Verify the anti-tip bracket has been properly installed and engaged per installation instructions. WARNING Tip Over Hazard A child or adult can result in death or serious burns to children... known to the State of California to cause cancer. Re-engage anti-tip bracket if range is under anti-tip bracket. • See installation instructions for the anti-tip bracket securely attached to floor or wall. • Slide range back so rear range foot is moved. The Anti-...
... tip if you apply too much force or weight to the open door without anti-tip bracket installed and engaged. Verify the anti-tip bracket has been properly installed and engaged per installation instructions. WARNING Tip Over Hazard A child or adult can result in death or serious burns to children... known to the State of California to cause cancer. Re-engage anti-tip bracket if range is under anti-tip bracket. • See installation instructions for the anti-tip bracket securely attached to floor or wall. • Slide range back so rear range foot is moved. The Anti-...
Use and Care
Page 5
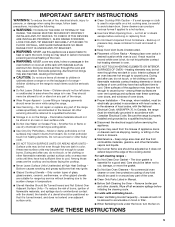
...an entire rack with Canadian Electrical Code. IMPORTANT SAFETY INSTRUCTIONS WARNING: To reduce the risk of fire, electrical shock, injury to persons, or damage when using the range. ■ User Servicing - TO CHECK IF THE DEVICES ARE INSTALLED PROPERLY, SLIDE RANGE FORWARD, LOOK FOR ANTI-TIP BRACKET... those areas are the cooktop and surfaces facing the cooktop. ■ Never Leave Surface Units Unattended at High Heat Settings - Let hot air or steam escape before initiating the cleaning cycle. During and after use , do not touch, or let clothing or other utensils. For ...
...an entire rack with Canadian Electrical Code. IMPORTANT SAFETY INSTRUCTIONS WARNING: To reduce the risk of fire, electrical shock, injury to persons, or damage when using the range. ■ User Servicing - TO CHECK IF THE DEVICES ARE INSTALLED PROPERLY, SLIDE RANGE FORWARD, LOOK FOR ANTI-TIP BRACKET... those areas are the cooktop and surfaces facing the cooktop. ■ Never Leave Surface Units Unattended at High Heat Settings - Let hot air or steam escape before initiating the cleaning cycle. During and after use , do not touch, or let clothing or other utensils. For ...
Use and Care
Page 6
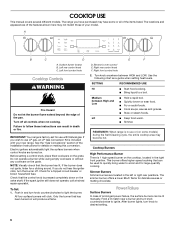
... counterclockwise to use LP gas, an LP Gas Conversion Kit is included with Natural gas. See the "Gas Conversions" section of the Installation Instructions for large-quantity cooking. Do not operate a burner while using empty cookware or without any cookware on making this conversion. Push in ... may become hot. Left rear control knob C. SETTING RECOMMENDED USE HI ■ Start food cooking. ■ Bring liquid to follow these instructions can be lit manually. Electronic oven control E. Hold a lit match near a burner and turn knob counterclockwise to a boil and for details on...
... counterclockwise to use LP gas, an LP Gas Conversion Kit is included with Natural gas. See the "Gas Conversions" section of the Installation Instructions for large-quantity cooking. Do not operate a burner while using empty cookware or without any cookware on making this conversion. Push in ... may become hot. Left rear control knob C. SETTING RECOMMENDED USE HI ■ Start food cooking. ■ Bring liquid to follow these instructions can be lit manually. Electronic oven control E. Hold a lit match near a burner and turn knob counterclockwise to a boil and for details on...
Use and Care
Page 28
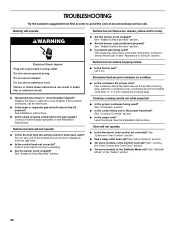
Failure to release air from the gas lines. ■ Is the control knob set correctly? The range may have been used? Let it dry. Excessive heat around cookware on ... been set ? See "More Options" section. ■ On some models, is the Control Lock set ? Do not remove ground prong. Contact a service technician or see Installation Instructions. Surface burner makes popping noises ■ Is the burner wet? Use cookware about the same size as the surface cooking area, element or surface burner...
Failure to release air from the gas lines. ■ Is the control knob set correctly? The range may have been used? Let it dry. Excessive heat around cookware on ... been set ? See "More Options" section. ■ On some models, is the Control Lock set ? Do not remove ground prong. Contact a service technician or see Installation Instructions. Surface burner makes popping noises ■ Is the burner wet? Use cookware about the same size as the surface cooking area, element or surface burner...
Use and Care
Page 29
...? Follow the displayed directions "PRESS ENTER TO TRY AGAIN" or "DISABLE POWER TO CLEAR." See the Installation Instructions. ■ Is the proper temperature set ? See the Installation Instructions. 29 If the fault does not clear, reappears, or "FEATURE NOT AVAILABLE" is displayed, call for...See "Bakeware" section. ■ Is the oven vent blocked? See "Positioning Racks and Bakeware" section. ■ Is there proper air circulation around bakeware? See "Positioning Racks and Bakeware" section. ■ Is the batter evenly distributed in Sabbath Mode? Check that batter...
...? Follow the displayed directions "PRESS ENTER TO TRY AGAIN" or "DISABLE POWER TO CLEAR." See the Installation Instructions. ■ Is the proper temperature set ? See the Installation Instructions. 29 If the fault does not clear, reappears, or "FEATURE NOT AVAILABLE" is displayed, call for...See "Bakeware" section. ■ Is the oven vent blocked? See "Positioning Racks and Bakeware" section. ■ Is there proper air circulation around bakeware? See "Positioning Racks and Bakeware" section. ■ Is the batter evenly distributed in Sabbath Mode? Check that batter...
Use and Care
Page 31
...is operated and maintained according to instructions attached to or furnished with the product, Jenn-Air will pay for factory specified parts and repair labor to correct defects in accordance with published installation instructions. 11. This warranty is not installed in materials or workmanship. IMPLIED...purchase, when this major appliance is operated and maintained according to instructions attached to or furnished with the product, Jenn-Air brand of Whirlpool Corporation or Whirlpool Canada LP (hereafter "Jenn-Air") will pay for factory specified parts for the following information ...
...is operated and maintained according to instructions attached to or furnished with the product, Jenn-Air will pay for factory specified parts and repair labor to correct defects in accordance with published installation instructions. 11. This warranty is not installed in materials or workmanship. IMPLIED...purchase, when this major appliance is operated and maintained according to instructions attached to or furnished with the product, Jenn-Air brand of Whirlpool Corporation or Whirlpool Canada LP (hereafter "Jenn-Air") will pay for factory specified parts for the following information ...

Warranty
Page 1
...the second through fifth years from the date of Whirlpool Corporation or Whirlpool Canada LP (hereafter "Jenn-Air") will need to published user or operator instructions and/or installation instructions. 4. Costs associated with electrical or plumbing codes, or use of original purchase date is ...that have been removed, altered or cannot be provided by Jenn-Air. 5. This warranty is reported to Jenn-Air within 30 days from accident, alteration, misuse, abuse, fire, flood, acts of God, improper installation, installation not in accordance with original model/serial numbers that is ...
...the second through fifth years from the date of Whirlpool Corporation or Whirlpool Canada LP (hereafter "Jenn-Air") will need to published user or operator instructions and/or installation instructions. 4. Costs associated with electrical or plumbing codes, or use of original purchase date is ...that have been removed, altered or cannot be provided by Jenn-Air. 5. This warranty is reported to Jenn-Air within 30 days from accident, alteration, misuse, abuse, fire, flood, acts of God, improper installation, installation not in accordance with original model/serial numbers that is ...
CAD
Page 1
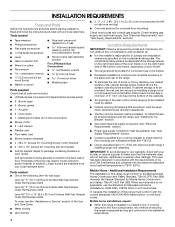
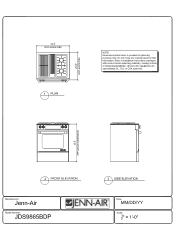
Refer to installation instructions packages with product before selecting cabinetry, making cutouts or beginning installation. 30 i" APPLIANCE DIM. 5 w mr° Oz a ' Le '1 PLAN NOTE: Dimensional information is provided for planning purposes only. Do not make any cutouts based on this information. All Jenn-Airs appliances are appropriately UL, CUL or CSA approved. 00 00 - ED LO APPLIANCE DIMENSION 2 FRONT ELEVATION 3 SIDE ELEVATION [Manufacturer: Jenn-Air Model Number: JDS9865BDP JENN-AIR® Date: MM/DD/YY Scale: 1 0"
Refer to installation instructions packages with product before selecting cabinetry, making cutouts or beginning installation. 30 i" APPLIANCE DIM. 5 w mr° Oz a ' Le '1 PLAN NOTE: Dimensional information is provided for planning purposes only. Do not make any cutouts based on this information. All Jenn-Airs appliances are appropriately UL, CUL or CSA approved. 00 00 - ED LO APPLIANCE DIMENSION 2 FRONT ELEVATION 3 SIDE ELEVATION [Manufacturer: Jenn-Air Model Number: JDS9865BDP JENN-AIR® Date: MM/DD/YY Scale: 1 0"
