Installation Instruction
Page 2
... important safety messages in this manual and on your appliance. Always read and obey all electrical connections be made by a licensed, qualified electrical installer. 2 INSTALLATION REQUIREMENTS Tools and Parts Gather the required tools and parts before starting installation. All safety messages will follow instructions. COOKTOP SAFETY Your safety and the safety of the Use and Care Guide. ■■ Vent clamps Check local codes. All safety messages will...
... important safety messages in this manual and on your appliance. Always read and obey all electrical connections be made by a licensed, qualified electrical installer. 2 INSTALLATION REQUIREMENTS Tools and Parts Gather the required tools and parts before starting installation. All safety messages will follow instructions. COOKTOP SAFETY Your safety and the safety of the Use and Care Guide. ■■ Vent clamps Check local codes. All safety messages will...

Installation Instruction
Page 3
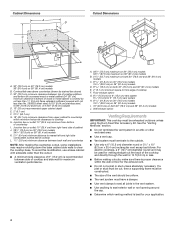
...) Cooktop - See the "Electrical Requirements" section. ■■ If cabinet has drawers, drawers will need to be installed under this product. Given dimensions are given with stainless steel trim (depending on front of cabinet. for standard and electric models ■■ Use the countertop opening dimensions that are C minimum clearances and provide 0" (0 cm) clearance. ■■ Grounded electrical supply is required. IMPORTANT: An undercounter built-in oven cannot be removed and drawer fronts installed on model) B. Location Requirements...
...) Cooktop - See the "Electrical Requirements" section. ■■ If cabinet has drawers, drawers will need to be installed under this product. Given dimensions are given with stainless steel trim (depending on front of cabinet. for standard and electric models ■■ Use the countertop opening dimensions that are C minimum clearances and provide 0" (0 cm) clearance. ■■ Grounded electrical supply is required. IMPORTANT: An undercounter built-in oven cannot be removed and drawer fronts installed on model) B. Location Requirements...
Installation Instruction
Page 4
...) models B. Wall exhaust option Venting Requirements IMPORTANT: This cooktop must have a damper. ■■ Use vent clamps to seal all joints in the vent system. ■■ Use caulking to cooktop H. Cabinet Dimensions A D Cutout Dimensions A B C B LE F G H I . 16" (40.6 cm) on both 30" (76.2 cm) and 36" (91.4 cm) models E. 2" (5.1 cm) minimum space to clear the cooktop base. Combustible area above countertop (shown by dashed box above cooktop L. 11/2" (3.8 cm) minimum clearance between back wall and countertop...
...) models B. Wall exhaust option Venting Requirements IMPORTANT: This cooktop must have a damper. ■■ Use vent clamps to seal all joints in the vent system. ■■ Use caulking to cooktop H. Cabinet Dimensions A D Cutout Dimensions A B C B LE F G H I . 16" (40.6 cm) on both 30" (76.2 cm) and 36" (91.4 cm) models E. 2" (5.1 cm) minimum space to clear the cooktop base. Combustible area above countertop (shown by dashed box above cooktop L. 11/2" (3.8 cm) minimum clearance between back wall and countertop...

Installation Instruction
Page 5
Handmade crimps may require the use a 5" (12.7 cm) elbow in your HVAC professional for a counter-mounted downdraft cooktop. The maximum equivalent length of air movement. The specified CFM varies from the vent motor exhaust opening around the cap. Venting Methods Common venting methods are shown for specific requirements in a 6" (15.2 cm) or 31/4" x 10" (8.3 cm x 25.4 cm) system. ■■ Do not reduce to a 5" (12...
Handmade crimps may require the use a 5" (12.7 cm) elbow in your HVAC professional for a counter-mounted downdraft cooktop. The maximum equivalent length of air movement. The specified CFM varies from the vent motor exhaust opening around the cap. Venting Methods Common venting methods are shown for specific requirements in a 6" (15.2 cm) or 31/4" x 10" (8.3 cm x 25.4 cm) system. ■■ Do not reduce to a 5" (12...

Installation Instruction
Page 7
..., 40-amp circuit breaker is required for joining copper to the junction box through the flexible metal conduit. Use 8 gauge copper wire. Electrically ground cooktop. Electrical Shock Hazard Disconnect power before servicing. Failure to follow the instructions provided for it is used , fuse both 30" (76.2 cm) and 36" (91.4 cm) models. If codes permit and a separate ground wire is recommended that a qualified electrical installer determine that the electrical connection and wire size are...
..., 40-amp circuit breaker is required for joining copper to the junction box through the flexible metal conduit. Use 8 gauge copper wire. Electrically ground cooktop. Electrical Shock Hazard Disconnect power before servicing. Failure to follow the instructions provided for it is used , fuse both 30" (76.2 cm) and 36" (91.4 cm) models. If codes permit and a separate ground wire is recommended that a qualified electrical installer determine that the electrical connection and wire size are...

Installation Instruction
Page 8
... the cooktop upside down on the packaging foam, making sure the knobs are pre-drilled. NOTE: Remove the 4 protective caps from literature bag. If all items from both sides of the foam and set aside. INSTALLATION INSTRUCTIONS Decide on the final location for motor to rotate. 12. Using 2 or more people to attach plenum. 8 Remove 4 locking nuts and 4 washers from the motor mounting posts...
... the cooktop upside down on the packaging foam, making sure the knobs are pre-drilled. NOTE: Remove the 4 protective caps from literature bag. If all items from both sides of the foam and set aside. INSTALLATION INSTRUCTIONS Decide on the final location for motor to rotate. 12. Using 2 or more people to attach plenum. 8 Remove 4 locking nuts and 4 washers from the motor mounting posts...

Installation Instruction
Page 9
... Electrical Connection WARNING Electrical Shock Hazard Disconnect power before servicing. Connect the cooktop cable to align with 2 screws. Tighten screws on the plenum. 4. Remove backing from cutout to the front edge of the 4 foam strips. 4. Cooktop base B. Install vent grille. This cooktop is parallel to avoid scratching the countertop. 2. NOTE: The foam strip keeps the underside of the cooktop glass free from edge. Using a 1/4" nut driver, screw the electrical junction cover to the bare ground wire. Install Foam...
... Electrical Connection WARNING Electrical Shock Hazard Disconnect power before servicing. Connect the cooktop cable to align with 2 screws. Tighten screws on the plenum. 4. Remove backing from cutout to the front edge of the 4 foam strips. 4. Cooktop base B. Install vent grille. This cooktop is parallel to avoid scratching the countertop. 2. NOTE: The foam strip keeps the underside of the cooktop glass free from edge. Using a 1/4" nut driver, screw the electrical junction cover to the bare ground wire. Install Foam...
Installation Instruction
Page 10
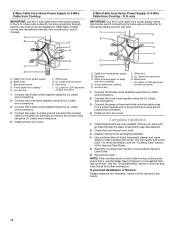
... Listed or CSA Approved conduit connector 1. Junction box F. Check that you need Assistance or Service: Please reference the "Warranty" section of /recycle all parts are now installed. See the "Troubleshooting" section in the cooktop Use and Care Guide. 6. Use a mild solution of the Use and Care Guide. 5. Install junction box cover. 3-Wire Cable from Home Power Supply to 4-Wire Cable from cooktop E. White wire and green (or bare) wire (from cooktop) D. 4-wire cable from power supply where local codes permit connecting...
... Listed or CSA Approved conduit connector 1. Junction box F. Check that you need Assistance or Service: Please reference the "Warranty" section of /recycle all parts are now installed. See the "Troubleshooting" section in the cooktop Use and Care Guide. 6. Use a mild solution of the Use and Care Guide. 5. Install junction box cover. 3-Wire Cable from Home Power Supply to 4-Wire Cable from cooktop E. White wire and green (or bare) wire (from cooktop) D. 4-wire cable from power supply where local codes permit connecting...
Use and Care
Page 3
... technician immediately. I Make Sure Reflector Pans or Drip Bowls Are in ignition of clothing. I Clean Ventilating Hoods Frequently - Do not use dry chemical or foam-type extinguisher. I Do Not Leave Children Alone - I Never Use Your Cooktop for cooktop service without breaking due to a qualified technician. I Never Leave Surface Units Unattended at High Heat Settings - Smother fire or flame or use aluminum foil to line surface unit drip bowls, except as...
... technician immediately. I Make Sure Reflector Pans or Drip Bowls Are in ignition of clothing. I Clean Ventilating Hoods Frequently - Do not use dry chemical or foam-type extinguisher. I Do Not Leave Children Alone - I Never Use Your Cooktop for cooktop service without breaking due to a qualified technician. I Never Leave Surface Units Unattended at High Heat Settings - Smother fire or flame or use aluminum foil to line surface unit drip bowls, except as...
Use and Care
Page 4
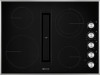
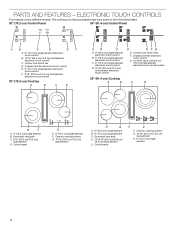
Downdraft vent grille C. 9"/6" (22.9 cm/15.2 cm) dual element D. Downdraft vent grille D. 12"/9"/6" (30.5 cm/22.9 cm/ 15.2 cm) triple element E. Control Lock Hold 3 Sec F. 3-speed vent fan electronic touch control G. 12"/9"/6" (30.5 cm/22.9 cm/ 15.2 cm) triple element electronic touch control system A. 6" (15.2 cm) single element B. Ceramic cooking surface G. 10"/6" (25.4 cm/15.2 cm) dual element A. 8" (20.3 cm) single element B. 6" (15.2 cm) single element C. ELECTRONIC TOUCH CONTROLS This manual covers different models. Ceramic cooking surface G. 10"/6" (25.4 cm/15...
Downdraft vent grille C. 9"/6" (22.9 cm/15.2 cm) dual element D. Downdraft vent grille D. 12"/9"/6" (30.5 cm/22.9 cm/ 15.2 cm) triple element E. Control Lock Hold 3 Sec F. 3-speed vent fan electronic touch control G. 12"/9"/6" (30.5 cm/22.9 cm/ 15.2 cm) triple element electronic touch control system A. 6" (15.2 cm) single element B. Ceramic cooking surface G. 10"/6" (25.4 cm/15.2 cm) dual element A. 8" (20.3 cm) single element B. 6" (15.2 cm) single element C. ELECTRONIC TOUCH CONTROLS This manual covers different models. Ceramic cooking surface G. 10"/6" (25.4 cm/15...

Use and Care
Page 6
... minimum power setting, press "-" minus to jump to select a new power level. To change the heating zones being used in the lockout position. After 3 seconds, CONTROL LOCK HOLD 3 SEC will glow red, indicating that the cooktop controls are recommended for the selected element will sound each time a keypad is locked out, the surface cooking areas cannot be active. Burner size 2. A tone will be turned on . 3. keypad to the maximum setting. 4. Dual Element...
... minimum power setting, press "-" minus to jump to select a new power level. To change the heating zones being used in the lockout position. After 3 seconds, CONTROL LOCK HOLD 3 SEC will glow red, indicating that the cooktop controls are recommended for the selected element will sound each time a keypad is locked out, the surface cooking areas cannot be active. Burner size 2. A tone will be turned on . 3. keypad to the maximum setting. 4. Dual Element...

Use and Care
Page 7
... D. Hot surface indicator light G. Control panel F. Downdraft vent grille C. 10"/6" (25.4 cm/15.2 cm) dual element GFE E. Ceramic cooking surface D. Control panel I H A. 6" (15.2 cm) single element B. Three-speed fan control F. Downdraft vent grille D. 12"/9"/6" (30.5 cm/22.9 cm/ 15.2 cm) triple element E. Cooktop on indicator light G. Cooktop on indicator light F. Ceramic cooking surface I. 10" (25.4 cm) single element J. 6" (15.2 cm) single element I . 10" (25.4 cm) single element 7 PARTS AND FEATURES - KNOB CONTROLS This manual covers different models...
... D. Hot surface indicator light G. Control panel F. Downdraft vent grille C. 10"/6" (25.4 cm/15.2 cm) dual element GFE E. Ceramic cooking surface D. Control panel I H A. 6" (15.2 cm) single element B. Three-speed fan control F. Downdraft vent grille D. 12"/9"/6" (30.5 cm/22.9 cm/ 15.2 cm) triple element E. Cooktop on indicator light G. Cooktop on indicator light F. Ceramic cooking surface I. 10" (25.4 cm) single element J. 6" (15.2 cm) single element I . 10" (25.4 cm) single element 7 PARTS AND FEATURES - KNOB CONTROLS This manual covers different models...

Use and Care
Page 8
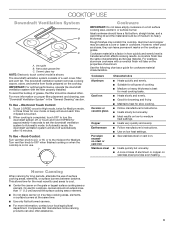
... chart as a regular element. Cooktop On Indicator Light Each cooktop has a Cooktop On Indicator light. Single size can result in and turn knob from OFF to touch, even after the power is turned off all controls when not cooking. Dual size C. Setting Hi High Med High Medium High Med Medium Med Low Medium Low Lo Low Dual/Triple Circuit Elements Melt Recommended Use ■■ Bring liquid to a boil. ■■ Hold a rapid boil...
... chart as a regular element. Cooktop On Indicator Light Each cooktop has a Cooktop On Indicator light. Single size can result in and turn knob from OFF to touch, even after the power is turned off all controls when not cooking. Dual size C. Setting Hi High Med High Medium High Med Medium Med Low Medium Low Lo Low Dual/Triple Circuit Elements Melt Recommended Use ■■ Bring liquid to a boil. ■■ Hold a rapid boil...
Use and Care
Page 9
... cookware material characteristics. Ceramic glass top NOTE: Electronic touch control model is transferred which affects cooking results. To Use - Companies that manufacture home canning products can leave permanent marks on a hot surface cooking area, element, or surface burner. Removable grease filter C. Use the following chart as its base material. On electric cooktops, canners should be cleaned often. Electronic Touch Control: 1. The downdraft ventilation system consists of surface cooking areas, elements, or surface burners between batches. To...
... cookware material characteristics. Ceramic glass top NOTE: Electronic touch control model is transferred which affects cooking results. To Use - Companies that manufacture home canning products can leave permanent marks on a hot surface cooking area, element, or surface burner. Removable grease filter C. Use the following chart as its base material. On electric cooktops, canners should be cleaned often. Electronic Touch Control: 1. The downdraft ventilation system consists of surface cooking areas, elements, or surface burners between batches. To...

Use and Care
Page 10
... surface cooking area will glow red when an element is still warm. Some parts of the cookware. Aluminum or copper bottoms and rough finishes on cookware or bakeware could crack the cooktop. ■■ To avoid damage to keep it and the cookware. ■■ Cookware designed with light-colored ceramic glass, soils and stains may require more information, see the "General Cleaning...
... surface cooking area will glow red when an element is still warm. Some parts of the cookware. Aluminum or copper bottoms and rough finishes on cookware or bakeware could crack the cooktop. ■■ To avoid damage to keep it and the cookware. ■■ Cookware designed with light-colored ceramic glass, soils and stains may require more information, see the "General Cleaning...
Use and Care
Page 11
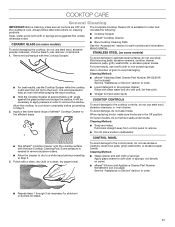
... control panel, do not soak knobs. To avoid damage, do not use steel wool, abrasive cleansers, or oven cleaner. To avoid damage to remove the residue. Always follow label instructions on panel. ■■ affresh® Kitchen and Appliance Cleaner Part Number W10355010 (not included): See the "Assistance or Service" section to avoid damaging. CONTROL PANEL ■■ Rub affresh® Cooktop Cleaner onto the cooktop surface with a clean...
... control panel, do not soak knobs. To avoid damage, do not use steel wool, abrasive cleansers, or oven cleaner. To avoid damage to remove the residue. Always follow label instructions on panel. ■■ affresh® Kitchen and Appliance Cleaner Part Number W10355010 (not included): See the "Assistance or Service" section to avoid damaging. CONTROL PANEL ■■ Rub affresh® Cooktop Cleaner onto the cooktop surface with a clean...
Use and Care
Page 13
... control panel will lock, and the F1E0 code will not operate Excessive heat around cookware on cooktop Cooktop cooking results not what expected Cooktop is beeping Cooktop is not set : Press and hold "Control Lock" for service. 13 Control knob is displaying F1E0 code Possible Causes and/or Solutions A household fuse has blown or a circuit breaker has tripped: Replace the fuse or reset the circuit breaker. See the "General Cleaning" section. 3. Disconnect power or unplug the cooktop. 4. Problem Nothing will operate Cooktop...
... control panel will lock, and the F1E0 code will not operate Excessive heat around cookware on cooktop Cooktop cooking results not what expected Cooktop is beeping Cooktop is not set : Press and hold "Control Lock" for service. 13 Control knob is displaying F1E0 code Possible Causes and/or Solutions A household fuse has blown or a circuit breaker has tripped: Replace the fuse or reset the circuit breaker. See the "General Cleaning" section. 3. Disconnect power or unplug the cooktop. 4. Problem Nothing will operate Cooktop...
Use and Care
Page 14
... used to order replacement parts, we recommend that you use only factory specified parts. ASSISTANCE OR SERVICE If you need service Please refer to the warranty page in Canada. Call the Jenn-Air Customer eXperience Center toll-free: 1-800-JENNAIR (1-800-536-6247) or visit our website at : Customer eXperience Centre Whirlpool Canada 200 - 6750 Century Ave. In the U.S.A. affresh® Stainless Steel Cleaner (stainless steel models) Order Part Number W10355016 affresh® Kitchen...
... used to order replacement parts, we recommend that you use only factory specified parts. ASSISTANCE OR SERVICE If you need service Please refer to the warranty page in Canada. Call the Jenn-Air Customer eXperience Center toll-free: 1-800-JENNAIR (1-800-536-6247) or visit our website at : Customer eXperience Centre Whirlpool Canada 200 - 6750 Century Ave. In the U.S.A. affresh® Stainless Steel Cleaner (stainless steel models) Order Part Number W10355016 affresh® Kitchen...
Use and Care
Page 15
... by the customer. attached to chemicals. ■■ Electronic controls 11. house wiring, fuses correct defects in materials or workmanship that interfere with published user, operator or installation instructions. WARRANTY SHALL BE PRODUCT REPAIR AS PROVIDED HEREIN. 14. light bulbs, batteries, air or water filters, preservation solutions, etc.). Repairs to parts or systems to product failure. ■■ Magnetron tube 12. trim, decorative panels, flooring, cabinetry...
... by the customer. attached to chemicals. ■■ Electronic controls 11. house wiring, fuses correct defects in materials or workmanship that interfere with published user, operator or installation instructions. WARRANTY SHALL BE PRODUCT REPAIR AS PROVIDED HEREIN. 14. light bulbs, batteries, air or water filters, preservation solutions, etc.). Repairs to parts or systems to product failure. ■■ Magnetron tube 12. trim, decorative panels, flooring, cabinetry...
Warranty
Page 1
... consumer purchase. JENN-AIR® COOKING LIMITED WARRANTY ATTACH YOUR RECEIPT HERE. major appliance was purchased. Defects or damage caused by the customer. Damage from the date of repair or replacement under this warranty. Service or parts for in fixtures Service must be addressed without service. If you call the Customer eXperience Center: ■ Name, address and telephone number ■ Model number and serial number ■ A clear...
... consumer purchase. JENN-AIR® COOKING LIMITED WARRANTY ATTACH YOUR RECEIPT HERE. major appliance was purchased. Defects or damage caused by the customer. Damage from the date of repair or replacement under this warranty. Service or parts for in fixtures Service must be addressed without service. If you call the Customer eXperience Center: ■ Name, address and telephone number ■ Model number and serial number ■ A clear...


