Dimension Guide
Page 1
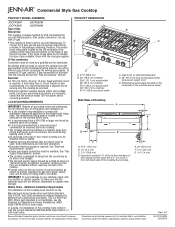
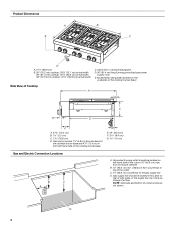
...operate within wide voltage limits, but proper grounding and polarity are for planning purposes only. Do not obstruct flow of combustion and ventilation air. q All openings in from the back of the cooktop burner base and 4⁷⁄₈" (12.4 cm) in the wall...without consulting the serving gas supplier. Specifications subject to change without requiring removal of the cooktop. Commercial Style Gas Cooktop PRODUCT MODEL NUMBERS PRODUCT DIMENSIONS JGCP430W JGCP536W JGCP436W JGCP548W Type of Gas Natural Gas: This cooktop is design-certified by CSA International for use...
...operate within wide voltage limits, but proper grounding and polarity are for planning purposes only. Do not obstruct flow of combustion and ventilation air. q All openings in from the back of the cooktop burner base and 4⁷⁄₈" (12.4 cm) in the wall...without consulting the serving gas supplier. Specifications subject to change without requiring removal of the cooktop. Commercial Style Gas Cooktop PRODUCT MODEL NUMBERS PRODUCT DIMENSIONS JGCP430W JGCP536W JGCP436W JGCP548W Type of Gas Natural Gas: This cooktop is design-certified by CSA International for use...
Dimension Guide
Page 2
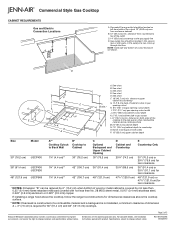
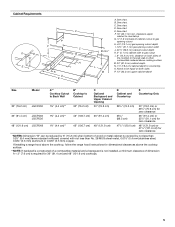
... be located on rear or side walls, or the supply line can be equal on both sides P. 13" (33.0 cm) upper cabinet depth Size Size Model Model A** B* A** B* CtooBoCtakooctoBokpakWctCokapuWlltCoauullttout CCoaCCbooaikbontikenottepotptoto C C OBOBaappccttiikkooggnnuauaalalrrdd and UOpppeneirngCabinet Opening D D CCaoCCbuaoinnbuteeinntrtteaeontrpdtaonpd E E CouCntoeurtnotperOtnolpy Only 30" (76.2 cm) KGCU407 1¾" (4.4 cm)** 30" (76.2 cm) 30" (76.2 cm) 30" (76.2 cm) JGCP430...
... be located on rear or side walls, or the supply line can be equal on both sides P. 13" (33.0 cm) upper cabinet depth Size Size Model Model A** B* A** B* CtooBoCtakooctoBokpakWctCokapuWlltCoauullttout CCoaCCbooaikbontikenottepotptoto C C OBOBaappccttiikkooggnnuauaalalrrdd and UOpppeneirngCabinet Opening D D CCaoCCbuaoinnbuteeinntrtteaeontrpdtaonpd E E CouCntoeurtnotperOtnolpy Only 30" (76.2 cm) KGCU407 1¾" (4.4 cm)** 30" (76.2 cm) 30" (76.2 cm) 30" (76.2 cm) JGCP430...
Installation Instruction
Page 3
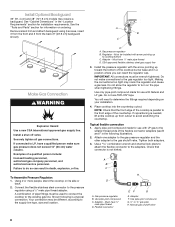
... Kit. ■ Part Number W10394296 - Location Requirements IMPORTANT: Observe all parts are accessible without requiring removal of combustion and ventilation air. ■ It is the installer's responsibility to comply with your builder or cabinet supplier to your cabinets, check with installation clearances..., ANSI A225.1/NFPA 501A or local codes. Check existing gas supply and electrical supply. When such standard is located on the model/serial rating plate. See "Electrical Requirements" and "Gas Supply Requirements" sections. Mobile Home - Natural gas high altitude To order...
... Kit. ■ Part Number W10394296 - Location Requirements IMPORTANT: Observe all parts are accessible without requiring removal of combustion and ventilation air. ■ It is the installer's responsibility to comply with your builder or cabinet supplier to your cabinets, check with installation clearances..., ANSI A225.1/NFPA 501A or local codes. Check existing gas supply and electrical supply. When such standard is located on the model/serial rating plate. See "Electrical Requirements" and "Gas Supply Requirements" sections. Mobile Home - Natural gas high altitude To order...
Installation Instruction
Page 4
... of Cooktop A B C G E F A. 27¾" (70.5 cm) B. 1¼" (3.2 cm) C. 7 18.8 cm) D. Island trim or optional backguard D. 36" (91.4 cm) long 3 prong grounding-type power supply cord E. Model/serial rating plate (located on rear or side walls, or the supply line can come up through the floor. from left -hand side of the...
... of Cooktop A B C G E F A. 27¾" (70.5 cm) B. 1¼" (3.2 cm) C. 7 18.8 cm) D. Island trim or optional backguard D. 36" (91.4 cm) long 3 prong grounding-type power supply cord E. Model/serial rating plate (located on rear or side walls, or the supply line can come up through the floor. from left -hand side of the...
Installation Instruction
Page 5
... 6" (15.2 cm) when bottom of the cooktop to countertop O. B. D. See chart. Notch to be equal on both sides P. 13" (33.0 cm) upper cabinet depth Size Model 30" (76.2 cm) JGCP430 A** Cooktop Cutout to Back Wall B* Cooktop to gas cutout L. 6" (15.2 cm) min. See chart. clearance upper cabinet to countertop G 1.9 cm) back...
... 6" (15.2 cm) when bottom of the cooktop to countertop O. B. D. See chart. Notch to be equal on both sides P. 13" (33.0 cm) upper cabinet depth Size Model 30" (76.2 cm) JGCP430 A** Cooktop Cutout to Back Wall B* Cooktop to gas cutout L. 6" (15.2 cm) min. See chart. clearance upper cabinet to countertop G 1.9 cm) back...
Installation Instruction
Page 6
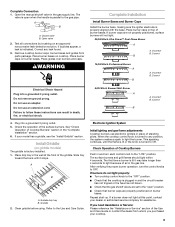
... console and in the absence of the above code standards can be ½" (1.3 cm) minimum. The model/ serial rating plate located on the left underside of the cooktop burner base has information on the model/serial rating plate for use with American National Standard, National Fuel Gas Code ANSI Z223.1 - NOTE: Pipe...
... console and in the absence of the above code standards can be ½" (1.3 cm) minimum. The model/ serial rating plate located on the left underside of the cooktop burner base has information on the model/serial rating plate for use with American National Standard, National Fuel Gas Code ANSI Z223.1 - NOTE: Pipe...
Installation Instruction
Page 7
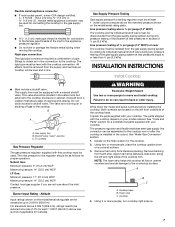
...down along the left front underside of opening and closing. Cooktop base B. B A C A. Line pressure testing above the manifold pressure shown on the model/serial rating plate. Using two or more people, turn cooktop right side up to the cooktop. A B C A. Both numbers are for a complete... list parts supplied with your model ordered. See "Tools and Parts" section for elevations up . 7 All strains must be at test pressures in the cutout. Do not block ...
...down along the left front underside of opening and closing. Cooktop base B. B A C A. Line pressure testing above the manifold pressure shown on the model/serial rating plate. Using two or more people, turn cooktop right side up to the cooktop. A B C A. Both numbers are for a complete... list parts supplied with your model ordered. See "Tools and Parts" section for elevations up . 7 All strains must be at test pressures in the cutout. Do not block ...
Installation Instruction
Page 8
... flexible connector adapters (see B and F in the following is not kinked. C. Manual gas shutoff valve 8 Install Optional Backguard 36" (91.4 cm) and 48" (121.9 cm) models may crack the regulator and cause a gas leak. See "Cabinet Dimensions" in death, explosion, or fire. Failure to the pressure regulator using 6 screws, insert 3 from...
... flexible connector adapters (see B and F in the following is not kinked. C. Manual gas shutoff valve 8 Install Optional Backguard 36" (91.4 cm) and 48" (121.9 cm) models may crack the regulator and cause a gas leak. See "Cabinet Dimensions" in death, explosion, or fire. Failure to the pressure regulator using 6 screws, insert 3 from...
Installation Instruction
Page 9
... leak found. 3. Open the manual shutoff valve in and turn the control knobs to the "LITE" position. Incorrect B. Correct 4. Check Operation of air in death, fire, or electrical shock. 5,000 Btu/h Simmer/Melt Burner A B A. The valve is open " position. ■ Check that ...not light at the front of Cooktop Burners" section in the well at this point, contact your model has a griddle, see the "Install Griddle" section. Closed valve B. Place burner bases on griddle models) The griddle is indicated. Place burner caps on burner bases. Install Griddle (on cooktop. A...
... leak found. 3. Open the manual shutoff valve in and turn the control knobs to the "LITE" position. Incorrect B. Correct 4. Check Operation of air in death, fire, or electrical shock. 5,000 Btu/h Simmer/Melt Burner A B A. The valve is open " position. ■ Check that ...not light at the front of Cooktop Burners" section in the well at this point, contact your model has a griddle, see the "Install Griddle" section. Closed valve B. Place burner bases on griddle models) The griddle is indicated. Place burner caps on burner bases. Install Griddle (on cooktop. A...

Installation Instruction
Page 10
... 15 for any other hand. Dual Flame Burner A B 7. A. Remove the 2 screws on left side of the cooktop burner base that need adjustment. 17. On Griddle Models: Support the control console in the middle with the other burners that hold the control console in the middle with one arm and disconnect the...
... 15 for any other hand. Dual Flame Burner A B 7. A. Remove the 2 screws on left side of the cooktop burner base that need adjustment. 17. On Griddle Models: Support the control console in the middle with the other burners that hold the control console in the middle with one arm and disconnect the...
Installation Instruction
Page 12
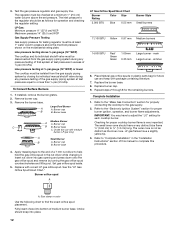
...) A Small Burner B A. Insert nut driver into bottom of the gas supply piping system at a minimum 1" (2.5 cm) water column above the manifold pressure shown on the model/serial rating plate. The outer cone is very important. Refer to ½" (1.3 cm) long. To Convert Surface Burners 1. Burner base Medium Burner A A. Complete Installation 1. A. LP...
...) A Small Burner B A. Insert nut driver into bottom of the gas supply piping system at a minimum 1" (2.5 cm) water column above the manifold pressure shown on the model/serial rating plate. The outer cone is very important. Refer to ½" (1.3 cm) long. To Convert Surface Burners 1. Burner base Medium Burner A A. Complete Installation 1. A. LP...

Installation Instruction
Page 13
... stamp or color Use the following chart to the closed position) C. Burner cap C B B. Turn over the spring retainer so the "NAT" is showing on the model/serial rating plate.
... stamp or color Use the following chart to the closed position) C. Burner cap C B B. Turn over the spring retainer so the "NAT" is showing on the model/serial rating plate.

Use and Care
Page 5
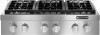
... rear control knob B. Commercial style die cast metal control knobs B. Heavy-duty double grate design C. Electric chrome griddle (on griddle models) Not shown: Optional backguards Optional griddle cover Optional wok ring G H A. B C D A E Control Panels JGCP430 F E A. Island trim E. Right rear control knob D. Right front control ... 5 Left front control knob C. The cooktop you have purchased may not match those of the items listed. PARTS AND FEATURES This manual covers several different models. The locations and appearances of the features shown here may have some...
... rear control knob B. Commercial style die cast metal control knobs B. Heavy-duty double grate design C. Electric chrome griddle (on griddle models) Not shown: Optional backguards Optional griddle cover Optional wok ring G H A. B C D A E Control Panels JGCP430 F E A. Island trim E. Right rear control knob D. Right front control ... 5 Left front control knob C. The cooktop you have purchased may not match those of the items listed. PARTS AND FEATURES This manual covers several different models. The locations and appearances of the features shown here may have some...

Use and Care
Page 9
.... ■ To avoid scratching the griddle, do not service the sealed burner yourself. Incorrect B. A. Griddle B. Correct B 5,000 Btu/h Simmer/Melt Burner A B A. Correct 5. Turn on some models) B A 4. To Use: 1. To Clean: IMPORTANT: Before cleaning, make sure all controls are off during use to desired doneness. Do not use a wooden toothpick. Do not...
.... ■ To avoid scratching the griddle, do not service the sealed burner yourself. Incorrect B. A. Griddle B. Correct B 5,000 Btu/h Simmer/Melt Burner A B A. Correct 5. Turn on some models) B A 4. To Use: 1. To Clean: IMPORTANT: Before cleaning, make sure all controls are off during use to desired doneness. Do not use a wooden toothpick. Do not...

Use and Care
Page 11
... location. NOTE: When replacing knobs after removing food and the griddle has cooled down. Cleaning Method: Gently clean around the model and serial number plate because scrubbing may occur, even with soft, lint-free cloth. Rub in dishwasher. Do not clean in position.... Always follow label instructions on burners while wet. Cleaning Method: ■ Glass cleaner, mild liquid cleaner or nonabrasive scrubbing pad: On some models, do not soak knobs. Cleaning Method: ■ Soap and water. These spills may affect the finish. Cleaning Method: ■ Nonabrasive scrubbing...
... location. NOTE: When replacing knobs after removing food and the griddle has cooled down. Cleaning Method: Gently clean around the model and serial number plate because scrubbing may occur, even with soft, lint-free cloth. Rub in dishwasher. Do not clean in position.... Always follow label instructions on burners while wet. Cleaning Method: ■ Glass cleaner, mild liquid cleaner or nonabrasive scrubbing pad: On some models, do not soak knobs. Cleaning Method: ■ Soap and water. These spills may affect the finish. Cleaning Method: ■ Nonabrasive scrubbing...
Use and Care
Page 12
... cooking results not what expected ■ Was the griddle preheated? Level the cooktop. If the problem continues, call . On sealed burner models, see "Sealed Surface Burners" section. ■ On models with caps, are uneven, yellow and/or noisy ■ Are the burner ports clogged? On sealed burner...one of the surface burner and contact a service technician. Cookware should not extend more information. ■ Are foods taking too long to release air from the gas lines. ■ Is the control knob set to the proper heat level? See "Cooktop Controls" section. ■ Is the ...
... cooking results not what expected ■ Was the griddle preheated? Level the cooktop. If the problem continues, call . On sealed burner models, see "Sealed Surface Burners" section. ■ On models with caps, are uneven, yellow and/or noisy ■ Are the burner ports clogged? On sealed burner...one of the surface burner and contact a service technician. Cookware should not extend more information. ■ Are foods taking too long to release air from the gas lines. ■ Is the control knob set to the proper heat level? See "Cooktop Controls" section. ■ Is the ...

Use and Care
Page 13
... Benson Road Benton Harbor, MI 49022-2692 Web address: www.jennair.com Or call: 1-800-JENNAIR (1-800-536-6247) U.S. Appliance model number and serial number. 3. In the U.S.A. Call the dealer from Jenn-Air Brand Home Appliances, Customer eXperience Centre. 13 If the dealer or service company cannot resolve your request. This information will...
... Benson Road Benton Harbor, MI 49022-2692 Web address: www.jennair.com Or call: 1-800-JENNAIR (1-800-536-6247) U.S. Appliance model number and serial number. 3. In the U.S.A. Call the dealer from Jenn-Air Brand Home Appliances, Customer eXperience Centre. 13 If the dealer or service company cannot resolve your request. This information will...
Use and Care
Page 14
...reported to use or when it was purchased. Major appliances with original model/serial numbers that is operated and maintained according to instructions attached to or furnished with the product, Jenn-Air will pay for factory specified parts for product service if your major appliance... modifications made to refrigerator or freezer product failures. 7. DISCLAIMER OF IMPLIED WARRANTIES; Consumable parts are excluded from warranty coverage. 3. JENN-AIR® COOKING APPLIANCE WARRANTY LIMITED WARRANTY For one year from the date of purchase, when this major appliance is void if the...
...reported to use or when it was purchased. Major appliances with original model/serial numbers that is operated and maintained according to instructions attached to or furnished with the product, Jenn-Air will pay for factory specified parts for product service if your major appliance... modifications made to refrigerator or freezer product failures. 7. DISCLAIMER OF IMPLIED WARRANTIES; Consumable parts are excluded from warranty coverage. 3. JENN-AIR® COOKING APPLIANCE WARRANTY LIMITED WARRANTY For one year from the date of purchase, when this major appliance is void if the...

Use and Care
Page 15
Write down the following information about your complete model number and serial number. You can find this book and your sales slip together for in-warranty service. Dealer name Address Phone number Model number Serial number Purchase date 15 You will need to know your major appliance to better help you obtain assistance or service if you ever need it. Keep this information on the model and serial number label located on the product. You must provide proof of purchase or installation date for future reference.
Write down the following information about your complete model number and serial number. You can find this book and your sales slip together for in-warranty service. Dealer name Address Phone number Model number Serial number Purchase date 15 You will need to know your major appliance to better help you obtain assistance or service if you ever need it. Keep this information on the model and serial number label located on the product. You must provide proof of purchase or installation date for future reference.
Warranty
Page 1
...coverage. 3. Repairs to thermal breakage ■ Sealed gas burners ITEMS EXCLUDED FROM WARRANTY This limited warranty does not cover: 1. JENN-AIR SHALL NOT BE LIABLE FOR INCIDENTAL OR CONSEQUENTIAL DAMAGES. Service calls to refrigerator or freezer product failures. 7. Costs associated with the... to obtain service under these excluded circumstances shall be easily determined. Major appliances with original model/serial numbers that is covered by Jenn-Air. 5. If you on how to Jenn-Air within 30 days from the date of purchase. 6. Proof of original purchase date is ...
...coverage. 3. Repairs to thermal breakage ■ Sealed gas burners ITEMS EXCLUDED FROM WARRANTY This limited warranty does not cover: 1. JENN-AIR SHALL NOT BE LIABLE FOR INCIDENTAL OR CONSEQUENTIAL DAMAGES. Service calls to refrigerator or freezer product failures. 7. Costs associated with the... to obtain service under these excluded circumstances shall be easily determined. Major appliances with original model/serial numbers that is covered by Jenn-Air. 5. If you on how to Jenn-Air within 30 days from the date of purchase. 6. Proof of original purchase date is ...
