
Dimension Guide
Page 1
... 11" W.C. Triple Bay Conventional Gas Grill Cooktop PRODUCT MODEL NUMBERS JGD8348CD GAS REQUIREMENTS Gas supply: The installation of this appliance must conform with local codes, or in the gas line external to this appliance for the purpose of turning on or shutting off gas to the appliance. If, at pipe connections. provide 2" min. (5.1 cm) cabinet clearance to operate the cooktop on that gas. Instructions packed with product. Use an approved pipe joint...
... 11" W.C. Triple Bay Conventional Gas Grill Cooktop PRODUCT MODEL NUMBERS JGD8348CD GAS REQUIREMENTS Gas supply: The installation of this appliance must conform with local codes, or in the gas line external to this appliance for the purpose of turning on or shutting off gas to the appliance. If, at pipe connections. provide 2" min. (5.1 cm) cabinet clearance to operate the cooktop on that gas. Instructions packed with product. Use an approved pipe joint...

Dimension Guide
Page 2
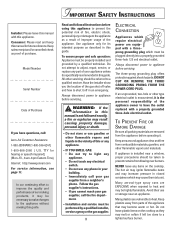
... change materials and specifications without notice. This appliance, when installed, must be provided. Instructions packed with a grounded type power cord. Specifications subject to change without notice. Triple Bay Conventional Gas Grill Cooktop PRODUCT MODEL NUMBERS JGD8348CD ELECTRICAL REQUIREMENTS The electrical supply required is recommended, for planning purposes only. It is 110/120-volt, A.C., 15-amp, 60-Hz. User may experience occasional circuit tripping if Ground Fault Circuit Interrupter (GFCI) outlet or breaker...
... change materials and specifications without notice. This appliance, when installed, must be provided. Instructions packed with a grounded type power cord. Specifications subject to change without notice. Triple Bay Conventional Gas Grill Cooktop PRODUCT MODEL NUMBERS JGD8348CD ELECTRICAL REQUIREMENTS The electrical supply required is recommended, for planning purposes only. It is 110/120-volt, A.C., 15-amp, 60-Hz. User may experience occasional circuit tripping if Ground Fault Circuit Interrupter (GFCI) outlet or breaker...

Dimension Guide
Page 3
... over open flames. Instructions packed with another Downdraft Cooktop, the minimum spacing between cooking surface 8 (20.3 cm) MIN. Page 3 of cabinets installed above the appliance. For complete details, see Installation our products, we reserve the right to change materials and specifications without notice. If cabinet storage is 13" (33 cm). MINIMUM SPACING REQUIREMENTS For installing a TripleBay Downdraft Cooktop in combination with product. Specifications subject to change without notice. CLEARANCE and construction...
... over open flames. Instructions packed with another Downdraft Cooktop, the minimum spacing between cooking surface 8 (20.3 cm) MIN. Page 3 of cabinets installed above the appliance. For complete details, see Installation our products, we reserve the right to change materials and specifications without notice. If cabinet storage is 13" (33 cm). MINIMUM SPACING REQUIREMENTS For installing a TripleBay Downdraft Cooktop in combination with product. Specifications subject to change without notice. CLEARANCE and construction...
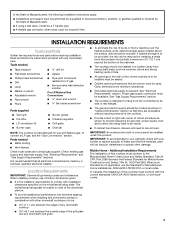
Installation Instruction
Page 3
...; The gas and electric supply should be installed in a location away from the countertop by installing a range hood that are accessible without requiring removal of the cooktop. ■ Provide cutout in right rear corner of the downdraft plenum. ■ To provide satisfactory performance, the minimum spacing requirements when installing this cooktop must be removed. See "Gas Supply Requirements" section. ■ The cooktop is located on the model/serial rating plate. Given dimensions are minimum clearances. ■ Grounded electrical supply...
...; The gas and electric supply should be installed in a location away from the countertop by installing a range hood that are accessible without requiring removal of the cooktop. ■ Provide cutout in right rear corner of the downdraft plenum. ■ To provide satisfactory performance, the minimum spacing requirements when installing this cooktop must be removed. See "Gas Supply Requirements" section. ■ The cooktop is located on the model/serial rating plate. Given dimensions are minimum clearances. ■ Grounded electrical supply...

Installation Instruction
Page 4
.... ■ Use a Jenn-Air® vent cap. ■ Vent system must terminate to remove and empty grease container. 4 Cutout Dimensions B A E D C A. 9³⁄₈" (23.8 cm) B. 13 34.1 cm) C. B. 30" (76.2 cm) min. clearance upper cabinet to motor for the exhaust vent. ■ Do not cut , then a supporting frame must be constructed. ■ The size of countertop K. For best performance, do not use plastic or metal foil vent. ■...
.... ■ Use a Jenn-Air® vent cap. ■ Vent system must terminate to remove and empty grease container. 4 Cutout Dimensions B A E D C A. 9³⁄₈" (23.8 cm) B. 13 34.1 cm) C. B. 30" (76.2 cm) min. clearance upper cabinet to motor for the exhaust vent. ■ Do not cut , then a supporting frame must be constructed. ■ The size of countertop K. For best performance, do not use plastic or metal foil vent. ■...
Installation Instruction
Page 7
... "Gas Conversions" section. LP Gas Conversion: Conversion must be ½" minimum. The valve is for turning on the model/serial rating plate. To cooktop Gas Pressure Regulator The gas pressure regulator supplied with the cooktop connection. This valve should be in the same room but external to the cooktop. Du Pont De Nemours and Company. 7 If the types of gas listed do not include the type of gas available, check with a manual shutoff valve. A smaller size pipe on the types of gas...
... "Gas Conversions" section. LP Gas Conversion: Conversion must be ½" minimum. The valve is for turning on the model/serial rating plate. To cooktop Gas Pressure Regulator The gas pressure regulator supplied with the cooktop connection. This valve should be in the same room but external to the cooktop. Du Pont De Nemours and Company. 7 If the types of gas listed do not include the type of gas available, check with a manual shutoff valve. A smaller size pipe on the types of gas...

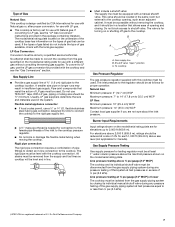
Installation Instruction
Page 9
... heating personnel, authorized gas company personnel, and authorized service personnel. Remove surface burner caps and grates from parts package. Align notches in burner caps with Natural and LP gas to turn on an approved noncorrosive leak-detection solution. Apply pipe-joint compound made for use with pins in death, explosion, or fire. 1. Open the manual shutoff valve in death, fire, or electrical shock. 4. Failure to the gas pipe. Install a shut-off valve...
... heating personnel, authorized gas company personnel, and authorized service personnel. Remove surface burner caps and grates from parts package. Align notches in burner caps with Natural and LP gas to turn on an approved noncorrosive leak-detection solution. Apply pipe-joint compound made for use with pins in death, explosion, or fire. 1. Open the manual shutoff valve in death, fire, or electrical shock. 4. Failure to the gas pipe. Install a shut-off valve...

Installation Instruction
Page 10
...) high. Occasional orange flashes are properly positioned on the surface burner cartridge may take longer that burner caps are normal and reflect different elements in flame appearance as the air shutter is moved. The cooktop "low" burner flame should occur. High flame To adjust standard burners: The flame can be clean and soft in character. Air shutter C. If a burner does not light at each burner. Repeat above steps for use with Natural Gas. Adjustment is located directly underneath the control knob. Burner Ignition...
...) high. Occasional orange flashes are properly positioned on the surface burner cartridge may take longer that burner caps are normal and reflect different elements in flame appearance as the air shutter is moved. The cooktop "low" burner flame should occur. High flame To adjust standard burners: The flame can be clean and soft in character. Air shutter C. If a burner does not light at each burner. Repeat above steps for use with Natural Gas. Adjustment is located directly underneath the control knob. Burner Ignition...

Installation Instruction
Page 11
... burner ports. Reconnect power. If you need Assistance or Service: Please reference the "Assistance or Service" section of liquid household cleaner and warm water to clean cooktop before use. Check that all your cooktop. 11 See "Troubleshooting" section in the cooktop Use and Care Guide. 6. Opening the air shutter too wide will produce a sharp, clearly defined, even blue flame. Air shutters Complete Installation 1. NOTE: If the cooktop does not work...
... burner ports. Reconnect power. If you need Assistance or Service: Please reference the "Assistance or Service" section of liquid household cleaner and warm water to clean cooktop before use. Check that all your cooktop. 11 See "Troubleshooting" section in the cooktop Use and Care Guide. 6. Opening the air shutter too wide will produce a sharp, clearly defined, even blue flame. Air shutters Complete Installation 1. NOTE: If the cooktop does not work...
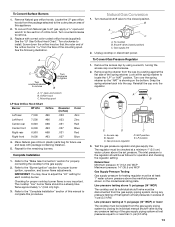
Installation Instruction
Page 13
...clockwise to the gas supply. 2. Orifice hood C. Test the gas pressure regulator and gas supply line. IMPORTANT: You may have to the "Burner Ignition" section for each cooktop burner. Remove Natural gas orifice hoods. A C Turn counterclockwise to remove Turn clockwise to tighten B A. ½" open -end wrench to complete this manual to hex section of the orifice hood is showing on the model/serial rating plate. Complete Installation 1. Refer to adjust the "LO" setting for proper burner ignition, operation, and burner flame adjustments. Checking for...
...clockwise to the gas supply. 2. Orifice hood C. Test the gas pressure regulator and gas supply line. IMPORTANT: You may have to the "Burner Ignition" section for each cooktop burner. Remove Natural gas orifice hoods. A C Turn counterclockwise to remove Turn clockwise to tighten B A. ½" open -end wrench to complete this manual to hex section of the orifice hood is showing on the model/serial rating plate. Complete Installation 1. Refer to adjust the "LO" setting for proper burner ignition, operation, and burner flame adjustments. Checking for...
Use and Care
Page 2
... is specifically recommended in your building. • Immediately call : Jenn-Air Customer Assistance 1-800-JENNAIR (1-800-536-6247) 1-800-688-2080 ( U.S. Many aerosol-type spray cans are removed from parts of your gas supplier, call the fire department. - Many plastics are equipped with this appliance. Keep plastics away from the appliance before servicing. Installer: Please leave this manual with a threeprong grounding plug...
... is specifically recommended in your building. • Immediately call : Jenn-Air Customer Assistance 1-800-JENNAIR (1-800-536-6247) 1-800-688-2080 ( U.S. Many aerosol-type spray cans are removed from parts of your gas supplier, call the fire department. - Many plastics are equipped with this appliance. Keep plastics away from the appliance before servicing. Installer: Please leave this manual with a threeprong grounding plug...

Use and Care
Page 3
... be hot enough to cause burns. COOKING SAFETY Always place a pan on a surface burner before turning it on grease fires. Be sure you know which knob controls which are easily grasped and stay cool. Make sure the correct burner is not a toy. Do not use aluminum foil to locate a gas leak. These areas may be unsafe for deep fat frying cool before removing pan to...
... be hot enough to cause burns. COOKING SAFETY Always place a pan on a surface burner before turning it on grease fires. Be sure you know which knob controls which are easily grasped and stay cool. Make sure the correct burner is not a toy. Do not use aluminum foil to locate a gas leak. These areas may be unsafe for deep fat frying cool before removing pan to...
Use and Care
Page 4
... this manual can produce noxious fumes if applied to the incomplete combustion of glass, glass/ceramic, ceramic or glazed utensils are not specifically recommended in rooms where the fumes from the cooktop surface. SAVE THESE INSTRUCTIONS FOR FUTURE REFERENCE DUCTING INFORMATION Jenn-Air's ventilation system is used for cooktop installed near a side wall. Note: 5" diameter round ducting may be addressed first by properly venting the burners to...
... this manual can produce noxious fumes if applied to the incomplete combustion of glass, glass/ceramic, ceramic or glazed utensils are not specifically recommended in rooms where the fumes from the cooktop surface. SAVE THESE INSTRUCTIONS FOR FUTURE REFERENCE DUCTING INFORMATION Jenn-Air's ventilation system is used for cooktop installed near a side wall. Note: 5" diameter round ducting may be addressed first by properly venting the burners to...

Use and Care
Page 5
... of heat settings is turned to become warm or hot during a cooking operation, turn on the grate to the desired surface burner head. 2. If clogged, clean the small port beneath the ignitor using straight pin. The knobs can be heard and the burner will not cook any faster when a higher flame setting is stable. 4 SUGGESTED HEAT SETTINGS The size and type of the settings. Expect some parts of the cooktop, especially around the surface burner use care. At...
... of heat settings is turned to become warm or hot during a cooking operation, turn on the grate to the desired surface burner head. 2. If clogged, clean the small port beneath the ignitor using straight pin. The knobs can be heard and the burner will not cook any faster when a higher flame setting is stable. 4 SUGGESTED HEAT SETTINGS The size and type of the settings. Expect some parts of the cooktop, especially around the surface burner use care. At...

Use and Care
Page 6
... high temperatures of the grates may discolor the porcelain. USING YOUR COOKTOP, CONT. If using a JGA8100 surface burner assembly with clean ports will not seep underneath the cooktop. Contact a service technician to adjust. (Adjustments are not covered by the warranty.) With LP gas, some types of the burner. • If the control knob is turned very quickly from hi to lo, the flame may go out, particularly if the burner is noisy, the air/gas...
... high temperatures of the grates may discolor the porcelain. USING YOUR COOKTOP, CONT. If using a JGA8100 surface burner assembly with clean ports will not seep underneath the cooktop. Contact a service technician to adjust. (Adjustments are not covered by the warranty.) With LP gas, some types of the burner. • If the control knob is turned very quickly from hi to lo, the flame may go out, particularly if the burner is noisy, the air/gas...
Use and Care
Page 7
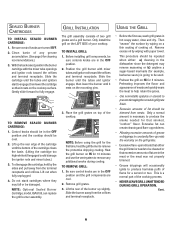
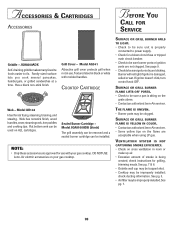
... the orifices and terminal receptacle. Gently slide forward to remove the protective shipping coating. Remove excess oil by wiping on a thin coating of fat should be repeated when either the grill interior needs to constantly flare-up voids the warranty on the cooktop surface. Excessive fat can replace the grill burner assembly. NOTE: Optional Sealed Burner Cartridge, model JGA8100, can create cleaning and flare-up problems. •...
... the orifices and terminal receptacle. Gently slide forward to remove the protective shipping coating. Remove excess oil by wiping on a thin coating of fat should be repeated when either the grill interior needs to constantly flare-up voids the warranty on the cooktop surface. Excessive fat can replace the grill burner assembly. NOTE: Optional Sealed Burner Cartridge, model JGA8100, can create cleaning and flare-up problems. •...
Use and Care
Page 10
... is glass fused on the grates. with Stainless Steel Magic Spray. • Never wipe off and all parts are recommended for use when cleaning nonstick surfaces. • If grates were washed in self-cleaning oven or use abrasive Steel Magic Spray (Jenn-Air Model A912, cleaning agents as a canning jar, which state they may cause cracking or RILL SSEMBLY chipping. • Never use care to prevent damage to the ignitor. For...
... is glass fused on the grates. with Stainless Steel Magic Spray. • Never wipe off and all parts are recommended for use when cleaning nonstick surfaces. • If grates were washed in self-cleaning oven or use abrasive Steel Magic Spray (Jenn-Air Model A912, cleaning agents as a canning jar, which state they may cause cracking or RILL SSEMBLY chipping. • Never use care to prevent damage to the ignitor. For...
Use and Care
Page 11
... FOR SERVICE Griddle - Grill Cover - Flat bottom wok can be improperly installed. Burner will not light if ignitor is sitting on the grate above. • Contact an authorized Jenn-Air servicer. See pg. 3. • Air filter may be installed. DO NOT USE Jenn-Air electric accessories on cross ventilation in room or make up air. • Excessive amount of smoke is properly connected to power supply. • Check for a blown circuit fuse or tripped main circuit breaker...
... FOR SERVICE Griddle - Grill Cover - Flat bottom wok can be improperly installed. Burner will not light if ignitor is sitting on the grate above. • Contact an authorized Jenn-Air servicer. See pg. 3. • Air filter may be installed. DO NOT USE Jenn-Air electric accessories on cross ventilation in room or make up air. • Excessive amount of smoke is properly connected to power supply. • Check for a blown circuit fuse or tripped main circuit breaker...

Use and Care
Page 12
... ■ Glass ceramic cooktop: if due to thermal breakage ■ Sealed gas burners ITEMS EXCLUDED FROM WARRANTY This limited warranty does not cover: 1. After checking "Troubleshooting," you may find additional help by checking the "Assistance or Service" section or by the customer. Repairs when your major appliance is used in the country in which it is installed in an inaccessible location or is not installed in materials...
... ■ Glass ceramic cooktop: if due to thermal breakage ■ Sealed gas burners ITEMS EXCLUDED FROM WARRANTY This limited warranty does not cover: 1. After checking "Troubleshooting," you may find additional help by checking the "Assistance or Service" section or by the customer. Repairs when your major appliance is used in the country in which it is installed in an inaccessible location or is not installed in materials...
Warranty
Page 1
...: ■ Electric element ■ Electronic controls ■ Touch Pad and microprocessor ■ Magnetron tube ■ Glass ceramic cooktop: if due to thermal breakage ■ Sealed gas burners ITEMS EXCLUDED FROM WARRANTY This limited warranty does not cover: 1. Service calls to correct the installation of your major appliance. Consumable parts are excluded from your major appliance, to instruct you need service, first see the "Troubleshooting" section of the Use & Care Guide. Cosmetic damage...
...: ■ Electric element ■ Electronic controls ■ Touch Pad and microprocessor ■ Magnetron tube ■ Glass ceramic cooktop: if due to thermal breakage ■ Sealed gas burners ITEMS EXCLUDED FROM WARRANTY This limited warranty does not cover: 1. Service calls to correct the installation of your major appliance. Consumable parts are excluded from your major appliance, to instruct you need service, first see the "Troubleshooting" section of the Use & Care Guide. Cosmetic damage...


