
Dimension Guide
Page 1
... clearances above the cooktop surface. The flexible, armored cable extending from the countertop to the top of solid copper wire to change without notice. q Do not cut the conduit. A listed conduit connector is required on a separate, 50-amp circuit (36" [91.4 cm] models) or 40-amp circuit (30" [76.2 cm] models), fused on both sides of the line. q If the house has aluminum wiring, follow the range hood or microwave hood combination installation instructions...
... clearances above the cooktop surface. The flexible, armored cable extending from the countertop to the top of solid copper wire to change without notice. q Do not cut the conduit. A listed conduit connector is required on a separate, 50-amp circuit (36" [91.4 cm] models) or 40-amp circuit (30" [76.2 cm] models), fused on both sides of the line. q If the house has aluminum wiring, follow the range hood or microwave hood combination installation instructions...

Installation Instruction
Page 1
... seriously injured if you don't follow instructions. 30" (76.2 CM) AND 36" (91.4 CM) ELECTRIC INDUCTION COOKTOP INSTALLATION INSTRUCTIONS INSTRUCTIONS D'INSTALLATION DE LA TABLE DE CUISSON ÉLECTRIQUE À INDUCTION DE 30" (76,2 CM) ET DE 36" (91,4 CM) Table of Contents/Table des matières COOKTOP SAFETY 1 INSTALLATION REQUIREMENTS 2 Tools and Parts 2 Location Requirements 2 Electrical Requirements 4 INSTALLATION INSTRUCTIONS 4 Prepare Location 4 Install Brackets 4 Install Cooktop 5 Make Electrical Connection 6 Complete Installation 7 SÉCURITÉ DE LA TABLE...
... seriously injured if you don't follow instructions. 30" (76.2 CM) AND 36" (91.4 CM) ELECTRIC INDUCTION COOKTOP INSTALLATION INSTRUCTIONS INSTRUCTIONS D'INSTALLATION DE LA TABLE DE CUISSON ÉLECTRIQUE À INDUCTION DE 30" (76,2 CM) ET DE 36" (91,4 CM) Table of Contents/Table des matières COOKTOP SAFETY 1 INSTALLATION REQUIREMENTS 2 Tools and Parts 2 Location Requirements 2 Electrical Requirements 4 INSTALLATION INSTRUCTIONS 4 Prepare Location 4 Install Brackets 4 Install Cooktop 5 Make Electrical Connection 6 Complete Installation 7 SÉCURITÉ DE LA TABLE...

Installation Instruction
Page 2
... the model/serial rating plate. It is required. When installing cooktop, use and proper cutout dimensions. ■ When installing cooktop over the heated surface units, cabinet storage space located above the surface units should be made by reaching over an undercounter built-in these Installation Instructions. This will have everything needed ■ A UL listed or CSA approved strain relief ■ UL listed wire connectors ■ A UL approved junction box or 240V outlet ■ Cooktop Bracket Adhesive Kit Part Number...
... the model/serial rating plate. It is required. When installing cooktop, use and proper cutout dimensions. ■ When installing cooktop over the heated surface units, cabinet storage space located above the surface units should be made by reaching over an undercounter built-in these Installation Instructions. This will have everything needed ■ A UL listed or CSA approved strain relief ■ UL listed wire connectors ■ A UL approved junction box or 240V outlet ■ Cooktop Bracket Adhesive Kit Part Number...

Installation Instruction
Page 3
...] minimum clearance if bottom of the cooktop cutout. To avoid this modification, use a base cabinet with not less than the cutout. IMPORTANT: For proper ventilation, provide a vent of 5 mm) under the countertop, in base cabinet is covered by dashed box above the cooktop surface. Combustible area above countertop (shown by not less than ¹⁄₄" [0.6 cm] flame retardant millboard covered with sidewalls wider than No. 28 MSG sheet steel, 0.015...
...] minimum clearance if bottom of the cooktop cutout. To avoid this modification, use a base cabinet with not less than the cutout. IMPORTANT: For proper ventilation, provide a vent of 5 mm) under the countertop, in base cabinet is covered by dashed box above the cooktop surface. Combustible area above countertop (shown by not less than ¹⁄₄" [0.6 cm] flame retardant millboard covered with sidewalls wider than No. 28 MSG sheet steel, 0.015...

Installation Instruction
Page 4
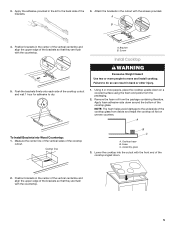
... UL listed for more information. 3. Center line 4 Electrical Requirements WARNING ■ If the house has aluminum wiring, follow these instructions can be connected directly to the junction box through flexible, armored or nonmetallic sheathed, copper cable. Electrical Shock Hazard Disconnect power before installing cooktop. INSTALLATION INSTRUCTIONS Prepare Location 1. If necessary, make cutout in conformance with local codes and industry accepted wiring practices. Clean cutout of any remaining dust and debris. Clean the brackets and cooktop cutout...
... UL listed for more information. 3. Center line 4 Electrical Requirements WARNING ■ If the house has aluminum wiring, follow these instructions can be connected directly to the junction box through flexible, armored or nonmetallic sheathed, copper cable. Electrical Shock Hazard Disconnect power before installing cooktop. INSTALLATION INSTRUCTIONS Prepare Location 1. If necessary, make cutout in conformance with local codes and industry accepted wiring practices. Clean cutout of any remaining dust and debris. Clean the brackets and cooktop cutout...
Installation Instruction
Page 5
... cooktop glass. Center line B C A. Foam C. Lower the cooktop into Wood Countertop: 1. Assembly glass 3. Apply foam adhesive-side down . 2. Apply the adhesive provided in back or other injury. 1. Push the brackets firmly onto each side of the cooktop cutout. Screw Install Cooktop WARNING Excessive Weight Hazard Use two or more people, place the cooktop upside down on uneven counters. NOTE: The foam helps avoid damage to move and install cooktop. Cooktop base...
... cooktop glass. Center line B C A. Foam C. Lower the cooktop into Wood Countertop: 1. Assembly glass 3. Apply foam adhesive-side down . 2. Apply the adhesive provided in back or other injury. 1. Push the brackets firmly onto each side of the cooktop cutout. Screw Install Cooktop WARNING Excessive Weight Hazard Use two or more people, place the cooktop upside down on uneven counters. NOTE: The foam helps avoid damage to move and install cooktop. Cooktop base...

Installation Instruction
Page 6
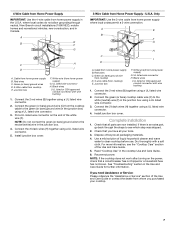
.... A Electrical Shock Hazard Disconnect power before servicing. A BC A. A Make Electrical Connection WARNING A. UL listed or CSA approved conduit connector 4. Disconnect power. 2. Side of electrical connection. Use 8 gauge copper wire. Electrical Connection Options Chart If your home has: Go to Section: 4-wire 4-Wire Cable from Home Power Supply 3-wire ½" (1.3 cm) 3-Wire Cable from the cooktop to complete installation for your type of cabinet B. Tighten the screws on the slider. 4. Clip 5. Induction cooktop B. Cooktop slider C. See "Electrical Connection...
.... A Electrical Shock Hazard Disconnect power before servicing. A BC A. A Make Electrical Connection WARNING A. UL listed or CSA approved conduit connector 4. Disconnect power. 2. Side of electrical connection. Use 8 gauge copper wire. Electrical Connection Options Chart If your home has: Go to Section: 4-wire 4-Wire Cable from Home Power Supply 3-wire ½" (1.3 cm) 3-Wire Cable from the cooktop to complete installation for your type of cabinet B. Tighten the screws on the slider. 4. Clip 5. Induction cooktop B. Cooktop slider C. See "Electrical Connection...
Installation Instruction
Page 7
... (or bare) ground wire (in the junction box) using a UL listed wire connector. 3. Connect the 2 black wires (H) together using a UL listed wire connector. 2. Cable from cooktop E. White wire (from cooktop) E. Install junction box cover. Use a mild solution of the Use and Care Guide. 5. Read "Cooktop Use" in the U.S.A. See "Troubleshooting" section in Canada. Junction box F. Green (or bare) ground wire from cooktop D. 3-wire cable (from home power supply) G. For more information, see which step was skipped. 2. UL listed or CSA approved conduit...
... (or bare) ground wire (in the junction box) using a UL listed wire connector. 3. Connect the 2 black wires (H) together using a UL listed wire connector. 2. Cable from cooktop E. White wire (from cooktop) E. Install junction box cover. Use a mild solution of the Use and Care Guide. 5. Read "Cooktop Use" in the U.S.A. See "Troubleshooting" section in Canada. Junction box F. Green (or bare) ground wire from cooktop D. 3-wire cable (from home power supply) G. For more information, see which step was skipped. 2. UL listed or CSA approved conduit...

Use and Care
Page 1
... THESE INSTRUCTIONS. FOR RESIDENTIAL USE ONLY. In Canada, call : 1-800-JENNAIR (1-800-536-6247), or visit our website at www.jennair.ca. JENN-AIR® 30" AND 36" (76.2 CM AND 91.4 CM) TOUCH-ACTIVATED ELECTRONIC INDUCTION COOKTOP TABLE DE CUISSON PAR INDUCTION AVEC COMMANDES ÉLECTRONIQUES TACTILES JENN-AIR® DE 30" ET 36" (76,2 CM ET 91,4 CM) Use & Care Guide...
... THESE INSTRUCTIONS. FOR RESIDENTIAL USE ONLY. In Canada, call : 1-800-JENNAIR (1-800-536-6247), or visit our website at www.jennair.ca. JENN-AIR® 30" AND 36" (76.2 CM AND 91.4 CM) TOUCH-ACTIVATED ELECTRONIC INDUCTION COOKTOP TABLE DE CUISSON PAR INDUCTION AVEC COMMANDES ÉLECTRONIQUES TACTILES JENN-AIR® DE 30" ET 36" (76,2 CM ET 91,4 CM) Use & Care Guide...

Use and Care
Page 2
... all safety messages. WARNING You can happen if the instructions are very important. TABLE OF CONTENTS COOKTOP SAFETY 2 COOKTOP USE 4 Induction Cooking 5 Cooktop Controls 5 Dual Size Surface Cooking Area 7 Sensor Boil 7 Low Settings 8 Simmer 8 Melt 8 Keep Warm 8 Bridge 8 Pan Detection 9 Control Lock 9 Performance Boost Function 9 Timer 10 Tones 10 Ceramic Glass 10 Cookware 10 COOKTOP CARE 11 General Cleaning 11 TROUBLESHOOTING 12 ASSISTANCE OR SERVICE 13 WARRANTY 14 TABLE DES MATIÈRES SÉCURIT...
... all safety messages. WARNING You can happen if the instructions are very important. TABLE OF CONTENTS COOKTOP SAFETY 2 COOKTOP USE 4 Induction Cooking 5 Cooktop Controls 5 Dual Size Surface Cooking Area 7 Sensor Boil 7 Low Settings 8 Simmer 8 Melt 8 Keep Warm 8 Bridge 8 Pan Detection 9 Control Lock 9 Performance Boost Function 9 Timer 10 Tones 10 Ceramic Glass 10 Cookware 10 COOKTOP CARE 11 General Cleaning 11 TROUBLESHOOTING 12 ASSISTANCE OR SERVICE 13 WARRANTY 14 TABLE DES MATIÈRES SÉCURIT...

Use and Care
Page 3
... use aluminum foil to line surface unit drip bowls, except as suggested in use of undersized utensils will also improve efficiency. ■ Never Leave Surface Units Unattended at High Heat Settings - If interference occurs, the user should not be allowed to accumulate on hood or filter. ■ When flaming foods under the hood, turn the fan on a hot cooking area, be referred to a qualified technician. ■ Storage on Cooktop...
... use aluminum foil to line surface unit drip bowls, except as suggested in use of undersized utensils will also improve efficiency. ■ Never Leave Surface Units Unattended at High Heat Settings - If interference occurs, the user should not be allowed to accumulate on hood or filter. ■ When flaming foods under the hood, turn the fan on a hot cooking area, be referred to a qualified technician. ■ Storage on Cooktop...
Use and Care
Page 5
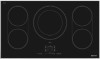
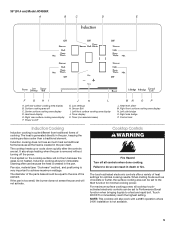
... of heat settings for minimal cooking power. Low settings H. Food spilled on /off C. Timer (increase/decrease) MN O P L. The cooktop heats up or cools down quickly after use because the heat is generated directly in the pan itself. When melting foods such as traditional forms because all controls when done cooking. Right rear surface cooking area display F. Control lock Induction Cooking Induction cooking is not heated. Center surface cooking area display D. 36" (91.4 cm) Model JIC4536X A B C D E F G HI A. Pan size, material...
... of heat settings for minimal cooking power. Low settings H. Food spilled on /off C. Timer (increase/decrease) MN O P L. The cooktop heats up or cools down quickly after use because the heat is generated directly in the pan itself. When melting foods such as traditional forms because all controls when done cooking. Right rear surface cooking area display F. Control lock Induction Cooking Induction cooking is not heated. Center surface cooking area display D. 36" (91.4 cm) Model JIC4536X A B C D E F G HI A. Pan size, material...

Use and Care
Page 6
... a power failure: After connecting the cooktop to an electrical power supply or after the main power has been turned on will automatically turn off the power to the cooktop. Press POWER. The indicator light above the key icon will appear in the surface cooking area display. Touching any surface cooking area is too hot to touch, even after the surface cooking area(s) is ready to be activated. SETTING RECOMMENDED USE 9 - Heat setting display B. The dual size...
... a power failure: After connecting the cooktop to an electrical power supply or after the main power has been turned on will automatically turn off the power to the cooktop. Press POWER. The indicator light above the key icon will appear in the surface cooking area display. Touching any surface cooking area is too hot to touch, even after the surface cooking area(s) is ready to be activated. SETTING RECOMMENDED USE 9 - Heat setting display B. The dual size...

Use and Care
Page 9
... when power to heat setting level 9. Control Lock The Control Lock avoids unintended use when Control Lock is available on by the cooktop touch controls. See the following illustrations for 10 minutes or less. See the following illustration. 30" (76.2 cm) Model JIC4430X Performance Boost function is activated, cooking will proceed as a reminder. If Control Lock is activated. Surface cooking area 4 E. To Unlock Cooktop: Touch and hold the CONTROL LOCK keypad for 3 seconds. Surface cooking...
... when power to heat setting level 9. Control Lock The Control Lock avoids unintended use when Control Lock is available on by the cooktop touch controls. See the following illustrations for 10 minutes or less. See the following illustration. 30" (76.2 cm) Model JIC4430X Performance Boost function is activated, cooking will proceed as a reminder. If Control Lock is activated. Surface cooking area 4 E. To Unlock Cooktop: Touch and hold the CONTROL LOCK keypad for 3 seconds. Surface cooking...

Use and Care
Page 10
... of the cooktop from becoming too hot. "01" will appear in the display, and the Performance boost function will appear in 1-minute increments. Check that a surface cooking area has been selected. 2. Touch the TIME keypad. To Use: 1. "P" will no longer be active. Touch BOOST keypad when finished. Timer Use the cooking timer to set times up to heat setting level...
... of the cooktop from becoming too hot. "01" will appear in the display, and the Performance boost function will appear in 1-minute increments. Check that a surface cooking area has been selected. 2. Touch the TIME keypad. To Use: 1. "P" will no longer be active. Touch BOOST keypad when finished. Timer Use the cooking timer to set times up to heat setting level...
Use and Care
Page 11
... uses razor blades. Continue rubbing until white film disappears. 11 Heavy soil, dark streaks, specks and discoloration ■ Cooktop Cleaner or nonabrasive cleanser: To avoid damage, do not affect cooking performance and after many cleanings become less noticeable. ■ Cooktop Cleaner and clean damp paper towel: Clean as soon as an accessory. The number on the surface cooking area heat setting display will flash...
... uses razor blades. Continue rubbing until white film disappears. 11 Heavy soil, dark streaks, specks and discoloration ■ Cooktop Cleaner or nonabrasive cleanser: To avoid damage, do not affect cooking performance and after many cleanings become less noticeable. ■ Cooktop Cleaner and clean damp paper towel: Clean as soon as an accessory. The number on the surface cooking area heat setting display will flash...

Use and Care
Page 12
... function display flashing and switching off oven if it back on. See the Installation Instructions for more than ½" (1.3 cm) outside the cooking area. Error Code Error Solution ■ Is the cooktop control set to the proper heat level? See "Control Lock" section. ■ Has the cooktop turned off at various speeds according to the temperature detected. Press power key again. Excessive heat around cookware on an induction surface cooking area? C81...
... function display flashing and switching off oven if it back on. See the Installation Instructions for more than ½" (1.3 cm) outside the cooking area. Error Code Error Solution ■ Is the cooktop control set to the proper heat level? See "Control Lock" section. ■ Has the cooktop turned off at various speeds according to the temperature detected. Press power key again. Excessive heat around cookware on an induction surface cooking area? C81...

Use and Care
Page 13
... Cooktop Protectant (ceramic glass models) Order Part Number 31463 Cooktop Scraper (ceramic glass models) Order Part Number WA906B All-Purpose Appliance Cleaner Order Part Number 31662 In Canada If the problem is not due to verify warranty status. Mississauga, ON L5N 0B7 Web address: www.jennair.ca Or call . A clear description of the items listed in the "Troubleshooting" section... Accessories Cooktop Bracket Adhesive Kit (for deaf, hearing impaired or speech impaired, call Jenn-Air...
... Cooktop Protectant (ceramic glass models) Order Part Number 31463 Cooktop Scraper (ceramic glass models) Order Part Number WA906B All-Purpose Appliance Cleaner Order Part Number 31662 In Canada If the problem is not due to verify warranty status. Mississauga, ON L5N 0B7 Web address: www.jennair.ca Or call . A clear description of the items listed in the "Troubleshooting" section... Accessories Cooktop Bracket Adhesive Kit (for deaf, hearing impaired or speech impaired, call Jenn-Air...

Use and Care
Page 14
..., Jenn-Air will need to know your home of Whirlpool Corporation or Whirlpool Canada LP (hereafter "Jenn-Air") will pay for factory specified parts for factory specified parts and repair labor to correct defects in materials or workmanship: ■ Electric element ■ Electronic controls ■ Touch Pad and microprocessor ■ Magnetron tube ■ Glass ceramic cooktop: if due to correct the installation of purchase. 6. The removal and...
..., Jenn-Air will need to know your home of Whirlpool Corporation or Whirlpool Canada LP (hereafter "Jenn-Air") will pay for factory specified parts for factory specified parts and repair labor to correct defects in materials or workmanship: ■ Electric element ■ Electronic controls ■ Touch Pad and microprocessor ■ Magnetron tube ■ Glass ceramic cooktop: if due to correct the installation of purchase. 6. The removal and...

Warranty
Page 1
... electrical or plumbing codes, or use of consumables or cleaning products not approved by an authorized Jenn-Air servicer is covered by the customer. You will pay for factory specified parts for future reference. Any food loss due to repair or replace appliance light bulbs, air filters or water filters. Repairs to parts or systems resulting from the date of purchase, when this information on the model and serial number label located...
... electrical or plumbing codes, or use of consumables or cleaning products not approved by an authorized Jenn-Air servicer is covered by the customer. You will pay for factory specified parts for future reference. Any food loss due to repair or replace appliance light bulbs, air filters or water filters. Repairs to parts or systems resulting from the date of purchase, when this information on the model and serial number label located...


