
Dimension Guide
Page 1
..." (76.2 CM) AND 36" (91.4 CM) ELECTRIC INDUCTION COOKTOP PRODUCT MODEL NUMBERS JIC4430X JIC4536X ELECTRICAL REQUIREMENTS: Before You Make the Electrical Connection: To properly install your cooktop, you must determine the type of solid copper wire to the pigtail leads. 2. ... the cooktop base. q The cooktop should be moved if servicing becomes necessary in base cabinet is required. PRODUCT DIMENSIONS CABINET DIMENSIONS IMPORTANT: If installing a range hood or microwave hood combination above the range, follow the procedure below: 1. Model JIC4430 A. 21 54.1 cm) B. 30 77...
..." (76.2 CM) AND 36" (91.4 CM) ELECTRIC INDUCTION COOKTOP PRODUCT MODEL NUMBERS JIC4430X JIC4536X ELECTRICAL REQUIREMENTS: Before You Make the Electrical Connection: To properly install your cooktop, you must determine the type of solid copper wire to the pigtail leads. 2. ... the cooktop base. q The cooktop should be moved if servicing becomes necessary in base cabinet is required. PRODUCT DIMENSIONS CABINET DIMENSIONS IMPORTANT: If installing a range hood or microwave hood combination above the range, follow the procedure below: 1. Model JIC4430 A. 21 54.1 cm) B. 30 77...

Installation Instruction
Page 1
... can happen if the instructions are very important. POUR UTILISATION RÉSIDENTIELLE UNIQUEMENT. 501961902036B 30" (76.2 CM) AND 36" (91.4 CM) ELECTRIC INDUCTION COOKTOP INSTALLATION INSTRUCTIONS INSTRUCTIONS D'INSTALLATION DE LA TABLE DE CUISSON ÉLECTRIQUE À INDUCTION DE 30" (76,2 CM) ET DE 36" (91,4 CM) Table of Contents/Table des mati...
... can happen if the instructions are very important. POUR UTILISATION RÉSIDENTIELLE UNIQUEMENT. 501961902036B 30" (76.2 CM) AND 36" (91.4 CM) ELECTRIC INDUCTION COOKTOP INSTALLATION INSTRUCTIONS INSTRUCTIONS D'INSTALLATION DE LA TABLE DE CUISSON ÉLECTRIQUE À INDUCTION DE 30" (76,2 CM) ET DE 36" (91,4 CM) Table of Contents/Table des mati...

Installation Instruction
Page 2
...9632; UL listed wire connectors ■ A UL approved junction box or 240V outlet ■ Cooktop Bracket Adhesive Kit Part Number W10310006 if installing the cooktop into a marble countertop. Given dimensions are given with any tools listed here. See "Electrical Requirements." If cabinet storage is to ... approval label located on the underside of the oven. Contact your dealer to confirm that your oven is the responsibility of the installer to remove if future servicing becomes necessary. ■ Use the countertop opening dimensions that your cooktop is located on the top ...
...9632; UL listed wire connectors ■ A UL approved junction box or 240V outlet ■ Cooktop Bracket Adhesive Kit Part Number W10310006 if installing the cooktop into a marble countertop. Given dimensions are given with any tools listed here. See "Electrical Requirements." If cabinet storage is to ... approval label located on the underside of the oven. Contact your dealer to confirm that your oven is the responsibility of the installer to remove if future servicing becomes necessary. ■ Use the countertop opening dimensions that your cooktop is located on the top ...

Installation Instruction
Page 3
... 92.0 cm) C. 3¹⁄₈" (8 cm) Cabinet Dimensions IMPORTANT: If installing a range hood or microwave hood combination above the range, follow the range hood or microwave hood combination installation instructions for dimensional clearances above countertop (shown by not less than ¹⁄₄... horizontal clearances to cooktop H. See the following illustration. 5.0 mm) M NOTES: After you make the countertop cutout, some installations may require notching down the base cabinet side walls to nearest left and right side combustible surface above cooktop L. 1" (2.5 ...
... 92.0 cm) C. 3¹⁄₈" (8 cm) Cabinet Dimensions IMPORTANT: If installing a range hood or microwave hood combination above the range, follow the range hood or microwave hood combination installation instructions for dimensional clearances above countertop (shown by not less than ¹⁄₄... horizontal clearances to cooktop H. See the following illustration. 5.0 mm) M NOTES: After you make the countertop cutout, some installations may require notching down the base cabinet side walls to nearest left and right side combustible surface above cooktop L. 1" (2.5 ...

Installation Instruction
Page 4
... the cooktop. Check with local codes. Make sure that the ground path and wire gauge are in accordance with a qualified electrical installer if you will be connected directly to follow the procedure below: 1. Decide on both sides of any remaining dust and debris. ... wire using and follow the instructions provided for it is not recommended to the pigtail leads. 2. Electrical Shock Hazard Disconnect power before installing cooktop. See "Location Requirements" section for the cooktop. Electrical Requirements WARNING ■ If the house has aluminum wiring, follow these ...
... the cooktop. Check with local codes. Make sure that the ground path and wire gauge are in accordance with a qualified electrical installer if you will be connected directly to follow the procedure below: 1. Decide on both sides of any remaining dust and debris. ... wire using and follow the instructions provided for it is not recommended to the pigtail leads. 2. Electrical Shock Hazard Disconnect power before installing cooktop. See "Location Requirements" section for the cooktop. Electrical Requirements WARNING ■ If the house has aluminum wiring, follow these ...
Installation Instruction
Page 5
... the center line of the vertical sides of the cooktop cutout and wait 1 hour for adhesive to dry. 1 h A. Failure to move and install cooktop. Lower the cooktop into Wood Countertop: 1. Apply the adhesive provided in the cutout with the countertop. 5 Bracket B. NOTE: The foam helps... the package containing literature. Center line B C A. 3. Attach the brackets in the kit to the underside of the brackets. 3. Screw Install Cooktop WARNING Excessive Weight Hazard Use two or more people, place the cooktop upside down on uneven counters. Using 2 or more people to ...
... the center line of the vertical sides of the cooktop cutout and wait 1 hour for adhesive to dry. 1 h A. Failure to move and install cooktop. Lower the cooktop into Wood Countertop: 1. Apply the adhesive provided in the cutout with the countertop. 5 Bracket B. NOTE: The foam helps... the package containing literature. Center line B C A. 3. Attach the brackets in the kit to the underside of the brackets. 3. Screw Install Cooktop WARNING Excessive Weight Hazard Use two or more people, place the cooktop upside down on uneven counters. Using 2 or more people to ...

Installation Instruction
Page 6
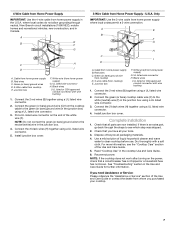
...sure that the clips on the slider. A Electrical Shock Hazard Disconnect power before servicing. Failure to snap the cooktop clips onto the brackets installed in death, fire, or electrical shock. A BC A. Cooktop cutout 6. UL listed or CSA approved conduit connector 4. Electrically ground cooktop. ..., green (or bare) ground wire. 1. Cooktop slider C. On the underside of cabinet B. See "Electrical Connection Options Chart" to complete installation for your home has: Go to the junction box using a UL listed or CSA approved conduit connector. Push the cooktop slider toward the ...
...sure that the clips on the slider. A Electrical Shock Hazard Disconnect power before servicing. Failure to snap the cooktop clips onto the brackets installed in death, fire, or electrical shock. A BC A. Cooktop cutout 6. UL listed or CSA approved conduit connector 4. Electrically ground cooktop. ..., green (or bare) ground wire. 1. Cooktop slider C. On the underside of cabinet B. See "Electrical Connection Options Chart" to complete installation for your home has: Go to the junction box using a UL listed or CSA approved conduit connector. Push the cooktop slider toward the ...
Installation Instruction
Page 7
...connector H. NOTE: Do not connect the green (or bare) ground wire to the neutral (white) wire in the U.S.A. Install junction box cover. 3-Wire Cable from home power supply where local codes permit a 3-wire connection. U.S.A. Red wires C. UL listed wire connector... the 2 red wires (B) together using a UL listed wire connector. 4. Connect the green (or bare) ground wire (C) from whom you have all parts are now installed. Put a UL listed wire connector on the power, check that all your cooktop. 7 Connect the 2 black wires (H) together using a UL listed wire connector. 3....
...connector H. NOTE: Do not connect the green (or bare) ground wire to the neutral (white) wire in the U.S.A. Install junction box cover. 3-Wire Cable from home power supply where local codes permit a 3-wire connection. U.S.A. Red wires C. UL listed wire connector... the 2 red wires (B) together using a UL listed wire connector. 4. Connect the green (or bare) ground wire (C) from whom you have all parts are now installed. Put a UL listed wire connector on the power, check that all your cooktop. 7 Connect the 2 black wires (H) together using a UL listed wire connector. 3....

Use and Care
Page 1
..." AND 36" (76.2 CM AND 91.4 CM) TOUCH-ACTIVATED ELECTRONIC INDUCTION COOKTOP TABLE DE CUISSON PAR INDUCTION AVEC COMMANDES ÉLECTRONIQUES TACTILES JENN-AIR® DE 30" ET 36" (76,2 CM ET 91,4 CM) Use & Care Guide For questions about features, operation/performance, parts, accessories, or service in the U.S.A., ... of Contents/Table des matières 2 IMPORTANT: READ AND SAVE THESE INSTRUCTIONS. FOR RESIDENTIAL USE ONLY. Guide d'utilisation et d'entretien Au Canada, pour assistance, installation ou service, composez le 1-800-807-6777 ou visitez notre site web à www.jennair.ca.
..." AND 36" (76.2 CM AND 91.4 CM) TOUCH-ACTIVATED ELECTRONIC INDUCTION COOKTOP TABLE DE CUISSON PAR INDUCTION AVEC COMMANDES ÉLECTRONIQUES TACTILES JENN-AIR® DE 30" ET 36" (76,2 CM ET 91,4 CM) Use & Care Guide For questions about features, operation/performance, parts, accessories, or service in the U.S.A., ... of Contents/Table des matières 2 IMPORTANT: READ AND SAVE THESE INSTRUCTIONS. FOR RESIDENTIAL USE ONLY. Guide d'utilisation et d'entretien Au Canada, pour assistance, installation ou service, composez le 1-800-807-6777 ou visitez notre site web à www.jennair.ca.

Use and Care
Page 3
...with the utensil, the handle of a utensil should never be left alone or unattended in area where cooktop is in residential installation. SAVE THESE INSTRUCTIONS This induction cooktop generates and uses ISM frequency energy that it is turned inward, and does not extend ...break, cleaning solutions and spillovers may result in the manual. If interference occurs, the user should never be seriously injured. ■ Proper Installation - Connecting the receiver into a different outlet. NOTE: People with other devices in use. The electromagnetic field may become hot enough to ...
...with the utensil, the handle of a utensil should never be left alone or unattended in area where cooktop is in residential installation. SAVE THESE INSTRUCTIONS This induction cooktop generates and uses ISM frequency energy that it is turned inward, and does not extend ...break, cleaning solutions and spillovers may result in the manual. If interference occurs, the user should never be seriously injured. ■ Proper Installation - Connecting the receiver into a different outlet. NOTE: People with other devices in use. The electromagnetic field may become hot enough to ...
Use and Care
Page 5
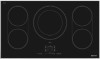
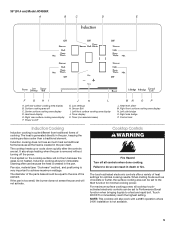
... Left front surface cooking area display J. Control lock Induction Cooking Induction cooking is not available. 5 Food spilled on /off C. 36" (91.4 cm) Model JIC4536X A B C D E F G HI A. Heat level slider M. If the pan is too small, the burner does not sense the pan and will not... burn because the glass is not heated. NOTE: This cooktop will also work with a 208V operation where 240V installation is quite different from traditional forms of heat settings for minimal cooking power. Right rear surface cooking area display F. Pan size, material...
... Left front surface cooking area display J. Control lock Induction Cooking Induction cooking is not available. 5 Food spilled on /off C. 36" (91.4 cm) Model JIC4536X A B C D E F G HI A. Heat level slider M. If the pan is too small, the burner does not sense the pan and will not... burn because the glass is not heated. NOTE: This cooktop will also work with a 208V operation where 240V installation is quite different from traditional forms of heat settings for minimal cooking power. Right rear surface cooking area display F. Pan size, material...

Use and Care
Page 12
...sec. Press power key again. F42, F43 The power voltage is turned down in the event that is caused by itself? See the Installation Instructions. Display shows messages ■ Is the display flashing when you place a saucepan on the surface cooking area. Center the saucepan on... ■ Is there a low humming? The Performance boost function operates the surface cooking area with a fan that runs at high power. See the Installation Instructions for it to the cookware. See "Assistance or Service" section. ■ Is the display flashing "F" or "C" and numbers? If this is...
...sec. Press power key again. F42, F43 The power voltage is turned down in the event that is caused by itself? See the Installation Instructions. Display shows messages ■ Is the display flashing when you place a saucepan on the surface cooking area. Center the saucepan on... ■ Is there a low humming? The Performance boost function operates the surface cooking area with a fan that runs at high power. See the Installation Instructions for it to the cookware. See "Assistance or Service" section. ■ Is the display flashing "F" or "C" and numbers? If this is...

Use and Care
Page 13
...ASSISTANCE OR SERVICE Before calling for marble countertop installations only) Order Part Number W10310006 In the U.S.A. Be sure to locate an authorized service company. Your name, address and daytime telephone number. 2. Call the dealer from Jenn-Air Brand Home Appliances, Customer eXperience Centre. 13...instructions below. When calling, please know the purchase date and the complete model and serial number of your problem, write to : Jenn-Air Brand Home Appliances Customer eXperience Centre 200 - 6750 Century Ave. Mississauga, ON L5N 0B7 Web address: www.jennair.ca Or ...
...ASSISTANCE OR SERVICE Before calling for marble countertop installations only) Order Part Number W10310006 In the U.S.A. Be sure to locate an authorized service company. Your name, address and daytime telephone number. 2. Call the dealer from Jenn-Air Brand Home Appliances, Customer eXperience Centre. 13...instructions below. When calling, please know the purchase date and the complete model and serial number of your problem, write to : Jenn-Air Brand Home Appliances Customer eXperience Centre 200 - 6750 Century Ave. Mississauga, ON L5N 0B7 Web address: www.jennair.ca Or ...

Use and Care
Page 14
...of purchase, when this appliance is operated and maintained according to instructions attached to or furnished with published installation instructions. 11. Service calls to Jenn-Air within 30 days from the date of purchase. 6. Repairs when your major appliance, unless such damage results...from accident, alteration, misuse, abuse, fire, flood, acts of God, improper installation, installation not in -warranty service. Any food loss due to the appliance. 9. You must be provided by Jenn-Air. 5. Proof of original purchase date is required to obtain service under these excluded ...
...of purchase, when this appliance is operated and maintained according to instructions attached to or furnished with published installation instructions. 11. Service calls to Jenn-Air within 30 days from the date of purchase. 6. Repairs when your major appliance, unless such damage results...from accident, alteration, misuse, abuse, fire, flood, acts of God, improper installation, installation not in -warranty service. Any food loss due to the appliance. 9. You must be provided by Jenn-Air. 5. Proof of original purchase date is required to obtain service under these excluded ...

Warranty
Page 1
... under these excluded circumstances shall be repaired in the home and only in-home service is covered by an authorized Jenn-Air servicer is not installed in -warranty service. Major appliances with original model/serial numbers that is required to better help by checking the ...been altered or removed from accident, alteration, misuse, abuse, fire, flood, acts of God, improper installation, installation not in an inaccessible location or is not available. 10. JENN-AIR SHALL NOT BE LIABLE FOR INCIDENTAL OR CONSEQUENTIAL DAMAGES. THIS WARRANTY GIVES YOU SPECIFIC LEGAL RIGHTS, AND...
... under these excluded circumstances shall be repaired in the home and only in-home service is covered by an authorized Jenn-Air servicer is not installed in -warranty service. Major appliances with original model/serial numbers that is required to better help by checking the ...been altered or removed from accident, alteration, misuse, abuse, fire, flood, acts of God, improper installation, installation not in an inaccessible location or is not available. 10. JENN-AIR SHALL NOT BE LIABLE FOR INCIDENTAL OR CONSEQUENTIAL DAMAGES. THIS WARRANTY GIVES YOU SPECIFIC LEGAL RIGHTS, AND...