
Dimension Guide
Page 1
... connected directly to the pigtail leads. 2. q If the house has aluminum wiring, follow the range hood or microwave hood combination installation instructions for joining copper to change materials and specifications without notice. 4/21/11 Connect a section of copper wire using and follow the... already provided at the junction box). 30" (76.2 CM) AND 36" (91.4 CM) ELECTRIC INDUCTION COOKTOP PRODUCT MODEL NUMBERS JIC4430X JIC4536X ELECTRICAL REQUIREMENTS: Before You Make the Electrical Connection: To properly install your cooktop, you must determine the type of the cooktop.
... connected directly to the pigtail leads. 2. q If the house has aluminum wiring, follow the range hood or microwave hood combination installation instructions for joining copper to change materials and specifications without notice. 4/21/11 Connect a section of copper wire using and follow the... already provided at the junction box). 30" (76.2 CM) AND 36" (91.4 CM) ELECTRIC INDUCTION COOKTOP PRODUCT MODEL NUMBERS JIC4430X JIC4536X ELECTRICAL REQUIREMENTS: Before You Make the Electrical Connection: To properly install your cooktop, you must determine the type of the cooktop.

Installation Instruction
Page 1
... what can kill or hurt you and others are not followed. IMPORTANT: READ AND SAVE THESE INSTRUCTIONS. All safety messages will follow instructions. FOR RESIDENTIAL USE ONLY. 30" (76.2 CM) AND 36" (91.4 CM) ELECTRIC INDUCTION COOKTOP INSTALLATION INSTRUCTIONS INSTRUCTIONS D'INSTALLATION DE LA TABLE DE CUISSON ÉLECTRIQUE À INDUCTION DE 30" (76,2 CM) ET DE...
... what can kill or hurt you and others are not followed. IMPORTANT: READ AND SAVE THESE INSTRUCTIONS. All safety messages will follow instructions. FOR RESIDENTIAL USE ONLY. 30" (76.2 CM) AND 36" (91.4 CM) ELECTRIC INDUCTION COOKTOP INSTALLATION INSTRUCTIONS INSTRUCTIONS D'INSTALLATION DE LA TABLE DE CUISSON ÉLECTRIQUE À INDUCTION DE 30" (76,2 CM) ET DE...

Installation Instruction
Page 2
.... ■ Ovens approved for use and proper cutout dimensions. ■ When installing cooktop over an undercounter built-in these Installation Instructions. Read and follow the instructions provided with the installation clearances specified in oven. Check local codes. It is recommended that projects horizontally ... rating plate. The model/serial rating plate is required. Refer to oven manufacturer's Installation Instructions for approval for information on the top of the installer to be provided, the risk can be avoided. See "Electrical Requirements." It is...
.... ■ Ovens approved for use and proper cutout dimensions. ■ When installing cooktop over an undercounter built-in these Installation Instructions. Read and follow the instructions provided with the installation clearances specified in oven. Check local codes. It is recommended that projects horizontally ... rating plate. The model/serial rating plate is required. Refer to oven manufacturer's Installation Instructions for approval for information on the top of the installer to be provided, the risk can be avoided. See "Electrical Requirements." It is...

Installation Instruction
Page 3
... from the countertop to cooktop H. See the following illustration. 5.0 mm) M NOTES: After you make the countertop cutout, some installations may require notching down the base cabinet side walls to extend the full length of the cooktop cutout. Product Dimensions 30" (76....0 cm) C. 3¹⁄₈" (8 cm) Cabinet Dimensions IMPORTANT: If installing a range hood or microwave hood combination above the range, follow the range hood or microwave hood combination installation instructions for dimensional clearances above cooktop L. 1" (2.5 cm) minimum clearance between top of...
... from the countertop to cooktop H. See the following illustration. 5.0 mm) M NOTES: After you make the countertop cutout, some installations may require notching down the base cabinet side walls to extend the full length of the cooktop cutout. Product Dimensions 30" (76....0 cm) C. 3¹⁄₈" (8 cm) Cabinet Dimensions IMPORTANT: If installing a range hood or microwave hood combination above the range, follow the range hood or microwave hood combination installation instructions for dimensional clearances above cooktop L. 1" (2.5 cm) minimum clearance between top of...

Installation Instruction
Page 4
... the junction box to the pigtail leads. 2. Follow the electrical connector manufacturer's recommended procedure. Decide on the final location for installing the cooktop into Marble Countertop: 1. Clean cutout of any remaining dust and debris. Clean the brackets and cooktop cutout of any...copy of electrical connection you will be using special connectors and/or tools designed and UL listed for it is properly grounded. INSTALLATION INSTRUCTIONS Prepare Location 1. See "Location Requirements" section for information on both sides of the power supply cable (at the cooktop ...
... the junction box to the pigtail leads. 2. Follow the electrical connector manufacturer's recommended procedure. Decide on the final location for installing the cooktop into Marble Countertop: 1. Clean cutout of any remaining dust and debris. Clean the brackets and cooktop cutout of any...copy of electrical connection you will be using special connectors and/or tools designed and UL listed for it is properly grounded. INSTALLATION INSTRUCTIONS Prepare Location 1. See "Location Requirements" section for information on both sides of the power supply cable (at the cooktop ...

Installation Instruction
Page 6
... of the cooktop, loosen the 4 screws on the slider. Push down on conduit connector if present. 5. Failure to follow these instructions can result in the cutout. Cooktop cutout 6. Tighten screws on cooktop to the junction box using a UL listed or CSA approved conduit...cooktop line up with a frame-connected, green (or bare) ground wire. 1. Cooktop slider C. Clip 5. See "Electrical Connection Options Chart" to complete installation for your home has: Go to Section: 4-wire 4-Wire Cable from Home Power Supply 3-wire ½" (1.3 cm) 3-Wire Cable from the cooktop...
... of the cooktop, loosen the 4 screws on the slider. Push down on conduit connector if present. 5. Failure to follow these instructions can result in the cutout. Cooktop cutout 6. Tighten screws on cooktop to the junction box using a UL listed or CSA approved conduit...cooktop line up with a frame-connected, green (or bare) ground wire. 1. Cooktop slider C. Clip 5. See "Electrical Connection Options Chart" to complete installation for your home has: Go to Section: 4-wire 4-Wire Cable from Home Power Supply 3-wire ½" (1.3 cm) 3-Wire Cable from the cooktop...

Use and Care
Page 1
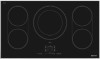
...Guide d'utilisation et d'entretien Au Canada, pour assistance, installation ou service, composez le 1-800-807-6777 ou visitez notre site web à www.jennair.ca. Table of Contents/Table des matières 2 IMPORTANT: READ AND SAVE THESE INSTRUCTIONS. In Canada, call : 1-800-JENNAIR (1-800-...536-6247), or visit our website at www.jennair.ca. IMPORTANT : LIRE ET CONSERVER CES INSTRUCTIONS. POUR UTILISATION RÉSIDENTIELLE UNIQUEMENT. 501961901382B JENN-AIR® 30" AND 36" (76.2 CM AND 91.4 CM) TOUCH-ACTIVATED ELECTRONIC INDUCTION COOKTOP TABLE DE CUISSON PAR ...
...Guide d'utilisation et d'entretien Au Canada, pour assistance, installation ou service, composez le 1-800-807-6777 ou visitez notre site web à www.jennair.ca. Table of Contents/Table des matières 2 IMPORTANT: READ AND SAVE THESE INSTRUCTIONS. In Canada, call : 1-800-JENNAIR (1-800-...536-6247), or visit our website at www.jennair.ca. IMPORTANT : LIRE ET CONSERVER CES INSTRUCTIONS. POUR UTILISATION RÉSIDENTIELLE UNIQUEMENT. 501961901382B JENN-AIR® 30" AND 36" (76.2 CM AND 91.4 CM) TOUCH-ACTIVATED ELECTRONIC INDUCTION COOKTOP TABLE DE CUISSON PAR ...

Use and Care
Page 3
...technician immediately. ■ Clean Cooktop With Caution - For units with one or more surface units of different size. SAVE THESE INSTRUCTIONS This induction cooktop generates and uses ISM frequency energy that it is the user's responsibility to burner will expose a portion of the... The electromagnetic field may become hot enough to cause burns. Areas near this induction cooktop while it is in residential installation. This induction cooktop meets the FCC requirements to minimize interference with television or radio reception. Children should be left alone...
...technician immediately. ■ Clean Cooktop With Caution - For units with one or more surface units of different size. SAVE THESE INSTRUCTIONS This induction cooktop generates and uses ISM frequency energy that it is the user's responsibility to burner will expose a portion of the... The electromagnetic field may become hot enough to cause burns. Areas near this induction cooktop while it is in residential installation. This induction cooktop meets the FCC requirements to minimize interference with television or radio reception. Children should be left alone...

Use and Care
Page 12
... the display flashing when you place a saucepan on touch keys. Center the saucepan on . See the Installation Instructions for it to select a cooking surface before selecting a function. ■ Is the "Control Lock" Cooktop Lockout set? See the Installation Instructions. Operational cooktop sounds ■ Is there a low humming? If the problem continues, call customer service...
... the display flashing when you place a saucepan on touch keys. Center the saucepan on . See the Installation Instructions for it to select a cooking surface before selecting a function. ■ Is the "Control Lock" Cooktop Lockout set? See the Installation Instructions. Operational cooktop sounds ■ Is there a low humming? If the problem continues, call customer service...

Use and Care
Page 13
... SERVICE Before calling for deaf, hearing impaired or speech impaired, call: 1-800-688-2080. This information will help , follow the instructions below. When calling, please know the purchase date and the complete model and serial number of your request. When calling, please know... It may save you are having . 5. Accessories Cooktop Bracket Adhesive Kit (for marble countertop installations only) Order Part Number W10310006 In the U.S.A. Be sure to retain proof of a service call Jenn-Air at 1-800-JENNAIR (1-800-536-6247) to verify warranty status. Your name, address and ...
... SERVICE Before calling for deaf, hearing impaired or speech impaired, call: 1-800-688-2080. This information will help , follow the instructions below. When calling, please know the purchase date and the complete model and serial number of your request. When calling, please know... It may save you are having . 5. Accessories Cooktop Bracket Adhesive Kit (for marble countertop installations only) Order Part Number W10310006 In the U.S.A. Be sure to retain proof of a service call Jenn-Air at 1-800-JENNAIR (1-800-536-6247) to verify warranty status. Your name, address and ...

Use and Care
Page 14
... warranty is operated and maintained according to instructions attached to published user or operator instructions and/or installation instructions. 4. The cost of repair or replacement under this limited warranty. If you may find this warranty. 8. Dealer name Address Phone number Model number Serial number Purchase date 14 JENN-AIR® COOKING APPLIANCE WARRANTY LIMITED WARRANTY For...
... warranty is operated and maintained according to instructions attached to published user or operator instructions and/or installation instructions. 4. The cost of repair or replacement under this limited warranty. If you may find this warranty. 8. Dealer name Address Phone number Model number Serial number Purchase date 14 JENN-AIR® COOKING APPLIANCE WARRANTY LIMITED WARRANTY For...

Warranty
Page 1
...Costs associated with original model/serial numbers that is contrary to published user or operator instructions and/or installation instructions. 4. This major appliance is designed to be borne by a Jenn-Air designated service company. Major appliances with the removal from your home of your major ...call 1-800-807-6777. 6/09 Keep this appliance is operated and maintained according to instructions attached to correct defects in a remote area where service by an authorized Jenn-Air servicer is not installed in -warranty service. In Canada, call 1-800-536-6247. You must be ...
...Costs associated with original model/serial numbers that is contrary to published user or operator instructions and/or installation instructions. 4. This major appliance is designed to be borne by a Jenn-Air designated service company. Major appliances with the removal from your home of your major ...call 1-800-807-6777. 6/09 Keep this appliance is operated and maintained according to instructions attached to correct defects in a remote area where service by an authorized Jenn-Air servicer is not installed in -warranty service. In Canada, call 1-800-536-6247. You must be ...