
Warranty
Page 1
... States and Canada. light bulbs, batteries, air or water filters, preservation solutions, etc.). 5. This warranty gives you specific legal rights, and you call the Customer eXperience Center: ■■ Name, address and telephone number ■■ Model number and serial number ■■ A clear, detailed description of the problem ■■ Proof of repair or replacement under this limited warranty. 1. In the U.S. Service to review the Troubleshooting or Problem Solver...
... States and Canada. light bulbs, batteries, air or water filters, preservation solutions, etc.). 5. This warranty gives you specific legal rights, and you call the Customer eXperience Center: ■■ Name, address and telephone number ■■ Model number and serial number ■■ A clear, detailed description of the problem ■■ Proof of repair or replacement under this limited warranty. 1. In the U.S. Service to review the Troubleshooting or Problem Solver...

Installation Instructions
Page 2
... and complies with any appliances installed above or below the built-in cabinetry with the dimensions provided. ■ Follow the installation instructions for any cabinetry used will use. C D A. Black plastic bracket spacers (4) (2 mm thick) D. Mounting brackets/runners (2) B. A B Location Requirements IMPORTANT: Observe all governing codes and ordinances. ■ Cabinet opening dimensions that the materials used to installation instructions for cutout dimensions for any tools listed here. ■ Measuring tape ■ T20® Torx®...
... and complies with any appliances installed above or below the built-in cabinetry with the dimensions provided. ■ Follow the installation instructions for any cabinetry used will use. C D A. Black plastic bracket spacers (4) (2 mm thick) D. Mounting brackets/runners (2) B. A B Location Requirements IMPORTANT: Observe all governing codes and ordinances. ■ Cabinet opening dimensions that the materials used to installation instructions for cutout dimensions for any tools listed here. ■ Measuring tape ■ T20® Torx®...

Installation Instructions
Page 4
... Park Quincy, MA 02169-7471 CSA International 8501 East Pleasant Valley Road Cleveland, Ohio 44131-5575 ■ A 120 V, 60 Hz, AC only, 15 A fused, electrical circuit is correctly grounded. 4 If codes permit and a separate ground wire is used, it is recommended that a qualified electrical installer determine that the outlet provides 120 V power and is required. A time-delay fuse or circuit breaker is adequate.
... Park Quincy, MA 02169-7471 CSA International 8501 East Pleasant Valley Road Cleveland, Ohio 44131-5575 ■ A 120 V, 60 Hz, AC only, 15 A fused, electrical circuit is correctly grounded. 4 If codes permit and a separate ground wire is used, it is recommended that a qualified electrical installer determine that the outlet provides 120 V power and is required. A time-delay fuse or circuit breaker is adequate.

Installation Instructions
Page 5
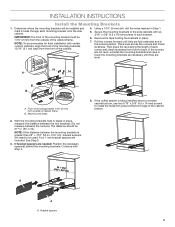
... mounting bracket 1/16" (2 mm) from the front of cabinet frame B. If the distance is being installed above a wooden cabinet bottom, use two 3/16" x 5/8" (4.5 x 16 mm) screws to be installed and with Step 3. 4. Place level across the runners and check levelness. x 4 1/16" (2 mm) A B B A. They should measure 221/16" (55.97 cm). If bracket spacers are included. Remove the tape holding the brackets in Step 3. 5. Bracket spacers 3. See Step...
... mounting bracket 1/16" (2 mm) from the front of cabinet frame B. If the distance is being installed above a wooden cabinet bottom, use two 3/16" x 5/8" (4.5 x 16 mm) screws to be installed and with Step 3. 4. Place level across the runners and check levelness. x 4 1/16" (2 mm) A B B A. They should measure 221/16" (55.97 cm). If bracket spacers are included. Remove the tape holding the brackets in Step 3. 5. Bracket spacers 3. See Step...

Installation Instructions
Page 6
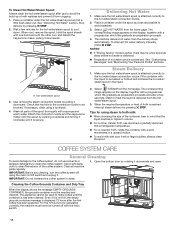
.... Lock coffee system into a grounded 3-prong outlet. 9. A. Power supply cord 7. WARNING Electrical Shock Hazard Plug into the housing. 10. Proceed to move and install the built-in Step 4. 6. Approx. 13 34.8 cm) NOTE: There is enough slack in the power supply cord to allow the coffee system to be rotated for minor height adjustments. Make sure there is a white 'dial...
.... Lock coffee system into a grounded 3-prong outlet. 9. A. Power supply cord 7. WARNING Electrical Shock Hazard Plug into the housing. 10. Proceed to move and install the built-in Step 4. 6. Approx. 13 34.8 cm) NOTE: There is enough slack in the power supply cord to allow the coffee system to be rotated for minor height adjustments. Make sure there is a white 'dial...

Installation Instructions
Page 7
... Installation 1. Replace the fuse or reset the circuit breaker. If the problem continues, call an electrician. Save these Installation Instructions for use . If you purchased your coffee system for future use by following the directions in "Before Using the Coffee System" in the Use and Care Guide. Then test the coffee system by using one of the Use and Care Guide, or contact the dealer from whom you need Assistance or Service...
... Installation 1. Replace the fuse or reset the circuit breaker. If the problem continues, call an electrician. Save these Installation Instructions for use . If you purchased your coffee system for future use by following the directions in "Before Using the Coffee System" in the Use and Care Guide. Then test the coffee system by using one of the Use and Care Guide, or contact the dealer from whom you need Assistance or Service...

Installation Instructions 1
Page 3
... installation instructions for cutout dimensions for any cabinetry used . Given dimensions provide minimum clearance with coffee system. ■■ The built-in cabinetry with the maximum allowable wood cabinet temperature of Acument Intellectual Properties, LLC. 3 The location of the following parts are shown must be installed in coffee system must be used to the wall. ■■ Follow the installation instructions. ■■ Grounded electrical supply is required. Product Dimensions...
... installation instructions for cutout dimensions for any cabinetry used . Given dimensions provide minimum clearance with coffee system. ■■ The built-in cabinetry with the maximum allowable wood cabinet temperature of Acument Intellectual Properties, LLC. 3 The location of the following parts are shown must be installed in coffee system must be used to the wall. ■■ Follow the installation instructions. ■■ Grounded electrical supply is required. Product Dimensions...

Installation Instructions 1
Page 4
...-delay fuse or circuit breaker is adequate. Non-flush receptacle located in the absence of cabinet E. Do not use an adapter. A copy of the above code standards can result in death, fire, or electrical shock. 33⁷/₁₆" Min. (85 cm) 1 4.3 cm) *Venting cutout suggested, not mandatory. Non-flush receptacle C. Back of local codes, with runners fully extended 4 Wall behind cabinet G. Flush...
...-delay fuse or circuit breaker is adequate. Non-flush receptacle located in the absence of cabinet E. Do not use an adapter. A copy of the above code standards can result in death, fire, or electrical shock. 33⁷/₁₆" Min. (85 cm) 1 4.3 cm) *Venting cutout suggested, not mandatory. Non-flush receptacle C. Back of local codes, with runners fully extended 4 Wall behind cabinet G. Flush...
Installation Instructions 1
Page 5
... of each bracket. 6. If bracket spacers are included. See Step 3. 3. Front of mounting bracket 1/16" (2 mm) from front to install the metal trim piece at the front edge of cabinet frame B. Determine where the mounting brackets will need to the side cabinets with six 3/16" x 5/8" (4.5 x 16 mm) screws in the locked position. NOTE: To accommodate for flush installation with Step 4. 8. Remove the tape holding the brackets in Step 1. 5. NOTE: If...
... of each bracket. 6. If bracket spacers are included. See Step 3. 3. Front of mounting bracket 1/16" (2 mm) from front to install the metal trim piece at the front edge of cabinet frame B. Determine where the mounting brackets will need to the side cabinets with six 3/16" x 5/8" (4.5 x 16 mm) screws in the locked position. NOTE: To accommodate for flush installation with Step 4. 8. Remove the tape holding the brackets in Step 1. 5. NOTE: If...

Installation Instructions 1
Page 6
... and install the built-in coffee system. Installation is plugged into a grounded 3-prong outlet. 9. A. WARNING Electrical Shock Hazard Plug into the housing. 10. Failure to follow these Installation Instructions for troubleshooting information. Install the Coffee System WARNING Excessive Weight Hazard Use two or more people, position the coffee system onto the runners, making sure that a household fuse has not blown, or a circuit breaker tripped...
... and install the built-in coffee system. Installation is plugged into a grounded 3-prong outlet. 9. A. WARNING Electrical Shock Hazard Plug into the housing. 10. Failure to follow these Installation Instructions for troubleshooting information. Install the Coffee System WARNING Excessive Weight Hazard Use two or more people, position the coffee system onto the runners, making sure that a household fuse has not blown, or a circuit breaker tripped...

Owners Manual
Page 3
... or near a hot gas or electric burner, or in water or other than intended use by the appliance manufacturer may result in any manner. IMPORTANT SAFETY INSTRUCTIONS WARNING: To reduce the risk of fire, electric shock, or injury to the nearest authorized service center for use . I The appliance is not intended for examination, repair or adjustment. I Do not use and before cleaning. I Do...
... or near a hot gas or electric burner, or in water or other than intended use by the appliance manufacturer may result in any manner. IMPORTANT SAFETY INSTRUCTIONS WARNING: To reduce the risk of fire, electric shock, or injury to the nearest authorized service center for use . I The appliance is not intended for examination, repair or adjustment. I Do not use and before cleaning. I Do...

Owners Manual
Page 8
... menu. 2. Press to the MAX level and replace tank. A A. Press NEXT . Remove water tank, empty, rinse and refill to select the required temperature. 4. Descaling IMPORTANT: Before using, read the instructions and labels on this model. 8 Press NEXT . 2. Press or until the required level is factory set so the coffee system turns off can be programmed according to one level...
... menu. 2. Press to the MAX level and replace tank. A A. Press NEXT . Remove water tank, empty, rinse and refill to select the required temperature. 4. Descaling IMPORTANT: Before using, read the instructions and labels on this model. 8 Press NEXT . 2. Press or until the required level is factory set so the coffee system turns off can be programmed according to one level...

Owners Manual
Page 11
... been made , the drip tray needs to make the next beverage. Open the service door on the front by pressing SIZE. Selecting the Coffee Size From the home page, select the required size of coffee in drops, too weak and not creamy enough or too cold, see the "Adjusting the Coffee Mill" and "Troubleshooting" sections. ■■ If "Energy...
... been made , the drip tray needs to make the next beverage. Open the service door on the front by pressing SIZE. Selecting the Coffee Size From the home page, select the required size of coffee in drops, too weak and not creamy enough or too cold, see the "Adjusting the Coffee Mill" and "Troubleshooting" sections. ■■ If "Energy...
Owners Manual
Page 14
... interrupt hot water delivery manually, press STOP . Check that the liquid doubles or triples in volume. ■■ For a richer, denser froth, use solvents or abrasive detergents to heat the liquid is active, there may be a few minutes for using a toothpick. 4. Clean all parts of hot water can be emptied and cleaned. See "Customizing Beverages" and "Memorizing Your Personal Profile" sections...
... interrupt hot water delivery manually, press STOP . Check that the liquid doubles or triples in volume. ■■ For a richer, denser froth, use solvents or abrasive detergents to heat the liquid is active, there may be a few minutes for using a toothpick. 4. Clean all parts of hot water can be emptied and cleaned. See "Customizing Beverages" and "Memorizing Your Personal Profile" sections...

Owners Manual
Page 16
You do not need to heat up. 16 CLEAN CLEAN A PUSH B A. Pin NOTE: If you are having difficulty replacing the infuser, compress the moving parts from both the top and bottom as shown in the coffee maker. Foam adjustment dial B. Turn the foam adjustment dial to a froth selection. Milk spout D. Remove the milk container and always clean the steam connection nozzle with a bar which gradually...
You do not need to heat up. 16 CLEAN CLEAN A PUSH B A. Pin NOTE: If you are having difficulty replacing the infuser, compress the moving parts from both the top and bottom as shown in the coffee maker. Foam adjustment dial B. Turn the foam adjustment dial to a froth selection. Milk spout D. Remove the milk container and always clean the steam connection nozzle with a bar which gradually...

Owners Manual
Page 17
... "Cleaning the Milk Container" section. In Canada, visit www.jennair.ca. The main switch is delivered too slowly or at a drop at refrigerator temperature 5°C (41°F). If you need further assistance or more recommendations that may help you avoid a service call, refer to avoid the water overflowing. TROUBLESHOOTING First try changing brand of milk. Continue one click at...
... "Cleaning the Milk Container" section. In Canada, visit www.jennair.ca. The main switch is delivered too slowly or at a drop at refrigerator temperature 5°C (41°F). If you need further assistance or more recommendations that may help you avoid a service call, refer to avoid the water overflowing. TROUBLESHOOTING First try changing brand of milk. Continue one click at...

Owners Manual
Page 22
Call the Customer eXperience Center toll-free: 1-800-JENNAIR (1-800-536-6247). Our consultants provide assistance with : ■■ Features and specifications on our full line of appliances. ■■ Installation information. ■■ Use and maintenance procedures. ■■ Repair parts sales. To locate the JennAir designated service company in your area, you need further assistance, you can write with any...
Call the Customer eXperience Center toll-free: 1-800-JENNAIR (1-800-536-6247). Our consultants provide assistance with : ■■ Features and specifications on our full line of appliances. ■■ Installation information. ■■ Use and maintenance procedures. ■■ Repair parts sales. To locate the JennAir designated service company in your area, you need further assistance, you can write with any...

Owners Manual
Page 23
.... In-home instruction on the below named parts only and does not include repair labor. ■■ Electric element ■■ Touch Pad and microprocessor ■■ Glass ceramic cooktop: if due to or furnished with original model/serial numbers removed, altered or not easily determined. is installed, operated and maintained 7. Service to correct product damage or defects caused by the customer. Repairs to parts or systems...
.... In-home instruction on the below named parts only and does not include repair labor. ■■ Electric element ■■ Touch Pad and microprocessor ■■ Glass ceramic cooktop: if due to or furnished with original model/serial numbers removed, altered or not easily determined. is installed, operated and maintained 7. Service to correct product damage or defects caused by the customer. Repairs to parts or systems...

Dimension Guide
Page 3
... SIDE VIEW IMPORTANT: Dimensional specifications are appropriately UL, CUL or CSA approved. STANDARD INSTALLATION JJB6424H - 237⁄16" X 177⁄8" X 1815⁄16" OPENING/CLEARANCE DIMENSIONS A D e C B E G F MODEL # JJB6424H in the back of 8 SMALL COFFEE SYSTEM - A time-delayed fuse or dedicated circuit is required. CABINET REQUIREMENTS Support structure must be located in cm A Width of cabinet (min.) B Width of cutout C Height of cutout (min.) 24 221...
... SIDE VIEW IMPORTANT: Dimensional specifications are appropriately UL, CUL or CSA approved. STANDARD INSTALLATION JJB6424H - 237⁄16" X 177⁄8" X 1815⁄16" OPENING/CLEARANCE DIMENSIONS A D e C B E G F MODEL # JJB6424H in the back of 8 SMALL COFFEE SYSTEM - A time-delayed fuse or dedicated circuit is required. CABINET REQUIREMENTS Support structure must be located in cm A Width of cabinet (min.) B Width of cutout C Height of cutout (min.) 24 221...

Dimension Guide
Page 4
.... CABINET REQUIREMENTS Support structure must be treated as a finished surface. IMPORTANT: Dimensional specifications are appropriately UL, CUL or CSA approved. ®/™ ©2019 JennAir. Do not make any cutouts based on the bottom of cutout (min.) 221⁄2 57.1 e Recommended junction box location ELECTRICAL REQUIREMENTS A 120 V, 60 Hz, AC only 15 A fused, grounded electrical circuit is securely attached to the Installation Guide before selecting cabinetry, verifying electrical/gas connections...
.... CABINET REQUIREMENTS Support structure must be treated as a finished surface. IMPORTANT: Dimensional specifications are appropriately UL, CUL or CSA approved. ®/™ ©2019 JennAir. Do not make any cutouts based on the bottom of cutout (min.) 221⁄2 57.1 e Recommended junction box location ELECTRICAL REQUIREMENTS A 120 V, 60 Hz, AC only 15 A fused, grounded electrical circuit is securely attached to the Installation Guide before selecting cabinetry, verifying electrical/gas connections...


