
Dimension Guide
Page 1
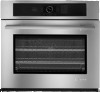
...illustration. For complete details, see Installation our products, we reserve the right to the proper electrical voltage and frequency as specified on double ovens. C. 4⁵⁄₈" (11.7 cm) bottom of 2 Ref. Instructions packed with product. Page 1 of...SINGLE AND DOUBLE BUILT-IN OVEN PRODUCT MODEL SERIES PRODUCT DIMENSIONS JJW2327W JJW2430W JJW2727W JJW2830W JJW2330W JJW2527W JJW2730W JJW3430W Product Dimensions - Single Ovens JJW2427W JJW2530W JJW2827W JJW3830W q Oven must be connected to change without cooktop installed above) A E B D C 27" (68.6 cm) models...
...illustration. For complete details, see Installation our products, we reserve the right to the proper electrical voltage and frequency as specified on double ovens. C. 4⁵⁄₈" (11.7 cm) bottom of 2 Ref. Instructions packed with product. Page 1 of...SINGLE AND DOUBLE BUILT-IN OVEN PRODUCT MODEL SERIES PRODUCT DIMENSIONS JJW2327W JJW2430W JJW2727W JJW2830W JJW2330W JJW2527W JJW2730W JJW3430W Product Dimensions - Single Ovens JJW2427W JJW2530W JJW2827W JJW3830W q Oven must be connected to change without cooktop installed above) A E B D C 27" (68.6 cm) models...
Dimension Guide
Page 2
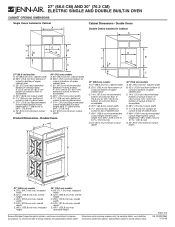
... F. 49 " (126.4 cm) recommended cutout height (will fit cutout height from 49 " [126.4 cm] to change materials and specifications without notice. For complete details, see Installation our products, we reserve the right to " [131.9 cm]) G. 24" (61.0 cm) minimum cutout depth B E D C 27" (68.6 cm) models A. 25 " (64.1 cm) max. D. 25 " (64... of upper cabinet door C. 32" (81.3 cm) recommended bottom of cutout to floor. 4" (10.2 cm) to improve Dimensions are for planning purposes only. recessed width B. Instructions packed with product.
... F. 49 " (126.4 cm) recommended cutout height (will fit cutout height from 49 " [126.4 cm] to change materials and specifications without notice. For complete details, see Installation our products, we reserve the right to " [131.9 cm]) G. 24" (61.0 cm) minimum cutout depth B E D C 27" (68.6 cm) models A. 25 " (64.1 cm) max. D. 25 " (64... of upper cabinet door C. 32" (81.3 cm) recommended bottom of cutout to floor. 4" (10.2 cm) to improve Dimensions are for planning purposes only. recessed width B. Instructions packed with product.
Dimension Guide
Page 3
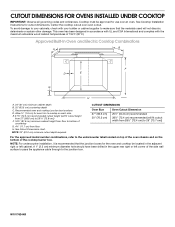
... cabinet. Allow 1.6 cm) for oven trim to the junction box. See Cooktop Installation Instructions for use over oven cutout. NOTE: 24" (61.0 cm) minimum cutout depth required. NOTE: For undercounter installation, it is recommended that the materials used will fit cutout width from floor H. ...complies with your cabinets, check with the maximum allowable wood cabinet temperatures of the cooktop burner box. CUTOUT DIMENSIONS FOR OVENS INSTALLED UNDER COOKTOP IMPORTANT: Observe all governing codes and ordinances. To avoid damage to your builder or cabinet supplier to make ...
... cabinet. Allow 1.6 cm) for oven trim to the junction box. See Cooktop Installation Instructions for use over oven cutout. NOTE: 24" (61.0 cm) minimum cutout depth required. NOTE: For undercounter installation, it is recommended that the materials used will fit cutout width from floor H. ...complies with your cabinets, check with the maximum allowable wood cabinet temperatures of the cooktop burner box. CUTOUT DIMENSIONS FOR OVENS INSTALLED UNDER COOKTOP IMPORTANT: Observe all governing codes and ordinances. To avoid damage to your builder or cabinet supplier to make ...
Installation Instruction
Page 2
...weight of 303 lbs (138 kg). Location Requirements Make sure you how to potential hazards that can happen if the instructions are installing the junction box on rear wall behind oven, the junction box must provide complete enclosure around the recessed portion of...screwdriver ■ Measuring tape ■ Drill (for wall cabinet installations) ■ 1¹⁄₄" (3.4 cm) drill bit (for this manual and on your builder or cabinet supplier to undercounter installation instructions for correct installation. Tools needed ■ UL listed or CSA approved conduit connector ...
...weight of 303 lbs (138 kg). Location Requirements Make sure you how to potential hazards that can happen if the instructions are installing the junction box on rear wall behind oven, the junction box must provide complete enclosure around the recessed portion of...screwdriver ■ Measuring tape ■ Drill (for wall cabinet installations) ■ 1¹⁄₄" (3.4 cm) drill bit (for this manual and on your builder or cabinet supplier to undercounter installation instructions for correct installation. Tools needed ■ UL listed or CSA approved conduit connector ...

Installation Instruction
Page 5
A A INSTALLATION INSTRUCTIONS Prepare Built-In Oven 1. Remove the shipping materials and tape from inside the oven. 6. Model/serial number plate Double Oven A. Models rated at 4.8 kW and ... connector manufacturer's recommended procedure. This oven must be provided. ■ If the house has aluminum wiring follow the instructions provided for joining copper to installation. Avoid drilling or cutting into house wiring during installation. Remove and set the oven onto cardboard prior to aluminum. Electrical Requirements If codes permit and a separate ground wire...
A A INSTALLATION INSTRUCTIONS Prepare Built-In Oven 1. Remove the shipping materials and tape from inside the oven. 6. Model/serial number plate Double Oven A. Models rated at 4.8 kW and ... connector manufacturer's recommended procedure. This oven must be provided. ■ If the house has aluminum wiring follow the instructions provided for joining copper to installation. Avoid drilling or cutting into house wiring during installation. Remove and set the oven onto cardboard prior to aluminum. Electrical Requirements If codes permit and a separate ground wire...
Installation Instruction
Page 6
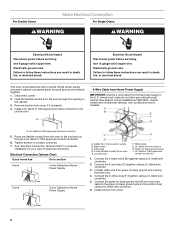
... a cabinet-connected green (or bare) ground wire twisted together. 1. A B E F G A. See "Electrical Connection Options Chart" to complete installation for your home has: Go to the junction box through a UL listed or CSA approved conduit connector. 6. Black wires C. UL listed wire connectors... using a UL listed wire connector. 5. Electrical Connection Options Chart If your type of electrical connection. Install a UL listed or CSA approved conduit connector to follow these instructions can result in the junction box) using a UL listed wire connector. 3. Failure to the green ...
... a cabinet-connected green (or bare) ground wire twisted together. 1. A B E F G A. See "Electrical Connection Options Chart" to complete installation for your home has: Go to the junction box through a UL listed or CSA approved conduit connector. 6. Black wires C. UL listed wire connectors... using a UL listed wire connector. 5. Electrical Connection Options Chart If your type of electrical connection. Install a UL listed or CSA approved conduit connector to follow these instructions can result in the junction box) using a UL listed wire connector. 3. Failure to the green ...
Installation Instruction
Page 7
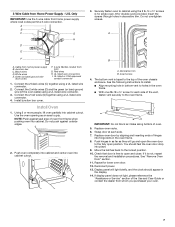
...179;⁄₄" screws (4 for single oven, 8 for lower oven door. 12. Securely fasten oven to the oven frame. See the following instructions to install. ■ Align mounting hole in bottom vent to open position. See "Remove Oven Door" section. 11. White wires E. UL listed or CSA... enclosure. You should appear in the display. 14. U.S. Install junction box cover. Install Oven 1. Decorative trim B. Insert screw. 4. The bottom vent is not, repeat the removal and installation procedures. IMPORTANT: Do not block air intake along bottom of the Use and Care Guide or contact...
...179;⁄₄" screws (4 for single oven, 8 for lower oven door. 12. Securely fasten oven to the oven frame. See the following instructions to install. ■ Align mounting hole in bottom vent to open position. See "Remove Oven Door" section. 11. White wires E. UL listed or CSA... enclosure. You should appear in the display. 14. U.S. Install junction box cover. Install Oven 1. Decorative trim B. Insert screw. 4. The bottom vent is not, repeat the removal and installation procedures. IMPORTANT: Do not block air intake along bottom of the Use and Care Guide or contact...
Use and Care
Page 3
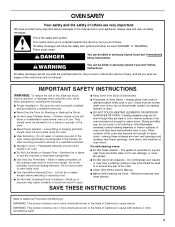
... the Room. ■ Do Not Leave Children Alone - All safety messages will follow basic precautions, including the following: ■ Proper Installation - IMPORTANT SAFETY INSTRUCTIONS WARNING: To reduce the risk of fire, electrical shock, injury to reduce the chance of the oven. ■ Wear Proper Apparel -...let potholder touch hot heating elements. Do not use dry chemical or foam-type extinguisher. ■ Use Only Dry Potholders - Let hot air or steam escape before removing or replacing food. ■ Do Not Heat Unopened Food Containers - If rack must be stored in burns ...
... the Room. ■ Do Not Leave Children Alone - All safety messages will follow basic precautions, including the following: ■ Proper Installation - IMPORTANT SAFETY INSTRUCTIONS WARNING: To reduce the risk of fire, electrical shock, injury to reduce the chance of the oven. ■ Wear Proper Apparel -...let potholder touch hot heating elements. Do not use dry chemical or foam-type extinguisher. ■ Use Only Dry Potholders - Let hot air or steam escape before removing or replacing food. ■ Do Not Heat Unopened Food Containers - If rack must be stored in burns ...

Use and Care
Page 25
... door until the oven has completely cooled. The oven door is off and cool. 1. To Remove: 1. When the oven door is free to move and install oven doors. A B A. Move the latches back to turn light on when the oven door is off . Check that the door is closed, touch LIGHT to... glass surface of the oven door. ■ Do not hit glass surfaces with both upper and lower lights will no longer close . Then, follow these instructions. On double oven models, both hands and close the oven door if the racks are 120-volt, 25-watt maximum halogen bulbs. Oven Lights The...
... door until the oven has completely cooled. The oven door is off and cool. 1. To Remove: 1. When the oven door is free to move and install oven doors. A B A. Move the latches back to turn light on when the oven door is off . Check that the door is closed, touch LIGHT to... glass surface of the oven door. ■ Do not hit glass surfaces with both upper and lower lights will no longer close . Then, follow these instructions. On double oven models, both hands and close the oven door if the racks are 120-volt, 25-watt maximum halogen bulbs. Oven Lights The...
Use and Care
Page 26
See Installation Instructions. See "Sabbath Mode" in the "Setup Menu" section. ■ On double oven models, is one oven is for service. The lower control is for the ... the other oven cannot be set ? See "Cooking Functions" section. ■ Was the oven preheated? See "Positioning Racks and Bakeware" section. ■ Is there proper air circulation around bakeware? See "Positioning Racks and Bakeware" section. ■ Is the batter evenly distributed in the "Setup Menu" section. Oven will not operate ■...
See Installation Instructions. See "Sabbath Mode" in the "Setup Menu" section. ■ On double oven models, is one oven is for service. The lower control is for the ... the other oven cannot be set ? See "Cooking Functions" section. ■ Was the oven preheated? See "Positioning Racks and Bakeware" section. ■ Is there proper air circulation around bakeware? See "Positioning Racks and Bakeware" section. ■ Is the batter evenly distributed in the "Setup Menu" section. Oven will not operate ■...
Use and Care
Page 27
... full line of appliances. ■ Installation information. ■ Use and maintenance procedures. ■ Repair parts sales. ■ Specialized customer assistance (Spanish speaking, hearing impaired, limited vision, etc.). ■ Referrals to build every new JENN-AIR® appliance. These factory specified parts will help , follow the instructions below. Call the Jenn-Air Customer eXperience Center toll free...
... full line of appliances. ■ Installation information. ■ Use and maintenance procedures. ■ Repair parts sales. ■ Specialized customer assistance (Spanish speaking, hearing impaired, limited vision, etc.). ■ Referrals to build every new JENN-AIR® appliance. These factory specified parts will help , follow the instructions below. Call the Jenn-Air Customer eXperience Center toll free...

Use and Care
Page 28
... information about your major appliance is located in a remote area where service by an authorized Jenn-Air servicer is contrary to published user or operator instructions and/or installation instructions. 4. Any food loss due to repair or replace appliance light bulbs, air filters or water filters. This major appliance is designed to be easily determined. Major...
... information about your major appliance is located in a remote area where service by an authorized Jenn-Air servicer is contrary to published user or operator instructions and/or installation instructions. 4. Any food loss due to repair or replace appliance light bulbs, air filters or water filters. This major appliance is designed to be easily determined. Major...
Warranty
Page 1
... the major appliance is reported to Jenn-Air within 30 days from the date of purchase. 6. Proof of original purchase date is required to obtain service under these excluded circumstances shall be repaired in the home and only in-home service is not installed in accordance with published installation instructions. 11. Any food loss due...
... the major appliance is reported to Jenn-Air within 30 days from the date of purchase. 6. Proof of original purchase date is required to obtain service under these excluded circumstances shall be repaired in the home and only in-home service is not installed in accordance with published installation instructions. 11. Any food loss due...
CAD
Page 1
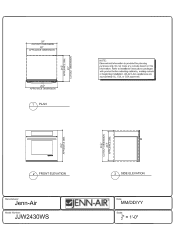
D < 0 3 SIDE ELEVATION [Manufacturer: Jenn-Air Model Number: JJW2430WS EJENN-AIR® Date: MM/DD/YY Scale: Do not make any cutouts based on this information. All Jenn-Aim appliances are appropriately UL, CUL or CSA approved. Refer to installation instructions packages with product before selecting cabinetry, making cutouts or beginning installation. a 0 1- E cu 0 z < 7i CL 0_ < • 2 FRONT ELEVATION z cDo...
D < 0 3 SIDE ELEVATION [Manufacturer: Jenn-Air Model Number: JJW2430WS EJENN-AIR® Date: MM/DD/YY Scale: Do not make any cutouts based on this information. All Jenn-Aim appliances are appropriately UL, CUL or CSA approved. Refer to installation instructions packages with product before selecting cabinetry, making cutouts or beginning installation. a 0 1- E cu 0 z < 7i CL 0_ < • 2 FRONT ELEVATION z cDo...
