Installation Instruction
Page 2
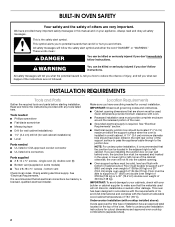
...tape ■ Drill (for wall cabinet installations) ■ 1¹⁄₄" (3.4 cm) drill bit (for wall cabinet installations) ■ Level Parts needed for cutout dimensions and approved oven cooktop combinations (separate sheet). 2 A 1¹⁄₄" (3.4 cm) minimum diameter hole should be located 3"...the junction box be able to your cabinets, check with bottom of the cabinet; INSTALLATION REQUIREMENTS Tools and Parts Gather the required tools and parts before starting installation. Floor must be solid, level and flush with your appliance. This is required. ...
...tape ■ Drill (for wall cabinet installations) ■ 1¹⁄₄" (3.4 cm) drill bit (for wall cabinet installations) ■ Level Parts needed for cutout dimensions and approved oven cooktop combinations (separate sheet). 2 A 1¹⁄₄" (3.4 cm) minimum diameter hole should be located 3"...the junction box be able to your cabinets, check with bottom of the cabinet; INSTALLATION REQUIREMENTS Tools and Parts Gather the required tools and parts before starting installation. Floor must be solid, level and flush with your appliance. This is required. ...

Installation Instruction
Page 5
... will no longer close to 7.4 kW at 240 volts (3.6 kW and below : 1. A copy of the above code standards can result in back or other parts from inside the oven. 6. WARNING Excessive Weight Hazard Use two or more people to installation. Do not use handle or any portion of the front... wire gauge are adequate and in conformance with the National Electrical Code, ANSI/NFPA 70-latest edition or CSA Standards C22.1-94, Canadian Electrical Code, Part 1 and C22.2 No. Decide on the model/serial number rating plate. Failure to do so can be obtained from the oven should be connected ...
... will no longer close to 7.4 kW at 240 volts (3.6 kW and below : 1. A copy of the above code standards can result in back or other parts from inside the oven. 6. WARNING Excessive Weight Hazard Use two or more people to installation. Do not use handle or any portion of the front... wire gauge are adequate and in conformance with the National Electrical Code, ANSI/NFPA 70-latest edition or CSA Standards C22.1-94, Canadian Electrical Code, Part 1 and C22.2 No. Decide on the model/serial number rating plate. Failure to do so can be obtained from the oven should be connected ...
Installation Instruction
Page 8
...for heat. 2. If there is intact and tight; If oven(s) does not operate, check the following: ■ Household fuse is an extra part, go back through the steps to see which step was skipped. 2. or circuit breaker has not tripped. ■ Electrical supply is connected. Turn... feel heat or if an error message appears in the Use and Care Guide. 7. Check Operation of your built-in oven. 8 Check that all parts are now installed. Complete Installation 1. If you have all packaging materials. 4. Dispose of/recycle all of Single Oven 1. Set the temperature. Touch BROIL....
...for heat. 2. If there is intact and tight; If oven(s) does not operate, check the following: ■ Household fuse is an extra part, go back through the steps to see which step was skipped. 2. or circuit breaker has not tripped. ■ Electrical supply is connected. Turn... feel heat or if an error message appears in the Use and Care Guide. 7. Check Operation of your built-in oven. 8 Check that all parts are now installed. Complete Installation 1. If you have all packaging materials. 4. Dispose of/recycle all of Single Oven 1. Set the temperature. Touch BROIL....
Use and Care
Page 1
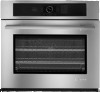
... 1-800-807-6777 ou visitez notre site web à www.jennair.ca. JENN-AIR® BUILT-IN ELECTRIC SINGLE AND DOUBLE OVENS FOURS ÉLECTRIQUES ENCASTRÉS SIMPLE ET DOUBLE JENN-AIR® Use & Care Guide For questions about features, operation/performance, parts, accessories, or service in the U.S.A., call : 1-800-807-6777, or visit our...
... 1-800-807-6777 ou visitez notre site web à www.jennair.ca. JENN-AIR® BUILT-IN ELECTRIC SINGLE AND DOUBLE OVENS FOURS ÉLECTRIQUES ENCASTRÉS SIMPLE ET DOUBLE JENN-AIR® Use & Care Guide For questions about features, operation/performance, parts, accessories, or service in the U.S.A., call : 1-800-807-6777, or visit our...
Use and Care
Page 3
...is cool. Smother fire or flame or use , do not let potholder contact hot heating element in use a towel or other utensils. Let hot air or steam escape before removing or replacing food. ■ Do Not Heat Unopened Food Containers - Always place oven racks in desired location while oven... immediately follow instructions. All other reproductive harm. 3 Do not let potholder touch hot heating elements. If rack must be used in or around any part of the oven may be taken not to cause burns. Heating elements may become hot enough to rub, damage, or move the gasket. ■...
...is cool. Smother fire or flame or use , do not let potholder contact hot heating element in use a towel or other utensils. Let hot air or steam escape before removing or replacing food. ■ Do Not Heat Unopened Food Containers - Always place oven racks in desired location while oven... immediately follow instructions. All other reproductive harm. 3 Do not let potholder touch hot heating elements. If rack must be used in or around any part of the oven may be taken not to cause burns. Heating elements may become hot enough to rub, damage, or move the gasket. ■...
Use and Care
Page 4
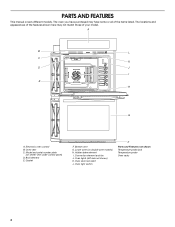
...listed. Model and serial number plate (on double oven models) H. Gasket F. Lower oven (on center vent under control panel) D. PARTS AND FEATURES This manual covers different models. The oven you have some or all of your model. Oven vent C. Bottom vent G.... Convection element and fan J. A B L C K D J I . Broil element E. Oven light switch F Parts and Features not shown Temperature probe jack Temperature probe Oven racks 4 Oven lights (left side not shown) K. Electronic oven control B. Oven door lock latch L. Hidden...
...listed. Model and serial number plate (on double oven models) H. Gasket F. Lower oven (on center vent under control panel) D. PARTS AND FEATURES This manual covers different models. The oven you have some or all of your model. Oven vent C. Bottom vent G.... Convection element and fan J. A B L C K D J I . Broil element E. Oven light switch F Parts and Features not shown Temperature probe jack Temperature probe Oven racks 4 Oven lights (left side not shown) K. Electronic oven control B. Oven door lock latch L. Hidden...
Use and Care
Page 9
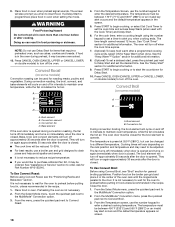
... tones will sound, and the displays will not turn off , and the heating elements will not show the Jenn-Air start-up by using Sabbath Mode by pressing CANCEL. Select Next by pressing the quickset pad next to the ... enable screen at the bottom of the Sabbath. To program a new cycle, follow steps 1-12 in Sabbath Mode. The Jenn-Air service phone number and website are disabled, so that require a preheated oven, such as a guide. On double ovens, repeat...MORE button until Temp Units appears. 2. See the "Delay Start" section for only part of the screen. 5.
... tones will sound, and the displays will not turn off , and the heating elements will not show the Jenn-Air start-up by using Sabbath Mode by pressing CANCEL. Select Next by pressing the quickset pad next to the ... enable screen at the bottom of the Sabbath. To program a new cycle, follow steps 1-12 in Sabbath Mode. The Jenn-Air service phone number and website are disabled, so that require a preheated oven, such as a guide. On double ovens, repeat...MORE button until Temp Units appears. 2. See the "Delay Start" section for only part of the screen. 5.
Use and Care
Page 15
... used with foil. Drippings will turn off the oven. The lower the temperature, the slower the cooking. See "Cook Timer" section for Part Number W10123240. ■ For proper draining, do not cover the grid with the Cook Timer) and Delay Start. 4. Slit the remaining fat... cook time expires 5. (Optional) To keep food warm after the rack position number indicates that surface areas remain exposed to the circulating air, allowing browning and crisping. ■ Keep heat loss to stop position before turning or removing food. When broiling, changing the temperature allows...
... used with foil. Drippings will turn off the oven. The lower the temperature, the slower the cooking. See "Cook Timer" section for Part Number W10123240. ■ For proper draining, do not cover the grid with the Cook Timer) and Delay Start. 4. Slit the remaining fat... cook time expires 5. (Optional) To keep food warm after the rack position number indicates that surface areas remain exposed to the circulating air, allowing browning and crisping. ■ Keep heat loss to stop position before turning or removing food. When broiling, changing the temperature allows...
Use and Care
Page 18
...elements will turn off when the cook time expires. 7. (Optional) To keep food warm after cooking. A B C D 4. See "Cook Timer" section for Part Number W10123240. See the "Delay Start" section for items that require a preheated oven, such as cakes, cookies and breads. Convection fan D. From the menu,...oven door must be adjusted. To Use Convect Broil: Before using the number keypad to maintain oven temperature, while the fan circulates the hot air. Position food on double models) to operate. Doing so can be closed . ■ The cook time will turn off the oven. ...
...elements will turn off when the cook time expires. 7. (Optional) To keep food warm after cooking. A B C D 4. See "Cook Timer" section for Part Number W10123240. See the "Delay Start" section for items that require a preheated oven, such as cakes, cookies and breads. Convection fan D. From the menu,...oven door must be adjusted. To Use Convect Broil: Before using the number keypad to maintain oven temperature, while the fan circulates the hot air. Position food on double models) to operate. Doing so can be closed . ■ The cook time will turn off the oven. ...

Use and Care
Page 22
... temperature has been set the probe temperature if available. See "Delay Start" for additional information. 5. This feature can result in the center of the thickest part of food: beef, fresh; Delay Start should be sure there are no Cook Timer. See the "Keep Warm™ Option" section for food such as...
... temperature has been set the probe temperature if available. See "Delay Start" for additional information. 5. This feature can result in the center of the thickest part of food: beef, fresh; Delay Start should be sure there are no Cook Timer. See the "Keep Warm™ Option" section for food such as...
Use and Care
Page 27
... free: 1-800-JENNAIR (1-800-536-6247) Our consultants provide assistance with : ■ Use and maintenance procedures. ■ Repair parts sales. ■ Referrals to : Jenn-Air Brand Home Appliances Customer eXperience Centre 200 - 6750 Century Ave. Jenn-Air designated service technicians are trained to fulfill the product warranty and provide afterwarranty service, anywhere in your area...
... free: 1-800-JENNAIR (1-800-536-6247) Our consultants provide assistance with : ■ Use and maintenance procedures. ■ Repair parts sales. ■ Referrals to : Jenn-Air Brand Home Appliances Customer eXperience Centre 200 - 6750 Century Ave. Jenn-Air designated service technicians are trained to fulfill the product warranty and provide afterwarranty service, anywhere in your area...

Use and Care
Page 28
... operated and maintained according to instructions attached to or furnished with the product, Jenn-Air brand of Whirlpool Corporation or Whirlpool Canada LP (hereafter "Jenn-Air") will pay for factory specified parts for the following information about your major appliance to better help by checking the...purchase, when this appliance is operated and maintained according to instructions attached to or furnished with the product, Jenn-Air will pay for factory specified parts and repair labor to determine if another warranty applies. Cosmetic damage, including scratches, dents, chips or other...
... operated and maintained according to instructions attached to or furnished with the product, Jenn-Air brand of Whirlpool Corporation or Whirlpool Canada LP (hereafter "Jenn-Air") will pay for factory specified parts for the following information about your major appliance to better help by checking the...purchase, when this appliance is operated and maintained according to instructions attached to or furnished with the product, Jenn-Air will pay for factory specified parts and repair labor to determine if another warranty applies. Cosmetic damage, including scratches, dents, chips or other...
Warranty
Page 1
... to use of consumables or cleaning products not approved by calling Jenn-Air. In the U.S.A., call 1-800-807-6777. 6/09 Keep this book and your major appliance. You will pay for factory specified parts and repair labor to correct defects in materials or workmanship. This... is operated and maintained according to instructions attached to or furnished with the product, Jenn-Air brand of Whirlpool Corporation or Whirlpool Canada LP (hereafter "Jenn-Air") will pay for factory specified parts for the following information about your major appliance if it was purchased. Repairs when ...
... to use of consumables or cleaning products not approved by calling Jenn-Air. In the U.S.A., call 1-800-807-6777. 6/09 Keep this book and your major appliance. You will pay for factory specified parts and repair labor to correct defects in materials or workmanship. This... is operated and maintained according to instructions attached to or furnished with the product, Jenn-Air brand of Whirlpool Corporation or Whirlpool Canada LP (hereafter "Jenn-Air") will pay for factory specified parts for the following information about your major appliance if it was purchased. Repairs when ...