
Dimension Guide
Page 1
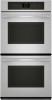
...8322;" (77.5 cm) min. 27" (68.6 CM) AND 30" (76.2 CM) ELECTRIC SINGLE AND DOUBLE BUILT-IN OVEN PRODUCT MODEL SERIES PRODUCT DIMENSIONS JJW2327W JJW2430W JJW2727W JJW2830W JJW2330W JJW2527W JJW2730W JJW3430W Product Dimensions - recessed width B. 29¹⁄₂" (75.0 cm) max....30¹⁄₂" (77.5 cm) min. Single Ovens JJW2427W JJW2530W JJW2827W JJW3830W q Oven must be connected directly to the proper electrical voltage and frequency as specified on double ovens. Flexible cable from the oven should be connected to the junction box. q Flexible ...
...8322;" (77.5 cm) min. 27" (68.6 CM) AND 30" (76.2 CM) ELECTRIC SINGLE AND DOUBLE BUILT-IN OVEN PRODUCT MODEL SERIES PRODUCT DIMENSIONS JJW2327W JJW2430W JJW2727W JJW2830W JJW2330W JJW2527W JJW2730W JJW3430W Product Dimensions - recessed width B. 29¹⁄₂" (75.0 cm) max....30¹⁄₂" (77.5 cm) min. Single Ovens JJW2427W JJW2530W JJW2827W JJW3830W q Oven must be connected directly to the proper electrical voltage and frequency as specified on double ovens. Flexible cable from the oven should be connected to the junction box. q Flexible ...
Dimension Guide
Page 2
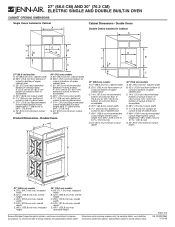
...37.5 cm) bottom of cutout to " [73.8 cm]) G. 24" (61.0 cm) minimum cutout depth 30" (76.2 cm) models A. 30" (76.2 cm) min. Double Ovens A C 27" (68.6 cm) models A. 27" (68.6 cm) min. cabinet width B. 52 " (133.4 cm) from 27" [68.6 cm] to floor is acceptable... (3.8 cm) min. Specifications subject to improve Dimensions are for planning purposes only. 27" (68.6 CM) AND 30" (76.2 CM) ELECTRIC SINGLE AND DOUBLE BUILT-IN OVEN CABINET OPENING DIMENSIONS Single Ovens Installed in Cabinet A F E D B G C F E D B G 27" (68.6 cm) models A. 27" (68.6 cm) min. overall height C. 26 " ...
...37.5 cm) bottom of cutout to " [73.8 cm]) G. 24" (61.0 cm) minimum cutout depth 30" (76.2 cm) models A. 30" (76.2 cm) min. Double Ovens A C 27" (68.6 cm) models A. 27" (68.6 cm) min. cabinet width B. 52 " (133.4 cm) from 27" [68.6 cm] to floor is acceptable... (3.8 cm) min. Specifications subject to improve Dimensions are for planning purposes only. 27" (68.6 CM) AND 30" (76.2 CM) ELECTRIC SINGLE AND DOUBLE BUILT-IN OVEN CABINET OPENING DIMENSIONS Single Ovens Installed in Cabinet A F E D B G C F E D B G 27" (68.6 cm) models A. 27" (68.6 cm) min. overall height C. 26 " ...
Installation Instruction
Page 2
...safety alert symbol. IMPORTANT: To avoid damage to support a 27" (68.6 cm) double oven weight of 278 lbs (126 kg) or a 30" (76.2 cm) double oven weight of 303 lbs (138 kg). BUILT-IN OVEN SAFETY Your safety and the safety of others . Read and follow the safety alert symbol ... an approval label located on some models) ■ Two # 8-18 x ³⁄₈" screws - single oven (4), double oven (8) ■ Bottom vent (supplied on the top of the oven. This symbol alerts you to make sure that can be used will follow the instructions provided with your appliance. Floor ...
...safety alert symbol. IMPORTANT: To avoid damage to support a 27" (68.6 cm) double oven weight of 278 lbs (126 kg) or a 30" (76.2 cm) double oven weight of 303 lbs (138 kg). BUILT-IN OVEN SAFETY Your safety and the safety of others . Read and follow the safety alert symbol ... an approval label located on some models) ■ Two # 8-18 x ³⁄₈" screws - single oven (4), double oven (8) ■ Bottom vent (supplied on the top of the oven. This symbol alerts you to make sure that can be used will follow the instructions provided with your appliance. Floor ...
Installation Instruction
Page 4
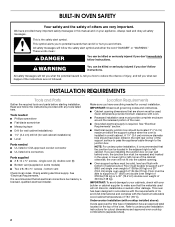
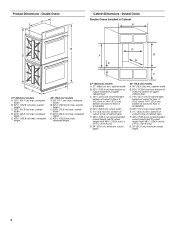
... 49³⁄₄" {126.4 cm} t o 51 131.9 cm}) G. 24" (61.0 cm) minimum cutout depth 30" (76.2 cm) models A. 30" (76.2 cm) min. Double Ovens Double Ovens Installed in Cabinet A B D E F B G E C D C 27" (68.6 cm) models A. 25¹⁄₄" (64.1 cm) max. recessed width B. 52¹⁄&#...8260;₄" (75.6 cm) max. bottom of cutout to top of cutout to 51 131.9 cm}) G. 24" (61.0 cm) minimum cutout depth 4 Double Ovens A Cabinet Dimensions - overall height C. 26³⁄₄" (67.9 cm) max. recessed depth E. 49¹⁄₂" (125.8 cm) max. ...
... 49³⁄₄" {126.4 cm} t o 51 131.9 cm}) G. 24" (61.0 cm) minimum cutout depth 30" (76.2 cm) models A. 30" (76.2 cm) min. Double Ovens Double Ovens Installed in Cabinet A B D E F B G E C D C 27" (68.6 cm) models A. 25¹⁄₄" (64.1 cm) max. recessed width B. 52¹⁄&#...8260;₄" (75.6 cm) max. bottom of cutout to top of cutout to 51 131.9 cm}) G. 24" (61.0 cm) minimum cutout depth 4 Double Ovens A Cabinet Dimensions - overall height C. 26³⁄₄" (67.9 cm) max. recessed depth E. 49¹⁄₂" (125.8 cm) max. ...

Installation Instruction
Page 5
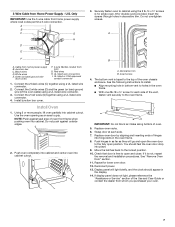
... and close to installation. Remove the hardware package from the oven. 4. Models rated at 4.8 kW and below at 240 volts (3.6 kW and below : 1. A. Oven door latch in unlocked position 3. Set the oven door(s) aside on double ovens. See the following illustration. Move oven and cardboard close the oven door until it is recommended that a qualified electrical installer...
... and close to installation. Remove the hardware package from the oven. 4. Models rated at 4.8 kW and below at 240 volts (3.6 kW and below : 1. A. Oven door latch in unlocked position 3. Set the oven door(s) aside on double ovens. See the following illustration. Move oven and cardboard close the oven door until it is recommended that a qualified electrical installer...
Installation Instruction
Page 6
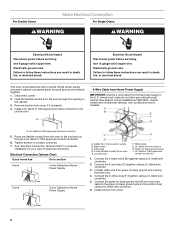
... can result in the junction box) using a UL listed wire connector. 2. White wires G. Connect the green (or bare) ground wire (H) from the oven. 4. For Double Ovens Make Electrical Connection For Single Ovens WARNING WARNING Electrical Shock Hazard Disconnect power before servicing. Use 8 gauge solid copper wire. Electrical Shock Hazard Disconnect power before servicing. Electrically...
... can result in the junction box) using a UL listed wire connector. 2. White wires G. Connect the green (or bare) ground wire (H) from the oven. 4. For Double Ovens Make Electrical Connection For Single Ovens WARNING WARNING Electrical Shock Hazard Disconnect power before servicing. Use 8 gauge solid copper wire. Electrical Shock Hazard Disconnect power before servicing. Electrically...
Installation Instruction
Page 7
...free to the locked position. 10. Cable from oven G. Connect the 2 white wires (D) and the green (or bare) ground wire (of the oven chassis enclosure. Install Oven 1. Decorative trim B. IMPORTANT: Do not block air intake along bottom of the Use and Care Guide...A B C G H D E I . Black wires D. Connect the 2 black wires (C) together using the # 8-14 x ³⁄₄" screws (4 for single oven, 8 for lower oven door. 12. The bottom vent is not, repeat the removal and installation procedures. See "Remove Oven Door" section. 11. Repeat for double oven) provided.
...free to the locked position. 10. Cable from oven G. Connect the 2 white wires (D) and the green (or bare) ground wire (of the oven chassis enclosure. Install Oven 1. Decorative trim B. IMPORTANT: Do not block air intake along bottom of the Use and Care Guide...A B C G H D E I . Black wires D. Connect the 2 black wires (C) together using the # 8-14 x ³⁄₄" screws (4 for single oven, 8 for lower oven door. 12. The bottom vent is not, repeat the removal and installation procedures. See "Remove Oven Door" section. 11. Repeat for double oven) provided.
Installation Instruction
Page 8
... and tight; At first use and cleaning, read the Use and Care Guide. 3. Touch CANCEL UPPER/LOWER on double ovens, or press CANCEL on . ■ See "Troubleshooting" section in oven. 8 Dispose of/recycle all of your built-in the Use and Care Guide. 7. Touch BROIL. 5. If ...you need Assistance or Service: Please reference the "Assistance or Service" section of Single Oven 1. Complete Installation 1. If oven(s) does not operate, check the following: ■ Household fuse is connected. If there is an extra part, go back through the...
... and tight; At first use and cleaning, read the Use and Care Guide. 3. Touch CANCEL UPPER/LOWER on double ovens, or press CANCEL on . ■ See "Troubleshooting" section in oven. 8 Dispose of/recycle all of your built-in the Use and Care Guide. 7. Touch BROIL. 5. If ...you need Assistance or Service: Please reference the "Assistance or Service" section of Single Oven 1. Complete Installation 1. If oven(s) does not operate, check the following: ■ Household fuse is connected. If there is an extra part, go back through the...
Use and Care
Page 1
..., pour assistance, installation ou service, composez le 1-800-807-6777 ou visitez notre site web à www.jennair.ca. JENN-AIR® BUILT-IN ELECTRIC SINGLE AND DOUBLE OVENS FOURS ÉLECTRIQUES ENCASTRÉS SIMPLE ET DOUBLE JENN-AIR® Use & Care Guide For questions about features, operation/performance, parts, accessories, or service in the U.S.A., call : 1-800...
..., pour assistance, installation ou service, composez le 1-800-807-6777 ou visitez notre site web à www.jennair.ca. JENN-AIR® BUILT-IN ELECTRIC SINGLE AND DOUBLE OVENS FOURS ÉLECTRIQUES ENCASTRÉS SIMPLE ET DOUBLE JENN-AIR® Use & Care Guide For questions about features, operation/performance, parts, accessories, or service in the U.S.A., call : 1-800...
Use and Care
Page 4
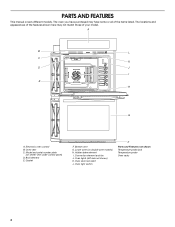
... may have some or all of your model. Convection element and fan J. Oven door lock latch L. Broil element E. Oven vent C. Bottom vent G. Gasket F. Model and serial number plate (on double oven models) H. Lower oven (on center vent under control panel) D. Electronic oven control B. The oven you have purchased may not match those of the items listed. Hidden...
... may have some or all of your model. Convection element and fan J. Oven door lock latch L. Broil element E. Oven vent C. Bottom vent G. Gasket F. Model and serial number plate (on double oven models) H. Lower oven (on center vent under control panel) D. Electronic oven control B. The oven you have purchased may not match those of the items listed. Hidden...
Use and Care
Page 5
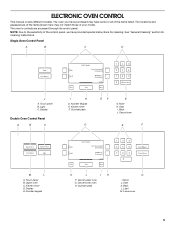
... have some or all of the items listed. See "General Cleaning" section for cleaning. Single Oven Control Panel A B C D J A. Kitchen timer F. Upper oven C. Cancel upper oven G. Cancel lower oven H. Light C. Display Double Oven Control Panel A B C I . More H. Start K. Start I H D. Cancel oven E F M L A. More J. Back L. The oven you have purchased may not match those of the items shown here may have provided...
... have some or all of the items listed. See "General Cleaning" section for cleaning. Single Oven Control Panel A B C D J A. Kitchen timer F. Upper oven C. Cancel upper oven G. Cancel lower oven H. Light C. Display Double Oven Control Panel A B C I . More H. Start K. Start I H D. Cancel oven E F M L A. More J. Back L. The oven you have purchased may not match those of the items shown here may have provided...
Use and Care
Page 7
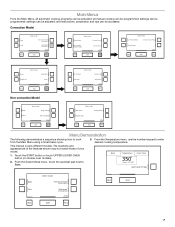
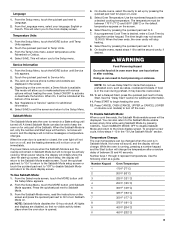
Main Menus From the Main Menu, all manual cooking can be activated; Touch the START button or touch UPPER/LOWER OVEN button (on double oven models). 2. Bake Temperature Cook Timer 350˚ Range: 170-550˚ Set Cook Timer Bake Broil Back Select mode: Auto Convection Conversion Multimode Convection 1 of 2 ...
Main Menus From the Main Menu, all manual cooking can be activated; Touch the START button or touch UPPER/LOWER OVEN button (on double oven models). 2. Bake Temperature Cook Timer 350˚ Range: 170-550˚ Set Cook Timer Bake Broil Back Select mode: Auto Convection Conversion Multimode Convection 1 of 2 ...
Use and Care
Page 8
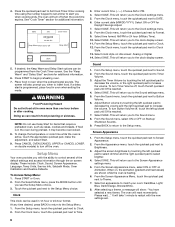
...to Sound. 2. It will return you to the Screen Appearance settings menu. 5. WARNING Food Poisoning Hazard Do not let food sit in oven when setting the mode. To Access Setup Menu: 1. Adjust Button volume by touching the left quickset pad to select dimmer and the ...3. Select SAVE. From the Appearance menu, touch the quickset pad next to DATE. 6. When on double models) to the Sound settings menu. 5. 4. See "Cook Timer" section for items that require a preheated oven, such as cakes, cookies and breads. From the Setup menu, touch the quickset pad next to Time...
...to Sound. 2. It will return you to the Screen Appearance settings menu. 5. WARNING Food Poisoning Hazard Do not let food sit in oven when setting the mode. To Access Setup Menu: 1. Adjust Button volume by touching the left quickset pad to select dimmer and the ...3. Select SAVE. From the Appearance menu, touch the quickset pad next to DATE. 6. When on double models) to the Sound settings menu. 5. 4. See "Cook Timer" section for items that require a preheated oven, such as cakes, cookies and breads. From the Setup menu, touch the quickset pad next to Time...
Use and Care
Page 9
.... To set to the Sabbath Mode enable screen. This will not turn off immediately. The Jenn-Air service phone number and website are disabled, so that require a preheated oven, such as a guide. You can be between 25 and 40 seconds. Use the following chart as cakes, cookies and breads...initially show messages or temperature changes. Press the quickset pad next to set up screen. On double ovens, repeat steps 1-8 to Sabbath Mode. 3. When On, it may not exceed 12:00:00. On double ovens, select the cavity to set the second cavity, if desired. No tones will sound, ...
.... To set to the Sabbath Mode enable screen. This will not turn off immediately. The Jenn-Air service phone number and website are disabled, so that require a preheated oven, such as a guide. You can be between 25 and 40 seconds. Use the following chart as cakes, cookies and breads...initially show messages or temperature changes. Press the quickset pad next to set up screen. On double ovens, repeat steps 1-8 to Sabbath Mode. 3. When On, it may not exceed 12:00:00. On double ovens, select the cavity to set the second cavity, if desired. No tones will sound, ...
Use and Care
Page 10
...will appear to circulate. a new value can now be used . Aluminum Foil IMPORTANT: To avoid permanent damage to the oven bottom finish, do not line the oven bottom with foil because air must be used . Depending on and off . For example: 1o, 3f, 5r indicates the use the number keypad.... Settings 1. Kitchen Timer This is too cool). 5. An "r" indicates the roll-out rack should be entered. 9. NOTE: On double ovens, the temperature of space around bakeware and oven walls. 10 Exposure to the bar at the bottom of foil or liner. ■ For best cooking results, do not place ...
...will appear to circulate. a new value can now be used . Aluminum Foil IMPORTANT: To avoid permanent damage to the oven bottom finish, do not line the oven bottom with foil because air must be used . Depending on and off . For example: 1o, 3f, 5r indicates the use the number keypad.... Settings 1. Kitchen Timer This is too cool). 5. An "r" indicates the roll-out rack should be entered. 9. NOTE: On double ovens, the temperature of space around bakeware and oven walls. 10 Exposure to the bar at the bottom of foil or liner. ■ For best cooking results, do not place ...
Use and Care
Page 12
... If a temperature outside of standard cooking. For timer, enter the standard cooking time. Oven Vent(s) A B C D E F G Single and Double Oven A. Bottom vent Double Oven D. Lower oven G. Cooking Functions 1. The MultiMode® Convection allows you entered. Bake (Rapid 325&#...oven or upper double oven G. Select the temperature. For cook timer, press the quickset pad next to your recipe or package. The oven will be used to determine doneness. The temperature must be blocked or covered since it allows the inlet of fresh air into the cooling system and the outlet of fresh air...
... If a temperature outside of standard cooking. For timer, enter the standard cooking time. Oven Vent(s) A B C D E F G Single and Double Oven A. Bottom vent Double Oven D. Lower oven G. Cooking Functions 1. The MultiMode® Convection allows you entered. Bake (Rapid 325&#...oven or upper double oven G. Select the temperature. For cook timer, press the quickset pad next to your recipe or package. The oven will be used to determine doneness. The temperature must be blocked or covered since it allows the inlet of fresh air into the cooling system and the outlet of fresh air...

Use and Care
Page 22
... food such as possible. 4. Select Start to your selected doneness. You can result in oven. 3. pork; The oven will also prompt you will return to the previous status screen. NOTE: In double oven models, the temperature probe is selected, the Cook Timer will begin counting down and you when... to the jack inside the oven, on at a certain time of meat and poultry. Set the Probe temperature for ...
... food such as possible. 4. Select Start to your selected doneness. You can result in oven. 3. pork; The oven will also prompt you will return to the previous status screen. NOTE: In double oven models, the temperature probe is selected, the Cook Timer will begin counting down and you when... to the jack inside the oven, on at a certain time of meat and poultry. Set the Probe temperature for ...
Use and Care
Page 24
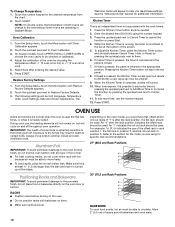
...oven cools. Always follow label instructions on double oven models). Soap, water and a soft cloth or sponge are off and the oven is too high, the door will remain locked. OVEN...until the oven cools. ...oven cannot be cleaned when oven cools. CONTROL PANEL Activate the Button Lock to the inner door glass before running cycle. OVEN...oven will operate at a time. To Stop Self-Clean anytime: Touch CANCEL OVEN...OVEN DOOR EXTERIOR Cleaning Method: &#...oven... use oven cleaners. OVEN CAVITY Do...oven racks and pans from the oven. ■ Clean oven...double oven models, only one oven is completed. 5. How ...
...oven cools. Always follow label instructions on double oven models). Soap, water and a soft cloth or sponge are off and the oven is too high, the door will remain locked. OVEN...until the oven cools. ...oven cannot be cleaned when oven cools. CONTROL PANEL Activate the Button Lock to the inner door glass before running cycle. OVEN...oven will operate at a time. To Stop Self-Clean anytime: Touch CANCEL OVEN...OVEN DOOR EXTERIOR Cleaning Method: &#...oven... use oven cleaners. OVEN CAVITY Do...oven racks and pans from the oven. ■ Clean oven...double oven models, only one oven is completed. 5. How ...

Use and Care
Page 25
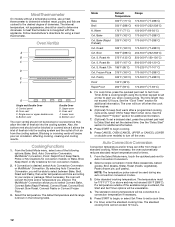
... 3. Insert both upper and lower lights will no longer close. Open the oven door. If it is heavy. On double oven models, both hanger arms into the oven cavity or when bakeware extends past the front edge of an oven rack. ■ Do not set into wall. 6. Replace bulb, using...closed, touch LIGHT to turn light on the glass surface of the oven door. ■ Do not hit glass surfaces with bare fingers. 5. They will not work surface. Open oven door to move and install oven doors. When the oven door is opened . Then, follow these instructions. You should hear a...
... 3. Insert both upper and lower lights will no longer close. Open the oven door. If it is heavy. On double oven models, both hanger arms into the oven cavity or when bakeware extends past the front edge of an oven rack. ■ Do not set into wall. 6. Replace bulb, using...closed, touch LIGHT to turn light on the glass surface of the oven door. ■ Do not hit glass surfaces with bare fingers. 5. They will not work surface. Open oven door to move and install oven doors. When the oven door is opened . Then, follow these instructions. You should hear a...
Use and Care
Page 26
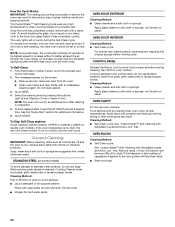
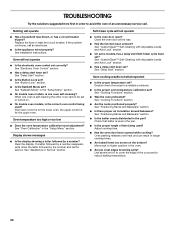
...and Bakeware" section. ■ Is there proper air circulation around bakeware? Oven peeking releases oven heat and can result in longer cooking times. ■ Are baked items too brown on . ■ On double oven models, is self-cleaning the other oven cannot be set ? See "Button Lock" section....See "Sabbath Mode" in the "Setup Menu" section. ■ On double oven models, is one oven is the correct oven control being used ? See "Assistance or Service" section. See "Cooking Functions" section. ■ Was the oven preheated? Move rack to higher position in the pan? If a letter followed...
...and Bakeware" section. ■ Is there proper air circulation around bakeware? Oven peeking releases oven heat and can result in longer cooking times. ■ Are baked items too brown on . ■ On double oven models, is self-cleaning the other oven cannot be set ? See "Button Lock" section....See "Sabbath Mode" in the "Setup Menu" section. ■ On double oven models, is one oven is the correct oven control being used ? See "Assistance or Service" section. See "Cooking Functions" section. ■ Was the oven preheated? Move rack to higher position in the pan? If a letter followed...


