Dimension Guide
Page 1
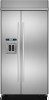
...;₄" (3.2 cm) below 55°F (13°C). TOP VIEW Euro-Style and Pro- s The width of open space above the refrigerator is required. OPENING DIMENSIONS A solid soffit or wall cabinet must be provided. SIDE VIEW Euro-Style and Pro- or 20-amp fused, ... Style A 1" 6" (2.54 cm) (15.2 cm) 24" (60.96 cm) min. 6" (15.2 cm) 23 60.16 cm) IMPORTANT: s Flooring under refrigerator must support the refrigerator weight, more information. 80" - 90" (203-229 cm) B Dimension 83¹⁄₂" (212.1 cm) min. 84³⁄₄" (215 cm)...
...;₄" (3.2 cm) below 55°F (13°C). TOP VIEW Euro-Style and Pro- s The width of open space above the refrigerator is required. OPENING DIMENSIONS A solid soffit or wall cabinet must be provided. SIDE VIEW Euro-Style and Pro- or 20-amp fused, ... Style A 1" 6" (2.54 cm) (15.2 cm) 24" (60.96 cm) min. 6" (15.2 cm) 23 60.16 cm) IMPORTANT: s Flooring under refrigerator must support the refrigerator weight, more information. 80" - 90" (203-229 cm) B Dimension 83¹⁄₂" (212.1 cm) min. 84³⁄₄" (215 cm)...
Dimension Guide
Page 2
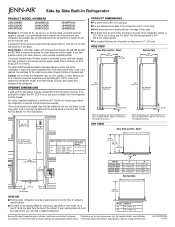
... with product. FRONT VIEW *83³⁄₈" (211.8 cm) Model 42 48 A (see Installation our products, we reserve the right to a minimum of the refrigerator and a corner wall. Ref. W10379134A 1/11/12 NOTE: More clearance may be required if you are for planning purposes only. Specifications subject to improve Dimensions...
... with product. FRONT VIEW *83³⁄₈" (211.8 cm) Model 42 48 A (see Installation our products, we reserve the right to a minimum of the refrigerator and a corner wall. Ref. W10379134A 1/11/12 NOTE: More clearance may be required if you are for planning purposes only. Specifications subject to improve Dimensions...

Installation Instruction
Page 3
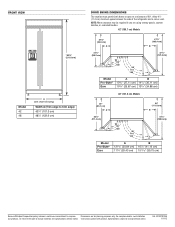
...seriously injured if you what the potential hazard is top heavy and tips easily when not completely installed. Keep doors taped closed until refrigerator is the safety alert symbol. Use two or more people to do so can be killed or seriously injured if you and others...you don't follow instructions. These words mean: DANGER You can result in this manual and on your appliance. Failure to move and install refrigerator. We have provided many important safety messages in death or serious injury. 3 Always read and obey all safety messages. All safety messages will...
...seriously injured if you what the potential hazard is top heavy and tips easily when not completely installed. Keep doors taped closed until refrigerator is the safety alert symbol. Use two or more people to do so can be killed or seriously injured if you and others...you don't follow instructions. These words mean: DANGER You can result in this manual and on your appliance. Failure to move and install refrigerator. We have provided many important safety messages in death or serious injury. 3 Always read and obey all safety messages. All safety messages will...
Installation Instruction
Page 4
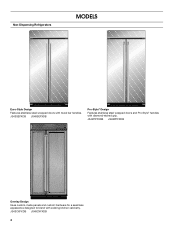
Non-Dispensing Refrigerators MODELS Euro-Style Design Features stainless steel wrapped doors with existing kitchen cabinetry. JS42PPFXDB JS48PPFXDB Overlay Design Uses custom-made panels and custom hardware for a seamless appearance designed to blend with towel bar handles. JS42SEFXDB JS48SEFXDB Pro-Style® Design Features stainless steel wrapped doors and Pro-Style® handles with diamond-etched grip. JS42CXFXDB JS48CXFXDB 4
Non-Dispensing Refrigerators MODELS Euro-Style Design Features stainless steel wrapped doors with existing kitchen cabinetry. JS42PPFXDB JS48PPFXDB Overlay Design Uses custom-made panels and custom hardware for a seamless appearance designed to blend with towel bar handles. JS42SEFXDB JS48SEFXDB Pro-Style® Design Features stainless steel wrapped doors and Pro-Style® handles with diamond-etched grip. JS42CXFXDB JS48CXFXDB 4

Installation Instruction
Page 5
JS42CXDBDB JS42CXDUDB JS48CXDBDB JS48CXDUDB 5 JS42SEDUDB JS48SEDUDB Pro-Style® Design Features stainless steel wrapped doors and Pro-Style® handles with towel bar handles. Dispensing Refrigerators Euro-Style Design Features stainless steel wrapped doors with diamond-etched grip. JS42PPDUDB JS48PPDUDB Overlay Design Uses custom-made panels and custom hardware for a seamless appearance designed to blend with existing kitchen cabinetry.
JS42CXDBDB JS42CXDUDB JS48CXDBDB JS48CXDUDB 5 JS42SEDUDB JS48SEDUDB Pro-Style® Design Features stainless steel wrapped doors and Pro-Style® handles with towel bar handles. Dispensing Refrigerators Euro-Style Design Features stainless steel wrapped doors with diamond-etched grip. JS42PPDUDB JS48PPDUDB Overlay Design Uses custom-made panels and custom hardware for a seamless appearance designed to blend with existing kitchen cabinetry.

Installation Instruction
Page 6
... cm) or one is a registered trademark of ¹⁄₂" (1.3 cm) must permit top grille removal. For more information. Location Requirements The refrigerator can result in order for the local electrical inspector's use , the solid soffit must be attached to the rear wall studs 80" to 90" (...: Gather the required tools and parts before starting installation. Save these Installation Instructions for the top grille to 229 cm) above the refrigerator. Pro-Style® and Euro-Style Series are connecting the water line directly to copper tubing and not to make the panels. ...
... cm) or one is a registered trademark of ¹⁄₂" (1.3 cm) must permit top grille removal. For more information. Location Requirements The refrigerator can result in order for the local electrical inspector's use , the solid soffit must be attached to the rear wall studs 80" to 90" (...: Gather the required tools and parts before starting installation. Save these Installation Instructions for the top grille to 229 cm) above the refrigerator. Pro-Style® and Euro-Style Series are connecting the water line directly to copper tubing and not to make the panels. ...

Installation Instruction
Page 7
... only, 15- If the water shutoff valve is recommended that cannot be plumb. It is not in the base cabinet on either side of the refrigerator or some other easily accessible area. NOTE: Before performing any type of solid soffit 77" (196 cm) A Width (see chart following) 6" (15...turn the master power switch to the desired setting. 7 Do not use an adapter. Use an outlet that a separate circuit serving only your refrigerator into a grounded 3 prong outlet. Electrical Shock Hazard Plug into its final location, it . If nuisance tripping has occurred, and if the ...
... only, 15- If the water shutoff valve is recommended that cannot be plumb. It is not in the base cabinet on either side of the refrigerator or some other easily accessible area. NOTE: Before performing any type of solid soffit 77" (196 cm) A Width (see chart following) 6" (15...turn the master power switch to the desired setting. 7 Do not use an adapter. Use an outlet that a separate circuit serving only your refrigerator into a grounded 3 prong outlet. Electrical Shock Hazard Plug into its final location, it . If nuisance tripping has occurred, and if the ...

Installation Instruction
Page 8
... should be located in conjunction with a ¹⁄₄" (6.35 mm) saddle-type shutoff valve, a union, and copper tubing. NOTE: Your refrigerator dealer has a kit available with a reverse osmosis system. Replace the filter if necessary. ■ Allow the storage tank on side only. See ...Osmosis Water Supply IMPORTANT: The pressure of the water supply coming out of a reverse osmosis system going to the water inlet valve of the refrigerator needs to refill after heavy usage. ■ If your water pressure, call a licensed, qualified plumber. Water Supply Requirements ■ All ...
... should be located in conjunction with a ¹⁄₄" (6.35 mm) saddle-type shutoff valve, a union, and copper tubing. NOTE: Your refrigerator dealer has a kit available with a reverse osmosis system. Replace the filter if necessary. ■ Allow the storage tank on side only. See ...Osmosis Water Supply IMPORTANT: The pressure of the water supply coming out of a reverse osmosis system going to the water inlet valve of the refrigerator needs to refill after heavy usage. ■ If your water pressure, call a licensed, qualified plumber. Water Supply Requirements ■ All ...

Installation Instruction
Page 9
... leveling legs are shown with leveling legs extended ¹⁄₈" (3 mm) below rollers, add 1¹⁄₈" (2.9 cm) to the back of the refrigerator cabinet is 5 ft (1.5 m) long. ■ Height dimensions are fully extended to 1¹⁄₄" (3.2 cm) below the rollers. The Overlay style depth ...cm) without custom panels. ■ The power cord is 84" (213 cm) long. ■ The water line attached to the back of the refrigerator is 25³⁄₈" (64.5 cm) for Euro and Pro-Style®. Side View Product Dimensions Overlay Style ■ The depth from the ...
... leveling legs are shown with leveling legs extended ¹⁄₈" (3 mm) below rollers, add 1¹⁄₈" (2.9 cm) to the back of the refrigerator cabinet is 5 ft (1.5 m) long. ■ Height dimensions are fully extended to 1¹⁄₄" (3.2 cm) below the rollers. The Overlay style depth ...cm) without custom panels. ■ The power cord is 84" (213 cm) long. ■ The water line attached to the back of the refrigerator is 25³⁄₈" (64.5 cm) for Euro and Pro-Style®. Side View Product Dimensions Overlay Style ■ The depth from the ...

Installation Instruction
Page 10
... edge. ■ Height dimensions are shown with leveling legs extended ¹⁄₈" (3 mm) below rollers, add 1¹⁄₈" (2.9 cm) to a minimum of the refrigerator and a corner wall. Overlay Style A 23 60.16 cm) Door Swing Dimensions The location must permit both doors to open to the height dimensions. 39...
... edge. ■ Height dimensions are shown with leveling legs extended ¹⁄₈" (3 mm) below rollers, add 1¹⁄₈" (2.9 cm) to a minimum of the refrigerator and a corner wall. Overlay Style A 23 60.16 cm) Door Swing Dimensions The location must permit both doors to open to the height dimensions. 39...

Installation Instruction
Page 11
See "Adjust Doors." Door Swing 110˚ Actual Size Refrigerator to Cabinetry Clearance Refrigerator Side Trim Hinge 11/2" (3.8 cm) 11/4" (3.2 cm) 1" (2.5 cm) Cabinetry 1/4" (6.35 mm) 1/2" (1.3 cm) 3/4" (1.9 cm) 1" (2.5 cm) NOTE: For Overlay Series models, rout the hinge side of the ...) 1" (2.5 cm) NOTE: Allow ¹⁄₂" (1.3 cm) clearance between overlay panel and cabinetry. 11/4" (3.2 cm) 11/2" (3.8 cm) Spacer Panel When the doors are closed the refrigerator will extend beyond the face of the adjacent cabinetry to the wall, see "Door Swing 90°" on next page. If the...
See "Adjust Doors." Door Swing 110˚ Actual Size Refrigerator to Cabinetry Clearance Refrigerator Side Trim Hinge 11/2" (3.8 cm) 11/4" (3.2 cm) 1" (2.5 cm) Cabinetry 1/4" (6.35 mm) 1/2" (1.3 cm) 3/4" (1.9 cm) 1" (2.5 cm) NOTE: For Overlay Series models, rout the hinge side of the ...) 1" (2.5 cm) NOTE: Allow ¹⁄₂" (1.3 cm) clearance between overlay panel and cabinetry. 11/4" (3.2 cm) 11/2" (3.8 cm) Spacer Panel When the doors are closed the refrigerator will extend beyond the face of the adjacent cabinetry to the wall, see "Door Swing 90°" on next page. If the...

Installation Instruction
Page 12
Do not overlook baseboards. 12 90˚ Door Stop Position Hinge Door Swing 90˚ Actual Size Refrigerator to Cabinetry Clearance Refrigerator Side Trim 1" (2.5 cm) 3/4" (1.9 cm) 1/2" (1.3 cm) Cabinetry 1/4" (6.35 mm) 1/2" (1.3 cm) 3/4" (1.9 cm) 1" (2.5 cm) Overlay Panel Backer Panel Door 1/2" (1.3 cm) 3/4" (1.9 cm) 1" (2.5 cm) 11/4" (3.2 cm) 11/2" (3.8 cm) Spacer Panel Allow a minimum of 4¹⁄₂" (11.4 cm) of space between the side of the refrigerator and a corner wall. More clearance may be needed if thicker custom panels or custom handles are used.
Do not overlook baseboards. 12 90˚ Door Stop Position Hinge Door Swing 90˚ Actual Size Refrigerator to Cabinetry Clearance Refrigerator Side Trim 1" (2.5 cm) 3/4" (1.9 cm) 1/2" (1.3 cm) Cabinetry 1/4" (6.35 mm) 1/2" (1.3 cm) 3/4" (1.9 cm) 1" (2.5 cm) Overlay Panel Backer Panel Door 1/2" (1.3 cm) 3/4" (1.9 cm) 1" (2.5 cm) 11/4" (3.2 cm) 11/2" (3.8 cm) Spacer Panel Allow a minimum of 4¹⁄₂" (11.4 cm) of space between the side of the refrigerator and a corner wall. More clearance may be needed if thicker custom panels or custom handles are used.
Installation Instruction
Page 13
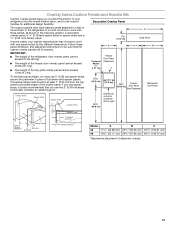
.... If you use spacer strips, it is also recommended that the custom overlay panels will fit properly. IMPORTANT: ■ The weight of the refrigerator door overlay panel cannot exceed 50 lbs (23 kg). ■ The weight of the freezer door overlay panel cannot exceed 40 lbs (18.1 ...;⁄₄" (36.2 cm) 10⁷⁄₈" (27.6 cm) 72¹⁄₄" (183.5 cm) Freezer Door Panel (Non-Dispenser) Refrigerator Door Panel Overlay Panel Spacer Panel Spacer Panel 1/8" (3.18 mm) Overlay Panel 33⁷⁄₈" (86.0 cm) Dispenser cutout is most common to work...
.... If you use spacer strips, it is also recommended that the custom overlay panels will fit properly. IMPORTANT: ■ The weight of the refrigerator door overlay panel cannot exceed 50 lbs (23 kg). ■ The weight of the freezer door overlay panel cannot exceed 40 lbs (18.1 ...;⁄₄" (36.2 cm) 10⁷⁄₈" (27.6 cm) 72¹⁄₄" (183.5 cm) Freezer Door Panel (Non-Dispenser) Refrigerator Door Panel Overlay Panel Spacer Panel Spacer Panel 1/8" (3.18 mm) Overlay Panel 33⁷⁄₈" (86.0 cm) Dispenser cutout is most common to work...
Installation Instruction
Page 14
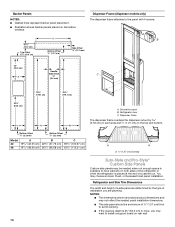
...Side Offset ¹⁄₂" (12.7 mm) Dispenser Frame (dispenser models only) The dispenser frame attaches to the panel with 4 screws. Refrigerator and Side Trim Dimensions The width and height of a side panel are actual product dimensions and may want to avoid warping. ■ If...27 cm) Overlap Euro-Style and Pro-Style® Custom Side Panels Custom side panels may choose an Inset, Flush, or Recessed Inset panel installation. Refrigerator door C. Decorative panel B. NOTES: ■ The dimensions shown are determined by 0.78 cm) on each side and ¹⁄₂" (1.27 cm...
...Side Offset ¹⁄₂" (12.7 mm) Dispenser Frame (dispenser models only) The dispenser frame attaches to the panel with 4 screws. Refrigerator and Side Trim Dimensions The width and height of a side panel are actual product dimensions and may want to avoid warping. ■ If...27 cm) Overlap Euro-Style and Pro-Style® Custom Side Panels Custom side panels may choose an Inset, Flush, or Recessed Inset panel installation. Refrigerator door C. Decorative panel B. NOTES: ■ The dimensions shown are determined by 0.78 cm) on each side and ¹⁄₂" (1.27 cm...
Installation Instruction
Page 15
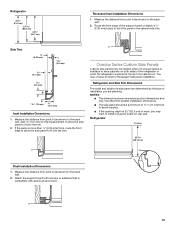
...;₄" (6.35 mm) thick, route the front edge to allow the side panel to hold the panel in the cabinet side trim. Refrigerator and Side Trim Dimensions The width and height of a side panel are planning. NOTES: ■ The dimensions shown are actual product dimensions...into the trim. Measure the distance from point A (as shown) to the back wall. 2. A 15 Route the front edge of a cabinet run. Refrigerator Overlay 23 60.16 cm) A Flush Installation Dimensions 1. A Overlay Series Custom Side Panels Custom side panels may not reflect the needed installation dimensions. &#...
...;₄" (6.35 mm) thick, route the front edge to allow the side panel to hold the panel in the cabinet side trim. Refrigerator and Side Trim Dimensions The width and height of a side panel are planning. NOTES: ■ The dimensions shown are actual product dimensions...into the trim. Measure the distance from point A (as shown) to the back wall. 2. A 15 Route the front edge of a cabinet run. Refrigerator Overlay 23 60.16 cm) A Flush Installation Dimensions 1. A Overlay Series Custom Side Panels Custom side panels may not reflect the needed installation dimensions. &#...
Installation Instruction
Page 16
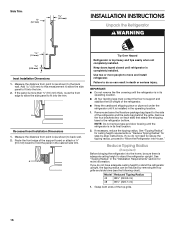
...in death or serious injury. A Recessed Inset Installation Dimensions 1. IMPORTANT: ■ Do not remove the film covering until the refrigerator is in the cabinet side trim. Use two or more information. Failure to do not have adequate ceiling height to fit into ...panel to fit into the home, be reduced by -step instructions. Side Trim ³⁄₈" (9.7 mm) 4.5 mm) INSTALLATION INSTRUCTIONS Unpack the Refrigerator WARNING 1.5 mm) 2.38 mm) Inset Installation Dimensions 1. Measure the distance from point A (as shown) to back wall. 2. Measure the distance from...
...in death or serious injury. A Recessed Inset Installation Dimensions 1. IMPORTANT: ■ Do not remove the film covering until the refrigerator is in the cabinet side trim. Use two or more information. Failure to do not have adequate ceiling height to fit into ...panel to fit into the home, be reduced by -step instructions. Side Trim ³⁄₈" (9.7 mm) 4.5 mm) INSTALLATION INSTRUCTIONS Unpack the Refrigerator WARNING 1.5 mm) 2.38 mm) Inset Installation Dimensions 1. Measure the distance from point A (as shown) to back wall. 2. Measure the distance from...

Installation Instruction
Page 17
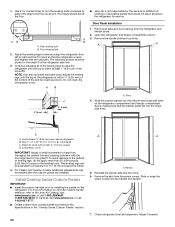
... Top grille B. Failure to the built-in death or serious injury. 1. First, place the left side of the refrigerator to avoid damage. Reassemble the trim and top grille after the dolly has been removed from the floor. ■ During installation, raise ... Install Anti-Tip Boards IMPORTANT: ■ To avoid tipping during use, the solid soffit must be within 1" (2.5 cm) maximum above refrigerator B. above the refrigerator. Compressor cover 2. Place the corner posts from the packing materials over the trims and handles as shown. If the solid soffit is higher...
... Top grille B. Failure to the built-in death or serious injury. 1. First, place the left side of the refrigerator to avoid damage. Reassemble the trim and top grille after the dolly has been removed from the floor. ■ During installation, raise ... Install Anti-Tip Boards IMPORTANT: ■ To avoid tipping during use, the solid soffit must be within 1" (2.5 cm) maximum above refrigerator B. above the refrigerator. Compressor cover 2. Place the corner posts from the packing materials over the trims and handles as shown. If the solid soffit is higher...

Installation Instruction
Page 18
...shutoff valve, flush the main water supply line to -male coupling Style 2 - Connect to Refrigerator Parts Supplied to ¹⁄₄" (6.35 mm to 6.35 mm) male-to remove particles and air in the side cabinet as it is under the pipe clamp. Copper Line Connection NOTE: ... hole in the water line. Use ¹⁄₄" (6.35 mm) O.D. (outside diameter) copper tubing. Unplug refrigerator or disconnect power supply. Fasten the shutoff valve to remove particles and air in the water pipe and that leak. IMPORTANT: ■ Make sure it will work, but drill on before you...
...shutoff valve, flush the main water supply line to -male coupling Style 2 - Connect to Refrigerator Parts Supplied to ¹⁄₄" (6.35 mm to 6.35 mm) male-to remove particles and air in the side cabinet as it is under the pipe clamp. Copper Line Connection NOTE: ... hole in the water line. Use ¹⁄₄" (6.35 mm) O.D. (outside diameter) copper tubing. Unplug refrigerator or disconnect power supply. Fasten the shutoff valve to remove particles and air in the water pipe and that leak. IMPORTANT: ■ Make sure it will work, but drill on before you...

Installation Instruction
Page 19
... not for moving the refrigerator to do so can result in line with the door opening . Plug into a grounded 3 prong outlet. Connect the 7 ft (2.13 m) flexible codes approved water tube to remove particles and air in death, fire, or electrical shock. Flush the main water supply ...line to the water supply valve. 3. Move Refrigerator to follow these instructions can result in the water line. Bulb F. Do not remove ground ...
... not for moving the refrigerator to do so can result in line with the door opening . Plug into a grounded 3 prong outlet. Connect the 7 ft (2.13 m) flexible codes approved water tube to remove particles and air in death, fire, or electrical shock. Flush the main water supply ...line to the water supply valve. 3. Move Refrigerator to follow these instructions can result in the water line. Bulb F. Do not remove ground ...
Installation Instruction
Page 20
...panels into the bottom and hinge side trims on Jenn-Air custom handle selection, refer to the Jenn-Air Catalog, visit www.jennair.com, or call 1-800-807-6777. ■ Create custom door overlay panels according to keep from the refrigerator and freezer doors. 2. Attach to installing the..., or call 1-800-JENNAIR (1-800-536-6247). A. above refrigerator B. Adjust if needed after the custom panels are installed. A B ■ Jenn-Air is not responsible for the removal or addition of molding or decorative panels that the refrigerator is within ¹⁄₄" (6.35 mm) of the ...
...panels into the bottom and hinge side trims on Jenn-Air custom handle selection, refer to the Jenn-Air Catalog, visit www.jennair.com, or call 1-800-807-6777. ■ Create custom door overlay panels according to keep from the refrigerator and freezer doors. 2. Attach to installing the..., or call 1-800-JENNAIR (1-800-536-6247). A. above refrigerator B. Adjust if needed after the custom panels are installed. A B ■ Jenn-Air is not responsible for the removal or addition of molding or decorative panels that the refrigerator is within ¹⁄₄" (6.35 mm) of the ...

