
Owners Manual
Page 1
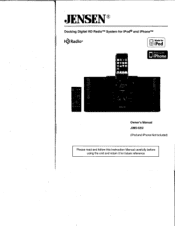
JENSEN' Docking Digital HD RadioTM System for iPod® and iPhoneTM I-0 Radio® Made for o iPod rl Works with iPhone GA1 Rad', Owner's Manual JiMS-525i (iPod and iPhone Not Included) Please read and follow this Instruction Manual carefully before using the unit and retain it for future reference
JENSEN' Docking Digital HD RadioTM System for iPod® and iPhoneTM I-0 Radio® Made for o iPod rl Works with iPhone GA1 Rad', Owner's Manual JiMS-525i (iPod and iPhone Not Included) Please read and follow this Instruction Manual carefully before using the unit and retain it for future reference

Owners Manual
Page 2
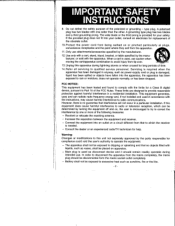
... SHOCK DO NOT OPEN CAUTION: TO REDUCE THE RISK OF ELECTRIC SHOCK DO NOT REMOVE COVER (OR BACK) NO USER SERVICEABLE PARTS INSIDE. Follow all Warnings. 4. DANGEROUS HIGH VOLTAGES ARE PRESENT INSIDE THE ENCLOSURE. This set has been designed and manufactured to assure personal safety. Do not use can be repaired by the user. Read these Instructions. 3. Keep these Instructions. 2. Do not...
... SHOCK DO NOT OPEN CAUTION: TO REDUCE THE RISK OF ELECTRIC SHOCK DO NOT REMOVE COVER (OR BACK) NO USER SERVICEABLE PARTS INSIDE. Follow all Warnings. 4. DANGEROUS HIGH VOLTAGES ARE PRESENT INSIDE THE ENCLOSURE. This set has been designed and manufactured to assure personal safety. Do not use can be repaired by the user. Read these Instructions. 3. Keep these Instructions. 2. Do not...
Owners Manual
Page 3
... interference to radio or television reception, which the receiver is used as sunshine, fire or the like. - 2 - Protect the power cord from the mains completely, the mains plug should remain readily operable during lightning storms or when unused for a Class B digital device, pursuant to comply with the apparatus. However, there is no objects filled with the instructions, may...
... interference to radio or television reception, which the receiver is used as sunshine, fire or the like. - 2 - Protect the power cord from the mains completely, the mains plug should remain readily operable during lightning storms or when unused for a Class B digital device, pursuant to comply with the apparatus. However, there is no objects filled with the instructions, may...
Owners Manual
Page 4
... THIS MANUAL 4 LOCATION OF CONTROLS 4 FRONT VIEW 4 REAR VIEW 5 DISPLAY UNIT 5 REMOTE CONTROL SECTION 6 GETTING STARTED 6 UNPACKING THE HD RADIOTM RECEIVER 6 CONNECTING THE FM ANTENNA WIRE 6 CONNECTING THE HD RADIOTM RECEIVER TO A CABLE RADIO SIGNAL 7 ANTENNA GROUNDING 7 NOTICE FOR CABLE TV SYSTEM INSTALLER 7 CONNECTING THE AM LOOP ANTENNA 7 AUX LINE-IN CONNECTION 7 CONNECTING AC POWER SUPPLY 8 ACTIVATING THE REMOTE CONTROL 8 REPLACING THE REMOTE CONTROL BATTERY 8 BATTERY PRECAUTIONS 8 RADIO OPERATION 9 LISTENING TO THE RADIO 9 TO PRESET CHANNELS...
... THIS MANUAL 4 LOCATION OF CONTROLS 4 FRONT VIEW 4 REAR VIEW 5 DISPLAY UNIT 5 REMOTE CONTROL SECTION 6 GETTING STARTED 6 UNPACKING THE HD RADIOTM RECEIVER 6 CONNECTING THE FM ANTENNA WIRE 6 CONNECTING THE HD RADIOTM RECEIVER TO A CABLE RADIO SIGNAL 7 ANTENNA GROUNDING 7 NOTICE FOR CABLE TV SYSTEM INSTALLER 7 CONNECTING THE AM LOOP ANTENNA 7 AUX LINE-IN CONNECTION 7 CONNECTING AC POWER SUPPLY 8 ACTIVATING THE REMOTE CONTROL 8 REPLACING THE REMOTE CONTROL BATTERY 8 BATTERY PRECAUTIONS 8 RADIO OPERATION 9 LISTENING TO THE RADIO 9 TO PRESET CHANNELS...
Owners Manual
Page 5
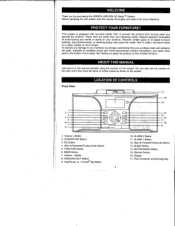
... residue on the furniture. Volume + Button 2. BAND Button 7. Button 8. Play/Pause / iTunes® Tag Button -4- 10. iPod Connector and Docking Bay These 'feet' are made from moving when you operate the controls. EQ Button 4. Volume - Display 17. To prevent any ...Button 11. SET/FM MODE Button 15. ALARM 1 Button 12. Remote Sensor 16. ABOUT THIS MANUAL Instructions in this manual thoroughly and retain it for purchasing the JENSEN JiMS-525i HD Radion^ System. SLEEP Button 14. Before operating the unit, please read this manual describe using the controls...
... residue on the furniture. Volume + Button 2. BAND Button 7. Button 8. Play/Pause / iTunes® Tag Button -4- 10. iPod Connector and Docking Bay These 'feet' are made from moving when you operate the controls. EQ Button 4. Volume - Display 17. To prevent any ...Button 11. SET/FM MODE Button 15. ALARM 1 Button 12. Remote Sensor 16. ABOUT THIS MANUAL Instructions in this manual thoroughly and retain it for purchasing the JENSEN JiMS-525i HD Radion^ System. SLEEP Button 14. Before operating the unit, please read this manual describe using the controls...
Owners Manual
Page 7
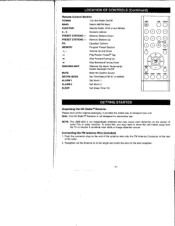
... CONTROLS (Continued) Remote Control Section POWER Turn the Radio On/Off BAND Select AM/FM Band FUNCTION Selects Radio, iPod or Aux Modes 0 - 9 Numeric buttons PRESET STATIONS Memory Stations Down PRESET STATIONS Memory Stations Up Ea Equalizer Options MEMORY Program Preset Stations +, - Volume Up and Down Play/Pause/ iTunes® Tag Skip Forward/Tuning Up Skip Backward/Tuning Down SNOOZE/LIGHT Silences the Alarm Temporarily/ Switch Backlight On/Off MUTE Mute the System Sound SET/FM MODE Set Time...
... CONTROLS (Continued) Remote Control Section POWER Turn the Radio On/Off BAND Select AM/FM Band FUNCTION Selects Radio, iPod or Aux Modes 0 - 9 Numeric buttons PRESET STATIONS Memory Stations Down PRESET STATIONS Memory Stations Up Ea Equalizer Options MEMORY Program Preset Stations +, - Volume Up and Down Play/Pause/ iTunes® Tag Skip Forward/Tuning Up Skip Backward/Tuning Down SNOOZE/LIGHT Silences the Alarm Temporarily/ Switch Backlight On/Off MUTE Mute the System Sound SET/FM MODE Set Time...
Owners Manual
Page 8
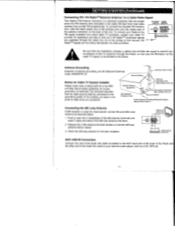
... programming. os O ti 2. AM outdoor antenna AUX LINE-IN Connection Connect one end of the Audio line cable (Included) to the AUX Input jack at the back of the Radio and the other end of the Audio line cable to your external audio player, such as is practical. Ground Clamp _...„,..-Antenna Lead In Wire Notice for Cable TV System Installer Please make...
... programming. os O ti 2. AM outdoor antenna AUX LINE-IN Connection Connect one end of the Audio line cable (Included) to the AUX Input jack at the back of the Radio and the other end of the Audio line cable to your external audio player, such as is practical. Ground Clamp _...„,..-Antenna Lead In Wire Notice for Cable TV System Installer Please make...
Owners Manual
Page 9
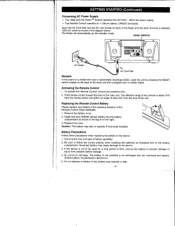
... by pressing the RESET switch located on back of the Radio and the other end into standby mode. Battery Precautions Follow these precautions when replacing the battery in the diagram below. Reversed battery may leak or explode if incorrectly installed. Caution: The battery may cause damage to the battery compartment. GETTING STARTED (Continued) Connecting AC Power Supply • This JiMS-525i HD RadioTM System operates from the...
... by pressing the RESET switch located on back of the Radio and the other end into standby mode. Battery Precautions Follow these precautions when replacing the battery in the diagram below. Reversed battery may leak or explode if incorrectly installed. Caution: The battery may cause damage to the battery compartment. GETTING STARTED (Continued) Connecting AC Power Supply • This JiMS-525i HD RadioTM System operates from the...
Owners Manual
Page 10
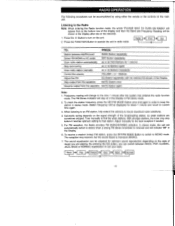
... mode SET Button repeatedly Scan radio station automatically ► or Hold Buttons for 1 second Stop auto-tuning ►►I or Buttons again Scan radio station manually ► or Buttons repeatedly Control the volume VOLUME + or - Press the FUNCTION Button to keep the station in radio mode. To check the station frequency, press the SET/FM MODE Button once and again in order to operate the unit in stereo mode. With stronger stations, the tuner may improve, but the sound...
... mode SET Button repeatedly Scan radio station automatically ► or Hold Buttons for 1 second Stop auto-tuning ►►I or Buttons again Scan radio station manually ► or Buttons repeatedly Control the volume VOLUME + or - Press the FUNCTION Button to keep the station in radio mode. To check the station frequency, press the SET/FM MODE Button once and again in order to operate the unit in stereo mode. With stronger stations, the tuner may improve, but the sound...
Owners Manual
Page 11
... desired preset channel appears in another station and repeat steps 5 to 7 to store a new station in the Display. 8. HD RadioTM Multicast Channels (FM Only) Together with 10 preset memories for AM and 20 preset memories for FM. Use the or Buttons to a desired station. 5. Example: You are listening to "97.9FM HD2" and turn the power back on or switch back to the radio mode, the station will manually need to change to...
... desired preset channel appears in another station and repeat steps 5 to 7 to store a new station in the Display. 8. HD RadioTM Multicast Channels (FM Only) Together with 10 preset memories for AM and 20 preset memories for FM. Use the or Buttons to a desired station. 5. Example: You are listening to "97.9FM HD2" and turn the power back on or switch back to the radio mode, the station will manually need to change to...
Owners Manual
Page 12
... Data System) This Radio supports RBDS, Program Identification and Radio Text. This function allows a radio station to ensure fast tuning of currently-playing songs are displayed along with the radio program. -11- For example, station slogans are synchronized with the programming and the title and artist of an AM or FM station. Today's analog is heard. If you will change , you tune directly to digital HD RadioTM broadcasting. This operation...
... Data System) This Radio supports RBDS, Program Identification and Radio Text. This function allows a radio station to ensure fast tuning of currently-playing songs are displayed along with the radio program. -11- For example, station slogans are synchronized with the programming and the title and artist of an AM or FM station. Today's analog is heard. If you will change , you tune directly to digital HD RadioTM broadcasting. This operation...

Owners Manual
Page 13
... screen and you are using . If a buying tag or not. Docking your iPod: Whe you first dock your iPod with Auto and Manual updating. 4. If the song cannot be stored in the iTunes window, you have any doubts about working on the same computer you would when accessing iTunes. 2. In Radio mode, "Tag Available" will appear on the "Sync" button to sync your iPod, The JiMS...
... screen and you are using . If a buying tag or not. Docking your iPod: Whe you first dock your iPod with Auto and Manual updating. 4. If the song cannot be stored in the iTunes window, you have any doubts about working on the same computer you would when accessing iTunes. 2. In Radio mode, "Tag Available" will appear on the "Sync" button to sync your iPod, The JiMS...
Owners Manual
Page 14
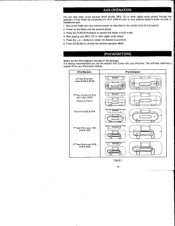
... connecting the AUX LINE-IN Jack to obtain the desired sound level. 6. iPod ADAPTORS Below are the iPod Adaptors included in AUX mode. 4. Press the + or - Buttons to your iPod when docked. AUX OPERATION You can play other music sources (iPod shuffle, MP3, CD or other digital audio player. 5. Set up the Radio and the external player. 3. This will help maximize a custom fit for your external player's audio...
... connecting the AUX LINE-IN Jack to obtain the desired sound level. 6. iPod ADAPTORS Below are the iPod Adaptors included in AUX mode. 4. Press the + or - Buttons to your iPod when docked. AUX OPERATION You can play other music sources (iPod shuffle, MP3, CD or other digital audio player. 5. Set up the Radio and the external player. 3. This will help maximize a custom fit for your external player's audio...
Owners Manual
Page 16
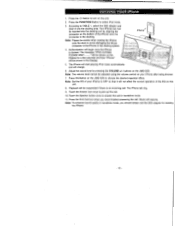
... call in handsfree mode. 11. Authentication will be adjusted using the volume control on the JiMS-525i to OFF so that it into the docking port by pressing the VOLUME +/- Adjust the sound level by aligning the connector on the JiMS-525i. Note: Set the EQ of the iPhone onto the connector in the Display. 5. Press the U Button to TABLE 1, select...
... call in handsfree mode. 11. Authentication will be adjusted using the volume control on the JiMS-525i to OFF so that it into the docking port by pressing the VOLUME +/- Adjust the sound level by aligning the connector on the JiMS-525i. Note: Set the EQ of the iPhone onto the connector in the Display. 5. Press the U Button to TABLE 1, select...
Owners Manual
Page 17
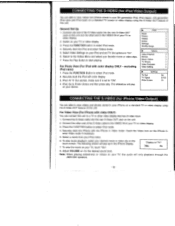
... S-Video cable into the rear S-Video OUT Jack on TV? Securely dock the iPod and select Videos mode. 5. Return to a TV or other video display that has S-video input. 1. iPod: At TV Out section, make sure it is set TV Out options to "On". 6. iPod Music Photos Videos Extras Settings Shuffle Songs Videos Video Playlists Movies Music Videos TV Shows Video Podcasts Video Setting Settings TV Out TV Signal Wide Screen On NTSC On CONNECTING THE S-VIDEO (for...
... S-Video cable into the rear S-Video OUT Jack on TV? Securely dock the iPod and select Videos mode. 5. Return to a TV or other video display that has S-video input. 1. iPod: At TV Out section, make sure it is set TV Out options to "On". 6. iPod Music Photos Videos Extras Settings Shuffle Songs Videos Video Playlists Movies Music Videos TV Shows Video Podcasts Video Setting Settings TV Out TV Signal Wide Screen On NTSC On CONNECTING THE S-VIDEO (for...

Owners Manual
Page 18
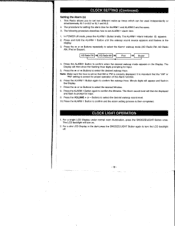
... the SET Button to exit and activate the new clock time to confirm. Please note that excessively high volume may impair your headset is an open-air type designed to allow you to hear outside sounds. Press and hold the SET Button for proper operation of the Alarm function. 3. Note: Make sure the hour is set so that the "AM" or "PM" setting is correctly displayed...
... the SET Button to exit and activate the new clock time to confirm. Please note that excessively high volume may impair your headset is an open-air type designed to allow you to hear outside sounds. Press and hold the SET Button for proper operation of the Alarm function. 3. Note: Make sure the hour is set so that the "AM" or "PM" setting is correctly displayed...
Owners Manual
Page 19
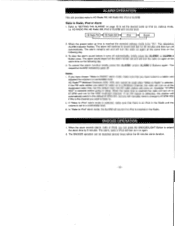
... be used independently or simultaneously AL I or IN Buttons to confirm and the alarm setting process is then completed. In POWER off . - 18 - Press the VOLUME + or - This Radio allows you to select the Alarml wakeup mode (HD Radio FM, HD Radio AM, iPod or Buzzer). Press the ►N or Ki Buttons repeatedly to set so that the "AM" or "PM" setting is correctly displayed. It...
... be used independently or simultaneously AL I or IN Buttons to confirm and the alarm setting process is then completed. In POWER off . - 18 - Press the VOLUME + or - This Radio allows you to select the Alarml wakeup mode (HD Radio FM, HD Radio AM, iPod or Buzzer). Press the ►N or Ki Buttons repeatedly to set so that the "AM" or "PM" setting is correctly displayed. It...
Owners Manual
Page 20
... default main non-HD radio station will manually need to change to 97.9FM HD2 if this is the channel you have chosen "Wake to RADIO" alarm mode, make sure that you want to listen to iPod" alarm mode is selected, make sure that there is selected before it turns off . HD Radio FM HD Radio AM iPod Buzzer 2. The alarm remains set and will sound if no...
... default main non-HD radio station will manually need to change to 97.9FM HD2 if this is the channel you have chosen "Wake to RADIO" alarm mode, make sure that you want to listen to iPod" alarm mode is selected, make sure that there is selected before it turns off . HD Radio FM HD Radio AM iPod Buzzer 2. The alarm remains set and will sound if no...
Owners Manual
Page 22
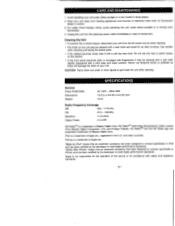
... Under License From iBiquity Digital Corporation. and Foreign Patents. SPECIFICATIONS General Power FUNCTION: Dimensions: Weight: AC 120V - 60Hz 20W 13.5 (L) x 6.6 (D) x 5.9 (H) Inch 4.9 lb Radio Frequency Coverage AM: 530 - 1710 kHz FM: 87.5 - 108 MHz Speakers: 2 x 8 ohms Output Power: 2 x 2.5W HD RadioTM is a trademark of iBiquity Digital Corp. and other liquids to meet Apple performance standards. Avoid operating your unit away from...
... Under License From iBiquity Digital Corporation. and Foreign Patents. SPECIFICATIONS General Power FUNCTION: Dimensions: Weight: AC 120V - 60Hz 20W 13.5 (L) x 6.6 (D) x 5.9 (H) Inch 4.9 lb Radio Frequency Coverage AM: 530 - 1710 kHz FM: 87.5 - 108 MHz Speakers: 2 x 8 ohms Output Power: 2 x 2.5W HD RadioTM is a trademark of iBiquity Digital Corp. and other liquids to meet Apple performance standards. Avoid operating your unit away from...
Owners Manual
Page 23
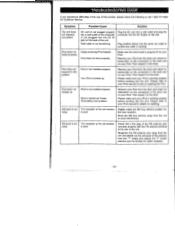
... for Customer Service. The reception at the set location is poor. iPod does not dock properly. Please make sure your iPod from the unit to the system. The reception at the set location is poor. iPod does not install properly. iPod does not respond to avoid interference. Then reseat it in the dock. iPod battery has problem. Move...
... for Customer Service. The reception at the set location is poor. iPod does not dock properly. Please make sure your iPod from the unit to the system. The reception at the set location is poor. iPod does not install properly. iPod does not respond to avoid interference. Then reseat it in the dock. iPod battery has problem. Move...


