
Owners Manual
Page 1
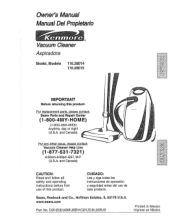
Owner's Manual Manual Del Propietario Vacuum Cleaner Aspiradora / Model, Modeio 116.28014 116.28015 IMPORTANT Before returning this product. CO1ZDDU_U_O-KCO1ZDDUZOUO Printed in Mexico impreso en M#xico Sears, Roebuck and Co., Hoffman Estates, IL 60179 U.S.A. For replacement parts, please ...
Owner's Manual Manual Del Propietario Vacuum Cleaner Aspiradora / Model, Modeio 116.28014 116.28015 IMPORTANT Before returning this product. CO1ZDDU_U_O-KCO1ZDDUZOUO Printed in Mexico impreso en M#xico Sears, Roebuck and Co., Hoffman Estates, IL 60179 U.S.A. For replacement parts, please ...
Owners Manual
Page 2
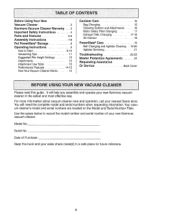
...are located on the Model and Serial Number Plate° Use the space below to Start Vacuuming Tips Suggested Pile Height Settings ........ Before Using Your New Vacuum Cleaner 2 Kenmore Vacuum Cleaner Warranty . ° o3 Important Safety Instructions ......... 4 Parts and Features 5-6 Assembly Instructions...and serial numbers when requesting information. Attachments Attachment Use Table PerformanceFeatures How Your Vacuum Cleaner Works ....... 9 9-I0 1t I2 12 I3 14-I5 15 Canister Care t6 Bag Changing 16 Cleaning Exterior and Attachments ..... 16 Motor Safety ...
...are located on the Model and Serial Number Plate° Use the space below to Start Vacuuming Tips Suggested Pile Height Settings ........ Before Using Your New Vacuum Cleaner 2 Kenmore Vacuum Cleaner Warranty . ° o3 Important Safety Instructions ......... 4 Parts and Features 5-6 Assembly Instructions...and serial numbers when requesting information. Attachments Attachment Use Table PerformanceFeatures How Your Vacuum Cleaner Works ....... 9 9-I0 1t I2 12 I3 14-I5 15 Canister Care t6 Bag Changing 16 Cleaning Exterior and Attachments ..... 16 Motor Safety ...
Owners Manual
Page 3
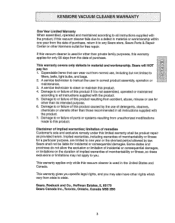
... or fitness, so these exclusions or limitations may also have other than those recommended in att instructions supplied with the producL 5. If this vacuum cleaner is not assembled, operated or maintained according to all instructions supplied with the product. 7. Disclaimer of purchase, return it is used...to a defect in material or workmanship within one year or the shortest period allowed by the use of detergents, cleaners, chemicals or utensils other Kenmore out!et for : 1. Damage to or failure of this product if it to any Sears store, Sears Parts & Repair Center or other...
... or fitness, so these exclusions or limitations may also have other than those recommended in att instructions supplied with the producL 5. If this vacuum cleaner is not assembled, operated or maintained according to all instructions supplied with the product. 7. Disclaimer of purchase, return it is used...to a defect in material or workmanship within one year or the shortest period allowed by the use of detergents, cleaners, chemicals or utensils other Kenmore out!et for : 1. Damage to or failure of this product if it to any Sears store, Sears Parts & Repair Center or other...
Owners Manual
Page 4
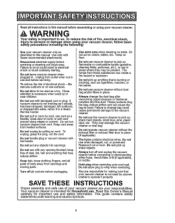
... anything that your responsibilities. These products clog the bag, reduce airflow and can create a fire hazard or explosion. keep free of your vacuum cleaner are responsible for Household use when damaged, cut, or punctured° Replace if cut or worn. SAVE THESE INSTRUCTIONS Proper assembly and... should, has been dropped, damaged, left outdoors, or dropped into openings. Do not put any opening blocked; Do not use vacuum cleaner without the exhaust filter or exhaust filter door in place_ Always change bag could result in electrical shock or brush suddenly starting_ ...
... anything that your responsibilities. These products clog the bag, reduce airflow and can create a fire hazard or explosion. keep free of your vacuum cleaner are responsible for Household use when damaged, cut, or punctured° Replace if cut or worn. SAVE THESE INSTRUCTIONS Proper assembly and... should, has been dropped, damaged, left outdoors, or dropped into openings. Do not put any opening blocked; Do not use vacuum cleaner without the exhaust filter or exhaust filter door in place_ Always change bag could result in electrical shock or brush suddenly starting_ ...
Owners Manual
Page 5
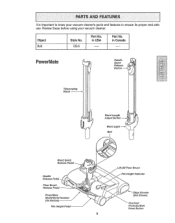
Object Belt Style No. Part No. CB-6 Part No. Floor Brush Release Pedal PMoowdelr/MSaetreial Numb er / (On Bottom) Pile Height Pedal-- in Canada PowerMate Handle Quick Release i Button Telescoping Wand Wand Length Adjust Button Belt Wand Quick Handle Release Pedal. in USA .......... Lift-Off Floor Brush Height In dica for Edge Cleaner (Not Shown) Overload Protector/Belt Reset Button 5 It is important to ensure its proper and safe use. Review these before using your vacuum cleaner's parts and features to know your vacuum cleaner.
Object Belt Style No. Part No. CB-6 Part No. Floor Brush Release Pedal PMoowdelr/MSaetreial Numb er / (On Bottom) Pile Height Pedal-- in Canada PowerMate Handle Quick Release i Button Telescoping Wand Wand Length Adjust Button Belt Wand Quick Handle Release Pedal. in USA .......... Lift-Off Floor Brush Height In dica for Edge Cleaner (Not Shown) Overload Protector/Belt Reset Button 5 It is important to ensure its proper and safe use. Review these before using your vacuum cleaner's parts and features to know your vacuum cleaner.
Owners Manual
Page 7
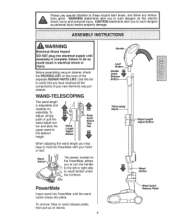
... in electrical shock or injury. Handle__/ Look \'r Button -_._ Handle _ LJ QReuliecakse ,_ Button _:L _i'_' _i_=:_¸ Telescoping Wand-----._ -- Before assembling vacuum cleaner, check the PACKING LIST on the cover of your hand or foot. To adjust, simply push or pull the wand adjust button and slide... Wand Length Adjust Button I m Hand Above Th_ Tab w m When adjusting the wand length you have to hold the PowerMate with your new Kenmore vacuum cleaner. Wand Length utton Wand Swlvel-_ The swivel, located on wands. To remove: Step on wand release pedal, then pull up on the ...
... in electrical shock or injury. Handle__/ Look \'r Button -_._ Handle _ LJ QReuliecakse ,_ Button _:L _i'_' _i_=:_¸ Telescoping Wand-----._ -- Before assembling vacuum cleaner, check the PACKING LIST on the cover of your hand or foot. To adjust, simply push or pull the wand adjust button and slide... Wand Length Adjust Button I m Hand Above Th_ Tab w m When adjusting the wand length you have to hold the PowerMate with your new Kenmore vacuum cleaner. Wand Length utton Wand Swlvel-_ The swivel, located on wands. To remove: Step on wand release pedal, then pull up on the ...
Owners Manual
Page 9
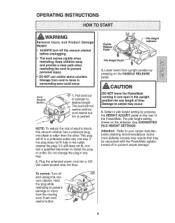
... Button 1. Hold the plug while rewinding to prevent damage or injury from cord to prevent carpet damage. Damage to carpet may require that they be vacuumed with the PowerMate agitator turned off to items in surrounding area could occur. Do not change the plug in the upright position for any way... the other. one way_ If the plug does not fit fully in a polarized outlet only one blade is pushe& NOTE: To reduce the risk of canister to install the proper outlet. This plug will fit in the outlet, reverse the plug If it still does not fit, contact a qualified electrician to...
... Button 1. Hold the plug while rewinding to prevent damage or injury from cord to prevent carpet damage. Damage to carpet may require that they be vacuumed with the PowerMate agitator turned off to items in surrounding area could occur. Do not change the plug in the upright position for any way... the other. one way_ If the plug does not fit fully in a polarized outlet only one blade is pushe& NOTE: To reduce the risk of canister to install the proper outlet. This plug will fit in the outlet, reverse the plug If it still does not fit, contact a qualified electrician to...
Owners Manual
Page 10
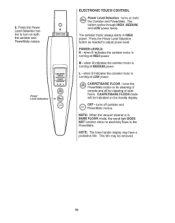
... is running at LOW power° ® CARPETIBARE FLOOR - when lit indicates the canister motor is runmng at MEDIUM power,. rMtuarntes mofof tcoarsn.ister and NOTE: When the vacuum cleaner is running at HIGH power,. The canister motor always starts in BARE FLOOR mode, the wand light DOES NOT function since no electricity...
... is running at LOW power° ® CARPETIBARE FLOOR - when lit indicates the canister motor is runmng at MEDIUM power,. rMtuarntes mofof tcoarsn.ister and NOTE: When the vacuum cleaner is running at HIGH power,. The canister motor always starts in BARE FLOOR mode, the wand light DOES NOT function since no electricity...

Owners Manual
Page 11
...in a locked position before checking. 11 Check hose for clogs. For best cleaning results, use the handle grip on the canister to move the vacuum cleaner to be cleane_.Fhis pattern should be pushed straig,_away from slipping when used on stairs (see PERFORMANCE FEATURES), NOTE...: Be sure the canister is resting securely on the caster will aid in preventing the canister from you and pulled straight bac_ot_t the end of each assembly area in HOWYOUR VACUUM CLEANER WORKS occasionally for twisting before puiling canister. CAUTION Product Damage Hazard Use care...
...in a locked position before checking. 11 Check hose for clogs. For best cleaning results, use the handle grip on the canister to move the vacuum cleaner to be cleane_.Fhis pattern should be pushed straig,_away from slipping when used on stairs (see PERFORMANCE FEATURES), NOTE...: Be sure the canister is resting securely on the caster will aid in preventing the canister from you and pulled straight bac_ot_t the end of each assembly area in HOWYOUR VACUUM CLEANER WORKS occasionally for twisting before puiling canister. CAUTION Product Damage Hazard Use care...
Owners Manual
Page 12
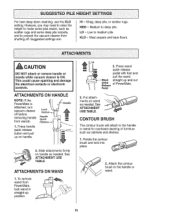
...or electronic controls. Slide attachments firmly on handle. 2. Lowto mediumpile. ATTACHMENTS ON HANDLE NOTE: If the /ll _ Handle aPtotawcehreMda, teturins Lock _ vacuum cleaner Button off before 11 Handle removing handle Qu_k m from PowerMate, lock wand in straight-up on handle as needed . I . See ATTACHMENT... BRUSH The contour brush wilt attach to the handle or wand. 12 CAUTION DO NOT attach or remove handle or wands while vacuum cleaner is ON. Press wand m m quick release pedal with foot and pull the wand straight up and out of furniture ...
...or electronic controls. Slide attachments firmly on handle. 2. Lowto mediumpile. ATTACHMENTS ON HANDLE NOTE: If the /ll _ Handle aPtotawcehreMda, teturins Lock _ vacuum cleaner Button off before 11 Handle removing handle Qu_k m from PowerMate, lock wand in straight-up on handle as needed . I . See ATTACHMENT... BRUSH The contour brush wilt attach to the handle or wand. 12 CAUTION DO NOT attach or remove handle or wands while vacuum cleaner is ON. Press wand m m quick release pedal with foot and pull the wand straight up and out of furniture ...
Owners Manual
Page 13
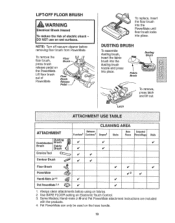
... BRUSH To assemble dusting brush, insert the fabric brush into the dusting brush nozzle and press into place. instructions are included 13 NOTE' Turn off vacuum cleaner before using on fabrics. 2, Use BARE FLOOR setting on Electronic Touch Control. 3, Some Models; Pet PowerMate can only be used on wet surfaces. To...
... BRUSH To assemble dusting brush, insert the fabric brush into the dusting brush nozzle and press into place. instructions are included 13 NOTE' Turn off vacuum cleaner before using on fabrics. 2, Use BARE FLOOR setting on Electronic Touch Control. 3, Some Models; Pet PowerMate can only be used on wet surfaces. To...

Owners Manual
Page 14
.... This allows the motor to the vacuum cleaner. To correct problem: Turn off and unplug vacuum cleaner to allow the vacuum cleaner to the the thermal protector turns the motor off and unplug the vacuum cleaner before cleaning the agitator area as agitator may come ono The canister motor will come on both sides of...
.... This allows the motor to the vacuum cleaner. To correct problem: Turn off and unplug vacuum cleaner to allow the vacuum cleaner to the the thermal protector turns the motor off and unplug the vacuum cleaner before cleaning the agitator area as agitator may come ono The canister motor will come on both sides of...

Owners Manual
Page 15
STAIR GRIP During normal operation while the canister is in the horizontal position, the caster wheel rotates freely 360°° The Stair Grip feature allows the caster wheel to lock in position when the vacuum cleaner is rotated 250 from outlet ,i4y before checking xi_/ / li _ _... , Meter Safety Filter ... cleaning of a red and a green light. 'i_ _i/, ¸_,!i_:z:!!i_ B_IRE FLOOR ;:OIRP_ , IN OPERATION When the vacuum cieaner is in order for the canister to rest on the extension wand° This light will operate when attached or not attached to the PowerMate, The light can...
STAIR GRIP During normal operation while the canister is in the horizontal position, the caster wheel rotates freely 360°° The Stair Grip feature allows the caster wheel to lock in position when the vacuum cleaner is rotated 250 from outlet ,i4y before checking xi_/ / li _ _... , Meter Safety Filter ... cleaning of a red and a green light. 'i_ _i/, ¸_,!i_:z:!!i_ B_IRE FLOOR ;:OIRP_ , IN OPERATION When the vacuum cieaner is in order for the canister to rest on the extension wand° This light will operate when attached or not attached to the PowerMate, The light can...
Owners Manual
Page 16
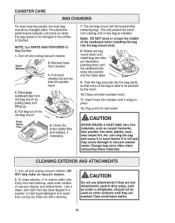
... static electricity and dust build-up , then lift canister hood_ 4. Turn off and unplug vacuum cleaner. Hood Release. 2. Tuck the bag securely into canister until they are washed.They could leave marks. 16 Close and latch canister hood, 11, Insert hose into the bag cavity ... attachments. The red bag mount will flip forward after cleaning. Attachments used on vacuum cleaner. 2. Pull bag out of mild liquid detergent and water, then wrung dry. Disengage cardboard tab from canister, 3. Check the motor safety filter and replace, if necessary, 7. CAUTION Do...
... static electricity and dust build-up , then lift canister hood_ 4. Turn off and unplug vacuum cleaner. Hood Release. 2. Tuck the bag securely into canister until they are washed.They could leave marks. 16 Close and latch canister hood, 11, Insert hose into the bag cavity ... attachments. The red bag mount will flip forward after cleaning. Attachments used on vacuum cleaner. 2. Pull bag out of mild liquid detergent and water, then wrung dry. Disengage cardboard tab from canister, 3. Check the motor safety filter and replace, if necessary, 7. CAUTION Do...
Owners Manual
Page 17
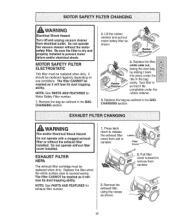
...Pull filter cover outward to release the exhaust filter cover from slot in rY scoomthpaletteitlyfitsunder the rubber retainer. 4. Do not operate the vacuum cleaner without filter cover installed. Be sure the filter is covered evenly. Lift the rubber retainer and pull out motor safety filter as...dirty. The filter CANNOT be washed as outlined in the BAG CHANGING section 2. WARNING Electrical Shock Hazard Turn off and unplug vacuum cleaner from canister. 17 Replace the bag as it will lose its dust trapping ability. Press latch down to remove from electrical outlet. ...
...Pull filter cover outward to release the exhaust filter cover from slot in rY scoomthpaletteitlyfitsunder the rubber retainer. 4. Do not operate the vacuum cleaner without filter cover installed. Be sure the filter is covered evenly. Lift the rubber retainer and pull out motor safety filter as...dirty. The filter CANNOT be washed as outlined in the BAG CHANGING section 2. WARNING Electrical Shock Hazard Turn off and unplug vacuum cleaner from canister. 17 Replace the bag as it will lose its dust trapping ability. Press latch down to remove from electrical outlet. ...
Owners Manual
Page 19
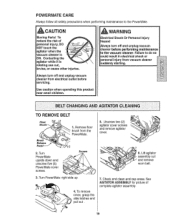
...clean end cap area& See AGITATOR ASSEMBLY for picture of personal injury, DO NOT touch the agitator when the vacuum cleaner is rotating can cut, bruise, or cause other injuries. I wARNING Electrical Shock Or Personal Injury Hazard Always turn off and... do so could result in electrical shock or personal injury from the PowerMate. 5. Always turn off and unplug vacuum cleaner from electrical outlet before performing maintenance to the vacuum cleaner. Turn upside down and _ "-, PunoswcererMwatefive (5) ._ PscorwewersM_ate cover _ 3. Use caution when operating this product...
...clean end cap area& See AGITATOR ASSEMBLY for picture of personal injury, DO NOT touch the agitator when the vacuum cleaner is rotating can cut, bruise, or cause other injuries. I wARNING Electrical Shock Or Personal Injury Hazard Always turn off and... do so could result in electrical shock or personal injury from the PowerMate. 5. Always turn off and unplug vacuum cleaner from electrical outlet before performing maintenance to the vacuum cleaner. Turn upside down and _ "-, PunoswcererMwatefive (5) ._ PscorwewersM_ate cover _ 3. Use caution when operating this product...
Owners Manual
Page 20
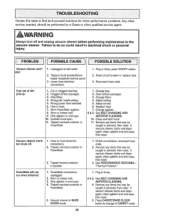
...or debris in the belt path area or in the PowerMate agitator and end cap areas. The agitator must also be cleaned according to your vacuum cleaner, _ must be cleaned every time the belt is no gap between the cover and base° 6, Turn PowerMate upside down and ...3. Place agitator assembly back into place. TO CLEAN AGITATOR: NOTE: In order to keep cIeaning efficiency high and to prevent damage to the following schedule: Vacuum Cleaner Use Clean Agitator HEAVY (used daily) MODERATE (used 2-3 times/week) LIGHT (used 1 time/week) every week every month every 2 months IMPORTANT ...
...or debris in the belt path area or in the PowerMate agitator and end cap areas. The agitator must also be cleaned according to your vacuum cleaner, _ must be cleaned every time the belt is no gap between the cover and base° 6, Turn PowerMate upside down and ...3. Place agitator assembly back into place. TO CLEAN AGITATOR: NOTE: In order to keep cIeaning efficiency high and to prevent damage to the following schedule: Vacuum Cleaner Use Clean Agitator HEAVY (used daily) MODERATE (used 2-3 times/week) LIGHT (used 1 time/week) every week every month every 2 months IMPORTANT ...

Owners Manual
Page 21
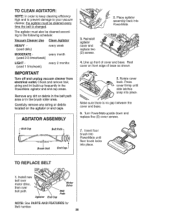
... BELT CHANGING AND AGITATOR CLEANING 3. TO REPLACE AGITATOR ASSEMBLY 1. Repiace agitator assembly, 4. Remove the floor brush from vacuum cleaner suddenlY starting. H kWARNING Electrical Shock Or Personal Injury Hazard Always turn off and unplug vacuum cleaner before performing maintenance to do so could result in electrical shock or personal injury from the PowerMate...
... BELT CHANGING AND AGITATOR CLEANING 3. TO REPLACE AGITATOR ASSEMBLY 1. Repiace agitator assembly, 4. Remove the floor brush from vacuum cleaner suddenlY starting. H kWARNING Electrical Shock Or Personal Injury Hazard Always turn off and unplug vacuum cleaner before performing maintenance to do so could result in electrical shock or personal injury from the PowerMate...
Owners Manual
Page 22
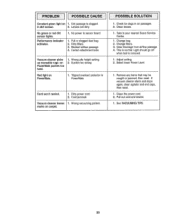
... BARE FLOOR mode. 22 = Change bag° 2. Worn or broken belt 9. Canister hood open tl. Vacuum cleaner starts but shuts off and unplug vacuum cleaner before performing maintenance to the vacuum cleaner. Clear airflow passages, 3. Remove any items that may be performed by a ...when attached, 3, Trippedthermal protector in hose 7. Hole in canister, 1, PowerMate connections unplugged, 2, Worn or broken belt, 3. Tripped overload protector in PowerMate. Removeany itemsthat may be caught or jammed, then reset, If vacuum cleaner starts and stops again, clean agitator and end caps...
... BARE FLOOR mode. 22 = Change bag° 2. Worn or broken belt 9. Canister hood open tl. Vacuum cleaner starts but shuts off and unplug vacuum cleaner before performing maintenance to the vacuum cleaner. Clear airflow passages, 3. Remove any items that may be performed by a ...when attached, 3, Trippedthermal protector in hose 7. Hole in canister, 1, PowerMate connections unplugged, 2, Worn or broken belt, 3. Tripped overload protector in PowerMate. Removeany itemsthat may be caught or jammed, then reset, If vacuum cleaner starts and stops again, clean agitator and end caps...
Owners Manual
Page 23
... and rewind, I . I . t, Adjust setting, 2o Select lower Power Level Remove any items that may be caught or jammed,then reset If vacuum cleaner starts and stops again, clean agitator and end caps, then reset. 1. Dirt passage is removed. No power to your nearest Sears Service Center..., 1o Change bag, 2o Change filters, 3. Certain attachment tools, Vacuum cleaner picks up moveable rugs -orPowerMate pushes too hard. 1, Wrong pile height setting_ 2, Suction too strong Red light on PowerMate. 1o Tripped overload ...
... and rewind, I . I . t, Adjust setting, 2o Select lower Power Level Remove any items that may be caught or jammed,then reset If vacuum cleaner starts and stops again, clean agitator and end caps, then reset. 1. Dirt passage is removed. No power to your nearest Sears Service Center..., 1o Change bag, 2o Change filters, 3. Certain attachment tools, Vacuum cleaner picks up moveable rugs -orPowerMate pushes too hard. 1, Wrong pile height setting_ 2, Suction too strong Red light on PowerMate. 1o Tripped overload ...


