
Owners Manual
Page 1
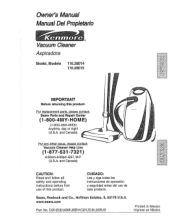
Owner's Manual Manual Del Propietario Vacuum Cleaner Aspiradora / Model, Modeio 116.28014 116.28015 IMPORTANT Before returning this product. www.sears.com Part No. and Canada) CAUTION: Read and follow all safety and operating instructions before first use of this product- CUIDADO: Lea y siga todas las instrucciones de operaci6n y seguridad antes del uso de este producto. CO1ZDDU_U_O-KCO1ZDDUZOUO Printed in Mexico impreso en M#xico Sears, Roebuck and...
Owner's Manual Manual Del Propietario Vacuum Cleaner Aspiradora / Model, Modeio 116.28014 116.28015 IMPORTANT Before returning this product. www.sears.com Part No. and Canada) CAUTION: Read and follow all safety and operating instructions before first use of this product- CUIDADO: Lea y siga todas las instrucciones de operaci6n y seguridad antes del uso de este producto. CO1ZDDU_U_O-KCO1ZDDUZOUO Printed in Mexico impreso en M#xico Sears, Roebuck and...
Owners Manual
Page 2
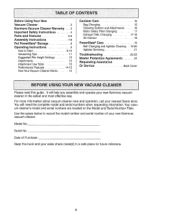
... Instructions How to record the model number and serial number of Purchase Keep this guide, It will need the complete model and serial numbers when requesting information. Attachments Attachment Use Table PerformanceFeatures How Your Vacuum Cleaner Works ....... 9 9-I0 1t I2 12 I3 14-I5 15 Canister Care t6 Bag Changing 16 Cleaning Exterior and Attachments ..... 16 Motor Safety Filter Changing ......... 17 Exhaust Filter Changing Dirt Sensor 17-18 18 PowerMate ®Care 19 Belt Changing and Agitator Cleaning .. 19-20 Agitator Servicing 21 Troubleshooting...
... Instructions How to record the model number and serial number of Purchase Keep this guide, It will need the complete model and serial numbers when requesting information. Attachments Attachment Use Table PerformanceFeatures How Your Vacuum Cleaner Works ....... 9 9-I0 1t I2 12 I3 14-I5 15 Canister Care t6 Bag Changing 16 Cleaning Exterior and Attachments ..... 16 Motor Safety Filter Changing ......... 17 Exhaust Filter Changing Dirt Sensor 17-18 18 PowerMate ®Care 19 Belt Changing and Agitator Cleaning .. 19-20 Agitator Servicing 21 Troubleshooting...
Owners Manual
Page 3
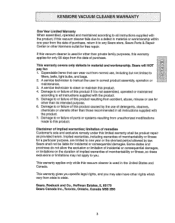
... normal use, including but not limited to filters, belts, light bulbs, and bags. 2. limitation of remedies Customer's sole and exclusive remedy under this product if it to any Sears store, Sears Parts & Repair Center or other Kenmore out!et for free repair. A service technician to clean or maintain this product. 4. This warranty applies only while this vacuum cleaner is used in the United States and Canada. If this vacuum cleaner is used for...
... normal use, including but not limited to filters, belts, light bulbs, and bags. 2. limitation of remedies Customer's sole and exclusive remedy under this product if it to any Sears store, Sears Parts & Repair Center or other Kenmore out!et for free repair. A service technician to clean or maintain this product. 4. This warranty applies only while this vacuum cleaner is used in the United States and Canada. If this vacuum cleaner is used for...
Owners Manual
Page 4
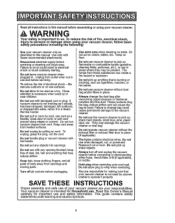
... hose, Handi-Mate Jr.® (if applicable), or nozzle. The fumes from openings and moving parts, Do not use and before servicing or cleaning out brush area, Failure to be present. Do not use of your vacuum cleaner are responsible for making sure that your vacuum cleaner is intended for important use with Sears recommended attachments. SAVE THESE INSTRUCTIONS Proper assembly and safe use vacuum cleaner without the exhaust filter or exhaust filter...
... hose, Handi-Mate Jr.® (if applicable), or nozzle. The fumes from openings and moving parts, Do not use and before servicing or cleaning out brush area, Failure to be present. Do not use of your vacuum cleaner are responsible for making sure that your vacuum cleaner is intended for important use with Sears recommended attachments. SAVE THESE INSTRUCTIONS Proper assembly and safe use vacuum cleaner without the exhaust filter or exhaust filter...
Owners Manual
Page 7
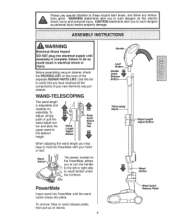
... the separate REPAIR PARTS LIST. Wand Swlvel-_ The swivel, located on wands. WARNING statements alert you have to such dangers as personal injury and/or property damage. , WARNING Electrical Shock Hazard DO NOT plug into place. Use this list to verify that you to hold the PowerMate with your new Kenmore vacuum cleaner. Before assembling vacuum cleaner, check the PACKING LIST on the cover of your hand or foot. Wand Length...
... the separate REPAIR PARTS LIST. Wand Swlvel-_ The swivel, located on wands. WARNING statements alert you have to such dangers as personal injury and/or property damage. , WARNING Electrical Shock Hazard DO NOT plug into place. Use this list to verify that you to hold the PowerMate with your new Kenmore vacuum cleaner. Before assembling vacuum cleaner, check the PACKING LIST on the cover of your hand or foot. Wand Length...
Owners Manual
Page 8
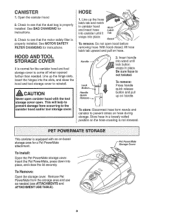
... hose latch tab upward and pull on -board storage area for instructions. Insert handle into wand until it snaps into canister until lock button snaps in place. To store; To Remove: Open the storage cover. HOOD AND TOOL STORAG E COVER It is properly instalied See MOTOR SAFETY FILTER CHANGING for a Pet PowerMate attachment. This will help to prevent damage from the storage area and use as needed . Remove Pet...
... hose latch tab upward and pull on -board storage area for instructions. Insert handle into wand until it snaps into canister until lock button snaps in place. To store; To Remove: Open the storage cover. HOOD AND TOOL STORAG E COVER It is properly instalied See MOTOR SAFETY FILTER CHANGING for a Pet PowerMate attachment. This will help to prevent damage from the storage area and use as needed . Remove Pet...
Owners Manual
Page 9
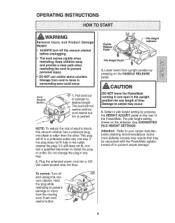
... polarized power cord into a 120 Volt outlet located near the floor. DO NOT use outlets above counters. ton is wider than the other. Push cord rewind button_ Handle Release indicator 3. To rewind: Turn off to install the proper outlet. The pile height setting shows on the rear of electric shock, this vacuum cleaner has a polarized plug; OPERATING INSTRUCTIONS WARNING Personal Injury and Product Damage Hazard ALWAYS turn off the vacuum cleaner before unplugging. Cord Rewind Button...
... polarized power cord into a 120 Volt outlet located near the floor. DO NOT use outlets above counters. ton is wider than the other. Push cord rewind button_ Handle Release indicator 3. To rewind: Turn off to install the proper outlet. The pile height setting shows on the rear of electric shock, this vacuum cleaner has a polarized plug; OPERATING INSTRUCTIONS WARNING Personal Injury and Product Damage Hazard ALWAYS turn off the vacuum cleaner before unplugging. Cord Rewind Button...

Owners Manual
Page 11
... continued acros_t_e carpet with PowerMate. Turn off and unplug vacuum cleaner from wall by the power cord. For best cleaning results, keep the airflow passage open. Suggested sweeping pattern. Personal injury or product damage could result. This is left in one stair to a new location for twisting before checking. 11 Check hose for further cleaning. nnlul WARNING Personal Injury and Product Damage Hazard DO NOT run over easily...
... continued acros_t_e carpet with PowerMate. Turn off and unplug vacuum cleaner from wall by the power cord. For best cleaning results, keep the airflow passage open. Suggested sweeping pattern. Personal injury or product damage could result. This is left in one stair to a new location for twisting before checking. 11 Check hose for further cleaning. nnlul WARNING Personal Injury and Product Damage Hazard DO NOT run over easily...
Owners Manual
Page 12
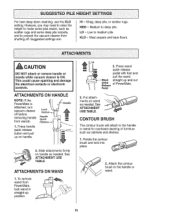
... and shelves_ I m 1. I . ATTACHMENTS ON WAND 1, To remove wand from wands. Put attachments on wand as needed . Rotate the contour brush and lock into place. 2. Press handle quick release button and pull up on handle as needed . CAUTION DO NOT attach or remove handle or wands while vacuum cleaner is ON. Release--*. See ATTACHMENT USE TABLE. Lowto mediumpile. This could cause sparking and damage the electrical contacts or electronic controls. Slide attachments firmly on handle. 2. Press wand m m quick release pedal with...
... and shelves_ I m 1. I . ATTACHMENTS ON WAND 1, To remove wand from wands. Put attachments on wand as needed . Rotate the contour brush and lock into place. 2. Press handle quick release button and pull up on handle as needed . CAUTION DO NOT attach or remove handle or wands while vacuum cleaner is ON. Release--*. See ATTACHMENT USE TABLE. Lowto mediumpile. This could cause sparking and damage the electrical contacts or electronic controls. Slide attachments firmly on handle. 2. Press wand m m quick release pedal with...
Owners Manual
Page 13
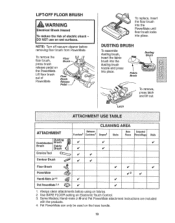
... Models; NOTE' Turn off vacuum cleaner before using on fabrics. 2, Use BARE FLOOR setting on the PowerMateo Lift floor brush out of electric shock DO NOT use on the hose handte. Furniture1 Cushions1 Drapes1 Stairs Ba_ c_,p_t_d Floers FloorslRugs Walls Combination Brush is' v' Brush DFBaurubssrtiichng I__ V' V' Crevice Tool V' V' Contour Brush V' Floor Brush 4 PowerMate _ Handi-Mate Jr.=3 _ Pet PowerMate 3,4 _ I l V' I/ V' V'2 V' V' V/ I, Always clean attachments before removing floor brush from PowerMate. DUSTING BRUSH To assemble dusting brush, insert...
... Models; NOTE' Turn off vacuum cleaner before using on fabrics. 2, Use BARE FLOOR setting on the PowerMateo Lift floor brush out of electric shock DO NOT use on the hose handte. Furniture1 Cushions1 Drapes1 Stairs Ba_ c_,p_t_d Floers FloorslRugs Walls Combination Brush is' v' Brush DFBaurubssrtiichng I__ V' V' Crevice Tool V' V' Contour Brush V' Floor Brush 4 PowerMate _ Handi-Mate Jr.=3 _ Pet PowerMate 3,4 _ I l V' I/ V' V'2 V' V' V/ I, Always clean attachments before removing floor brush from PowerMate. DUSTING BRUSH To assemble dusting brush, insert...

Owners Manual
Page 14
... help remove dirt trapped at carpet edges. To correct problem: Turn off the PowerMate and the red light will continue to run. RFORI WARNING Personal Injury Hazard AIways turn back on to see if the motor protector has reset, 14 To correct problem: Turn off and unplug the vacuum cleaner before cleaning the agitator area as agitator may come ono The canister motor will come on when using due to reduced airflow attachment PROTECTOR i vacuum cleaner has a thermal...
... help remove dirt trapped at carpet edges. To correct problem: Turn off the PowerMate and the red light will continue to run. RFORI WARNING Personal Injury Hazard AIways turn back on to see if the motor protector has reset, 14 To correct problem: Turn off and unplug the vacuum cleaner before cleaning the agitator area as agitator may come ono The canister motor will come on when using due to reduced airflow attachment PROTECTOR i vacuum cleaner has a thermal...

Owners Manual
Page 15
... increases suction for clogs. WAND LIGHT This vacuum cleaner is equipped with a light on the handle, tt consists of that picks up dirt. Rapidly moving air carries the dirt to change as dirt is mounted on the extension wand° This light will operate when attached or not attached to the PowerMate, The light can be used for lighting hard to reach locations, DIRT SENSOR The dirt sensor light system is being vacuumed. Turn off and /_/ unplug vacuum cleaner from...
... increases suction for clogs. WAND LIGHT This vacuum cleaner is equipped with a light on the handle, tt consists of that picks up dirt. Rapidly moving air carries the dirt to change as dirt is mounted on the extension wand° This light will operate when attached or not attached to the PowerMate, The light can be used for lighting hard to reach locations, DIRT SENSOR The dirt sensor light system is being vacuumed. Turn off and /_/ unplug vacuum cleaner from...
Owners Manual
Page 16
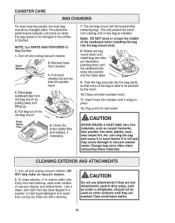
... installed. Attachments used on when the bag needs to vacuum cleaner motor. Pull bag out of the cardboard when installing the bag into the bag cavity so that has been dipped in dirty areas, such as carpet freshener, face powder, fine dust, plaster, soot, new carpet lint, etc. Wipe dry after removing bag, This will prevent the hood from canister, 3. The electronic performance indicator will flip forward after cleaning. Hood Release. 2. Rotate red bag...
... installed. Attachments used on when the bag needs to vacuum cleaner motor. Pull bag out of the cardboard when installing the bag into the bag cavity so that has been dipped in dirty areas, such as carpet freshener, face powder, fine dust, plaster, soot, new carpet lint, etc. Wipe dry after removing bag, This will prevent the hood from canister, 3. The electronic performance indicator will flip forward after cleaning. Hood Release. 2. Rotate red bag...
Owners Manual
Page 17
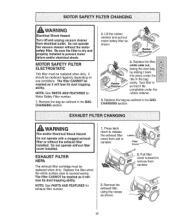
... PARTS AND FEATURES for exhaust filter number 1. NOTE: See PARTS AND FEATURES for Motor Safety Filter number, I cavity. WARNING Electrical Shock Hazard Turn off and unplug vacuum cleaner from electrical outlet. Do not operate the vacuum cleaner without filter cover installed. Lift the rubber retainer and pull out motor safety filter as shown_ Filter Covet' 2. Tuck filter in canister. 3, Remove the exhaust filter using the recess as shown _ _L white side out, l_i_ facing the dust bag...
... PARTS AND FEATURES for exhaust filter number 1. NOTE: See PARTS AND FEATURES for Motor Safety Filter number, I cavity. WARNING Electrical Shock Hazard Turn off and unplug vacuum cleaner from electrical outlet. Do not operate the vacuum cleaner without filter cover installed. Lift the rubber retainer and pull out motor safety filter as shown_ Filter Covet' 2. Tuck filter in canister. 3, Remove the exhaust filter using the recess as shown _ _L white side out, l_i_ facing the dust bag...
Owners Manual
Page 18
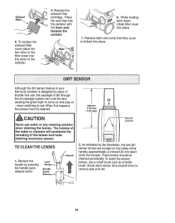
... of dirt through the air passage system can coat the lens causing the green light to come on and stay on the canister, 6. Brush each sensor lens several times to red. To replace the exhaust filter cover place the two tabs on the filter cover into the slots on - never switching to remove dust and dirt. As indicated by pressing the handle quick release button Lock Quick / ;*-- Release latch...
... of dirt through the air passage system can coat the lens causing the green light to come on and stay on the canister, 6. Brush each sensor lens several times to red. To replace the exhaust filter cover place the two tabs on the filter cover into the slots on - never switching to remove dust and dirt. As indicated by pressing the handle quick release button Lock Quick / ;*-- Release latch...
Owners Manual
Page 19
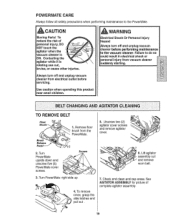
... worn belt, 7. I wARNING Electrical Shock Or Personal Injury Hazard Always turn off and unplug vacuum cleaner before servicing. Always turn off and unplug vacuum cleaner from electrical outlet before performing maintenance to the vacuum cleaner. Check and clean end cap area& See AGITATOR ASSEMBLY for picture of personal injury, DO NOT touch the agitator when the vacuum cleaner is rotating can cut, bruise, or cause other injuries. Use caution when operating this product...
... worn belt, 7. I wARNING Electrical Shock Or Personal Injury Hazard Always turn off and unplug vacuum cleaner before servicing. Always turn off and unplug vacuum cleaner from electrical outlet before performing maintenance to the vacuum cleaner. Check and clean end cap area& See AGITATOR ASSEMBLY for picture of personal injury, DO NOT touch the agitator when the vacuum cleaner is rotating can cut, bruise, or cause other injuries. Use caution when operating this product...
Owners Manual
Page 20
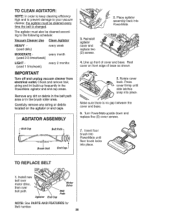
...; AGITATOR ASSEMBLY 2. Line up frequently in the brush roller area, Carefully remove any dirt or debris in the belt path area or in the PowerMate agitator and end cap areas. Remove any string or debris located on front edge of base as shown, 5. Place agitator assembly back into place. TO REPLACE BELT 1, Install new belt over motor drive, then over belt path, Agitator \ Path End Cap NOTE: See PARTS AND FEATURES for Belt number...
...; AGITATOR ASSEMBLY 2. Line up frequently in the brush roller area, Carefully remove any dirt or debris in the belt path area or in the PowerMate agitator and end cap areas. Remove any string or debris located on front edge of base as shown, 5. Place agitator assembly back into place. TO REPLACE BELT 1, Install new belt over motor drive, then over belt path, Agitator \ Path End Cap NOTE: See PARTS AND FEATURES for Belt number...
Owners Manual
Page 22
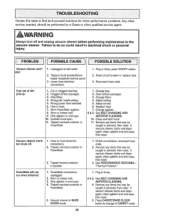
... service panel. 3. Loose hose electrical connections. 1. Replace hose, 7. Removeany itemsthat may be performed by a Sears or other service needed, should be caught or jammed, then reset, tf vacuum cleaner starts and stops again, clean agitator and end caps, then reseL Press CARPET/BARE FLOOR button to change to CARPET mode, Wrong pile height setting. 5. Adjust setting. 5, Adjust control, 6. Check connections, reconnect hose ends. 2. Dirty filters. 4. Canister hood open tl. Clear airflow passages, 3. Reconnect hose ends, Poor job of dirt pick...
... service panel. 3. Loose hose electrical connections. 1. Replace hose, 7. Removeany itemsthat may be performed by a Sears or other service needed, should be caught or jammed, then reset, tf vacuum cleaner starts and stops again, clean agitator and end caps, then reseL Press CARPET/BARE FLOOR button to change to CARPET mode, Wrong pile height setting. 5. Adjust setting. 5, Adjust control, 6. Check connections, reconnect hose ends. 2. Dirty filters. 4. Canister hood open tl. Clear airflow passages, 3. Reconnect hose ends, Poor job of dirt pick...
Owners Manual
Page 23
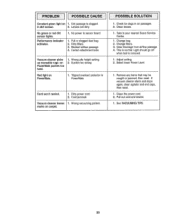
... removed. Certain attachment tools, Vacuum cleaner picks up moveable rugs -orPowerMate pushes too hard. 1, Wrong pile height setting_ 2, Suction too strong Red light on carpet. I . Clear blockage from airflow passage, 4. This is normal, Light should go off when tool is clogged, indirt sensor_ 2, Lensesare dirty No green or red dirt sensor lights° Performance Indicator activates_ 1. Clean the powercord, 2. Pull out cord and rewind, I . Fullor clogged dust bag 2. See VACUUMING TIPS, 23 Check for clogs...
... removed. Certain attachment tools, Vacuum cleaner picks up moveable rugs -orPowerMate pushes too hard. 1, Wrong pile height setting_ 2, Suction too strong Red light on carpet. I . Clear blockage from airflow passage, 4. This is normal, Light should go off when tool is clogged, indirt sensor_ 2, Lensesare dirty No green or red dirt sensor lights° Performance Indicator activates_ 1. Clean the powercord, 2. Pull out cord and rewind, I . Fullor clogged dust bag 2. See VACUUMING TIPS, 23 Check for clogs...
Owners Manual
Page 24
... help keep products operating properly under normal use, not just defects. ure of any covered refrigerator or freezer. [] Rental reimbursement if repair of your product. [] Unlimited service calls and nationwide service, as often as you want us, whenever you want us as a '_talkJngowner's manual? [] Power surge protection against electrical damage due to help by a force of more product failures occur within twelve months. [] Product replacement if your new product...
... help keep products operating properly under normal use, not just defects. ure of any covered refrigerator or freezer. [] Rental reimbursement if repair of your product. [] Unlimited service calls and nationwide service, as often as you want us, whenever you want us as a '_talkJngowner's manual? [] Power surge protection against electrical damage due to help by a force of more product failures occur within twelve months. [] Product replacement if your new product...


