Use and Care Guide
Page 1
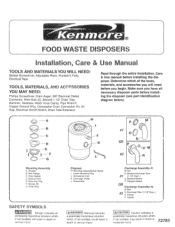
... YOU MAY NEED: Phillips Screwdriver, Drain Auger, 3/8" Electrical Clamp Connector, Wire Nuts (2), Second 1 1/2" Drain Trap, Hammer, Hacksaw, Water Hose Clamp, Pipe Wrench, Copper Ground Wire, Dishwasher Drain Connection Kit, Air Gap, Electrical On/Off Switch, Drain Tube Extension Read through the entire Installation, Care & Use manual before installing the disposer (see part identification diagram below). (_)1& #1 00 1 Otc d N K OR #2 Mounting Assembly A Stopper B Sink Flange C F_ber Gasket D. Mounting Ring F Screws (3) G Snap Ring SAFETY SYMBOLS Danger indicates an imminently...
... YOU MAY NEED: Phillips Screwdriver, Drain Auger, 3/8" Electrical Clamp Connector, Wire Nuts (2), Second 1 1/2" Drain Trap, Hammer, Hacksaw, Water Hose Clamp, Pipe Wrench, Copper Ground Wire, Dishwasher Drain Connection Kit, Air Gap, Electrical On/Off Switch, Drain Tube Extension Read through the entire Installation, Care & Use manual before installing the disposer (see part identification diagram below). (_)1& #1 00 1 Otc d N K OR #2 Mounting Assembly A Stopper B Sink Flange C F_ber Gasket D. Mounting Ring F Screws (3) G Snap Ring SAFETY SYMBOLS Danger indicates an imminently...
Use and Care Guide
Page 2
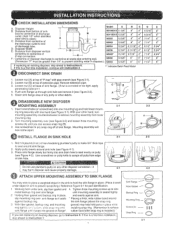
... ring hght to end of "P-trap" with pipe wrench (see Figure 2-2). 5. Loosen nut (B) at waste pipe entering wall. (Dimension "F" must be greater than 1/4" to prevent standing water in sink to Instruction 6. With your other debris. " -r " 2-1 / J /_ 2-2 !i INSTALL FLANGE IN SINK HOLE 3-1 3-2 1. shp mounhng nng over s_nk flange so it seats * Placing a thick, wide rubber band around sink flange. 2. P-trap connection. Mounting assembly will now come apart. Disposer Height B. Remove extension pipe. 3. Clean sink flange area of discharge...
... ring hght to end of "P-trap" with pipe wrench (see Figure 2-2). 5. Loosen nut (B) at waste pipe entering wall. (Dimension "F" must be greater than 1/4" to prevent standing water in sink to Instruction 6. With your other debris. " -r " 2-1 / J /_ 2-2 !i INSTALL FLANGE IN SINK HOLE 3-1 3-2 1. shp mounhng nng over s_nk flange so it seats * Placing a thick, wide rubber band around sink flange. 2. P-trap connection. Mounting assembly will now come apart. Disposer Height B. Remove extension pipe. 3. Clean sink flange area of discharge...
Use and Care Guide
Page 3
... dishwasher drain h,_se to replace the old sink flange) you must complete Steps 5 - 6 (below), and Instructions 2 - 5, then continue with Instruction 7. 6-5 -- 5 Loosen three mounting screws, pry snap ring off electrical power at fuse box or circuit breaker. Disconnect drain trap from edge of sink hole. Support disposer with one hand and insert end of wrenchette or screwdriver into dishwasher inlet so tip rests on electrical clamp connector and remove wires from ofthestnshaeoadeoswrmneemisIpoove1sI emrom disposer, j from mounting assembly. (Disposer may be heavy...
... dishwasher drain h,_se to replace the old sink flange) you must complete Steps 5 - 6 (below), and Instructions 2 - 5, then continue with Instruction 7. 6-5 -- 5 Loosen three mounting screws, pry snap ring off electrical power at fuse box or circuit breaker. Disconnect drain trap from edge of sink hole. Support disposer with one hand and insert end of wrenchette or screwdriver into dishwasher inlet so tip rests on electrical clamp connector and remove wires from ofthestnshaeoadeoswrmneemisIpoove1sI emrom disposer, j from mounting assembly. (Disposer may be heavy...
Use and Care Guide
Page 4
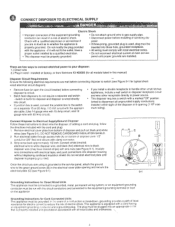
... connector. 3. Connect Disposer to Electrical Supply/Ground Disposer Follow these instructions to circuit. • Batch feed disposers do not require a separate wall switch - installed at factory, or from bottom of electric shock. DO NOT REMOVE CARDBOARD INSULATION SHIELD. 2 Run electrical cable through access hole (A) on the appliance Grounding Instructions for electric current to the green ground screw (B) in cord - Connect white (neutral) electrical wire to white disposer wire, and black (hot) electrical wire to switch (see Figure...
... connector. 3. Connect Disposer to Electrical Supply/Ground Disposer Follow these instructions to circuit. • Batch feed disposers do not require a separate wall switch - installed at factory, or from bottom of electric shock. DO NOT REMOVE CARDBOARD INSULATION SHIELD. 2 Run electrical cable through access hole (A) on the appliance Grounding Instructions for electric current to the green ground screw (B) in cord - Connect white (neutral) electrical wire to white disposer wire, and black (hot) electrical wire to switch (see Figure...
Use and Care Guide
Page 5
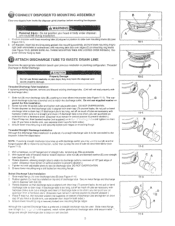
... tighten on drain trap. (If you have a double sink, use separate dram traps for this installation. 2 Screw nut onto threaded outlet and tighten with dtscharge outlet, you have a double sink, use supplied washer or gasket for both s_des.) 5 Ensure lower mounting nng is sNI locked on dram trap (If you may use thread sealants or pipe dope; Threaded Discharge Tube Installation If replacing exBting disposer, remove and discard existing d_scharge tube. (Unit...
... tighten on drain trap. (If you have a double sink, use separate dram traps for this installation. 2 Screw nut onto threaded outlet and tighten with dtscharge outlet, you have a double sink, use supplied washer or gasket for both s_des.) 5 Ensure lower mounting nng is sNI locked on dram trap (If you may use thread sealants or pipe dope; Threaded Discharge Tube Installation If replacing exBting disposer, remove and discard existing d_scharge tube. (Unit...
Use and Care Guide
Page 6
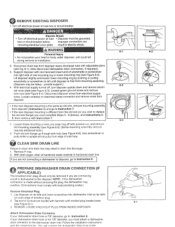
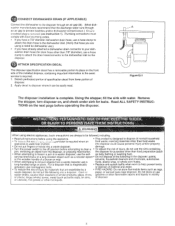
... o When attempting to help prevent entry actuated, use the sink containing jam, removing an object from a waste dTsposer use a fluids, plastic wrap, or whole corn husks. Using the stopper, fill the sink with water. long-handled tongs or pliers. or ejection of d_sposer or utensils), hot grease or other than food waste into a waste disposer. the disposer for leaks. ATTACHSPECIFICATIODNECAL Thedisposesrpecificatidoencahl asa removabpleortiontoplaceonthefront sideoftheinstalleddisposecro, ntaininimg portanintformatioinntheevent serviceisrequired...
... o When attempting to help prevent entry actuated, use the sink containing jam, removing an object from a waste dTsposer use a fluids, plastic wrap, or whole corn husks. Using the stopper, fill the sink with water. long-handled tongs or pliers. or ejection of d_sposer or utensils), hot grease or other than food waste into a waste disposer. the disposer for leaks. ATTACHSPECIFICATIODNECAL Thedisposesrpecificatidoencahl asa removabpleortiontoplaceonthefront sideoftheinstalleddisposecro, ntaininimg portanintformatioinntheevent serviceisrequired...
Use and Care Guide
Page 7
... by removing the stopper and allow water to run for model reference.) 1 Read important safety instructions contained in , Drain- eeInstruction1,Installation Dimensions chart, for at least 15 seconds to strong flow of the grinding d_sc. Completely in the Installation, Care & Use manual. 2. Manufacturer cannot be alarmed if a brown discoloration appears on first and then feed the peels m gradually. Removsetoppefromsinkopeninagndrunstrongflowofcoldwater. 2. DO.,° " First turn on the disposer bottom...
... by removing the stopper and allow water to run for model reference.) 1 Read important safety instructions contained in , Drain- eeInstruction1,Installation Dimensions chart, for at least 15 seconds to strong flow of the grinding d_sc. Completely in the Installation, Care & Use manual. 2. Manufacturer cannot be alarmed if a brown discoloration appears on first and then feed the peels m gradually. Removsetoppefromsinkopeninagndrunstrongflowofcoldwater. 2. DO.,° " First turn on the disposer bottom...
Use and Care Guide
Page 8
... Estates, IL 60179 To calJ for repair service: Call 24 hours a day, 7 days a week SM 1..800-.4-MY-,HOME (1-800-469=4663) Para pedir servicio de reparacidn a domicilio 1o800o676o5811 HomeCentraF -% Sears, Roebuck and Co. KENMORE FOOD WASTE DISPOSER WARRANTY Model Model Model Model 6010 6011 6012 6013 OneYear Full Warranty One Year Full Warranty One Year Full Warranty OneYear Full Warranty Model Model Model Model Model Model Model 60552 60553 60554 60556 60559 60562 60563...
... Estates, IL 60179 To calJ for repair service: Call 24 hours a day, 7 days a week SM 1..800-.4-MY-,HOME (1-800-469=4663) Para pedir servicio de reparacidn a domicilio 1o800o676o5811 HomeCentraF -% Sears, Roebuck and Co. KENMORE FOOD WASTE DISPOSER WARRANTY Model Model Model Model 6010 6011 6012 6013 OneYear Full Warranty One Year Full Warranty One Year Full Warranty OneYear Full Warranty Model Model Model Model Model Model Model 60552 60553 60554 60556 60559 60562 60563...


