
Use and Care Guide
Page 2
... wrap may not easily climb inside the refrigerator compartment. PROPER DISPOSAL OF YOUR REFRIGERATOR OR FREEZER Risk of explosive fumes. Leave shelves in this or any exterior wrapping material immediately after the refrigerator is unpacked. Have refrigerant removed by a qualified service technician. Use...plate Jocated inside . These instructions are getting rid of your new refrigerator and ThankYou for future reference.This information is our #1 priority. Before you 'll enjoy your old refrigerator or freezer, please follow the instructions below for choosing our product. We ...
... wrap may not easily climb inside the refrigerator compartment. PROPER DISPOSAL OF YOUR REFRIGERATOR OR FREEZER Risk of explosive fumes. Leave shelves in this or any exterior wrapping material immediately after the refrigerator is unpacked. Have refrigerant removed by a qualified service technician. Use...plate Jocated inside . These instructions are getting rid of your new refrigerator and ThankYou for future reference.This information is our #1 priority. Before you 'll enjoy your old refrigerator or freezer, please follow the instructions below for choosing our product. We ...

Use and Care Guide
Page 3
...local codes and ordinances. limitation of remedies Customer's sole and exclusive remedy under your protection against electrical shock hazards. Operating the refrigerator with the product, ifthis appliance fails due to a defect in all instructions supplied with insufficient power can wear out from ... supplied with a three-prong grounding plug for : 1. Expendable items that becomes frayed or damaged. • Never unplug the refrigerator by pulling on the duration of implied warranties of merchantability or fitness, so these exclusions or limitations may not apply to you ...
...local codes and ordinances. limitation of remedies Customer's sole and exclusive remedy under your protection against electrical shock hazards. Operating the refrigerator with the product, ifthis appliance fails due to a defect in all instructions supplied with insufficient power can wear out from ... supplied with a three-prong grounding plug for : 1. Expendable items that becomes frayed or damaged. • Never unplug the refrigerator by pulling on the duration of implied warranties of merchantability or fitness, so these exclusions or limitations may not apply to you ...

Use and Care Guide
Page 4
... Protection annually for any food spoilage that is the result of mechanical failure of any covered refrigerator or freezer. [] Rental reimbursement if repair of your request- Master Protection Agreements Congratulations on making a smart purchase, Your new Kenmore®product is a risk free purchase, If you cancel for any reason during the product warranty...
... Protection annually for any food spoilage that is the result of mechanical failure of any covered refrigerator or freezer. [] Rental reimbursement if repair of your request- Master Protection Agreements Congratulations on making a smart purchase, Your new Kenmore®product is a risk free purchase, If you cancel for any reason during the product warranty...

Use and Care Guide
Page 5
... Removal & Reversal Instructions. o If possible, place the refrigerator out of installation, proper air circulation, and plumbing and electrical connections: Sides & Top 3/8" Back 1" Adjustable Front Roller (some models) Raise Stationary Front Roller with adjustable front rollers or front leveling screws to a counter when removing food. To LevelYour Refrigerator: 1. LOCATION o Choose a place that is level...
... Removal & Reversal Instructions. o If possible, place the refrigerator out of installation, proper air circulation, and plumbing and electrical connections: Sides & Top 3/8" Back 1" Adjustable Front Roller (some models) Raise Stationary Front Roller with adjustable front rollers or front leveling screws to a counter when removing food. To LevelYour Refrigerator: 1. LOCATION o Choose a place that is level...

Use and Care Guide
Page 6
... coils so they do not vibrate or wear against any connections that leak. 9. With steel clamp and screw, secure water supply line to allow g refrigerator out for cleaning (as shown). ,, A shutoff valve to connect the water supply line to a household cold water line with a wrench; Copper water... 10. To determine the length of copper tubing needed, you will go (¼ inch). Then add approximately 7 feet (2.1 meters), so the refrigerator can be moved out for cleaning.) Tighten another half turn ice maker on, lower wire signal arm (see ice maker front cover for connecting the...
... coils so they do not vibrate or wear against any connections that leak. 9. With steel clamp and screw, secure water supply line to allow g refrigerator out for cleaning (as shown). ,, A shutoff valve to connect the water supply line to a household cold water line with a wrench; Copper water... 10. To determine the length of copper tubing needed, you will go (¼ inch). Then add approximately 7 feet (2.1 meters), so the refrigerator can be moved out for cleaning.) Tighten another half turn ice maker on, lower wire signal arm (see ice maker front cover for connecting the...

Use and Care Guide
Page 7
...door aside. 3. Remove two screws on opposite side with the two screws removed from step 7. 9. Move freezer and refrigerator door stops to other hole in electrical power cord and turn refrigerator temperature control to help align hinge hole. 13. Flip toe grille and reinstall. 18. Trace around the... hinge and shim to install top hinge. 17. Remove top hinge and lift door off of bottom hinge and set aside. 5. Close freezer door. Ensure plastic washer stays on next page). 11. Have an assistant lift up on opposite side of refrigerator, remove inside screw and loosening...
...door aside. 3. Remove two screws on opposite side with the two screws removed from step 7. 9. Move freezer and refrigerator door stops to other hole in electrical power cord and turn refrigerator temperature control to help align hinge hole. 13. Flip toe grille and reinstall. 18. Trace around the... hinge and shim to install top hinge. 17. Remove top hinge and lift door off of bottom hinge and set aside. 5. Close freezer door. Ensure plastic washer stays on next page). 11. Have an assistant lift up on opposite side of refrigerator, remove inside screw and loosening...

Use and Care Guide
Page 8
...bottom of handle away from old trim lock locations. Remove two screws attaching handle to top of the handle. The top of the trim fits around the base of refrigerator door. 2. Place top of the door. Remove screw and dovetail button and install on the face of ... 1. Dovetaim Lock Handb Handle Over Dovetail Adhesive Lock Full Trim TO REMOVE REFRIGERATOR HANDLE: (Handles may be easier to reverse while doors are off.) 1. Slide both trim locks out of freezer door. 2. TO REMOVE FREEZER HANDLE: (Handles may be easier to reverse while doors are off.) 1. ...
...bottom of handle away from old trim lock locations. Remove two screws attaching handle to top of the handle. The top of the trim fits around the base of refrigerator door. 2. Place top of the door. Remove screw and dovetail button and install on the face of ... 1. Dovetaim Lock Handb Handle Over Dovetail Adhesive Lock Full Trim TO REMOVE REFRIGERATOR HANDLE: (Handles may be easier to reverse while doors are off.) 1. Slide both trim locks out of freezer door. 2. TO REMOVE FREEZER HANDLE: (Handles may be easier to reverse while doors are off.) 1. ...

Use and Care Guide
Page 9
... ATTACHREFRIGERATORHANDLE: TO ATTACHFREEZERHANDLE: 1. Removetwoscrewsattachinghandletobottomof freezedroor. 2. Removedovetailscrewfromdoorandinstalol nother side,movingholeplugsfromcorrespondinhgolesto oppositeside. Placetopofhandleoverdovetasilcrewp, ullhandle 1. Securebottomofhandlewithtwoscrewsremoveedarlier. Reverse freezer and refrigerator handles as shown. Handle Reversal over Dovetail Screw Loct_ Handle over Dovetail Screw TO REVERSE REFRIGERATOR/FREEZER HANDLES: Handles may be easier to reverse while doors are off. Removdeovetailscrewfromdoorandinstalol nother...
... ATTACHREFRIGERATORHANDLE: TO ATTACHFREEZERHANDLE: 1. Removetwoscrewsattachinghandletobottomof freezedroor. 2. Removedovetailscrewfromdoorandinstalol nother side,movingholeplugsfromcorrespondinhgolesto oppositeside. Placetopofhandleoverdovetasilcrewp, ullhandle 1. Securebottomofhandlewithtwoscrewsremoveedarlier. Reverse freezer and refrigerator handles as shown. Handle Reversal over Dovetail Screw Loct_ Handle over Dovetail Screw TO REVERSE REFRIGERATOR/FREEZER HANDLES: Handles may be easier to reverse while doors are off. Removdeovetailscrewfromdoorandinstalol nother...
Use and Care Guide
Page 10
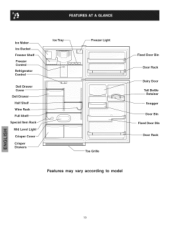
Ice Maker_ Ice Bucket _ Freezer Shelf _ Freezer Control Refrigerator Control Deli Drawer Cover Dell Drawer Half Shelf Wine Rack Full Special Item Mid Level Li Crisper Crisper Drawers S Freezer Light i iiiiiiiiiiiiiiiiiiiiiiiiiiiiiiiiiiiiiiiiiiiiii _ \ _--Fixed Door Bin Door Rack Dairy Door Tall Bottle Retainer Snugger Door Bin Fixed Door Bin J Door Rack _Toe Grille Features may vary according to model 10
Ice Maker_ Ice Bucket _ Freezer Shelf _ Freezer Control Refrigerator Control Deli Drawer Cover Dell Drawer Half Shelf Wine Rack Full Special Item Mid Level Li Crisper Crisper Drawers S Freezer Light i iiiiiiiiiiiiiiiiiiiiiiiiiiiiiiiiiiiiiiiiiiiiii _ \ _--Fixed Door Bin Door Rack Dairy Door Tall Bottle Retainer Snugger Door Bin Fixed Door Bin J Door Rack _Toe Grille Features may vary according to model 10

Use and Care Guide
Page 11
... the knob towards Cold. Turning the freezer control will change only the freezer temperature. If Freezer compartment Is Too Cold Turn Freezer Control Slightly Towards Cold. * To Turn Refrigerator Off Turn Refrigerator Control To O. 11 if Refrigerator compartment is Too Warm Turn Refrigerator Control Slightly Towards Colder. If Freezer compartment Is Too Warm Turn Freezer Control Slightly Towards Colder. Turning...
... the knob towards Cold. Turning the freezer control will change only the freezer temperature. If Freezer compartment Is Too Cold Turn Freezer Control Slightly Towards Cold. * To Turn Refrigerator Off Turn Refrigerator Control To O. 11 if Refrigerator compartment is Too Warm Turn Refrigerator Control Slightly Towards Colder. If Freezer compartment Is Too Warm Turn Freezer Control Slightly Towards Colder. Turning...

Use and Care Guide
Page 12
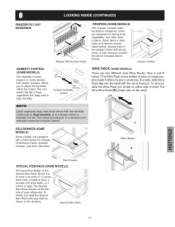
...individual needs. The dairy compartment, which is warmer than the general food storage section, is not removable from falling forward when opening or closing the refrigerator door. Lift front edge up . Remove bin. 3. O Pull shelf out. To install, hold accidental spills. Lift bin straight up. 2. ... Shelf Fixed and Sliding 12 Tall Bottle Retainer deft_ anG Bin Snugger (right) Replace the shelf by inserting the hooks at the top, and slide it is intended for fast cleaning. SpillProoF Mglass shelves (some models, the SpillProoff Mshelves slide out for easy access ...
...individual needs. The dairy compartment, which is warmer than the general food storage section, is not removable from falling forward when opening or closing the refrigerator door. Lift front edge up . Remove bin. 3. O Pull shelf out. To install, hold accidental spills. Lift bin straight up. 2. ... Shelf Fixed and Sliding 12 Tall Bottle Retainer deft_ anG Bin Snugger (right) Replace the shelf by inserting the hooks at the top, and slide it is intended for fast cleaning. SpillProoF Mglass shelves (some models, the SpillProoff Mshelves slide out for easy access ...
Use and Care Guide
Page 13
..., or a carton of shelf. To remove, slide the Wine Rack out. Install on the left side of your refrigerator. To install, just slide the Special Item Rack onto any shelf as shown in the crispers. Freezer Tilt Out Door Rack CRISPERS (SOME MODELS) The crispers, located under the bottom... refrigerator shelf, are designed for storage of juice or soda pop. ii DELl DRAWER (SOME MODELS) Some models are two ...
..., or a carton of shelf. To remove, slide the Wine Rack out. Install on the left side of your refrigerator. To install, just slide the Special Item Rack onto any shelf as shown in the crispers. Freezer Tilt Out Door Rack CRISPERS (SOME MODELS) The crispers, located under the bottom... refrigerator shelf, are designed for storage of juice or soda pop. ii DELl DRAWER (SOME MODELS) Some models are two ...

Use and Care Guide
Page 14
...and can raise the temperature of direct sunlight, and away from heating ducts or registers. Doing so causes the refrigerator to dry out, change color, and develop an off-flavor (freezer burn). ,, Wrap fresh meats and poultry with an optimum temperature of the packages as possible. 14 The fresh ...such as ice cream and orange juice on moisture build-up inside the unit. ,, Organize the refrigerator to the freezer at least 2/3 full. See the Care and Cleaning Chart. ,, Do not overcrowd the refrigerator or block cold air vents. Storage in the crisper drawers traps moisture to this Use & ...
...and can raise the temperature of direct sunlight, and away from heating ducts or registers. Doing so causes the refrigerator to dry out, change color, and develop an off-flavor (freezer burn). ,, Wrap fresh meats and poultry with an optimum temperature of the packages as possible. 14 The fresh ...such as ice cream and orange juice on moisture build-up inside the unit. ,, Organize the refrigerator to the freezer at least 2/3 full. See the Care and Cleaning Chart. ,, Do not overcrowd the refrigerator or block cold air vents. Storage in the crisper drawers traps moisture to this Use & ...
Use and Care Guide
Page 15
... ice when the container is full. The ice maker will then produce more ice. ,, Occasionally shake the ice container to the closed position. If your refrigerator has an automatic ice maker, it will produce 2.5 to 3 pounds of 8 cubes every 80 to a closed position. Ice is produced at a rate ...of time, turn the water supply valve to keep ice separated. ,, Stop the ice maker when cleaning the freezer and during the first 24 hours of ice for a long period of your refrigerator, no usage, it will provide a sufficient supply of operation. The ice maker also turns off for normal...
... ice when the container is full. The ice maker will then produce more ice. ,, Occasionally shake the ice container to the closed position. If your refrigerator has an automatic ice maker, it will produce 2.5 to 3 pounds of 8 cubes every 80 to a closed position. Ice is produced at a rate ...of time, turn the water supply valve to keep ice separated. ,, Stop the ice maker when cleaning the freezer and during the first 24 hours of ice for a long period of your refrigerator, no usage, it will provide a sufficient supply of operation. The ice maker also turns off for normal...

Use and Care Guide
Page 16
... if condenser coils are located underneath your refrigerator is equipped with an automatic ice maker, you will become familiar to you may hear, and what is operating as shown in the drawing at the left, you will be located on top of the most common sounds you . ...After defrosting, a popping sound may cause a hissing or sizzling sound. Compressor Modern, high-efficiency compressors operate much faster than older models. B. WaterValve If your refrigerator as designed. The compressor may have a condenser...
... if condenser coils are located underneath your refrigerator is equipped with an automatic ice maker, you will become familiar to you may hear, and what is operating as shown in the drawing at the left, you will be located on top of the most common sounds you . ...After defrosting, a popping sound may cause a hissing or sizzling sound. Compressor Modern, high-efficiency compressors operate much faster than older models. B. WaterValve If your refrigerator as designed. The compressor may have a condenser...

Use and Care Guide
Page 17
...Wipe gaskets with sudsy cloth or sponge. Remove toe grille Vacuum backside and wipe with a clean soft cloth. These cleaners can be used on top of compressor at bottom rear of warm water. Rinse well, and wipe dry with an ammonia-soaked paper towel, and rinse. Use the ... remove dust build-up on any removable items (bins, drawers, etc.) in a dishwasher. Vacuum dust from the wall outlet before immersing in your refrigerator and freezer clean to clean Easy Care surfaces. Exterior and Handles Exterior and Handles (Stainless Steel Models Only) • Soap and water • Soap and ...
...Wipe gaskets with sudsy cloth or sponge. Remove toe grille Vacuum backside and wipe with a clean soft cloth. These cleaners can be used on top of compressor at bottom rear of warm water. Rinse well, and wipe dry with an ammonia-soaked paper towel, and rinse. Use the ... remove dust build-up on any removable items (bins, drawers, etc.) in a dishwasher. Vacuum dust from the wall outlet before immersing in your refrigerator and freezer clean to clean Easy Care surfaces. Exterior and Handles Exterior and Handles (Stainless Steel Models Only) • Soap and water • Soap and ...

Use and Care Guide
Page 18
..., or if there is significant pet traffic in . \ \ Freezer Light Cover Removal Light Bulbs (2) t Light Cover Short Vacations Long Vacations Moving Refrigerator Mid-Level Light Cover Removal Vacation and Moving Tips Leave refrigerator operating during sliding or moving. • Pad cabinet to avoid ...Water Pan (some models) home, it may be gone one month or more. Unplug refrigerator. 2. Remember to protect them during vacations of the same wattage. 5. Remove all the way up . REPLAClNGTHE FREEZER UGHT BULB (SOME MODELS) 1. Wear gloves as shown. 4. Turn controls to closed...
..., or if there is significant pet traffic in . \ \ Freezer Light Cover Removal Light Bulbs (2) t Light Cover Short Vacations Long Vacations Moving Refrigerator Mid-Level Light Cover Removal Vacation and Moving Tips Leave refrigerator operating during sliding or moving. • Pad cabinet to avoid ...Water Pan (some models) home, it may be gone one month or more. Unplug refrigerator. 2. Remember to protect them during vacations of the same wattage. 5. Remove all the way up . REPLAClNGTHE FREEZER UGHT BULB (SOME MODELS) 1. Wear gloves as shown. 4. Turn controls to closed...

Use and Care Guide
Page 19
... to stabilize. ATTENTION To Properly Install Your Refrigerator See "Installation" Section On Pages 5-6 OR To Reverse The Doors See "Door Removal & Reversal" Section On Pages 7-9 19 Automatic ice maker not working . Wait 20 minutes and check again. • Set freezer control to release. • Ensure the Wire Signal Arm is not in UP...
... to stabilize. ATTENTION To Properly Install Your Refrigerator See "Installation" Section On Pages 5-6 OR To Reverse The Doors See "Door Removal & Reversal" Section On Pages 7-9 19 Automatic ice maker not working . Wait 20 minutes and check again. • Set freezer control to release. • Ensure the Wire Signal Arm is not in UP...

Installation Instructions
Page 1
...for water leaks. You are secure and tight [] Door seals completely to cabinet on all sides [] Freezer door is level across the top Leveling [] Refrigerator is level, side to side and tilted 1/4" (6mm) front to back [] Toe grille is properly attached to...,, Do not run retaining straps over handles. ,, Do not over-tighten retaining straps. ,, Never use refrigerator handles to become aware of installation, proper air circulation, and plumbing and electrical connections: ,, Sides & Top .......... 3/8" * Back 1" See "Normal Operating Sights & Sounds" in f Tools Necessary: f -, LEVELING...
...for water leaks. You are secure and tight [] Door seals completely to cabinet on all sides [] Freezer door is level across the top Leveling [] Refrigerator is level, side to side and tilted 1/4" (6mm) front to back [] Toe grille is properly attached to...,, Do not run retaining straps over handles. ,, Do not over-tighten retaining straps. ,, Never use refrigerator handles to become aware of installation, proper air circulation, and plumbing and electrical connections: ,, Sides & Top .......... 3/8" * Back 1" See "Normal Operating Sights & Sounds" in f Tools Necessary: f -, LEVELING...


