
Use and Care Guide
Page 1
... this Owner's manual carefully and be sure your gas grill is not intended to be installed in or on recreational vehicles or boats. Note to follow these instructions could result in a convenient place for outdoor use only and is properly assembled, installed and maintained. Customer Service Helpline: For parts ordering, call: 1-800-4-MY-HOME ® For assembly questions, call: 1-800-913-8999 MFG No: 720...
... this Owner's manual carefully and be sure your gas grill is not intended to be installed in or on recreational vehicles or boats. Note to follow these instructions could result in a convenient place for outdoor use only and is properly assembled, installed and maintained. Customer Service Helpline: For parts ordering, call: 1-800-4-MY-HOME ® For assembly questions, call: 1-800-913-8999 MFG No: 720...
Use and Care Guide
Page 2
... cylinder not connected for use with grill. WARNING 1. DANGER If you wish to have other appliance. ! Table of Contents Precautions Warranty 2 Safety Precautions 2~4 Hardware List 5 Parts Diagram 6 Parts List 7 Assembly Instructions 8~11 Lighting Instructions 12~13 Cleaning and Maintenance 14~15 Troubleshooting 15 Cooking Instruction 16 Cooking Chart 17 Kenmore Grill Warranty One-Year Full Warranty on Stainless Steel Burners For five years from the date of purchase, any stainless steel burner...
... cylinder not connected for use with grill. WARNING 1. DANGER If you wish to have other appliance. ! Table of Contents Precautions Warranty 2 Safety Precautions 2~4 Hardware List 5 Parts Diagram 6 Parts List 7 Assembly Instructions 8~11 Lighting Instructions 12~13 Cleaning and Maintenance 14~15 Troubleshooting 15 Cooking Instruction 16 Cooking Chart 17 Kenmore Grill Warranty One-Year Full Warranty on Stainless Steel Burners For five years from the date of purchase, any stainless steel burner...
Use and Care Guide
Page 3
... flow of Grill Never use gasoline or other damage. The LP gas tank used outdoors only, at least 24 inches from being used under or • near this information is the maximum size LP gas tank to excessive heat. • Never store an LP gas tank indoors. Replacement regulators and hose assemblies must be replaced prior to operate your gas grill. The LP gas tank must be used again. • Keep the gas regulator hose away from...
... flow of Grill Never use gasoline or other damage. The LP gas tank used outdoors only, at least 24 inches from being used under or • near this information is the maximum size LP gas tank to excessive heat. • Never store an LP gas tank indoors. Replacement regulators and hose assemblies must be replaced prior to operate your gas grill. The LP gas tank must be used again. • Keep the gas regulator hose away from...

Use and Care Guide
Page 4
... not been used for any flame with your gas grill or the LP gas tank. Here's what the Repair Protection Agreement * includes: ü Expert service by phone - Some limitations and exclusions apply. The flames should be fixed ü Fast help with operation of this burner tube cleaning procedure if your Repair Protection Agreement today! A low volume of "If Grill Still Fails To Light", or call...
... not been used for any flame with your gas grill or the LP gas tank. Here's what the Repair Protection Agreement * includes: ü Expert service by phone - Some limitations and exclusions apply. The flames should be fixed ü Fast help with operation of this burner tube cleaning procedure if your Repair Protection Agreement today! A low volume of "If Grill Still Fails To Light", or call...
Use and Care Guide
Page 5
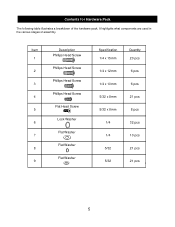
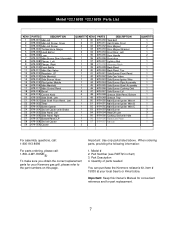
Item 1 2 3 4 5 6 7 8 9 Description Phillips Head Screw Phillips Head Screw Phillips Head Screw Phillips Head Screw Flat Head Screw Lock Washer Flat Washer Flat Washer Flat Washer Specification 1/4 x 15mm 1/4 x 12mm 1/4 x 10mm 5/32 x 8mm 5/32 x 8mm 1/4 1/4 5/32 5/32 Quantity 20 pcs 6 pcs 6 pcs 21 pcs 8 pcs 32 pcs 10 pcs 21 pcs 21 pcs 5 It highlights what components are used in the various stages of the hardware pack. Contents for Hardware Pack The following table illustrates a breakdown of assembly.
Item 1 2 3 4 5 6 7 8 9 Description Phillips Head Screw Phillips Head Screw Phillips Head Screw Phillips Head Screw Flat Head Screw Lock Washer Flat Washer Flat Washer Flat Washer Specification 1/4 x 15mm 1/4 x 12mm 1/4 x 10mm 5/32 x 8mm 5/32 x 8mm 1/4 1/4 5/32 5/32 Quantity 20 pcs 6 pcs 6 pcs 21 pcs 8 pcs 32 pcs 10 pcs 21 pcs 21 pcs 5 It highlights what components are used in the various stages of the hardware pack. Contents for Hardware Pack The following table illustrates a breakdown of assembly.
Use and Care Guide
Page 7
Important: Use only parts listed above. Part Number (see PART# in chart) 3. Model # 2. Quantity of parts needed You can purchase the Kenmore rotisserie kit, item # 15803 at your Kenmore gas grill, please refer to the part numbers on this Owner's Manual for convenient reference and for your local Sear's or Kmart store. When ordering parts, providing the following information: 1. Important: Keep this page. Part Description 4. Model 122.16538 122.16539 Parts List KEY# 1 2 3 4 5 6 7 8 9 10 11...
Important: Use only parts listed above. Part Number (see PART# in chart) 3. Model # 2. Quantity of parts needed You can purchase the Kenmore rotisserie kit, item # 15803 at your Kenmore gas grill, please refer to the part numbers on this Owner's Manual for convenient reference and for your local Sear's or Kmart store. When ordering parts, providing the following information: 1. Important: Keep this page. Part Description 4. Model 122.16538 122.16539 Parts List KEY# 1 2 3 4 5 6 7 8 9 10 11...

Use and Care Guide
Page 8
... sheet on floor and use as you assemble it appears damaged. This will allow you have been included. 5. Attach doors to side panels using (7) 5/32 x 8mm Phillips head screws with Brake Caster, B is swivel caster, C & D are damaged or missing parts when you unpack the shipping box, or you to slide grease tray out of back of grill head and remove all parts...
... sheet on floor and use as you assemble it appears damaged. This will allow you have been included. 5. Attach doors to side panels using (7) 5/32 x 8mm Phillips head screws with Brake Caster, B is swivel caster, C & D are damaged or missing parts when you unpack the shipping box, or you to slide grease tray out of back of grill head and remove all parts...
Use and Care Guide
Page 9
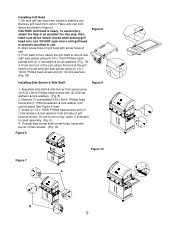
... and (4) ¼ flat washers & lock washers. (Fig. 7A) 4. DO NOT open doors until grill head is heavy. Assemble side shelf & side burner front panel using (2) 1/4 x 10mm Phillips head screws and (2) 1/4 lock washers. (Fig. 7B) Figure 8 Installing Side Burner & Side Shelf Figure 9 1. Do not screw in Figure 6. Remove grill head from above as shown. From the front of the cart, attach the front...
... and (4) ¼ flat washers & lock washers. (Fig. 7A) 4. DO NOT open doors until grill head is heavy. Assemble side shelf & side burner front panel using (2) 1/4 x 10mm Phillips head screws and (2) 1/4 lock washers. (Fig. 7B) Figure 8 Installing Side Burner & Side Shelf Figure 9 1. Do not screw in Figure 6. Remove grill head from above as shown. From the front of the cart, attach the front...

Use and Care Guide
Page 10
...(Fig.14). Insert valve orifice tip into burner tube as shown in side burner control panel. Using (3) 1/4 x 12mm screws and (3) 1/4 lock washers, securely attach side burner shelf to install side shelf. Figure 14 2.Install battery into igniter wire electrode on underside of control panel). Plug ignition wire into ignition box with 2 screws removed in step 1. 5. Secure side burner control panel to install side burner valve. See Figure 12 A inset. 2. Place side burner control knob bezel over side burner valve control stem. Installing Side Burner Valve 1. See Figure 12...
...(Fig.14). Insert valve orifice tip into burner tube as shown in side burner control panel. Using (3) 1/4 x 12mm screws and (3) 1/4 lock washers, securely attach side burner shelf to install side shelf. Figure 14 2.Install battery into igniter wire electrode on underside of control panel). Plug ignition wire into ignition box with 2 screws removed in step 1. 5. Secure side burner control panel to install side burner valve. See Figure 12 A inset. 2. Place side burner control knob bezel over side burner valve control stem. Installing Side Burner Valve 1. See Figure 12...

Use and Care Guide
Page 11
... check according to instructions found , turn grill to fit the hose and regulator assembly provided. 3. After cooking is repaired. If grill was shipped with cooking oil regularly. Never use , gas must be turned off and do not use a wrench to tighten because it has proper external mating threads to HIGH setting for damage. Read all safety, lighting and operating instructions. 2. Push grease tray back into the...
... check according to instructions found , turn grill to fit the hose and regulator assembly provided. 3. After cooking is repaired. If grill was shipped with cooking oil regularly. Never use , gas must be turned off and do not use a wrench to tighten because it has proper external mating threads to HIGH setting for damage. Read all safety, lighting and operating instructions. 2. Push grease tray back into the...
Use and Care Guide
Page 12
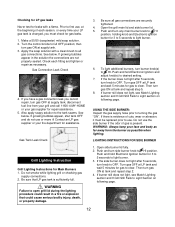
... first use . Gas Tank Leak Check Grill Lighting Instruction Grill Lighting Instructions for 3 to 5 seconds to light burner. 3. Be sure that could result in the solution the connections are securely tightened. 4. Be sure all gas connections. If burner still does not light, see Match Lighting section and If Grill Still Fails to Light Section on following page. 12 Push and hold Electronic Ignition and adjust knob(s) to desired setting. 7. Then turn burner knob...
... first use . Gas Tank Leak Check Grill Lighting Instruction Grill Lighting Instructions for 3 to 5 seconds to light burner. 3. Be sure that could result in the solution the connections are securely tightened. 4. Be sure all gas connections. If burner still does not light, see Match Lighting section and If Grill Still Fails to Light Section on following page. 12 Push and hold Electronic Ignition and adjust knob(s) to desired setting. 7. Then turn burner knob...

Use and Care Guide
Page 13
... the grill lid. • Set control knobs to release gas. Light the match and extend the lighting stick to grill. • Plugged orifice Correction: Remove burners from grill, carefully lift each burner up and away from your grill. ! The burner should be done every time a new LP gas tank is suspected in /or around the burner tubes, follow the instructions below. If Grill Still Fails To Light 1. Take the manual lighting stick 2. Turn the desired control knob to...
... the grill lid. • Set control knobs to release gas. Light the match and extend the lighting stick to grill. • Plugged orifice Correction: Remove burners from grill, carefully lift each burner up and away from your grill. ! The burner should be done every time a new LP gas tank is suspected in /or around the burner tubes, follow the instructions below. If Grill Still Fails To Light 1. Take the manual lighting stick 2. Turn the desired control knob to...
Use and Care Guide
Page 14
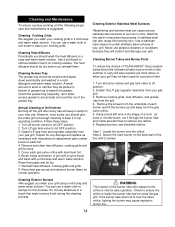
... gas tank valve to remove any damage and replace as necessary with 2 screws. Detach LP gas hose and regulator assembly from the gas valve orifice. 5. Brush inside several times to off the grill after every use will scratch and damage your gas grill. 3. If the burner tube does not fit over the valve orifice, lighting the burner may be followed at least once a month in a mild soap and warm water solution. Cleaning Grease Tray...
... gas tank valve to remove any damage and replace as necessary with 2 screws. Detach LP gas hose and regulator assembly from the gas valve orifice. 5. Brush inside several times to off the grill after every use will scratch and damage your gas grill. 3. If the burner tube does not fit over the valve orifice, lighting the burner may be followed at least once a month in a mild soap and warm water solution. Cleaning Grease Tray...
Use and Care Guide
Page 15
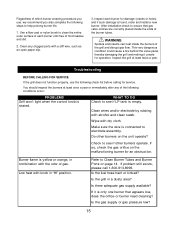
..., check the gas orifice on the malfunctioning burner for damage (cracks or holes) and if such damage is rotated. Burner flame is connected to see if other burners on page 14. After installation check to help prolong burner life. 1. Troubleshooting BEFORE CALLING FOR SERVICE If the grill does not function properly, use , we recommend you use the following check list before calling for operation. WHAT...
..., check the gas orifice on the malfunctioning burner for damage (cracks or holes) and if such damage is rotated. Burner flame is connected to see if other burners on page 14. After installation check to help prolong burner life. 1. Troubleshooting BEFORE CALLING FOR SERVICE If the grill does not function properly, use , we recommend you use the following check list before calling for operation. WHAT...
Use and Care Guide
Page 16
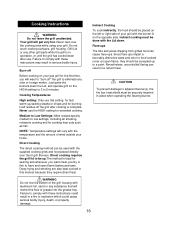
... ignite the burners,lower the Lid, and operate grill on your grill with these instructions may result in this setting for fast warm-up to food cooked cover an open -flame barbecued taste. Deep frying and smoking are also best cooked in serious bodily injury. Indirect Cooking To cook indirectly, the food should be placed on the left or right side...
... ignite the burners,lower the Lid, and operate grill on your grill with these instructions may result in this setting for fast warm-up to food cooked cover an open -flame barbecued taste. Deep frying and smoking are also best cooked in serious bodily injury. Indirect Cooking To cook indirectly, the food should be placed on the left or right side...
Use and Care Guide
Page 17
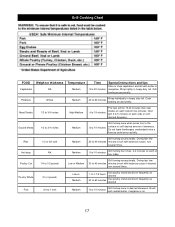
... could occur quickly. Grill Cooking Chart FOOD Vegetables Weight or thickness NA Temperature Medium Time 8 to 15 minutes Pre heat grill for 15-20 minutes then sear steaks on each side for two minutes. Grill turning occassionally. Meat/Steaks 1/2 to 3/4 inches High-Medium 4 to 20 minutes Special instructions and tips Slice or chop vegetables and dot with barbecue sauce, turn...
... could occur quickly. Grill Cooking Chart FOOD Vegetables Weight or thickness NA Temperature Medium Time 8 to 15 minutes Pre heat grill for 15-20 minutes then sear steaks on each side for two minutes. Grill turning occassionally. Meat/Steaks 1/2 to 3/4 inches High-Medium 4 to 20 minutes Special instructions and tips Slice or chop vegetables and dot with barbecue sauce, turn...


