

Use and Care Guide
Page 2
... SAFETY INSTRUCTIONS 3-5 Protection Agreements 5 Range Features 6 Before Setting Oven Controls 7 Setting Surface Controls 8 Oven Control Functions 9 Setting Oven Controls 9-11 Select Self Cleaning 11-12 General Care & Cleaning 13-15 Adjusting Your Oven Temperature 15 Before You Make a Service Call 16 Sears Service Back Page In this space below, record the date of purchase, model and serial number of your product, You will NOT pay for your sales receipt for future reference, Kenmore Appliance Warranty One Year Limited Warranty When installed, operated and...
... SAFETY INSTRUCTIONS 3-5 Protection Agreements 5 Range Features 6 Before Setting Oven Controls 7 Setting Surface Controls 8 Oven Control Functions 9 Setting Oven Controls 9-11 Select Self Cleaning 11-12 General Care & Cleaning 13-15 Adjusting Your Oven Temperature 15 Before You Make a Service Call 16 Sears Service Back Page In this space below, record the date of purchase, model and serial number of your product, You will NOT pay for your sales receipt for future reference, Kenmore Appliance Warranty One Year Limited Warranty When installed, operated and...
Use and Care Guide
Page 3
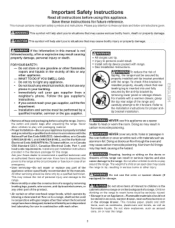
....1, Canadian Electrical Code, Part 1, and local code requirements, install only per installation instructions provided in an oven, warmer drawer, near the range. To check if the bracket is inserted into and fully secured by the anti-tip bracket by removing lower panel or storage drawer. NEVER use gasoline or other servicing should not be seriously injured • Storage in the cabinets above a range or on the backguard of the range and carefully attempt to...
....1, Canadian Electrical Code, Part 1, and local code requirements, install only per installation instructions provided in an oven, warmer drawer, near the range. To check if the bracket is inserted into and fully secured by the anti-tip bracket by removing lower panel or storage drawer. NEVER use gasoline or other servicing should not be seriously injured • Storage in the cabinets above a range or on the backguard of the range and carefully attempt to...
Use and Care Guide
Page 4
... sufficient time to line surface burner pans, or oven bottom, except as suggested in burns from cleaners and aerosols may ignite causing damage and injury. IMPORTANT INSTRUCTIONS FOR USING YOUR OVEN • Use Care When Opening Oven Door orWarmer Drawer--Stand to such substances. The oven vent is operating may cause container to burst and result in this Use & Care Guide. Touching the surfaces in injury. • Remove the oven door from the oven. • Do Not Use Oven...
... sufficient time to line surface burner pans, or oven bottom, except as suggested in burns from cleaners and aerosols may ignite causing damage and injury. IMPORTANT INSTRUCTIONS FOR USING YOUR OVEN • Use Care When Opening Oven Door orWarmer Drawer--Stand to such substances. The oven vent is operating may cause container to burst and result in this Use & Care Guide. Touching the surfaces in injury. • Remove the oven door from the oven. • Do Not Use Oven...
Use and Care Guide
Page 5
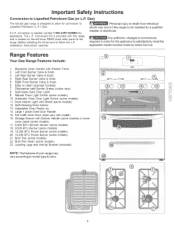
...& Knob. 4. Manual Oven Light Switch (some models). 23. Full width Oven Door (style vary with Drawer Handle (some models) or lower cover panel (some models). 17. 5,000 BTU Simmer Burner (some models). 18. 9,500 BTU Burner (some models). 19. 12,000 BTU Power Burner (some models). 20. 14,200 BTU Power Burner (some models). 12. Installation Instructions carefully. Right Rear Burner Valve & Knob. 5. Self-Clean Oven Door Latch. 9. Adjustable Oven Racks (s). 14. Broil Pan Insert (some models). 10. Gas) The natural gas range is needed, contact 1=800=4=MY-HOME® for conversion...
...& Knob. 4. Manual Oven Light Switch (some models). 23. Full width Oven Door (style vary with Drawer Handle (some models) or lower cover panel (some models). 17. 5,000 BTU Simmer Burner (some models). 18. 9,500 BTU Burner (some models). 19. 12,000 BTU Power Burner (some models). 20. 14,200 BTU Power Burner (some models). 12. Installation Instructions carefully. Right Rear Burner Valve & Knob. 5. Self-Clean Oven Door Latch. 9. Adjustable Oven Racks (s). 14. Broil Pan Insert (some models). 10. Gas) The natural gas range is needed, contact 1=800=4=MY-HOME® for conversion...
Use and Care Guide
Page 7
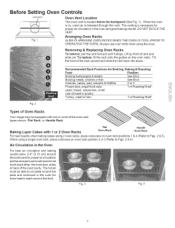
... VENT. Arranging Oven Racks ALWAYS ARRANGE OVEN RACKS WHEN THE OVEN IS COOL (PRIOR TO OPERATING THE OVEN). To replace, fit the rack onto the guides on , warm air is necessary for proper air circulation in the oven for proper air circulation and be able to circulate around the pans and cookware in the oven and good baking results. I Oven Controls Oven Vent Location The oven vent is on the oven walls. When the oven is located below the backguard...
... VENT. Arranging Oven Racks ALWAYS ARRANGE OVEN RACKS WHEN THE OVEN IS COOL (PRIOR TO OPERATING THE OVEN). To replace, fit the rack onto the guides on , warm air is necessary for proper air circulation in the oven for proper air circulation and be able to circulate around the pans and cookware in the oven and good baking results. I Oven Controls Oven Vent Location The oven vent is on the oven walls. When the oven is located below the backguard...
Use and Care Guide
Page 8
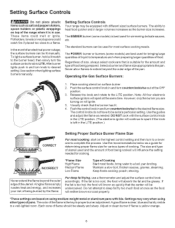
... Gas Surface Burners: 1. Use the guides and adjust the flame as needed for various types of flame should be greasy. Use the recommendations below as a guide for determining proper flame size for cooking. The size and type of utensil used for simmering delicate sauces, etc. J For deep fat frying, use . Adjust or clean burner if flame is clear, blue and hardly visible in the LITE position. (The electronic ignitor will influence the setting...
... Gas Surface Burners: 1. Use the guides and adjust the flame as needed for various types of flame should be greasy. Use the recommendations below as a guide for determining proper flame size for cooking. The size and type of utensil used for simmering delicate sauces, etc. J For deep fat frying, use . Adjust or clean burner if flame is clear, blue and hardly visible in the LITE position. (The electronic ignitor will influence the setting...
Use and Care Guide
Page 9
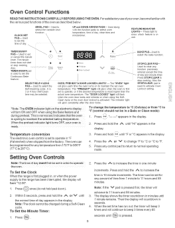
... the display. 2. Note: The clock cannot be selected. Then the display will flash when the oven door locks and unlocks or when using the Bake feature and during a Self-Clean cycle. TiMERON/OFF PAD-- The OVEN indicator light on to maintain the set to operate, or if the desired temperature is reset higher than the actual oven temperature. Press the _ or V to change the temperature to °C (Celsius) or from 1 minute to beep 3 times...
... the display. 2. Note: The clock cannot be selected. Then the display will flash when the oven door locks and unlocks or when using the Bake feature and during a Self-Clean cycle. TiMERON/OFF PAD-- The OVEN indicator light on to maintain the set to operate, or if the desired temperature is reset higher than the actual oven temperature. Press the _ or V to change the temperature to °C (Celsius) or from 1 minute to beep 3 times...
Use and Care Guide
Page 10
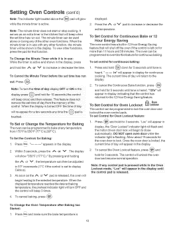
... timer in display for continuous baking: 1. Press B,koand make sure the bake temperature is displayed. 2. When the displayed temperature reaches the desired baking temperature, the preheat indicator light will turn the time of day will appear in the kitchen that function. pad will unlock the oven doorand resume normal operation. To Cancel the Minute Timer before the set temperature. appear in the display. 1. The oven can be programmed to bake at any other oven functions. Press the 1% or V set time...
... timer in display for continuous baking: 1. Press B,koand make sure the bake temperature is displayed. 2. When the displayed temperature reaches the desired baking temperature, the preheat indicator light will turn the time of day will appear in the kitchen that function. pad will unlock the oven doorand resume normal operation. To Cancel the Minute Timer before the set temperature. appear in the display. 1. The oven can be programmed to bake at any other oven functions. Press the 1% or V set time...
Use and Care Guide
Page 11
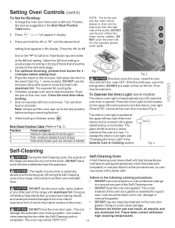
... interior oven light will automatically turn ON when the oven door is covered with aluminum foil. For optimum browning, preheat broil burner for Broiling: 1. some models). To Operate the Oven Light (some birds is in use a fire extinguisher. The interior oven light is located at the HI broil setting. The woven or any cleaning materials on the oven door gasket. Care should be in the Broil Rack Position Table below. 2. Setting Oven Controls (cont'd) To Set for 3 4 minutes before turning or removing...
... interior oven light will automatically turn ON when the oven door is covered with aluminum foil. For optimum browning, preheat broil burner for Broiling: 1. some models). To Operate the Oven Light (some birds is in use a fire extinguisher. The interior oven light is located at the HI broil setting. The woven or any cleaning materials on the oven door gasket. Care should be in the Broil Rack Position Table below. 2. Setting Oven Controls (cont'd) To Set for 3 4 minutes before turning or removing...
Use and Care Guide
Page 12
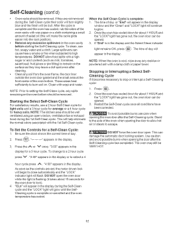
... V once. Use caution and avoid possible burns when opening the oven door after the Self-Cleaning cycle. DO NOT open . Large spillovers can damage the automatic door locking system. The time of day will appear in the display for about l HOURand the "LOCK" light has gone out, the oven door can be VERY HOT. Stand to remain on the surface as the controls are not removed during the Self-Clean cycle...
... V once. Use caution and avoid possible burns when opening the oven door after the Self-Cleaning cycle. DO NOT open . Large spillovers can damage the automatic door locking system. The time of day will appear in the display for about l HOURand the "LOCK" light has gone out, the oven door can be VERY HOT. Stand to remain on the surface as the controls are not removed during the Self-Clean cycle...
Use and Care Guide
Page 13
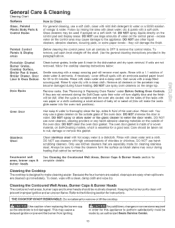
... Parts & Control Knobs For general cleaning, use harsh scrubbing cleaners. dry & polish with a clean cloth. Glass cleaners may cause a delayed ignition or prevent the burner from igniting, _ Anyadditions, changes or conversions required in the dishwasher and dry upon removal. DO NOT use other liquid cleaners, abrasive cleaners, scouring pads, or some paper towels - DO NOT use large amounts of a woven material, on the control panel - Porcelain Enamel Burner Grates, Cooktop Surface, Broiler Pan & insert, Broiler Drawer, Door Liner & Oven...
... Parts & Control Knobs For general cleaning, use harsh scrubbing cleaners. dry & polish with a clean cloth. Glass cleaners may cause a delayed ignition or prevent the burner from igniting, _ Anyadditions, changes or conversions required in the dishwasher and dry upon removal. DO NOT use other liquid cleaners, abrasive cleaners, scouring pads, or some paper towels - DO NOT use large amounts of a woven material, on the control panel - Porcelain Enamel Burner Grates, Cooktop Surface, Broiler Pan & insert, Broiler Drawer, Door Liner & Oven...
Use and Care Guide
Page 14
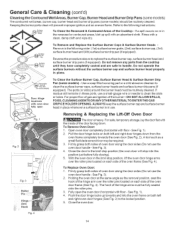
... be routinely cleaned. Fully open To Clean the Surface Burner Cap, Surface Burner Head & Surface Burner Drip Pan (some models) should be required. 3. Fig. 4 14 General Care & Cleaning (cont'd) Cleaning the Contoured Well Areas, Burner Cap, Burner Head and Burner Drip Pans (some models) The contoured well areas, burner cap, burner head and burner drip pans (some models) - If a spill occurs on or in the following instructions: Surface Burner To Clean the Recessed & Contoured Areas of oven door along the door sides (Do not use the oven door handle - The...
... be routinely cleaned. Fully open To Clean the Surface Burner Cap, Surface Burner Head & Surface Burner Drip Pan (some models) should be required. 3. Fig. 4 14 General Care & Cleaning (cont'd) Cleaning the Contoured Well Areas, Burner Cap, Burner Head and Burner Drip Pans (some models) The contoured well areas, burner cap, burner head and burner drip pans (some models) - If a spill occurs on or in the following instructions: Surface Burner To Clean the Recessed & Contoured Areas of oven door along the door sides (Do not use the oven door handle - The...
Use and Care Guide
Page 15
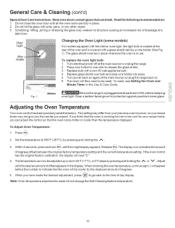
...: 1. The clock will not change the Self-Cleaning feature temperature. 15 To reset, see Setting the Clock and Minute Timer in use. This setting may weaken its structure causing an increased risk of day display. General Care & Cleaning (cont'd) Special Door Care Instructions- The glass shield must be in place whenever the oven is covered with a glass shield held by a wire holder (See Fig. 1). To replace the oven light bulb: 1. Set the temperature to the time of breakage at a later time. Turn power back...
...: 1. The clock will not change the Self-Cleaning feature temperature. 15 To reset, see Setting the Clock and Minute Timer in use. This setting may weaken its structure causing an increased risk of day display. General Care & Cleaning (cont'd) Special Door Care Instructions- The glass shield must be in place whenever the oven is covered with a glass shield held by a wire holder (See Fig. 1). To replace the oven light bulb: 1. Set the temperature to the time of breakage at a later time. Turn power back...
Use and Care Guide
Page 16
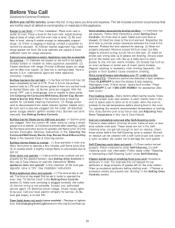
... turned ON. Failure to clean bottom, front top of oven, frame of range until burner ignites & then turn control knob to desired flame size. (2) Burner ports are square & have sufficient room for assistance (See back cover). Burned- Cleaning cycle was interrupted. Follow steps under "Stopping or Interrupting a Self-Cleaning Cycle" under Setting Oven Controls. (2) Oven door is too hot or cool, see "Broiling" in this Use & Care Manual. Wipe up on oven surfaces or broiler pan & insert (some models). Replace or tighten bulb...
... turned ON. Failure to clean bottom, front top of oven, frame of range until burner ignites & then turn control knob to desired flame size. (2) Burner ports are square & have sufficient room for assistance (See back cover). Burned- Cleaning cycle was interrupted. Follow steps under "Stopping or Interrupting a Self-Cleaning Cycle" under Setting Oven Controls. (2) Oven door is too hot or cool, see "Broiling" in this Use & Care Manual. Wipe up on oven surfaces or broiler pan & insert (some models). Replace or tighten bulb...


