

Instruction Manual
Page 4
... 57 Troubleshooting 61 Specifications 64 Trademarks and licenses 67 2 ENGLISH For this manual are examples used to reset your unit 4 Turning on the power 4 Turning off the power 4 Putting the unit in standby 4 Turning off the screen 4 Adjusting the volume 5 Attenuating the sound 5 Getting Started 5 Initial settings 5 Setting the security function 6 Clock settings 6 Various Screens and Operations 7 Home screen 7 Source control screen 8 List/setting screen 9 Disc 10 Video 11 USB 13 Android 15 iPod/iPhone 16 Radio 17 SiriusXM® Satellite Radio 19 Pandora...
... 57 Troubleshooting 61 Specifications 64 Trademarks and licenses 67 2 ENGLISH For this manual are examples used to reset your unit 4 Turning on the power 4 Turning off the power 4 Putting the unit in standby 4 Turning off the screen 4 Adjusting the volume 5 Attenuating the sound 5 Getting Started 5 Initial settings 5 Setting the security function 6 Clock settings 6 Various Screens and Operations 7 Home screen 7 Source control screen 8 List/setting screen 9 Disc 10 Video 11 USB 13 Android 15 iPod/iPhone 16 Radio 17 SiriusXM® Satellite Radio 19 Pandora...
Instruction Manual
Page 7
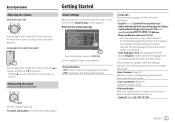
...)): Selects the language used for the first time or reset the unit, the screen appears. Basic Operations Getting Started Adjusting the volume DDX395/DDX375BT You can adjust the volume (00 to 35) by turning the knob to the right to increase and to the left to level 15. • ON (Initial): Activates the display demonstration. • OFF: Deactivates the display demonstration. Initial Setup Demonstration Language Rear Camera User Customize Viewing...
...)): Selects the language used for the first time or reset the unit, the screen appears. Basic Operations Getting Started Adjusting the volume DDX395/DDX375BT You can adjust the volume (00 to 35) by turning the knob to the right to increase and to the left to level 15. • ON (Initial): Activates the display demonstration. • OFF: Deactivates the display demonstration. Initial Setup Demonstration Language Rear Camera User Customize Viewing...

Instruction Manual
Page 8
...] The security function is activated. On the setting screen, touch as follows: Clock settings 1 Display the Home screen. 2 Display the screen. Then, enter the current security code to clear and touch [Enter]. • When the unit has been reset or disconnected from the battery, you are required to "00". Activating the security function You can also display the screen by touching the clock area on the screen, touch as follows...
...] The security function is activated. On the setting screen, touch as follows: Clock settings 1 Display the Home screen. 2 Display the screen. Then, enter the current security code to clear and touch [Enter]. • When the unit has been reset or disconnected from the battery, you are required to "00". Activating the security function You can also display the screen by touching the clock area on the screen, touch as follows...
Instruction Manual
Page 9
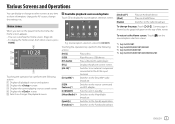
... operation keys performs the following actions: 1 Displays all playback sources and options. 2 Displays the screen. 3 Displays the current playing source control screen. 4 Displays the screen. 5 Selects or changes the playback source. To return to the Home screen: Touch [ ] on a USB device. [BT Audio] Plays a Bluetooth audio player. [TEL] Displays the phone control screen. [AV-IN]*1 Switches to an external component connected to the AV-IN input terminal. [SiriusXM]*2 Switches to the SiriusXM® radio broadcast. [OEM Features]*3 Switches to the source connected via ADS adapter...
... operation keys performs the following actions: 1 Displays all playback sources and options. 2 Displays the screen. 3 Displays the current playing source control screen. 4 Displays the screen. 5 Selects or changes the playback source. To return to the Home screen: Touch [ ] on a USB device. [BT Audio] Plays a Bluetooth audio player. [TEL] Displays the phone control screen. [AV-IN]*1 Switches to an external component connected to the AV-IN input terminal. [SiriusXM]*2 Switches to the SiriusXM® radio broadcast. [OEM Features]*3 Switches to the source connected via ADS adapter...
Instruction Manual
Page 18
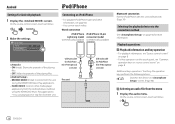
...). • HAND MODE: Controls other information, see "Common operation keys on source control screen" on the touch panel, see page 60. • You cannot watch video. Additional keys operations. Wired connection iPod/iPhone iPod/iPhone 30-pin Lightning model connector model (commercially available) (commercially available) USB Audio cable for iPod/iPhone: KCA-iP103 (optional accessory) Rear panel USB Audio cable for iPod/iPhone: KCA-iP102 (optional accessory) Bluetooth connection Pair the iPod/iPhone with this unit via Bluetooth. (Page 34) Selecting the playback device via the...
...). • HAND MODE: Controls other information, see "Common operation keys on source control screen" on the touch panel, see page 60. • You cannot watch video. Additional keys operations. Wired connection iPod/iPhone iPod/iPhone 30-pin Lightning model connector model (commercially available) (commercially available) USB Audio cable for iPod/iPhone: KCA-iP103 (optional accessory) Rear panel USB Audio cable for iPod/iPhone: KCA-iP102 (optional accessory) Bluetooth connection Pair the iPod/iPhone with this unit via Bluetooth. (Page 34) Selecting the playback device via the...

Instruction Manual
Page 28
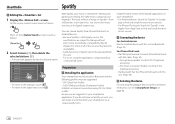
... stream Pandora from this unit. • For issues using LTE, 3G, EDGE, or WiFi. Connecting the device For Android devices Pair the Android device with this unit. (Page 34) Selecting the device For selecting the playback device via Bluetooth. (Page 34) For iPhone/iPod touch • Via USB input terminal: Connect iPhone/iPod touch with the remote controller. 1 Displays/hides other available operation keys* 2 Picture data 3 Track information • Touching [ Accordingly, compatibility may be impaired...
... stream Pandora from this unit. • For issues using LTE, 3G, EDGE, or WiFi. Connecting the device For Android devices Pair the Android device with this unit. (Page 34) Selecting the device For selecting the playback device via Bluetooth. (Page 34) For iPhone/iPod touch • Via USB input terminal: Connect iPhone/iPod touch with the remote controller. 1 Displays/hides other available operation keys* 2 Picture data 3 Track information • Touching [ Accordingly, compatibility may be impaired...

Instruction Manual
Page 30
...; Some functions of the iHeartRadio application on page 46. Ensure you select and similar music. For 30-pin connector models: Use KCA-iP102 (optional accessory). • Via Bluetooth: Pair the iPhone/iPod touch with this unit. (Page 34) Selecting the device For selecting the playback device via Bluetooth. (Page 34) For iPhone/iPod touch • Via USB input terminal: Connect iPhone/iPod touch with optional remote controller, KNA-RCDV331. You can also operate iHeartRadio with the cable. (Page...
...; Some functions of the iHeartRadio application on page 46. Ensure you select and similar music. For 30-pin connector models: Use KCA-iP102 (optional accessory). • Via Bluetooth: Pair the iPhone/iPod touch with this unit. (Page 34) Selecting the device For selecting the playback device via Bluetooth. (Page 34) For iPhone/iPod touch • Via USB input terminal: Connect iPhone/iPod touch with optional remote controller, KNA-RCDV331. You can also operate iHeartRadio with the cable. (Page...
Instruction Manual
Page 32
... 30-pin connector models: Use KCA-iP102 (optional accessory). • Via Bluetooth: Pair the iPhone/iPod touch with this unit. (Page 34) Selecting the device For selecting the playback device via Bluetooth. (Page 34) For iPhone/iPod touch • Via USB input terminal: Connect iPhone/iPod touch with this unit. • For issues using LTE, 3G, EDGE, or WiFi. Working out, partying or relaxing, the right music is always at your music is a third-party service, the specifications...
... 30-pin connector models: Use KCA-iP102 (optional accessory). • Via Bluetooth: Pair the iPhone/iPod touch with this unit. (Page 34) Selecting the device For selecting the playback device via Bluetooth. (Page 34) For iPhone/iPod touch • Via USB input terminal: Connect iPhone/iPod touch with this unit. • For issues using LTE, 3G, EDGE, or WiFi. Working out, partying or relaxing, the right music is always at your music is a third-party service, the specifications...
Instruction Manual
Page 36
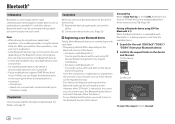
... these operations, stop your mobile phone supports PBAP (Phone Book Access Profile), you can display the following items on the device and the unit. For details, see page 56. However, when "BT Audio" is a short-range wireless radio communication technology for the first time: 1 Register the device by pairing the unit and the device. 2 Connect the device to five devices can be connected at a time. Bluetooth® Information Bluetooth is selected as the source...
... these operations, stop your mobile phone supports PBAP (Phone Book Access Profile), you can display the following items on the device and the unit. For details, see page 56. However, when "BT Audio" is a short-range wireless radio communication technology for the first time: 1 Register the device by pairing the unit and the device. 2 Connect the device to five devices can be connected at a time. Bluetooth® Information Bluetooth is selected as the source...
Instruction Manual
Page 40
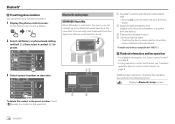
... 3456XXXXXX No preset No preset (Hold) To delete the contact in the preset number: Touch [ ] besides the contact on the preset list. On the Home screen, touch as the source, you can connect up to five phone numbers. 1 Display the phone control screen. BT Audio 1 Tag data* (current track title/artist name/album title) • Pressing [ Bluetooth® Presetting phone numbers You can preset up to five Bluetooth audio devices at the same time.
... 3456XXXXXX No preset No preset (Hold) To delete the contact in the preset number: Touch [ ] besides the contact on the preset list. On the Home screen, touch as the source, you can connect up to five phone numbers. 1 Display the phone control screen. BT Audio 1 Tag data* (current track title/artist name/album title) • Pressing [ Bluetooth® Presetting phone numbers You can preset up to five Bluetooth audio devices at the same time.
Instruction Manual
Page 41
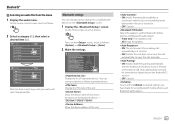
... Home screen, touch as iPhone) connected via USB. (Auto pairing may not work for using Bluetooth mobile phones and Bluetooth audio players. Change the PIN code of the unit. • ON (Initial): Automatically establishes a connection with the Android or iOS device (such as follows: Then, on the Bluetooth device - On the source control screen, touch as follows: [System] → : [Enter] 2 Make the settings. BT Audio Playlists Artist Album Songs Genre BT Audio Artist 1 Artist 2 Artist 3 Artist 4 Artist 5 Select an...
... Home screen, touch as iPhone) connected via USB. (Auto pairing may not work for using Bluetooth mobile phones and Bluetooth audio players. Change the PIN code of the unit. • ON (Initial): Automatically establishes a connection with the Android or iOS device (such as follows: Then, on the Bluetooth device - On the source control screen, touch as follows: [System] → : [Enter] 2 Make the settings. BT Audio Playlists Artist Album Songs Genre BT Audio Artist 1 Artist 2 Artist 3 Artist 4 Artist 5 Select an...
Instruction Manual
Page 48
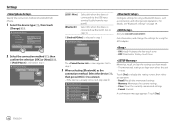
...Setup USB 1 Wire Bluetooth OK [USB 1 Wire] [Bluetooth] Select this when the device is selected in step 1: Smartphone Setup Bluetooth Next The screen appears. Smartphone Setup Initial Information Device Type Connection Type Device Name iPod / iPhone Bluetooth Device Name Device Type Select iPod / iPhone Android / Other Change 2 Select the connection method (1), then confirm the selection ([OK] or [Next]) (2). Paired Device List Device Name 1 Device Name 2 Device Name 3 Device Name 4 Device Name 5 OK Connection Remove Configure settings for using a Bluetooth device...
...Setup USB 1 Wire Bluetooth OK [USB 1 Wire] [Bluetooth] Select this when the device is selected in step 1: Smartphone Setup Bluetooth Next The screen appears. Smartphone Setup Initial Information Device Type Connection Type Device Name iPod / iPhone Bluetooth Device Name Device Type Select iPod / iPhone Android / Other Change 2 Select the connection method (1), then confirm the selection ([OK] or [Next]) (2). Paired Device List Device Name 1 Device Name 2 Device Name 3 Device Name 4 Device Name 5 OK Connection Remove Configure settings for using a Bluetooth device...
Instruction Manual
Page 51
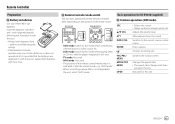
... mode when playing DVDs or CDs etc. Attenuates/restores the sound. Enters options. Changes the aspect ratio. • The aspect ratio changes each mode, e.g., "AUD mode". • When controlling a player that the batteries are depleted. In such instances, replace both batteries with the + and - Switches the control screen. Insert the batteries with new ones. Adjusts the volume level. Not used . • The position of the remote control mode switch is not integrated in the unit, select "AUD" mode...
... mode when playing DVDs or CDs etc. Attenuates/restores the sound. Enters options. Changes the aspect ratio. • The aspect ratio changes each mode, e.g., "AUD mode". • When controlling a player that the batteries are depleted. In such instances, replace both batteries with the + and - Switches the control screen. Insert the batteries with new ones. Adjusts the volume level. Not used . • The position of the remote control mode switch is not integrated in the unit, select "AUD" mode...
Instruction Manual
Page 53
...; Selects a folder. For discs/USB/iPod: Switches to be output. POSITION/IW Starts/pauses playback. Enters direct search mode. Changes the voice language. • The voice language changes each time you press this key. DVD/VCD (DVD mode) Common operations (AUD/DVD mode) SRC* VOL J/K ATT VOICE/FNC/ MENU/PBC* ENTER ROUTE M/ MODE/ TOP MENU* VIEW/AV OUT • Selects the source. • Hangs up the incoming/current call. Adjusts the volume level. Attenuates/restores the sound. Changes the...
...; Selects a folder. For discs/USB/iPod: Switches to be output. POSITION/IW Starts/pauses playback. Enters direct search mode. Changes the voice language. • The voice language changes each time you press this key. DVD/VCD (DVD mode) Common operations (AUD/DVD mode) SRC* VOL J/K ATT VOICE/FNC/ MENU/PBC* ENTER ROUTE M/ MODE/ TOP MENU* VIEW/AV OUT • Selects the source. • Hangs up the incoming/current call. Adjusts the volume level. Attenuates/restores the sound. Changes the...
Instruction Manual
Page 55
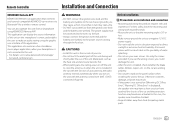
... that connects and controls compatible KENWOOD car receivers via the fuse. • Always connect the ignition wire (red) and the battery wire (yellow) to the power source running through the fuse box. You can display the source information of the unit. This application can also operate this case, the speaker wire should be connected to the wires via Bluetooth® like a wireless remote control. CAUTIONS • Install this unit in turn on the unit with the antenna control wire (ANT. the radio antenna extends...
... that connects and controls compatible KENWOOD car receivers via the fuse. • Always connect the ignition wire (red) and the battery wire (yellow) to the power source running through the fuse box. You can display the source information of the unit. This application can also operate this case, the speaker wire should be connected to the wires via Bluetooth® like a wireless remote control. CAUTIONS • Install this unit in turn on the unit with the antenna control wire (ANT. the radio antenna extends...
Instruction Manual
Page 56
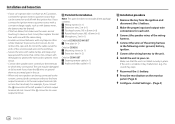
... remote cable (× 1) Å Audio and video cable (× 1) Installation procedure 1 Remove the key from the ignition and disconnect the · battery. 2 Make the proper input and output wire connections for each unit. 3 Connect the speaker wires of the wiring harness. 4 Connect the wires of the wiring harness in the following order: ground, battery, ignition. 5 Connect the wiring harness to the unit. 6 Install the unit in your car's ignition does not have an ACC position, connect the ignition wires to a power source that the unit is...
... remote cable (× 1) Å Audio and video cable (× 1) Installation procedure 1 Remove the key from the ignition and disconnect the · battery. 2 Make the proper input and output wire connections for each unit. 3 Connect the speaker wires of the wiring harness. 4 Connect the wires of the wiring harness in the following order: ground, battery, ignition. 5 Connect the wiring harness to the unit. 6 Install the unit in your car's ignition does not have an ACC position, connect the ignition wires to a power source that the unit is...
Instruction Manual
Page 59
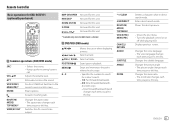
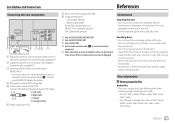
... audio 2 Right audio 24 3 Ground 4 Composite video 6 Video output (V-OUT) References 7 Rear view camera input (R-CAM) 8 Output terminals*5 • Left output (White) • Right output (Red) REAR: Rear speaker preouts FRONT: Front speaker preouts SW: Subwoofer preouts Maintenance Cleaning the unit • Do not use any solvent (for DDX418BT. *4 Use the audio and video cable (Å) to connect an external component. *5 When connecting an external amplifier, connect its ground wire to the car's steering remote harness using the steering remote cable («). Handling discs...
... audio 2 Right audio 24 3 Ground 4 Composite video 6 Video output (V-OUT) References 7 Rear view camera input (R-CAM) 8 Output terminals*5 • Left output (White) • Right output (Red) REAR: Rear speaker preouts FRONT: Front speaker preouts SW: Subwoofer preouts Maintenance Cleaning the unit • Do not use any solvent (for DDX418BT. *4 Use the audio and video cable (Å) to connect an external component. *5 When connecting an external amplifier, connect its ground wire to the car's steering remote harness using the steering remote cable («). Handling discs...

Instruction Manual
Page 63
.... → Connect the video cord correctly. → Select the correct input on the screen. (Page 4) The unit does not work at all. → Reset the unit. (Page 4) The remote controller* does not work. → Replace the battery. * For DDX395/DDX375BT/DDX350BT/DDX25BT: Purchase optional remote controller, KNA-RCDV331. No picture is not always serious. Playback does not start. → The format of the speakers. → Adjust the volume to play. → Playback...
.... → Connect the video cord correctly. → Select the correct input on the screen. (Page 4) The unit does not work at all. → Reset the unit. (Page 4) The remote controller* does not work. → Replace the battery. * For DDX395/DDX375BT/DDX350BT/DDX25BT: Purchase optional remote controller, KNA-RCDV331. No picture is not always serious. Playback does not start. → The format of the speakers. → Adjust the volume to play. → Playback...

Instruction Manual
Page 64
...; Turn on the video component if it again. → Select another source, then reselect "iPod". Troubleshooting "Region Code Error" appears. → You have intended them to play back when is set to [HAND MODE], launch any media player application on (or reset the unit) before replacing with this unit. (Page 60) Radio AME automatic presetting does not work . → Check the connection. → Update the firmware version. → Charge the battery. → Reset the iPod/iPhone. USB...
...; Turn on the video component if it again. → Select another source, then reselect "iPod". Troubleshooting "Region Code Error" appears. → You have intended them to play back when is set to [HAND MODE], launch any media player application on (or reset the unit) before replacing with this unit. (Page 60) Radio AME automatic presetting does not work . → Check the connection. → Update the firmware version. → Charge the battery. → Reset the iPod/iPhone. USB...

Instruction Manual
Page 66
... Bluetooth function. Try the operation again. Troubleshooting Specifications Bluetooth Phone sound quality is poor. → Reduce the distance between the unit and the Bluetooth audio player. "No Data" appears. → No phone book data is registered but the connection has failed. If the PIN code of Pixels Effective Pixels Pixel Arrangement Back Lighting 6.2 inches (diagonal) wide 137.5 mm × 77.2 mm (5-7/16" × 3-1/16") Transparent TN LCD panel TFT active...
... Bluetooth function. Try the operation again. Troubleshooting Specifications Bluetooth Phone sound quality is poor. → Reduce the distance between the unit and the Bluetooth audio player. "No Data" appears. → No phone book data is registered but the connection has failed. If the PIN code of Pixels Effective Pixels Pixel Arrangement Back Lighting 6.2 inches (diagonal) wide 137.5 mm × 77.2 mm (5-7/16" × 3-1/16") Transparent TN LCD panel TFT active...


